Data Transmission Service (DTS) provides a Java SDK demo for consuming change-tracked data from distributed databases. This guide walks you through downloading, configuring, and running the SDK demo against a PolarDB for Xscale (PolarDB-X) 1.0 instance or a Data Management (DMS) logical database.
Prerequisites
Before you begin, make sure you have:
Java Development Kit (JDK) V1.8 installed
IntelliJ IDEA installed
A change tracking task configured in DTS — see Track data changes from an ApsaraDB RDS for MySQL instance
One or more consumer groups created — see Create consumer groups
RAM user permissions
To track and consume data as a Resource Access Management (RAM) user, the RAM user must have the AliyunDTSFullAccess permission and permissions to access the source objects. For details, see Use a system policy to authorize a RAM user to manage DTS instances and Grant permissions to the RAM user.
Set up and run the SDK demo
The following steps use IntelliJ IDEA Community Edition 2020.1 for Windows.
Step 1: Download the SDK demo
Download the SDK demo package and decompress it.
Step 2: Open the project in IntelliJ IDEA
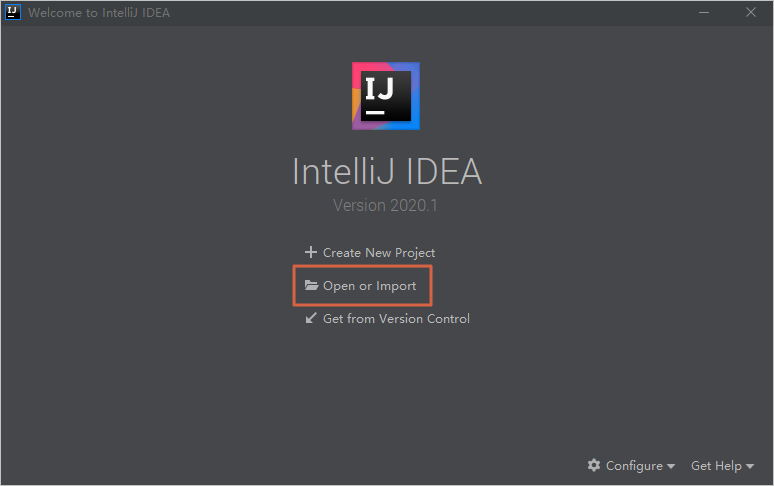
Open IntelliJ IDEA. In the welcome window, click Open or Import.
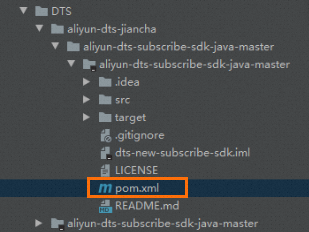
Navigate to the directory where you decompressed the package, open the folders, and double-click pom.xml.
In the dialog box that appears, select Open as Project.
Step 3: Open DistributedDTSConsumerDemo
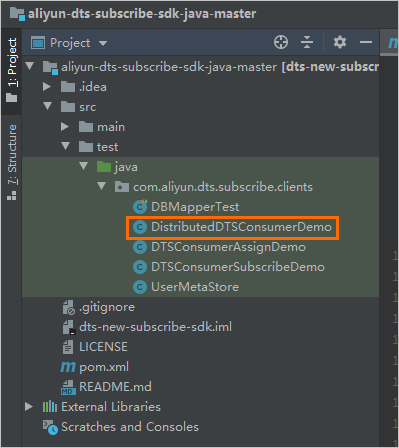
In IntelliJ IDEA, expand the project folders to find the Java files, then double-click DistributedDTSConsumerDemo.
Step 4: Configure the required parameters
Set the parameters in the main() method of DistributedDTSConsumerDemo:
public static void main(String[] args) throws ClientException {
        // Configure a change tracking task for a distributed database such as a PolarDB-X 1.0 instance.
        // Set the parameters for your AccessKey pair, instance ID, task ID, and consumer groups.
        String accessKeyId = "LTA***********99reZ";
        String accessKeySecret = "****************";
        String regionId = "cn-hangzhou";
        String dtsInstanceId = "dtse5212sed162****";
        String jobId = "l791216x16d****";
        String sid = "dtsip412t13160****";
        String userName = "xftest";
        String password = "******";
        String proxyUrl = "dts-cn-****.com:18001";
        // Initial checkpoint for first consumption (UNIX timestamp in seconds).
        // Example: 1566180200 corresponds to Mon Aug 19 10:03:21 CST 2019.
        String checkpoint = "1639620090";

        // Convert physical database/table names to logical database/table names.
        boolean mapping = true;
        // Force-use the initial checkpoint when starting. Only works in ASSIGN mode.
        boolean isForceUseInitCheckpoint = false;

        ConsumerContext.ConsumerSubscribeMode subscribeMode = ConsumerContext.ConsumerSubscribeMode.ASSIGN;
        DistributedDTSConsumerDemo demo = new DistributedDTSConsumerDemo(userName, password, regionId,
                jobId, sid, dtsInstanceId, accessKeyId, accessKeySecret, subscribeMode, proxyUrl,
                checkpoint, isForceUseInitCheckpoint, mapping);
        demo.start();
    }
The following table describes each parameter.
| Parameter | Description | How to obtain |
|---|---|---|
accessKeyId | AccessKey ID | See Create and obtain an AccessKey pair. |
accessKeySecret | AccessKey secret | See Create and obtain an AccessKey pair. |
regionId | Region ID of the change tracking task. Example: cn-hangzhou for China (Hangzhou). | In the DTS console, click the change tracking instance ID. On the Basic Information page, find the region of the instance. For all valid region IDs, see Supported regions. |
dtsInstanceId | ID of the change tracking instance. | In the DTS console, click the instance ID. The DTS Instance ID is listed on the Basic Information page. |
jobId | ID of the change tracking task. | Call the DescribeDtsJobs API operation to query the task ID. |
sid | ID of the consumer group. | In the DTS console, click the instance ID. In the left-side navigation pane, click Consume Data. Find the Consumer Group ID/Name in the list. |
userName | Account of the consumer group. | In the DTS console, click the instance ID. In the left-side navigation pane, click Consume Data. Find the Account in the list. |
password | Password of the consumer group account. | The password is set when you create the consumer group. |
proxyUrl | Endpoint and port of the change tracking instance. | In the DTS console, click the instance ID. On the Basic Information page, find Network. For lower latency, deploy the SDK client on an Elastic Compute Service (ECS) instance that uses the classic network or shares the same virtual private cloud (VPC) as the change tracking instance. |
checkpoint | Consumer offset — a UNIX timestamp in seconds that controls where the SDK client starts consuming data. Use it to resume after an interruption to prevent data loss, or to start consumption at a custom timestamp based on your business requirements. | Find the data range of the change tracking instance in the Data Range column on the Change Tracking Tasks page. The checkpoint must fall within this range. Use a UNIX timestamp converter to get the exact value. |
Step 5: Run the client
From the top menu bar in IntelliJ IDEA, choose Run > Run.
When the client starts successfully, the console shows that data changes are being tracked from the source instance. The client also reports consumption metrics at regular intervals. The following table describes the metrics.
| Metric | Description |
|---|---|
outCounts | Total number of data records consumed by the SDK client |
outBytes | Total amount of data consumed by the SDK client, in bytes |
outRps | Consumption rate of the SDK client, in requests per second (RPS) |
outBps | Consumption throughput of the SDK client, in bits per second |
count | None |
inBytes | Total amount of data sent by the DTS server, in bytes |
DStoreRecordQueue | Size of the data cache queue on the DTS server side |
inCounts | Total number of data records sent by the DTS server |
inRps | Send rate of the DTS server, in RPS |
inBps | Send throughput of the DTS server, in bits per second |
__dt | Timestamp when the SDK client received the data, in milliseconds |
DefaultUserRecordQueue | Size of the data cache queue after serialization |
Customize the record listener (optional)
By default, the SDK demo prints consumed records to the console. To process records differently — for example, writing them to a database or forwarding them to a message queue — modify the buildRecordListener() method or implement a custom RecordListener class.
The SDK delivers four operation types: INSERT, UPDATE, DELETE, and HEARTBEAT. The following example shows how to handle them:
public static Map<String, RecordListener> buildRecordListener() {
        // Implement your own record listener.
        RecordListener mysqlRecordPrintListener = new RecordListener() {
            @Override
            public void consume(DefaultUserRecord record) {

                OperationType operationType = record.getOperationType();

                if (operationType.equals(OperationType.INSERT)
                        || operationType.equals(OperationType.UPDATE)
                        || operationType.equals(OperationType.DELETE)
                        || operationType.equals(OperationType.HEARTBEAT)) {

                    // Process the record.
                    RecordListener recordPrintListener = new DefaultRecordPrintListener(DbType.MySQL);
                    recordPrintListener.consume(record);

                    // Commit pushes the checkpoint update to DTS.
                    record.commit("");
                }
            }
        };
        return Collections.singletonMap("mysqlRecordPrinter", mysqlRecordPrintListener);
    }