Data Disaster Recovery supports true incremental-forever backups for Oracle databases, combining a weekly full backup with synthetic backups for all subsequent runs. This reduces storage costs, lowers I/O impact on the source database, and enables second-level snapshot mounting for fast recovery.
When to use this feature
Use this feature when you need to:
-
Back up a self-managed Oracle database (versions 11–19) running on Linux
-
Reduce backup storage costs by avoiding repeated full backups after the initial one
-
Mount a backup snapshot in seconds for near-instant recovery
If you need logical backups (data export/import level), use the logical backup feature instead. This feature uses Recovery Manager (RMAN) for physical backups.
How it works
Data Disaster Recovery first performs a full backup in each week, and then performs synthetic backups for the subsequent backups. You can configure the number of full backups to be performed each week.
Full backup
The level-0 RMAN backup captures all data files, archived log files, server parameter files (SPFILEs), and control files.
Synthetic backup
Each synthetic backup run follows these steps:
-
Create and mount a snapshot: A snapshot of the previous full or synthetic backup set is created and cloned to the self-managed database using the Filesystem in Userspace (FUSE) protocol.
-
Create an incremental backup: Data blocks changed since the last backup are captured and saved as an incremental backup file.
-
Synthesize data: The
RMAN RECOVER COPY OF DATABASE WITH TAG 'DBS-specific tag'statement merges the incremental backup into the previous backup set, overwriting the snapshot. The original backup set is preserved. -
Unmount: The mount target on the self-managed database is unmounted.
The result is a complete, up-to-date backup set after each run — without storing a new full copy.
Benefits
| Benefit | Details |
|---|---|
| Lower storage costs | Only changed data blocks are transferred and stored |
| Lower I/O impact | Requires less disk IOPS on the source database than a full backup |
| Fast recovery | Mount a synthetic backup snapshot and restore data in seconds |
Prerequisites
Before you begin, make sure you have:
-
An Oracle database at version 11–19
-
A single-instance or Oracle Real Application Clusters (RAC) deployment — Data Guard physical standby is not supported
-
Linux as the operating system on the database server
-
A backup gateway installed on the database server — see Install a backup gateway
-
The FUSE protocol installed on the database server
-
Archive mode enabled on the Oracle database — see the "Enable the archive mode" section in Prepare for physical backup of an Oracle database
-
The SID of the Oracle database — see the "Obtain the SID of an Oracle database" section in Prepare for physical backup of an Oracle database
-
Block change tracking enabled on the Oracle database
To check whether block change tracking is enabled, run:
SELECT status FROM v$block_change_tracking;ENABLED means it is on. If the result is DISABLED, enable it:
ALTER DATABASE ENABLE BLOCK CHANGE TRACKING USING FILE <path-to-block-change-tracking-file> REUSE;Public preview statement
The true incremental-forever backup feature is in public preview. To access it, join the DingTalk group with ID 35585947.
During public preview:
-
The Backup set mode parameter must be set to Sandbox instance mount backup.
-
The sandbox feature is enabled by default and cannot be disabled.
-
Sandbox instances are free to create.
For more information about sandbox instances, see Copy data management.
Step 1: Create a backup schedule
Create a backup schedule as described in Create a backup schedule.
When purchasing the backup schedule, set Data Source Type to Oracle and Backup Method to Physical Backup.
Step 2: Configure the backup schedule
-
Log on to the Data Management (DMS) console V5.0.
-
In the top navigation bar, choose Security and Specifications (DBS) > Disaster Recovery for Data (DBS) > Backup Plan.
In simple mode, move the pointer over the
 icon in the upper-left corner and choose All Features > Security and Specifications (DBS) > Disaster Recovery for Data (DBS) > Backup Plan.
 -
On the Backup Schedules page, find the backup schedule and click Configure Backup Schedule in the Actions column.

-
In the Configure Backup Source and Destination step, set the parameters below, then click Next.
Backup source parameters
Parameter Description Schedule Name Auto-generated. Enter a descriptive name for easy identification. Names do not need to be unique. Backup Mode Defaults to the method selected at purchase. For this feature, this is Physical Backup. Instance Region The region where the source database is deployed. Backup Gateway The backup gateway installed on the database server. See Install a backup gateway. Data Type Defaults to Oracle. SID The SID of the source Oracle database. See the "Obtain the SID of an Oracle database" section in Prepare for physical backup of an Oracle database. Database The SQL\*Plus connection command: Database username/Password@Instance name as sysdba. Example:sys/password@orcl as sysdba. You can also use/ as sysdba, unless operating system authentication is disabled for the sysdba user.Oracle Home (Optional) The installation directory of the Oracle database. See the "Obtain the directory in which an Oracle database is installed" section in Prepare for physical backup of an Oracle database. Compliance warranty regarding cross-border data transfers Read and select the check box to agree to the compliance commitment. Backup destination parameters
Parameter Description Backup Storage Type Where backup data is stored. USB (recommended): stored in Data Disaster Recovery, billed by volume — see Storage fees. No Object Storage Service (OSS) bucket is required. OSS For User: stored in your own OSS bucket (Standard storage class only) — create the bucket in advance as described in Create buckets. For large data volumes, consider purchasing subscription storage plans to reduce costs. Storage Encryption Encrypted (recommended): AES-256 encryption with OSS server-side encryption — see Server-side encryption. Non-encrypted: backup data is stored without encryption. 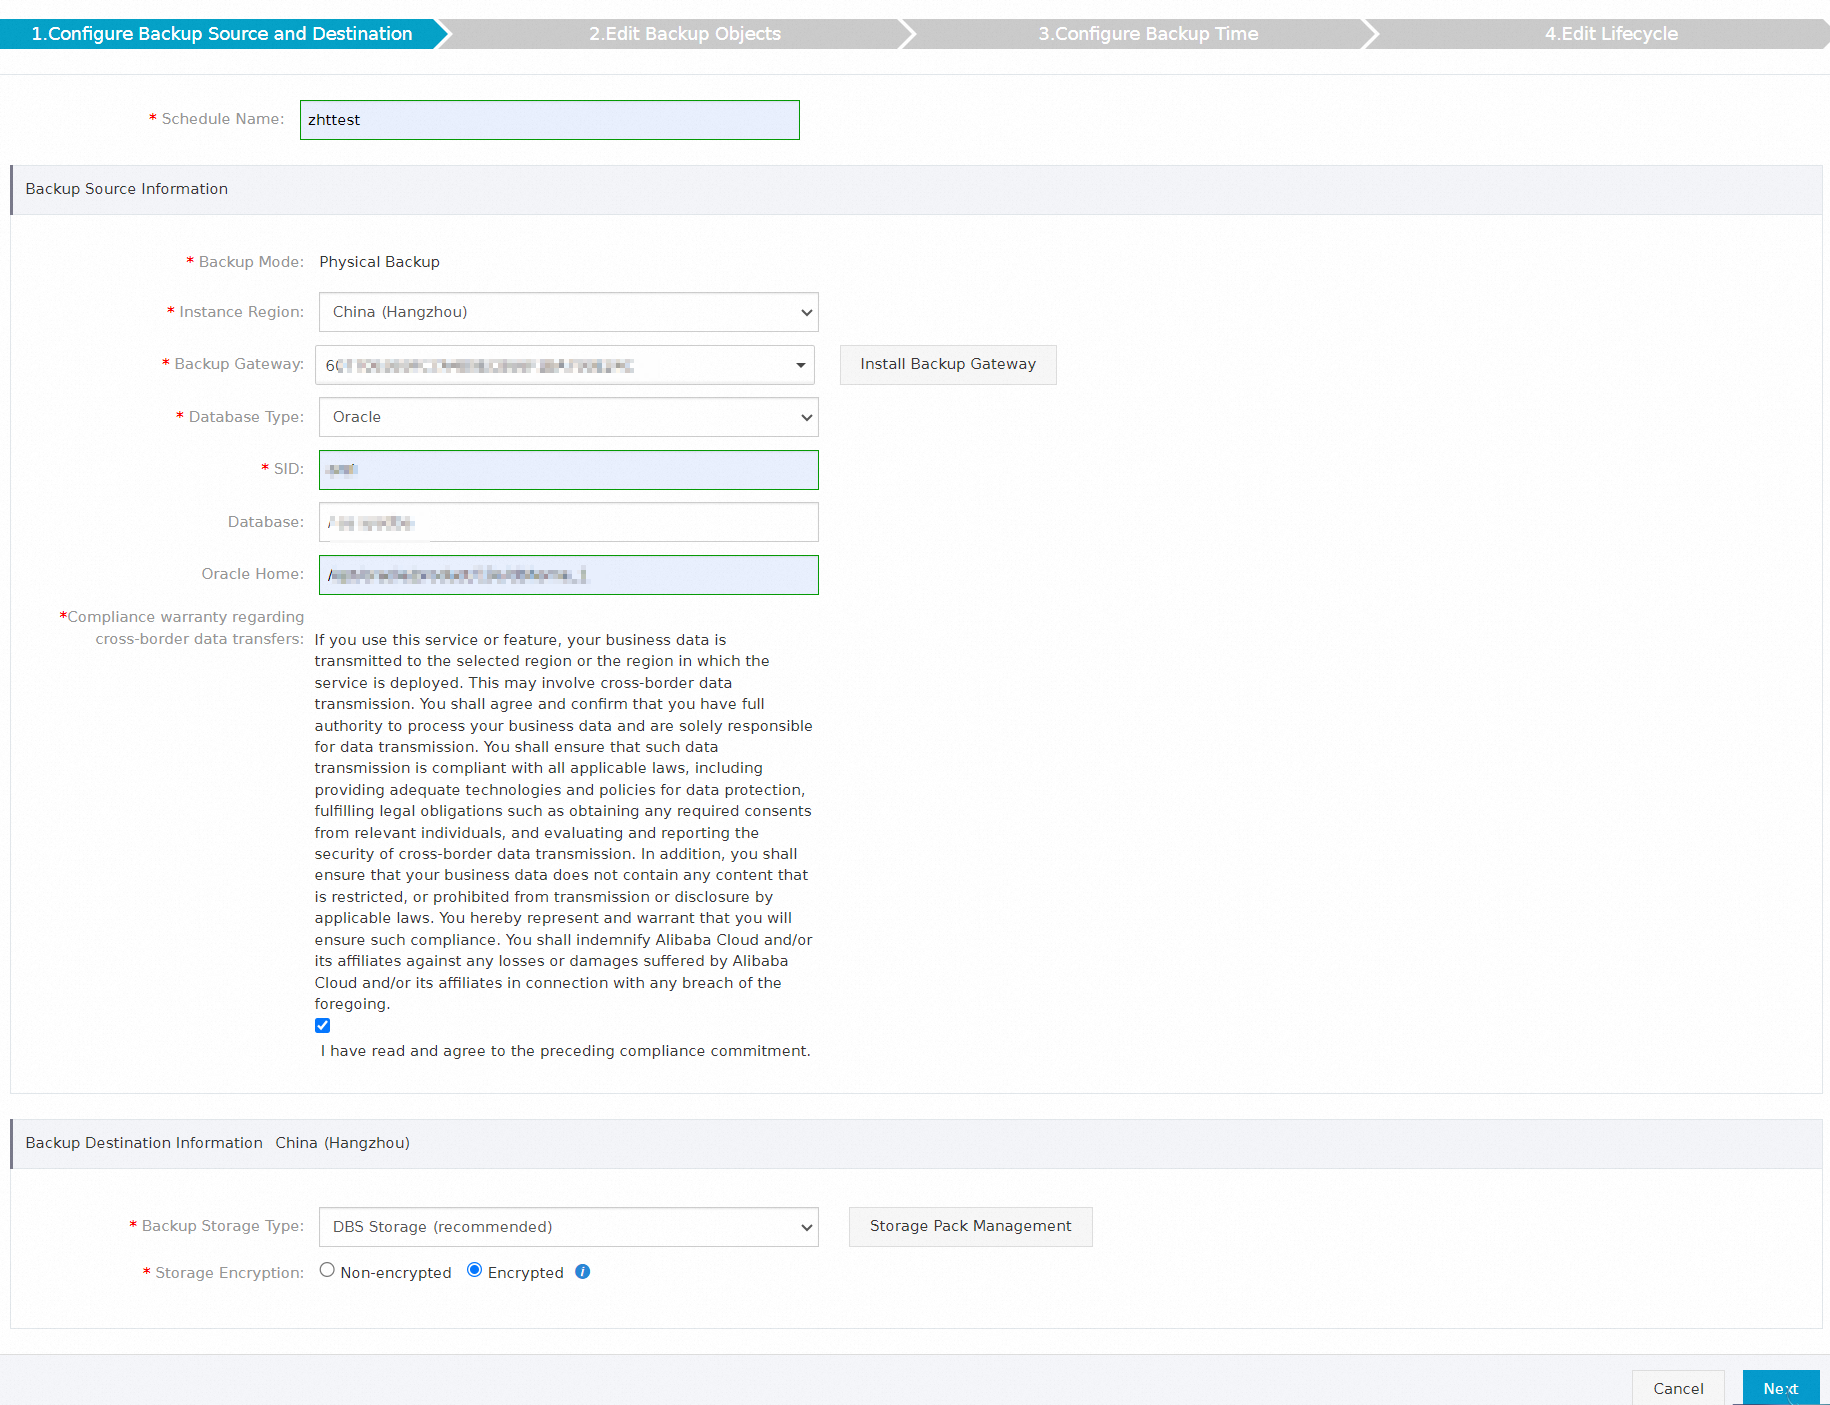
-
In the Edit Backup Objects step, Back Up Entire Instance is selected by default, which includes permission data and stored procedures. Click Next.
-
In the Configure Backup Time step, set the parameters below, then click Next.
Parameter Description Full-scale Backup Frequency Periodic Backup: runs on a recurring schedule. Single Backup: runs once. If you select Periodic Backup, also configure Full Data Backup Recurrence, Start At, and Incremental Backup. Full Data Backup Recurrence The days of the week to run the full backup. Select at least one day. Start At The start time of the backup. Set this to an off-peak time (for example, 01:00). If a previous backup is still running at the scheduled start time, the next backup is skipped. Incremental Backup Enable or disable incremental backup between scheduled full backups. Maximum Concurrent Threads for Full Data Backup Controls backup speed. Reduce this value to limit the impact on the source database. Backup network speed limit Limits network bandwidth used during backup. Default: 0(unlimited). For production databases, set a limit to reduce impact.Transaction Log backup interval How often incremental backups run. For example, a 10-minute interval means an incremental backup runs every 10 minutes. Delete Logs upon Backup Success If set to Enable, archived log files that have been backed up are automatically deleted from the self-managed database. Configure archive log save days when this is enabled. archive log save days Archived logs older than this number of days are deleted from the self-managed database after a successful backup. Default: 7. Visible only when Delete Logs upon Backup Success is set to Enable. Enable compression Enable (recommended): compresses data during backup to reduce storage space. Disable: no compression. Backup set mode Fixed to Sandbox instance mount backup during public preview. This mode uses RMAN image copy backup and streams data to OSS via FUSE — no disk storage is required on the server. The sandbox feature is automatically enabled, allowing backup snapshots to be mounted in seconds. FUSE must be installed on the database server for backups to succeed. -
In the Edit Lifecycle step, configure the lifecycle for full backup data in the Configure Full Data Backup Lifecycle section. If Incremental Backup is set to Enable, also configure the lifecycle for incremental backup data. For lifecycle rules, see How do I manage the lifecycle rules of backup sets?
-
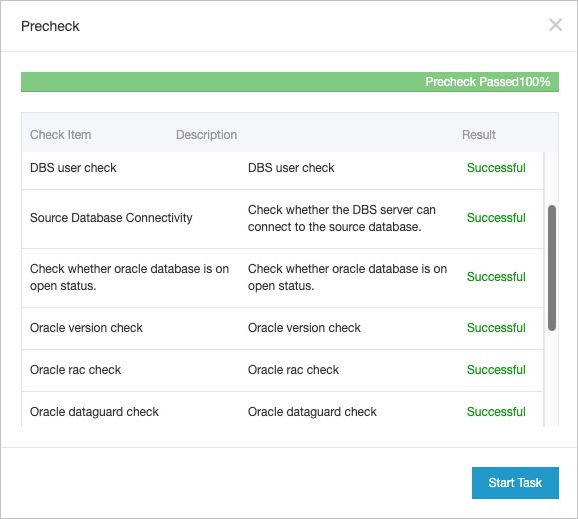
Click Precheck in the lower-right corner.
-
When Precheck Passed appears, click Start Task.
What's next
Restore an Oracle database from the backup to a different server, a different directory on the source server, or the original directory — see Restore an Oracle database from a physical backup.