A large number of events are generated when developers develop code based on open source projects in GitHub. GitHub records the information about each event, including the event type, event details, developer, and code repository. GitHub also exposes public events. DataWorks provides a template named "Top 10 Popular Programming Languages in GitHub". You can use the template to process and analyze public datasets in GitHub and send analysis results to specific users by email. After you run the case that is described in this topic, you can obtain the top 10 programming languages that are used per hour and the number of submissions of each programming language per hour in GitHub.
There are some differences in workflow details between manual configuration and ETL templates in actual applications, but the case effects of both are basically the same.
Case description
DataWorks provides a public MySQL data source, which stores real-time public data from GitHub. This topic describes how to synchronize and analyze the data and send the data analysis results to a specified mailbox. Main business processes:
Use the Data Integration service of DataWorks to synchronize real-time GitHub data from the MySQL data source to MaxCompute.
Analyze and process the synchronized data, obtain the top 10 programming languages that are used in the previous hour and the number of submissions of each programming language in the previous hour in GitHub, and then store the data processing results in Alibaba Cloud Object Storage Service (OSS).
Develop a Python function in Function Compute to send data processing results to a specified mailbox.
Use the task scheduling capabilities provided by DataWorks to implement automatic update of top programming languages in the previous hour in GitHub and send data processing results to the specified mailbox.
Procedure
Resource preparations
Before you perform operations that are described in this topic, you must activate the involved Alibaba Cloud services and make required preparations.
We recommend that you activate the involved Alibaba Cloud services in the same region. In this topic, the services are activated in the China (Shanghai) region.
If you have never used the involved Alibaba Cloud services, you can apply for a free trial. For more information, see Free trial of DataWorks, Free trial of MaxCompute, Free trial of Function Compute, and Free trial of OSS.
Activate DataWorks and create a workspace. In this topic, a workspace in standard mode is created. The operations on a workspace in basic mode are similar to those on a workspace in standard mode. For more information, see Activate DataWorks and Create a workspace.
Activate MaxCompute and create a MaxCompute project. For more information, see Activate MaxCompute and DataWorks.
Activate Function Compute. For more information, see Step 1: Activate Function Compute.
Activate OSS and create an OSS bucket. For more information, see Get started by using the OSS console and Step 1: Create a bucket.
Operation in the OSS console: Create an OSS bucket
Log on to the OSS console. In the left-side navigation pane, click Buckets. On the Buckets page, click Create Bucket. In the Create Bucket panel, configure the Bucket Name and Region parameters and click OK.

Operations in the Function Compute console: Create a function and develop code logic for the function
Log on to the Function Compute console. Create a service and grant permissions on OSS to the service.
When you develop function code logic, data in the desired OSS bucket needs to be read and data processing results need to be sent to a specified mailbox. In this case, you must grant required permissions on OSS to the service to which the desired function belongs.
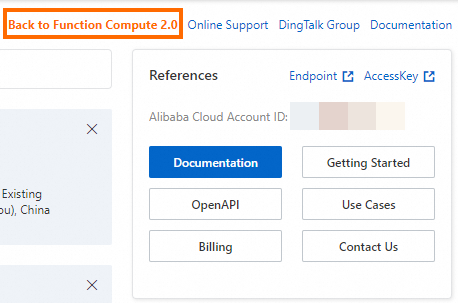
In the upper-right corner, click Back to Function Compute 2.0. You are navigated to the Function Compute 2.0 console.
In the left-side navigation pane, click Services & Functions. In the upper-left corner of the Services page, select a region in which you want to create a service. Then, click Create Service. In the Create Service panel, configure the Name parameter and click OK.
Click the name of the created service. In the left-side navigation pane of the page that appears, click Service Details. In the Role Settings section of the Service Details tab, click Modify. On the page that appears, select AliyunFcDefaultRole from the Service Role drop-down list and click Save to return back to the Service Details tab. In the Role Settings section, click AliyunFcDefaultRole to go to the Roles page in the RAM console.
Click Grant Permission on the Permissions tab. In the Grant Permission panel, select AliyunOSSReadOnlyAccess in System Policy and attach the policy as prompted. Then, the permissions to read data from OSS are granted to the service.
Create a function and develop code logic for the function.
Creates a function.
Go back to the Service Details tab of the created service. Click Functions in the left-side navigation pane. Then, click Create Function. On the Create Function page, configure the Function Name parameter, select Python 3.9 from the Runtime drop-down list, use default values for other parameters, and then click Create.
Install relevant dependency packages for the function environment.
NoteIn this topic, the Alibaba Cloud second-party package oss2 and the open source third-party package pandas are required. The Python 3.9 runtime environment provides the oss2 package. You do not need to manually install the oss2 package. You need to perform the following operations to manually install the pandas package.
Click the name of the created function. On the page that appears, click the Configurations tab. On the Configurations tab, click Modify in the Layers section. In the panel that appears, click Add Layer and select Add Public Layer. Then, select Pandas1x from the Official Common Layer drop-down list and click OK.

Click the Code tab. After the Python environment of WebIDE is loaded, copy the following code to the index.py file and modify the OSS internal endpoint and mailbox-relevant parameters:
# -*- coding: utf-8 -*- import logging import json import smtplib import oss2 import pandas as pd from email.mime.text import MIMEText from email.mime.multipart import MIMEMultipart from email.mime.base import MIMEBase from email.mime.text import MIMEText from email.utils import COMMASPACE from email import encoders def handler(event, context): evts = json.loads(event) bucket_name = evts["bucketName"] file_path = evts["filePath"] auth = oss2.StsAuth(context.credentials.access_key_id, context.credentials.access_key_secret, context.credentials.security_token) endpoint = 'https://oss-{}-internal.aliyuncs.com'.format(context.region) bucket = oss2.Bucket(auth, endpoint, bucket_name) file_name = file_path for obj in oss2.ObjectIteratorV2(bucket, prefix=file_path): if not obj.key.endswith('/'): file_name = obj.key csv_file = bucket.get_object(file_name) logger = logging.getLogger() logger.info('event: %s', evts) mail_host = 'smtp.***.com' ## The address of the email server. mail_port = '465'; ## The Simple Mail Transfer Protocol (SMTP) port of the email server. mail_username = 'sender_****@163.com' ## The username for identity authentication. Enter a complete email address. mail_password = 'EWEL******KRU' ## The password for identity authentication. Enter the SMTP authorization code of your mailbox. mail_sender = 'sender_****@163.com' ## The email address of the sender. mail_receivers = ['receiver_****@163.com'] ## The email address of the recipient. message = MIMEMultipart('alternative') message['Subject'] = 'GitHub data processing results' message['From'] = mail_sender message['To'] = mail_receivers[0] html_message = generate_mail_content(evts, csv_file) message.attach(html_message) # Send email smtpObj = smtplib.SMTP_SSL(mail_host + ':' + mail_port) smtpObj.login(mail_username,mail_password) smtpObj.sendmail(mail_sender,mail_receivers,message.as_string()) smtpObj.quit() return 'mail send success' def generate_mail_title(evt): mail_title='' if 'mailTitle' in evt.keys(): mail_content=evt['mailTitle'] else: logger = logging.getLogger() logger.error('msg not present in event') return mail_title def generate_mail_content(evts, csv_file): headerList = ['Github Repos', 'Stars'] # Read csv file content dumped_file = pd.read_csv(csv_file, names=headerList) # Convert DataFrame to HTML table table_html = dumped_file.to_html(header=headerList,index=False) # Convert DataFrame to HTML table table_html = dumped_file.to_html(index=False) mail_title=generate_mail_title(evts) # Email body html = f""" <html> <body> <h2>{mail_title}</h2> <p>Here are the top 10 languages on GitHub in the past hour:</p> {table_html} </body> </html> """ # Attach HTML message html_message = MIMEText(html, 'html') return html_messageNoteIn the preceding code, the variables bucketName, filePath, and mailTitle are used. You can obtain the values of the variables from the Function Compute node that you create in DataWorks. You do not need to change the values of the variables in the code.
Parameter to be modified
Configuration guide
Internal endpoint of OSS
(Line 20 in the code)
Replace
'https://oss-{}-internal.aliyuncs.com'with the internal endpoint of OSS based on the region in which you perform relevant operations.For example, if you perform operations in the China (Shanghai) region, you need to replace 'https://oss-{}-internal.aliyuncs.com' with
'https://oss-cn-shanghai-internal.aliyuncs.com'.For more information about internal endpoints of OSS in different regions, see Regions and endpoints.
Mailbox-relevant parameters
(Lines 31 to 36 in the code)
Perform the following operations based on your business requirements:
Change the values of the parameters in lines 31 to 35 in the code to the address of the email server, the SMTP port, the username, the password, and the email address of the sender.
Change the value of the parameter in line 36 in the code to the email address of the recipient.
NoteYou can refer to the help documentation of your mailbox to obtain relevant settings.
After code logic development is complete, click Deploy.
Operations in the DataWorks console: Add data sources
Add a MySQL data source.
The public GitHub data that is used in this topic is stored in a public MySQL database. In this case, you must first add a MySQL data source to connect to the MySQL database when you synchronize data to MaxCompute.
Go to the Data Sources page.
Log on to the DataWorks console. In the top navigation bar, select the desired region. In the left-side navigation pane, choose . On the page that appears, select the desired workspace from the drop-down list and click Go to Management Center.
In the left-side navigation pane of the SettingCenter page, click Data Sources.
On the Data Source page, click Add Data Source. In the Add Data Source dialog box, click MySQL and configure parameters such as Data Source Name as prompted. The following table describes the core parameters.
Parameter
Description
Configuration Mode
Set this parameter to connection string mode.
Data Source Name
You can specify a custom name. In this topic, set this parameter to github_events_share.
Connection Address
Set this parameter to jdbc:mysql://rm-bp1z69dodhh85z9qa.mysql.rds.aliyuncs.com:3306/github_events_share.
ImportantThis type of data source is only available for data reading in data synchronization scenarios.
Username
Set this parameter to workshop.
Password
Set this parameter to workshop#2017.
This password is only for reference. Do not use it in actual business.
Authentication Method
Set this parameter to No Authentication.
Resource group connectivity
Find the shared resource group for Data Integration and click Test Network Connectivity in the Connection Status (Development Environment) column. If the network connectivity test is successful, Connectable appears in the Connection Status (Development Environment) column.
Add a MaxCompute data source.
GitHub data needs to be synchronized to MaxCompute. In this case, you must add a MaxCompute data source first.
Go to the Data Sources page.
Log on to the DataWorks console. In the top navigation bar, select the desired region. In the left-side navigation pane, choose . On the page that appears, select the desired workspace from the drop-down list and click Go to Management Center.
In the left-side navigation pane of the SettingCenter page, click Data Sources.
On the Data Source page, click Add Data Source. In the Add Data Source dialog box, click MaxCompute and configure parameters such as Data Source Name and MaxCompute Project Name as prompted. For more information, see Add a MaxCompute data source.
Associate the MaxCompute data source with DataStudio.
You need to create a MaxCompute SQL task for data processing. In this case, you must associate the MaxCompute data source with DataStudio so that you can create an ODPS SQL node for development of SQL tasks. For more information, see Preparations before data development: Associate a data source or a cluster with DataStudio.
NoteIf data source information changes, but the data on the Data Source page is not updated in time, refresh the Data Source page to update the cached data.
Operations in the DataWorks console: Create a workflow and develop a data processing task
Go to the DataStudio page.
Log on to the DataWorks console. In the top navigation bar, select the desired region. In the left-side navigation pane, choose . On the page that appears, select the desired workspace from the drop-down list and click Go to Data Development.
Create a workflow.
In the Scheduled Workflow pane of the DataStudio page, choose . In the Create Workflow dialog box, configure the Workflow Name parameter and click Create.
Create nodes and configure scheduling dependencies for the nodes.

Double-click the name of the created workflow to go to the configuration tab of the workflow.
Click Create Node in the top toolbar. Then, drag Offline synchronization to the canvas. In the Create Node dialog box, configure the Name parameter and click Confirm to create a batch synchronization node.
Perform the similar operations to create an ODPS SQL node and a Function Compute node.
Configure the batch synchronization node.
Double-click the name of the batch synchronization node to go to the configuration tab of the batch synchronization node.
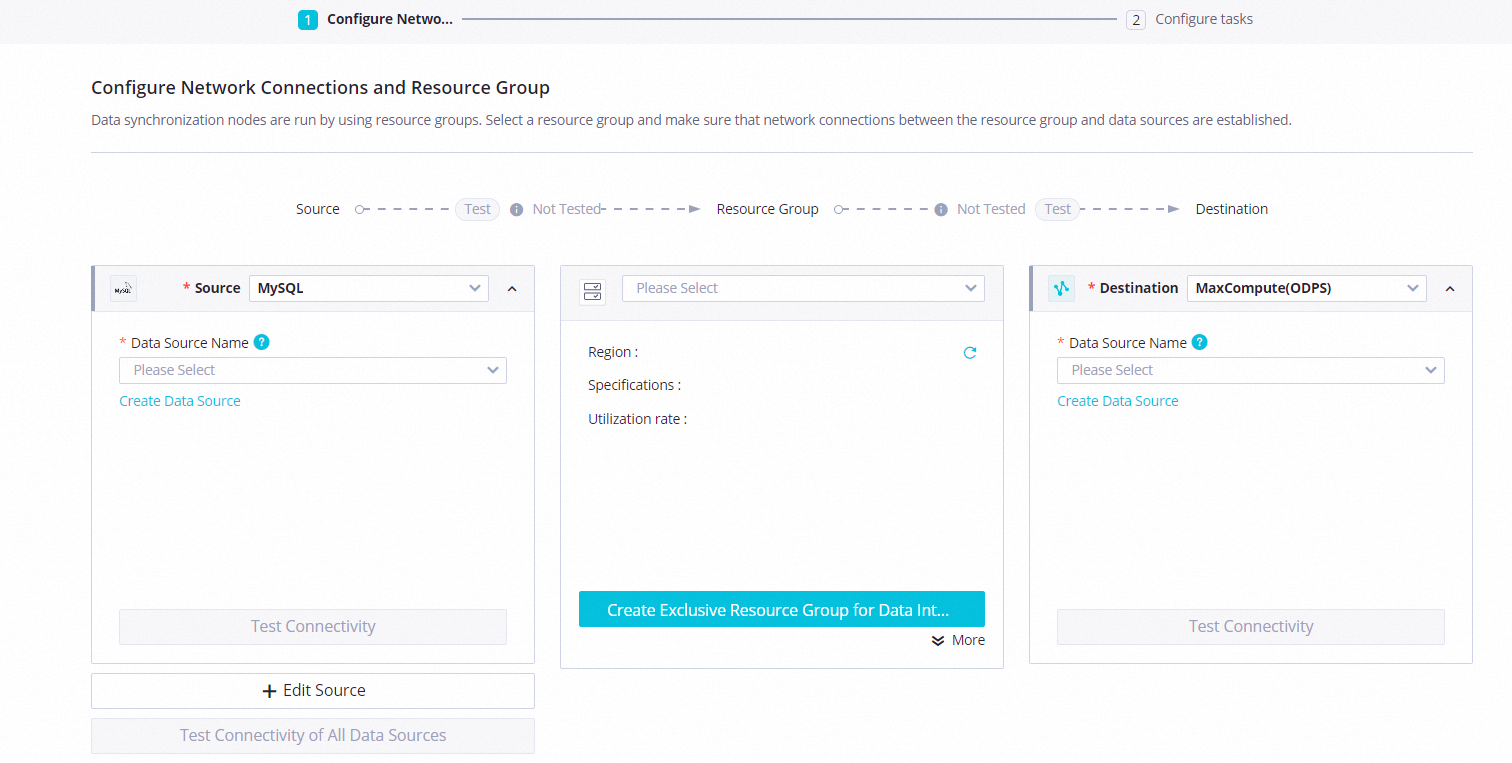
Configure network connectivity between a resource group and data sources.
Parameter
Description
Source
Select MySQL from the Source drop-down list and select the added MySQL data source from the Data Source Name drop-down list.
Destination
Select MaxCompute from the Destination drop-down list and select the added MaxCompute data source from the Data Source Name drop-down list.
Resource Group
Choose in the lower-right corner.
Click Next to complete the network connectivity test as prompted.
Configure the batch synchronization node. The following table describes the core parameters. Retain default values for other parameters.
Section
Description
Source
Table: Select github_public_event from the drop-down list.
Data filtering: Use the following content:
created_at >'${day1} ${hour1}' and created_at<'${day2} ${hour2}'
Destination
Table: Click Generate Destination Table Schema. In the Create Table dialog box, click Create Table.
Partition information: Set this parameter to
pt=${day_hour}.
Click the Properties tab in the right-side navigation pane and configure scheduling parameters for the node. The following table describes the core parameters. Retain default values for other parameters.
Section
Description
Scheduling Parameter
Click Load Parameters in Code. The following parameters with the value assignment logic configured are added:
day1: $[yyyy-mm-dd-1/24]hour1: $[hh24-1/24]day2: $[yyyy-mm-dd]hour2: $[hh24]day_hour: $[yyyymmddhh24]
Schedule
Scheduling Cycle: Set this parameter to Hour.
Rerun: Set this parameter to Allow Regardless of Running Status.
Dependencies
Select the Add Root Node check box.
Click Save in the top toolbar to save the node configurations.
Configure the ODPS SQL node.
Double-click the name of the ODPS SQL node to go to the configuration tab of the ODPS SQL node.
Copy and paste the following sample code into the code editor.
ImportantIn the following sample code, an OSS external table is created to store processed data. If this is the first time that you use an OSS external table, you must grant required permissions to the current account. Otherwise, an error is reported when you run the desired workflow. For more information about authorization, see STS authorization for OSS.
-- 1. Create an OSS external table for MaxCompute to store processing results of data in a public GitHub dataset.
-- The OSS external table is named odps_external and is stored in the previously created OSS bucket. The OSS bucket is named xc-bucket-demo2. You can modify the names based on your business requirements.

CREATE EXTERNAL TABLE IF NOT EXISTS odps_external(
	language STRING COMMENT 'The full repository name in the owner/Repository_name format.',
	num STRING COMMENT 'The number of submissions.'
)
partitioned by (
direction string
)
STORED BY  'com.aliyun.odps.CsvStorageHandler'
WITH SERDEPROPERTIES(
	'odps.text.option.header.lines.count'='0',
	 'odps.text.option.encoding'='UTF-8',
	 'odps.text.option.ignore.empty.lines'='false',
	 'odps.text.option.null.indicator'='')
LOCATION 'oss://oss-cn-shanghai-internal.aliyuncs.com/${YOUR_BUCKET_NAME}/odps_external/';

-- 2. Process the GitHub data that is synchronized to MaxCompute and write the processing results to the OSS external table.
-- Obtain the top 10 programming languages that are used in the previous hour and the number of submissions of each programming language in the previous hour in GitHub.
SET odps.sql.unstructured.oss.commit.mode=true;
INSERT INTO TABLE odps_external partition (direction='${day_hour}')
SELECT
    language,
    COUNT(*) AS num
FROM
    github_public_event
WHERE language IS NOT NULL AND pt='${day_hour}'
GROUP BY
    language
ORDER BY num DESC
limit 10;
Click the Properties tab in the right-side navigation pane and configure scheduling parameters for the node. The following table describes the core parameters. Retain default values for other parameters.
Section
Description
Scheduling Parameter
Click Load Parameters in Code. The following parameters with the value assignment logic configured are added:
YOUR_BUCKET_NAME: name of the previously created OSS bucketday_hour: $[yyyymmddhh24]
Schedule
Scheduling Cycle: Set this parameter to Hour.
Rerun: Set this parameter to Allow Regardless of Running Status.
Click Save in the top toolbar to save the node configurations.
Configure the Function Compute node.
Double-click the name of the Function Compute node to go to the configuration tab of the Function Compute node.
Configure the Function Compute node.
Parameter
Description
Select Function
Select the function that you created in the Function Compute console.
Invocation Method
Select Synchronous Invocation.
Variable
Use the following content:
{
    "bucketName": "${YOUR_BUCKET_NAME}",
    "filePath": "odps_external/direction=${day_hour}/",
    "mailTitle":"Top 10 programming languages that are used in the previous hour and the number of submissions of each programming language in the previous hour in GitHub"
}
Click the Properties tab in the right-side navigation pane and configure scheduling parameters for the node. The following table describes the core parameters. Retain default values for other parameters.
Section
Description
Scheduling Parameter
Click Add Parameter to add the following parameters and configure the value assignment logic for the parameters:
YOUR_BUCKET_NAME: name of the previously created OSS bucketday_hour: $[yyyymmddhh24]
Schedule
Scheduling Cycle: Set this parameter to Hour.
Rerun: Set this parameter to Allow Regardless of Running Status.
Click Save in the top toolbar to save the node configurations.
Operation in the DataWorks console: Run a workflow
In the Scheduled Workflow pane of the DataStudio page, find the created workflow and double-click the name of the workflow to go to the configuration tab of the workflow.
Click the Run icon in the top toolbar to run the entire workflow.
If the system prompts that the running of the workflow is complete, you can log on to the mailbox that receives data processing results to view relevant emails.
Operations in the DataWorks console: Commit and deploy a workflow
Optional. If you want to periodically synchronize data to MaxCompute for processing and periodically send data processing results to a specified mailbox, you must commit and deploy the desired workflow to Operation Center in DataWorks.
On the DataStudio page, find the desired workflow, and double-click the name of the workflow to go to the configuration tab of the workflow.
Click the Submit icon in the top toolbar to commit the workflow and then deploy the workflow to Operation Center as prompted. For more information, see Deploy nodes.
Then, the workflow is periodically run based on the configured scheduling cycle.
What to do next: Release resources
If you are using resources in a free trial or you no longer need to use the involved cloud services in this topic, you can release the resources of the cloud services to prevent additional fees.
To release the resources of OSS, log on to the OSS console and delete the bucket that is used in this topic.
To release the resources of Function Compute, log on to the Function Compute console and delete the desired service.
To release the resources of DataWorks, log on to the DataWorks console and delete the desired workspace.
To release the resources of MaxCompute, log on to the MaxCompute console and delete the desired project.