DataWorks lets you run Python scripts on shell nodes. This topic shows you how to run Python 2 and Python 3 scripts on common shell nodes and EMR Shell nodes.
Background
DataWorks lets you upload Python scripts as resources. You can then specify the interpreter path for Python 2 or Python 3 in a common shell node or an EMR Shell node and run the script by referencing the uploaded resource.
Prerequisites
-
Meet the prerequisites for using an EMR Shell node. For more information, see Prerequisites for using an EMR Shell node.
-
Meet the prerequisites for using a common shell node. For more information, see Prerequisites for using a common shell node.
-
If your Python script requires third-party packages, you must prepare the environment on the resource group. The method depends on the resource group type:
-
serverless resource group (Recommended): Install third-party packages using image management. For more information, see Custom images.
-
exclusive resource group for scheduling: Install third-party packages using O&M Assistant. For more information, see O&M Assistant.
NoteWhen you create a third-party package, ensure that the package type supports both
Python 2andPython 3. -
Limits
-
For the limits on EMR Shell nodes, see Limits on EMR Shell nodes.
-
For the limits on common shell nodes, see Limits on common shell nodes.
Run Python scripts on shell nodes
DataWorks allows you to run Python scripts by referencing resources from a common shell node or an EMR Shell node. The interpreter paths vary by Python version. For example:
-
Python 2:
python xx.py -
Python 3:
/home/tops/bin/python3 xx.py
Common shell node
-
Create a resource.
-
Go to the DataStudio page.
Log on to the DataWorks console. Switch to the target region and click in the left-side navigation pane. From the drop-down list, select the target workspace and click Go to DataStudio.
-
Create a MaxCompute Python resource.
On the DataStudio page, right-click the target workflow and choose Create Resource. In the MaxCompute directory, select the Python resource type and create a resource named
mc.py.NoteThe resource name
mc.pyis an example. You can specify a name based on your business requirements. -
Edit the MaxCompute Python resource.
On the configuration page of the resource, edit the code. Example code:
Python 3
print('This is a test text')Python 2
print "This is a test text" -
Click
 and
and  to save and commit the resource.
-
-
Reference the resource.
-
Create a common shell node.
On the DataStudio page, right-click the target workflow and choose Create Node. In the General directory, select Shell.
-
Reference the resource.
On the edit page for a common shell node, under the node, find the pending Insert Resource Path
mc.py, and right-click to select Insert Resource Path.The resource is now referenced in the code editor:
##@resource_reference{"mc.py"}
mc.py
-
-
Verify the result.
Python 3
-
Edit the common shell node.
In the common shell node, add the Python 3 interpreter path:
##@resource_reference{"mc.py"} /home/tops/bin/python3 mc.py -
Click the
 icon, select a resource group and a custom image, and then run the task.
################################# End run custom-script. ################################## This is a test text 2024-10-21 17:33:18 INFO ====================================================================== 2024-10-21 17:33:18 INFO Exit code of the Shell command 0 2024-10-21 17:33:18 INFO --- Invocation of Shell command completed --- 2024-10-21 17:33:18 INFO Shell run successfully! 2024-10-21 17:33:18 INFO Current task status: FINISH 2024-10-21 17:33:18 INFO Cost time is: 2.628s
Python 2
-
Edit the common shell node.
In the common shell node, add the Python 2 interpreter path:
##@resource_reference{"mc.py"} python mc.py -
Click the
icon, select a resource group and a custom image, and then run the task.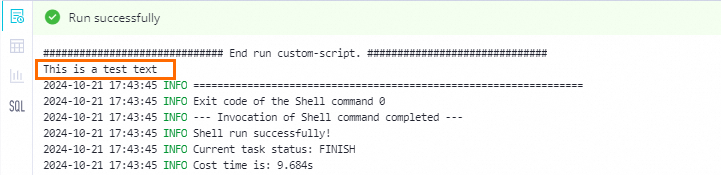
-
EMR shell node
-
Create a resource.
-
Go to the DataStudio page.
Log on to the DataWorks console. Switch to the target region and click in the left-side navigation pane. From the drop-down list, select the target workspace and click Go to DataStudio.
-
Create an EMR File resource.
On the DataStudio page, right-click the target workflow and choose Create Resource. In the EMR directory, select File. Select a Storage path and click Click Upload to upload your local
emr.pyscript. Example script content:Python 3
print('This is a test text')Python 2
print "This is a test text"NoteThe resource name
emr.pyis an example. You can specify a name based on your business requirements. -
Click
to commit the resource.
-
-
Reference the resource.
-
Create an EMR Shell node.
On the DataStudio page, right-click the target workflow and choose Create Node. In the EMR directory, select EMR Shell.
-
Reference the EMR File resource.
On the configuration page of the EMR Shell node, find the
emr.pyresource under . Right-click the resource and select Insert Resource Path.The resource is now referenced in the code editor:
##@resource_reference{"emr.py"}
emr.py
-
-
Verify the result.
Python 3
-
Edit the EMR Shell node.
In the EMR Shell node, add the Python 3 command execution path
/home/tops/bin/python3.##@resource_reference{"emr.py"} /home/tops/bin/python3 emr.py -
Click the
 icon, select a resource group and a custom image, and then run the task.
>>> [2024-10-21 17:51:29][INFO ][CommandExecutor ]: Process start to execute... Process Output>>> This is a test text >>> [2024-10-21 17:51:29][INFO ][CommandExecutor ]: Process is exited with exit value 0 >>> [2024-10-21 17:51:29][INFO ][CommandExecutor ]: Command state update to COMPLETED >>> [2024-10-21 17:51:29][INFO ][CommandExecutor ]: Process execute finished >>> [2024-10-21 17:51:29][INFO ][EmrDccJobSubmitter ]: Job Completed, status=0 2024-10-21 17:51:29 INFO ============================================================ 2024-10-21 17:51:29 INFO Exit code of the Shell command 0 2024-10-21 17:51:29 INFO --- Invocation of Shell command completed --- 2024-10-21 17:51:29 INFO Shell run successfully! 2024-10-21 17:51:29 INFO Current task status: FINISH 2024-10-21 17:51:29 INFO Cost time is: 17.667s
Python 2
-
Edit the EMR Shell node.
In the EMR Shell node, add the execution path
pythonfor the Python 2 command.##@resource_reference{"emr.py"} python emr.py -
Click the
icon, select a resource group and a custom image, and then run the task.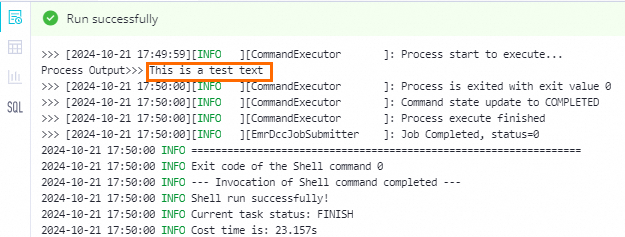
-