The dimension table feature lets you visually create MaxCompute production tables, import local data, and directly edit data in the corresponding MaxCompute tables.
DataWorks no longer recommends this feature. Use Data Upload instead, which provides more comprehensive capabilities.
Prerequisites
-
You have created a MaxCompute data source in your DataWorks workspace and associated a compute resource with Data Studio. For more information, see Associate a MaxCompute compute resource.
-
You have created a MaxCompute table. For more information, see Manage MaxCompute tables.
Limitations
If you have no existing dimension tables, the dimension table entry point does not appear in the new version of Data Analysis.
-
Permission limitations: To create a dimension table, you must have the workspace administrator, project owner, or developer role in a DataWorks workspace. For more information, see Add members to a workspace.
-
Column type limitations: Columns in MaxCompute tables created with the dimension table feature must be of the STRING type. To use other column types, you must create the table by running a DDL statement in DataStudio. For more information, see Standard DDL statements.
-
Sharing limitations: The maximum number of editors and readers varies by DataWorks edition.
Feature/edition
Basic Edition
Standard Edition
Professional Edition
Enterprise Edition
Maximum editors
0
3
5
10
Maximum readers
0
10
20
30
Go to the dimension table list
On the Data Analysis page, click Enter Data Analysis. Click the ![]() icon in the left-side navigation pane to go to the Dimension Table list page.
icon in the left-side navigation pane to go to the Dimension Table list page.
Create a dimension table
The new version of Data Analysis no longer supports creating dimension tables. Use Data Upload instead. The following content applies only to legacy Data Analysis.
-
On the Dimension Table page, click the
 icon next to New Dimension Table.
 -
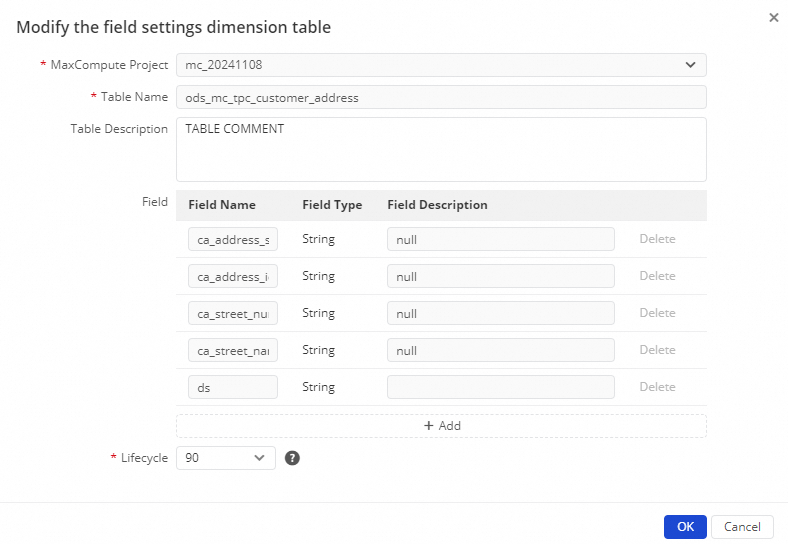
In the New Dimension Table dialog, configure the parameters. You can also import via DDL.
Parameter
Description
MaxCompute Project
Select the MaxCompute project to which the dimension table belongs.
Table Name
The name of the dimension table. The table created here is synchronized as a MaxCompute production table.
Table Description
Supplementary description of the table's purpose and properties.
Field
Add the Field Name and Field Description of the table. The Field Type supports only STRING.
Lifecycle
Specifies the time-to-live (TTL) for table data. If the table data remains unchanged for the specified period after the last update, the table is automatically reclaimed by MaxCompute.
-
Select I Acknowledge This Risk and Confirm That, as the Table Owner, I Am Responsible for Subsequent Changes to This Table, and then click Confirm to go to the dimension table editing page where you can view and manage the dimension table information.
MaxCompute tables in Data Analysis are maintained in the production environment. The table creator is responsible for the creation and subsequent maintenance of the table.
Import data to a dimension table
Dimension tables support direct data entry and importing data from spreadsheets, local CSV files, and Excel files to prepare for subsequent data analysis.
-
On the Dimension Table page, click a File Name under All Dimension Tables to go to the dimension table editing page.
-
On the dimension table editing page, click Start editing in the upper-right corner to enable the Import function.
If you have already clicked Start editing before leaving the page, you can import data directly when you re-enter.
-
In the Import dialog, click the file type you want to import and configure the corresponding parameters.
ImportantDimension tables support only STRING-type data. If the imported data contains non-STRING types, they are automatically converted to STRING.
-
Spreadsheet
Parameter
Description
Spreadsheet
From the Spreadsheet drop-down list, select the spreadsheet to import.
Sheet
From the Sheet drop-down list, select the sheet to import from the spreadsheet.
Data Preview
Preview the data to import. You can select or clear First Row as Field Names.
Field Mapping
Configure the mapping between Dimension Table Field and Data Column.
Import Data Mode
Options include Append and Overwrite.
-
Local CSV File
Parameter
Description
File
Click Select File, select the local CSV file to import, and then click Open.
Original Character Set
Options include UTF-8 and GBK. If garbled characters appear, switch the character set.
Separator
Includes row and column separators:
-
Row separators include \r\n, \n, and \r.
-
Column separators include ,, ;, and \t.
If cell data cannot be correctly separated, switch the separator.
Data Preview
Preview the data to import. You can select or clear First Row as Field Names.
Field Mapping
Configure the mapping between Dimension Table Field and Data Column.
Import Data Mode
Options include Append and Overwrite.
-
-
Local Excel File
Parameter
Description
File
Click Select File, select the local Excel file to import, and then click Open.
Sheet
From the Sheet drop-down list, select the sheet to import.
Data Preview
Preview the data to import. You can select or clear First Row as Field Names.
Field Mapping
Configure the mapping between Dimension Table Field and Data Column.
Import Data Mode
Options include Append and Overwrite.
-
-
Click OK.
-
Click Save in the upper-right corner of the page. The data in the MaxCompute table is updated accordingly.
After you save the dimension table, you can use the Diff feature to verify that the changes are as expected and avoid unintended modifications.
Edit a dimension table
You can modify the information of a MaxCompute table created by the dimension table feature through visual editing on the dimension table editing page, without writing SQL code.
-
On the Dimension Table page, click a File Name under All Dimension Tables to go to the dimension table editing page.
-
On the dimension table editing page, view and modify the dimension table information.
-
View dimension table information: On the left side of the page, you can view the MaxCompute Project, Table Name, Table Description, Lifecycle, and other Dimension table information of the MaxCompute production table.
-
Modify dimension table information: Click Modify field settings. In the Modify the field settings dimension table dialog, modify the Table Description and Lifecycle, and add columns.
The right side of the page displays all data of the MaxCompute table in a grid format, with column names in the first row. You can double-click a cell to modify the content of a specific column in a specific row.
-
-
Click Save in the upper-right corner to apply the changes to the MaxCompute table.
After you save the dimension table, you can view all data of the MaxCompute table. You can also click Diff in the upper-right corner to view changes in the Diff From the Previous Version dialog.
Share a dimension table
If you need multiple users to collaboratively edit a dimension table, you can share the dimension table and grant the editing permission to others.
RAM users with the tenant administrator, tenant security administrator, or authorized workspace administrator role can go to to enable Allow Sharing for dimension tables. For more information, see Data query and analysis management.
-
On the Dimension Table page, click a File Name under All Dimension Tables to go to the dimension table editing page.
-
On the dimension table editing page, click Share in the upper-right corner and configure the sharing method.
You can share a dimension table in the following ways:
-
Link: After you specify the members who can edit or read the table, click Copy Link and send the link to the desired users.
-
Specify Editors: To grant editing permissions on the dimension table to specific users, click . In the dialog, enter and select the members to share with, and then click Confirm.
NoteThe maximum number of editors varies by DataWorks edition. For more information, see Usage limits.
-
Users with Read Access: To grant read permissions on the dimension table to specific users, click . In the dialog, enter and select the members to share with, and then click Confirm.
NoteThe maximum number of readers varies by DataWorks edition. For more information, see Usage limits.
After you share the dimension table, send the link to the target users. They can access the table through the link. You can also return to the Dimension Table page to view dimension tables under Share it with me.
-
View and manage dimension tables
-
In the All Dimension Tables section on the Dimension Table page, view the lists of dimension tables under I created and Share it with me.
You can also share a dimension table with specified members.
-
Click a file name or the
 icon next to a dimension table to go to its editing page. You can also perform the following management operations on this page:
-
Change Owner: Click the
 icon next to a file. In the Change Owner dialog, enter and select the target user, and then click OK.
 -
Delete: Click the
 icon next to a file. In the Delete dialog, click OK.
-