DataWorks provides the do-while node to run a set of tasks in a loop. You can orchestrate the business logic inside a do-while node and use its internal end node to define the exit condition. You can use a do-while node by itself or with an assignment node to iterate over the dataset passed from the assignment node. This topic describes the components and application logic of the do-while node.
Background
The following table provides an overview of this topic.
Description | References |
Limitations and precautions for do-while nodes, including maximum loop count, testing methods, and log viewing. | |
Customizing the internal workflow, which must begin with the built-in start node and end with the built-in end node. | |
Using built-in variables to get loop parameters, with examples of value retrieval. | |
How the end node controls the loop exit, with code samples. | |
Review typical use cases for the do-while node. | Use case 1: Use with an assignment node and Use case 2: Use with branch and merge nodes |
Limitations
The do-while node is available only in DataWorks Standard Edition and later. For more information, see DataWorks editions and features.
A do-while node can loop a maximum of 1,024 times.
Parallel execution is not supported. A new loop can start only after the previous one completes.
Precautions
Dimension | Item | Description |
Loop support | Maximum number of loops | A do-while node can loop a maximum of 1,024 times. If the number of loops controlled by the end node exceeds 1,024, the node reports an error. |
Internal nodes | Workflow orchestration |
|
Value retrieval | The node provides built-in variables to retrieve specified values from an upstream assignment node. | |
Debugging | Task debugging | In standard-mode workspaces, you cannot test a do-while node directly in DataStudio. Instead, you must commit the task containing the node to the development environment and run it in Operation Center. |
Log viewing | To view the execution logs for a do-while node in Operation Center, right-click the instance and select View Inner Nodes. | |
Dependencies | Dependency settings | A do-while node can be used alone or with an assignment node. However, when performing a data backfill in Operation Center, you must select both nodes for execution. Running only the do-while node prevents it from receiving values from the assignment node. |
Components and workflow orchestration
A do-while node is a special container node that holds an internal workflow. When you create a do-while node, three internal nodes are automatically created: a start node (loop start), a shell node (loop task), and an end node (loop end condition). These internal nodes are organized into a workflow for looped task execution.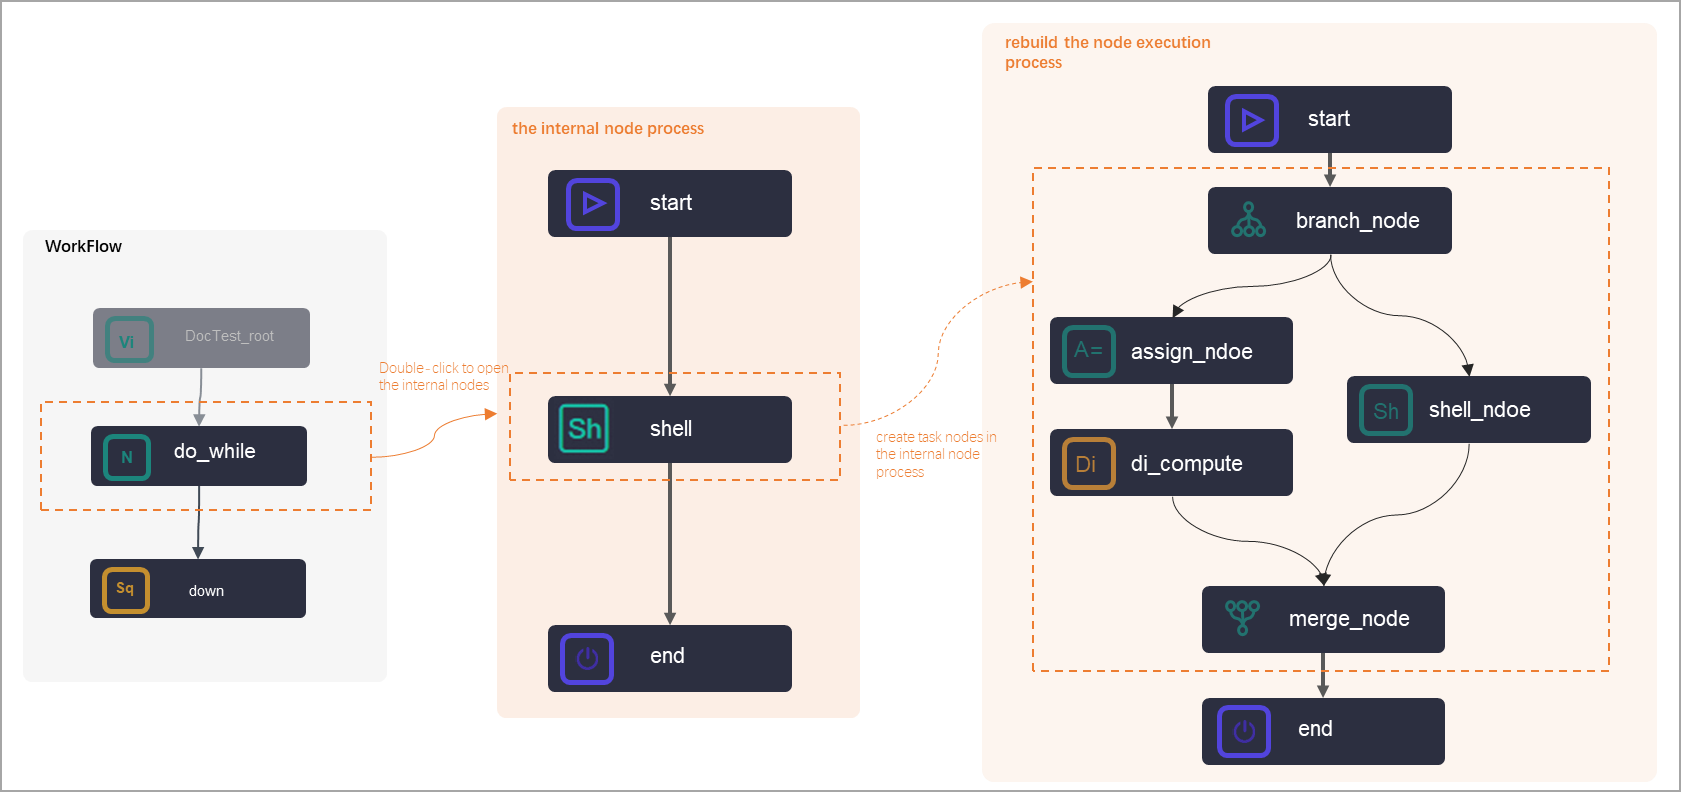
start node
Marks the start of the loop. It contains no task code and cannot be deleted. All other nodes in the loop must depend on the start node, either directly or indirectly.
Loop logic
By default, DataWorks creates an internal shell node for the loop task. You can delete the default shell node and build a custom business workflow inside the loop.
Typically, the loop workflow is used together with an assignment node, a branch node, or a merge node. When you customize loop tasks, you can remove dependencies between internal nodes and rearrange the workflow. However, the workflow must start with the start node and end with the end node.
end node
The end node defines the loop condition for the do-while node. It functions like an assignment node, outputting either
trueto continue the next loop orfalseto terminate it.You can write the loop condition code for the end node using ODPS SQL, Shell, or Python 2. The do-while node provides built-in variables to simplify this code. For more information about the built-in variables, see Built-in variables and Value retrieval examples. For code samples in different languages, see Sample code: Exit a loop by using the end node.
All nodes within the loop must be upstream of the end node, which cannot be deleted.
Built-in variables
A do-while node uses the ${dag.variable_name} format to retrieve variables. DataWorks provides two system built-in variables: ${dag.loopTimes} and ${dag.offset}. You can also use the do-while node with an assignment node and use the ${dag.variable_name} format to retrieve values from the assignment parameters.
System built-in variables
In each loop iteration, you can use built-in variables to get the current loop number and offset.
Built-in variable
Description
Value
${dag.loopTimes}The current loop number.
The value is 1 for the first loop, 2 for the second, 3 for the third, and so on, up to n for the nth loop.
${dag.offset}The offset.
The value is 0 for the first loop, 1 for the second, 2 for the third, and so on, up to n-1 for the nth loop.
Retrieve results from an assignment node
If you use a do-while node with an assignment node, you can also retrieve the assignment's parameter values.
NoteWhen a do-while node depends on an assignment node, you can set the output parameters of the assignment node as the Input Parameters of the do-while node. This allows the do-while node to retrieve the result set from the assignment node and a specified node within that result set. The format is ${dag.variable_name}, where variable_name must be configured as the Input Parameters of the do-while node. The example in this topic defines the
inputparameter (an Input Parameters) in the do-while node to receive the result set from the assignment node. In practice, you must replace this with your actual parameter name.Built-in variable
Description
${dag.input}The dataset passed from the upstream assignment node.
${dag.input[${dag.offset}]}Retrieves the data row for the current loop.
${dag.input.length}Retrieves the length of the dataset.
Value retrieval examples
The format of the result set from an assignment node depends on its language. To retrieve results from a Shell-based assignment node, use a one-dimensional array. For an ODPS SQL-based assignment node, use a two-dimensional array. For more information, see assignment node.
Example 1: Shell assignment node
Node output
The upstream assignment node uses Shell syntax, and its last output is
2021-03-28,2021-03-29,2021-03-30,2021-03-31,2021-04-01.Variable values
Built-in variable
Loop 1 value
Loop 2 value
${dag.input}2021-03-28,2021-03-29,2021-03-30,2021-03-31,2021-04-01${dag.input[${dag.offset}]}2021-03-282021-03-29${dag.input.length}5
${dag.loopTimes}1
2
${dag.offset}0
1
Example 2: ODPS SQL assignment node
Node output
The upstream assignment node uses ODPS SQL syntax, and the last SELECT statement returns two rows:
+----------------------------------------------+
| uid            | region         | age_range      | zodiac |
+----------------------------------------------+
| 0016359810821  | Hubei Province | 30-40 years old| Cancer |
| 0016359814159  | Unknown        | 30-40 years old| Cancer |
+----------------------------------------------+
Variable values
Built-in variable
Loop 1 value
Loop 2 value
${dag.input}+----------------------------------------------+ | uid | region | age_range | zodiac | +----------------------------------------------+ | 0016359810821 | Hubei Province | 30-40 years old| Cancer | | 0016359814159 | Unknown | 30-40 years old| Cancer | +----------------------------------------------+${dag.input[${dag.offset}]}0016359810821,Hubei Province,30-40 years old,Cancer0016359814159,Unknown,30-40 years old,Cancer${dag.input.length}2
NoteThe length of the dataset is the number of rows in the two-dimensional array.
${dag.input[0][1]}NoteThe value in the first row and second column of the two-dimensional array.
Hubei Province
${dag.loopTimes}1
2
${dag.offset}0
1
End node code samples
You can write the code for the end node in ODPS SQL, Shell, or Python 2. This section provides sample code for each language.
ODPS SQL
SELECT  CASE
 WHEN COUNT(1) > 0 AND ${dag.offset}<= 9
  THEN true
  ELSE false
 END
FROM  xc_dpe_e2.xc_rpt_user_info_d  where dt='20200101';
In this example, the end node code limits the total number of loops by comparing the table's row count and the loop offset to fixed values.
Shell
if [ ${dag.loopTimes} -lt 5 ];
then
     echo "True"
else
     echo "False"
fi
This code compares the current loop number, ${dag.loopTimes}, with 5 to limit the total number of loops.
For example, ${dag.loopTimes} is 1 for the first loop and 2 for the second. When its value reaches 5 on the fifth loop, the condition becomes false, the end node outputs False, and the loop terminates.
Python 2
if ${dag.loopTimes}<${dag.input.length}:
   print True;
else
   print False;
# If the end node outputs True, the next loop starts.
# If the end node outputs False, the loop terminates.
This code limits the number of loops by comparing the current loop number (${dag.loopTimes}) to the length of the dataset from the assignment node.
Use cases
Assignment node
The following table describes a typical scenario and precautions for using a do-while node with an assignment node.
Scenario | Configuration | Parameter passing |
If an internal node within a |
| In the Output Parameters of the assignment node, a parameter named |
Branch and merge nodes
The following table describes a typical scenario and precautions for using a do-while node with a branch node and a merge node.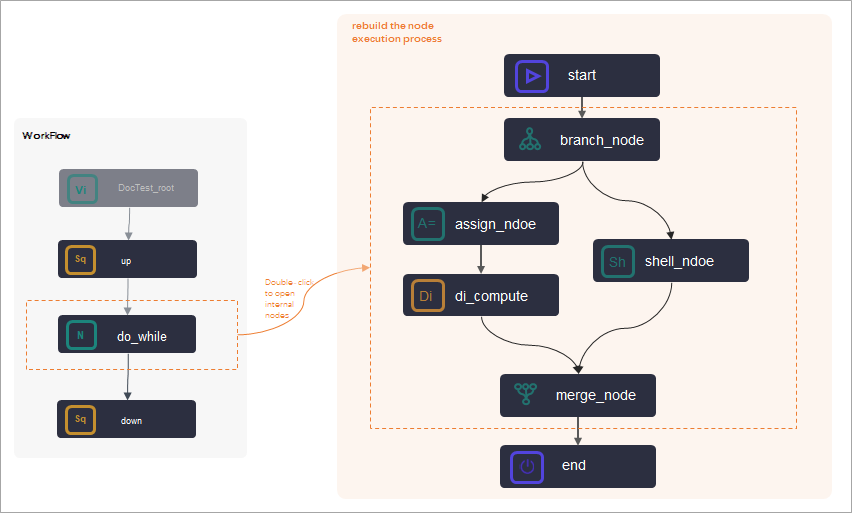
Use case | Precaution |
To perform logical judgments or iterate over results within a do-while node, use a branch node (such as | Inside a do-while node, a branch node (such as |