DataWorks supports Cloudera's Distribution Including Apache Hadoop (CDH) Spark nodes, which let you develop and periodically schedule Spark tasks without leaving the DataWorks interface. This topic describes how to create a CDH Spark node, upload a JAR file, configure scheduling, and commit the task to production.
Prerequisites
Before you begin, make sure you have:
A workflow created in DataStudio. All node development in DataWorks is organized within workflows. For instructions, see Create a workflow
A CDH cluster registered to your DataWorks workspace. See Register a CDH or CDP cluster to DataWorks
(Required for RAM users) The RAM user added to the workspace as a member with the Development role. The Workspace Administrator role also grants access but carries broader permissions — assign it only when necessary. See Add workspace members and assign roles to them
A serverless resource group purchased and configured, including workspace association and network settings. See Create and use a serverless resource group
Limitations
CDH Spark tasks can run on serverless resource groups or old-version exclusive resource groups. Use serverless resource groups.
Prepare Spark task code and a JAR file
Before scheduling a CDH Spark task in DataWorks, prepare your Spark task code in CDH and compile it into a JAR file. For details, see Overview.
You must upload the JAR file to the DataWorks console before DataWorks can schedule your CDH Spark tasks.
Step 1: Create a CDH Spark node
Log on to the DataWorks console. In the top navigation bar, select the target region. In the left navigation pane, choose Data Development and O\&M > Data Development, select a workspace, and click Go to Data Development.
On the DataStudio page, find your workflow, right-click its name, and choose Create Node > CDH > CDH Spark.
In the Create Node dialog box, set the Engine Instance, Path, and Name parameters.
Click Confirm.
Step 2: Create and reference a CDH JAR resource
Reference a JAR file in the CDH Spark node, then write a spark-submit command to submit the task.
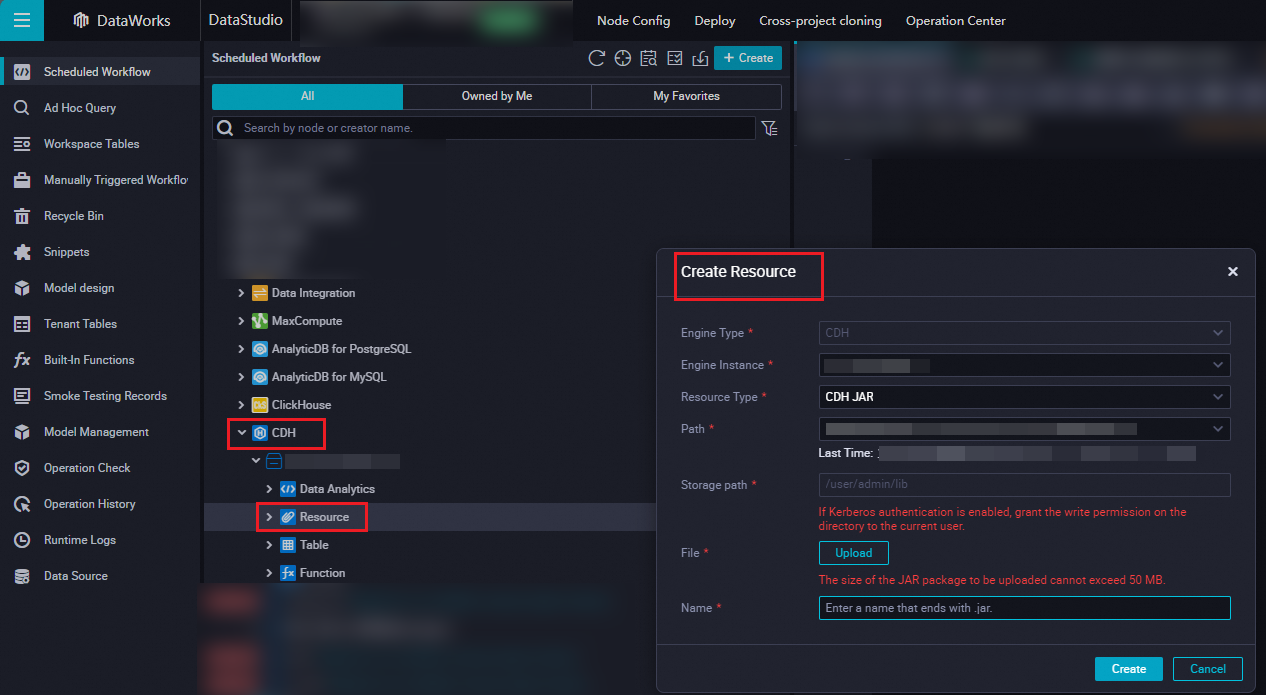
Create a CDH JAR resource
Find your workflow and click CDH. Right-click Resource and choose Create Resource > CDH JAR. In the Create Resource dialog box, click Upload and select the JAR file to upload.
Reference the CDH JAR resource
Go to the configuration tab of the node you created.
Under Resource in the CDH folder, right-click the resource name and select Insert Resource Path. This example uses a resource named
spark-examples_2.11_2.4.0.jar. A clause in##@resource_reference{""}format appears on the configuration tab when the resource is successfully referenced:##@resource_reference{"spark_examples_2.11_2.4.0.jar"} spark_examples_2.11_2.4.0.jar
Edit the node code to add the
spark-submitcommand. Use the following format:ImportantDo not add comments in CDH Spark node code. Comments cause a runtime error.
Parameter Description org.apache.spark.examples.SparkPiThe main class of the task in your compiled JAR file spark-examples_2.11-2.4.0.jarThe name of the JAR file you uploaded ##@resource_reference{"spark-examples_2.11-2.4.0.jar"} spark-submit --class org.apache.spark.examples.SparkPi --master yarn spark-examples_2.11-2.4.0.jar 100
Step 3: Configure task scheduling properties
To run the task on a schedule, click Properties in the right navigation pane of the node configuration tab.
Basic properties: See Configure basic properties.
Scheduling cycle and dependencies: Configure the run schedule, rerun behavior, and upstream dependencies. See Configure time properties and Configure same-cycle scheduling dependencies.
Resource group: See Configure the resource property. If the node needs to access the internet or a virtual private cloud (VPC), select the resource group connected to your network. See Network connectivity solutions.
Configure the Rerun and Parent Nodes parameters before you commit the task.
Step 4: Debug task code
(Optional) Select a resource group and assign values to scheduling parameters.
Click the
 icon in the top toolbar to open the Parameters dialog box. Select the resource group for debugging.
If your task code uses scheduling parameters, assign values to those parameters for the debug run. See Differences in value assignment logic across run modes for details.
Click the
 icon to save, then click the
  icon to run the task.
(Optional) Run a smoke test in the development environment before or after committing the task. See Perform smoke testing.
What's next
Commit and deploy the task
Click the Save icon to save the task.
Click the Submit icon to commit the task.
In the Submit dialog box, enter a Change description and click Confirm.
If your workspace runs in standard mode, deploy the task to the production environment after committing: click Deploy in the DataStudio top navigation bar. See Deploy tasks.
View the task in Operation Center
Click Operation Center in the upper-right corner of the node configuration tab to go to the production environment.
View and manage your scheduled task. See View and manage auto triggered tasks.
For a full Operation Center overview, see Overview.
Use cases
DataWorks handles job scheduling and monitoring so your Spark jobs are reliably submitted to CDH clusters at the configured schedule. Typical uses include:
Data analysis: Use Spark SQL, Dataset, and DataFrame APIs to aggregate, filter, and transform complex datasets for rapid insight.
Stream processing: Use Spark Streaming to process real-time data streams and act on results immediately.
Machine learning: Use MLlib to preprocess data, extract features, and run model training and evaluation at scale.
Large-scale ETL (extract, transform, and load): Process large datasets and load results into data warehouses or other storage systems.