In a data workflow, task code like SQL often changes based on the scheduling time to process date-specific data partitions. To avoid manual code changes, use scheduling parameters. You define placeholders in your code that the system automatically replaces with dynamic values, such as the business date or scheduled run time, when the task is scheduled. This automates and parameterizes your workflows.
Core configuration process
To use scheduling parameters, define them in your code and assign values in the Scheduling Settings. After testing in Data Studio, submit the node with its parameters to Operation Center. The system then runs the task, automatically replacing the parameters with their assigned values based on the assignment logic.
Step | Action | Goal |
1. Define parameters | In your node's code, define one or more parameters using the | Create a placeholder for a dynamic value. |
2. Configure parameters | In the pane for the node, assign values to the variables in the code. | Associate the |
3. Test | Use the Smoke test feature to simulate a specific business date and verify that the parameter substitution and code execution are correct. | Ensure the configuration is correct in the development environment. |
4. Deploy and verify | Submit the node to the production environment and confirm the final parameter configuration in Operation and Maintenance Center. | Ensure the parameters for the production task are as expected. |
Scheduling parameters take effect only when a task is scheduled in Operation Center. If you need to run code in Data Studio to verify whether the business logic meets expectations, you can temporarily assign values to scheduling parameters (script parameters) in Run Configuration.
Procedure
Step 1: Define parameters
Double-click the target node, such as a MaxCompute SQL node, to open the node editing page.
Define parameters in the code: In a MaxCompute SQL node, use the
${param}syntax to define a parameter name. DataWorks recommends using meaningful parameter names for easy reference and management.Scheduling parameter reference format:
Format type
Syntax
Scope
Remarks
General format
${parameter_name}Applicable to most node types, such as MaxCompute SQL nodes and batch synchronization nodes.
This is the most commonly used format.
Special format
Varies by node type. Does not use the
${...}format.PyODPS, Shell
For details, see Scheduling parameter configuration for each node type.
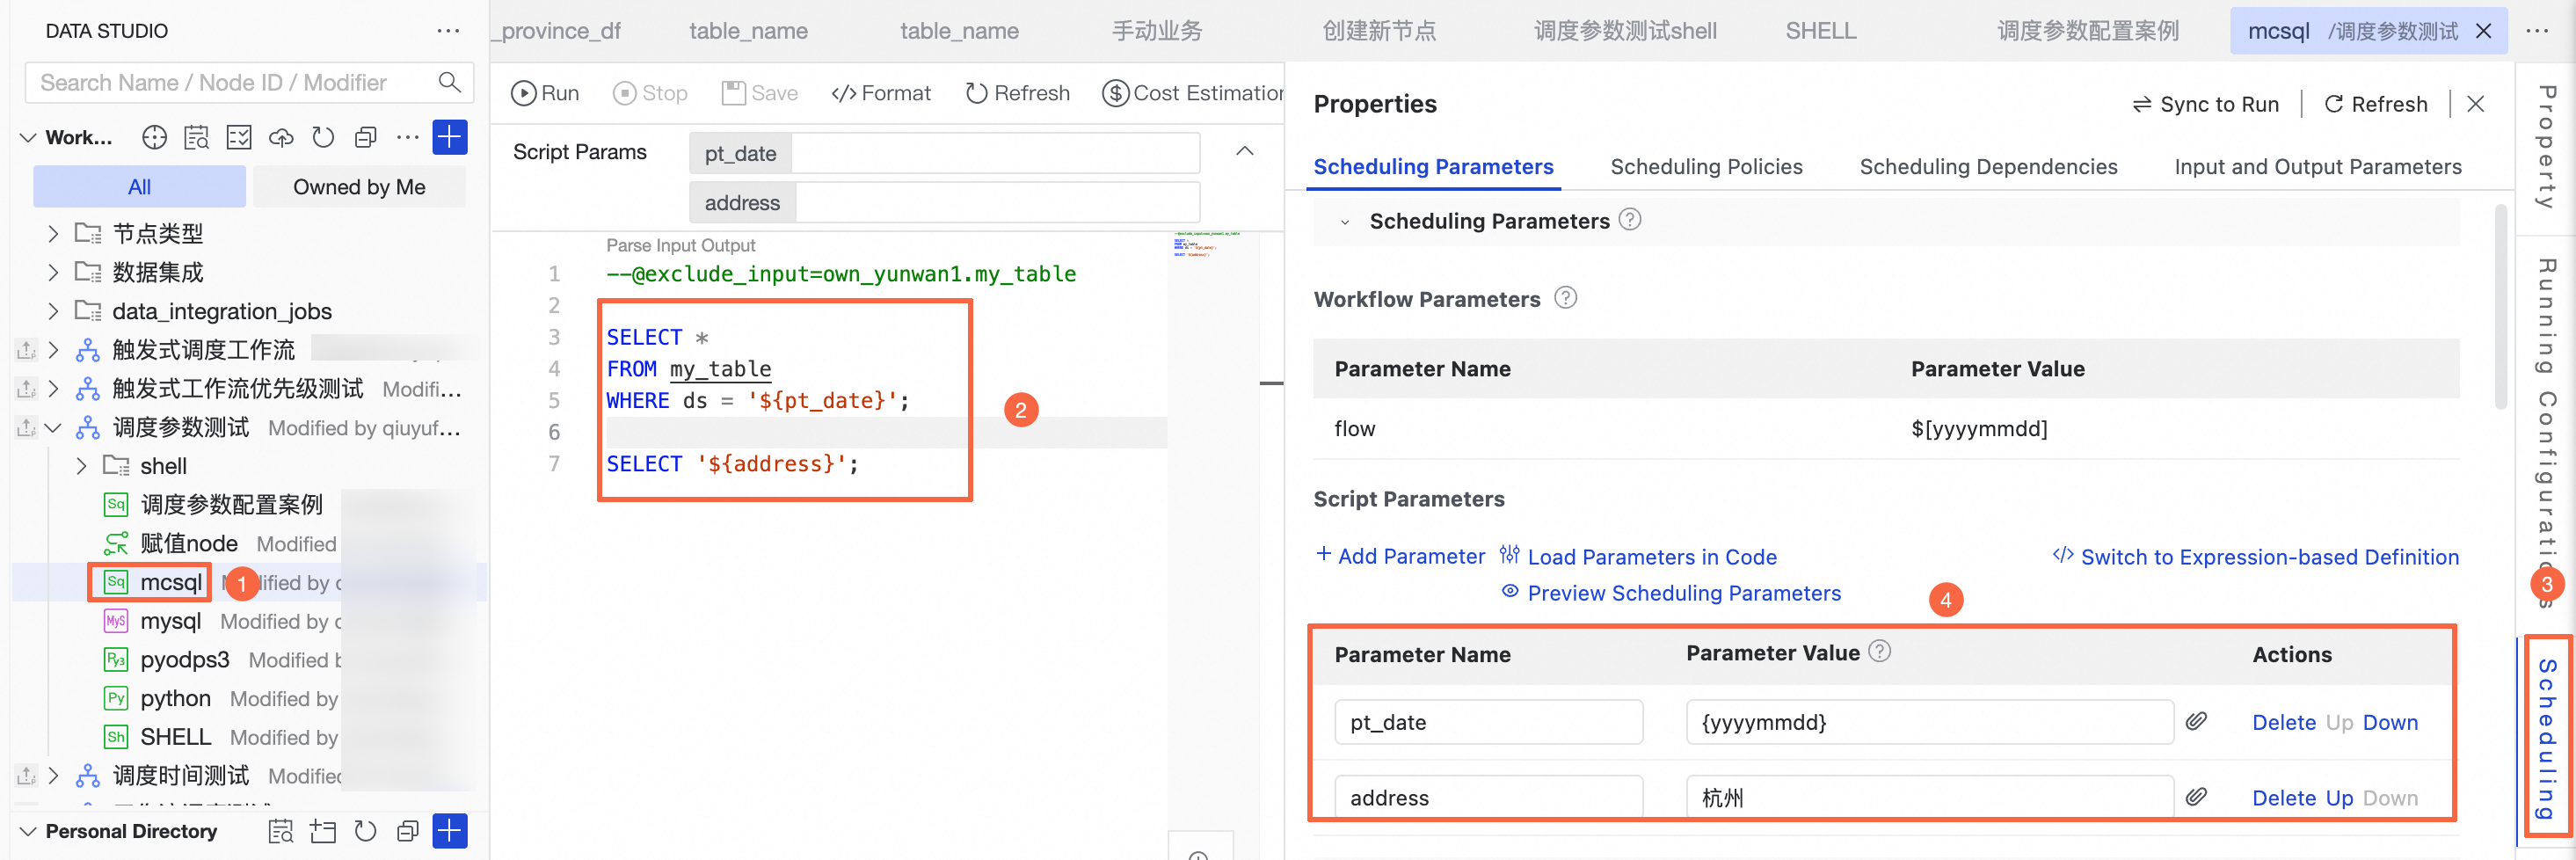
-- Example: Define a variable named pt_date for partition filtering
SELECT * FROM my_table WHERE ds = '${pt_date}';
Click Scheduling Settings on the right side of the page to open the Scheduling Parameters configuration.
Configure scheduling parameters as described below.
Step 2: Configure parameters
You can configure scheduling parameters by using Define with table or Defined with an expression. You can switch between the two modes by clicking Defined with an expression in the upper-right corner of the parameter list. The default mode is Define with table.
Configure parameters
Define with table
Click Scheduling Settings on the right side of the node to open the scheduling parameter configuration page.

Add parameters
Click Scheduling Settings on the right side of the node, and add parameters in Scheduling Parameters. The following methods are supported for adding parameters.
Click Add parameters to manually enter the parameter name and value. The parameter name must match the variable name defined in the code.
Click Loading parameters in code. DataWorks automatically parses variables from the code, such as
${pt_date}, and populates the parameter names. You only need to fill in the parameter values.
Assign values
You can set system built-in parameters, custom time parameters, workspace parameters, output parameters of upstream nodes, and constants.
Click the input box. The drop-down list displays some commonly used parameter expressions that you can select directly. You can also manually enter a custom expression or a system built-in variable.
You can fill in values based on your business requirements. For supported value formats, see Supported formats for scheduling parameters.
Scheduling parameter assignment also supports quick binding of context parameters. Click the
 button next to the parameter. In the Associate Output Parameter of Ancestor Node dialog, select a node that has configured output parameters and quickly associate the dependency. For details about output parameters, see Configure output parameters.
Define with an expression
Click Defined with an expression to switch the configuration mode. Use this mode if you prefer configuring parameters with expressions.

When using expression-based definition, separate multiple parameters with spaces.
When you add, delete, or modify scheduling parameters in Defined with an expression mode, DataWorks validates the syntax of the current expression. If validation fails, the scheduling parameters cannot be configured.
For example, DataWorks checks syntax rules such as no spaces are allowed around the equal sign.
Parameter preview
After defining parameters, click Preview of scheduling parameters to preview the parameter values for N instances after a specified business date, and verify whether the parameter definitions meet expectations. You can adjust the business date and the number of instances to preview.
 Note
NoteSome nodes, such as batch synchronization nodes, come with a built-in
${bizdate}parameter. This parameter is automatically assigned the value$bizdate. You can replace thebizdateparameter name in your code with a custom parameter name.${bizdate}itself has no special meaning and works the same as any other custom parameter.
Step 3: Smoke testing
After assigning values to scheduling parameters, we recommend that you use the smoke testing feature during the deployment process to configure a business date, simulate the scheduling scenario of the target task, and verify whether the code execution and parameter substitution meet expectations. If the results are not as expected, make adjustments in a timely manner to avoid affecting normal task scheduling.
Deploy the node code.

Configure the scheduling time and scheduling dependency.
Click Save to save the code and configuration. Then click the Deploy button on the toolbar to initiate smoke testing during the deployment process.
NoteIf the smoke test does not execute the latest code or parameters, click Republish Production.
Run the smoke test.
Click Initiate Smoke Testing. In the Smoke test dialog, select a business date, click Confirm, and start the smoke test.
View the smoke test logs.
Click the
 smoke test records button on the left menu, and click Logs in the smoke test records.
Check the parameter output in the logs to confirm whether the results meet expectations.
Step 4: Deploy and verify
After verification in the development environment, submit and deploy the task to Operation Center for production scheduling. After the task is deployed, make sure to check the scheduling parameters in the production environment to prevent runtime errors.
If the scheduling parameter configuration of a scheduled task does not meet expectations, or you cannot find the target task in Operation Center, verify that the task was deployed successfully. For details about deploying tasks, see Deploy a node.
Check the parameter definitions.
Go to Operation Center, switch to the target region and workspace, and navigate to the page. Click a task name in the task list and check whether the execution parameters in the General pane meet expectations.

Smoke testing in Operation Center.
You can also use smoke testing in Operation Center to confirm whether a deployed task performs parameter substitution and code execution as expected in the production environment. For details, see Smoke testing in Operation Center.
ImportantNote that smoke testing executes against real data in the production environment. Exercise caution to avoid polluting production data.

Observe the actual scheduling results.
After the task enters automatic scheduling, you can further verify whether the parameter substitution is correct by checking whether the parameters in Cycle Examples have been automatically replaced as required.

Complete configuration example
This topic uses a MaxCompute SQL node as an example to test whether the configured scheduling parameters meet expectations by using the smoke testing in the development environment feature, and then checks the scheduling parameter configuration of the task in Operation Center after deployment.
For scheduling parameter configuration of each node type, see Scheduling parameter configuration for each node type.
Edit the node code and configure scheduling parameters.
The code and scheduling parameter configuration of the MaxCompute SQL node are shown in the following figure.

Define variables in the code.
--Assign system built-in parameters
SELECT '${var1}';
SELECT '${var2}';
--Assign custom parameters
SELECT '${var3}';
SELECT '${var4}';
--Assign constants
SELECT '${var5}';
Assign values to variables.
In the section, assign values to the variables (as shown in area 2). For more value assignment formats, see Supported formats for scheduling parameters.
var1=$bizdate, which retrieves the business date inyyyymmddformat.var2=$cyctime, which retrieves the scheduled run time of the task inyyyymmddhh24missformat.var3=${yyyymmdd}, which retrieves the business date inyyyymmddformat.var4=$[yyyymmddhh24miss], which retrieves the scheduled run time of the task inyyyymmddhh24missformat.var5=Hangzhou, which sets var5 to the constant value Hangzhou.
Optional:Configure the scheduling time.
Configure the schedule of the MaxCompute SQL node to hourly (as shown in area 3).
NoteYou can select a time schedule based on your actual requirements. This topic uses hourly scheduling as an example.
Schedule start time:
16:00Schedule end time:
23:59Schedule interval:
1hour.
For more scheduling time configurations, see Configure scheduling time.
Configure the scheduling dependency.
Configure the scheduling dependency for the development node. For details, see Configure scheduling dependencies. In this example, the root node is used as the upstream dependency of this node.
Debug and run: Click Run on the toolbar to check whether the node running status and log output meet expectations. Scheduling parameters take effect only when a task is scheduled in Operation Center. If you need to run code in Data Studio to verify whether the business logic meets expectations, you can temporarily assign values to scheduling parameters (script parameters) in Run Configuration.
On the top toolbar of the node editing page, click Save and then deploy the MaxCompute SQL node configuration.
Initiate smoke testing during the deployment process.
Click Initiate Smoke Testing. In the Smoke test dialog, configure the business time to simulate the scheduling cycle of the node.
 The business time configuration is as follows:
Business date:
2025-10-16Start time:
16:00End time:
17:00
The MaxCompute SQL node is an hourly scheduled task. On business date
2025-10-17, two instances are generated at16:00and17:00.NoteBecause the business date is the day before the run date, the actual run date of the task is
2025-10-17.The expected parameter values for the
16:00instance are as follows:var1=20251016.var2=20251017160000.var3=20251016.var4=20251017160000.
The expected parameter values for the
17:00instance are as follows:var1=20251016.var2=20251017170000.var3=20251016.var4=20251017170000.
Click Confirm. The node starts running at the specified time.
After the run time ends, click the
smoke test records button on the left menu to view the smoke test logs.The two instances generated by the node run successfully, and the node results meet expectations.


If the current workspace uses standard mode, you need to deploy the node to the production environment. On the MaxCompute SQL node editing page, click Publish on the right side of the top menu bar to deploy the current node. For the deployment procedure, see Deploy nodes.
Go to Operation Center to confirm the scheduling parameter configuration of the node.

Click Operation and Maintenance Center on the right side of the DataStudio top menu bar to go to the Operation Center page.
On the page, search for the target node.
NoteYou can find the node on the scheduled task page only after it is deployed successfully.
Click the target node name, and check the Execution parameters in the General pane.
In this example, the execution parameters of the node are
var1=$bizdate var2=$cyctime var3=${yyyymmdd} var4=$[yyyymmddhh24miss], which meet expectations.Observe the actual instance substitution results. After scheduled instances are generated, click the Cycle Examples menu, search for the task name, click the task instance name, and check the Execution parameters in the General pane.
In this example, the execution parameters of the node are
var1=20251016 var2=20251017160000 var3=20251016 var4=20251017160000, which meet expectations.