The batch database synchronization feature in DataWorks periodically synchronizes the schema and data of some or all tables from a source database to a destination, supporting full, incremental, or combined synchronization modes. The following example uses a MySQL-to-MaxCompute migration to illustrate the configuration process.
Prerequisites
Data sources
Create the source and destination data sources. For more information, see Data Source Management.
Ensure your data sources support batch database synchronization. For details about the supported source data sources, such as PostgreSQL or Oracle, see Supported data sources. If your source data source is not on the supported list (for example, certain PostgreSQL versions), use single-table offline synchronization instead.
Resource group: Purchase and configure a serverless resource group.
Network connectivity: Establish network connectivity between the resource group and the data sources.
Applicability
Batch database synchronization tasks can be configured in both DataStudio and Data Integration. The features are identical in both modules.
Consistent configuration: The interface, parameters, and underlying functions are identical whether you create the task in DataStudio or Data Integration.
Bidirectional synchronization: Data Integration automatically synchronizes tasks to and displays them in the
data_integration_jobsdirectory in DataStudio. These tasks are categorized by theSourceType-DestinationTypechannel for unified management.T+1 data synchronization: Batch database synchronization also applies to T+1 database synchronization scenarios. You can configure it as a Recurring full synchronization, or as a built-in one-time full synchronization followed by recurring incremental synchronization, to implement a daily scheduled full snapshot or an incremental ETL pipeline.
Configure a synchronization task
Step 1: Create a synchronization task
Log on to the DataWorks console. In the target region, click in the left-side navigation pane. Select a workspace from the drop-down list and click Go to Data Integration.
In the left-side navigation pane, click Synchronization Task, and then click Create Synchronization Task at the top of the page. Configure the task information:
Data Source Type:
MySQL.Data Source Type:
MaxCompute.Specific Type:
batch database synchronization.Synchronization Mode: The Synchronization steps setting works with the subsequent full and incremental control setting. You can combine them to create different synchronization solutions. For details, see Full and incremental control.
Schema Migration: Automatically creates database objects like tables, fields, and data types in the destination to match the source schema, but does not migrate data.
Full Synchronization (optional): Copies all historical data from specified source objects, such as tables, to the destination in a single operation. This is typically used for initial data migration or data initialization.
Incremental Sync (optional): After a full synchronization is complete, this mode continuously captures new data from the source based on the incremental condition and synchronizes it to the destination.
Step 2: Configure data sources and runtime resources
In the Source Data Source section, select the
MySQLdata source in your workspace. In the Destination section, select the addedMaxComputedata source.In the Running Resources section, select the Resource Group for the synchronization task and allocate Resource Group CUs. If your synchronization task fails due to an out-of-memory (OOM) error, increase the allocated Resource Group CUs.
NoteThe Resource Group CUs value set here is the upper limit of CUs available to the entire batch database synchronization task. The number of CUs that the synchronization subtask of a single table actually consumes is determined by the Offline synchronization task cu parameter in in the upper-right corner of the task editing page. The default value is 1 CU and the minimum value is 0.5 CU.
These two settings together determine how many tables can be synchronized at the same time: maximum number of concurrent subtasks = Resource Group CUs ÷ Offline synchronization task cu. For example, if you allocate 10 CUs to the task and 2 CUs to each table, at most five subtasks run at the same time, which means five tables are synchronized concurrently. The remaining tables start only after earlier subtasks finish and release resources.
Ensure that both the source and destination data sources pass the Connectivity Check.
Step 3: Configure the synchronization solution
1. Data source
Select the tables to synchronize from the source data source in the Source tables section. Click the  icon to move them to the Selected tables list on the right.
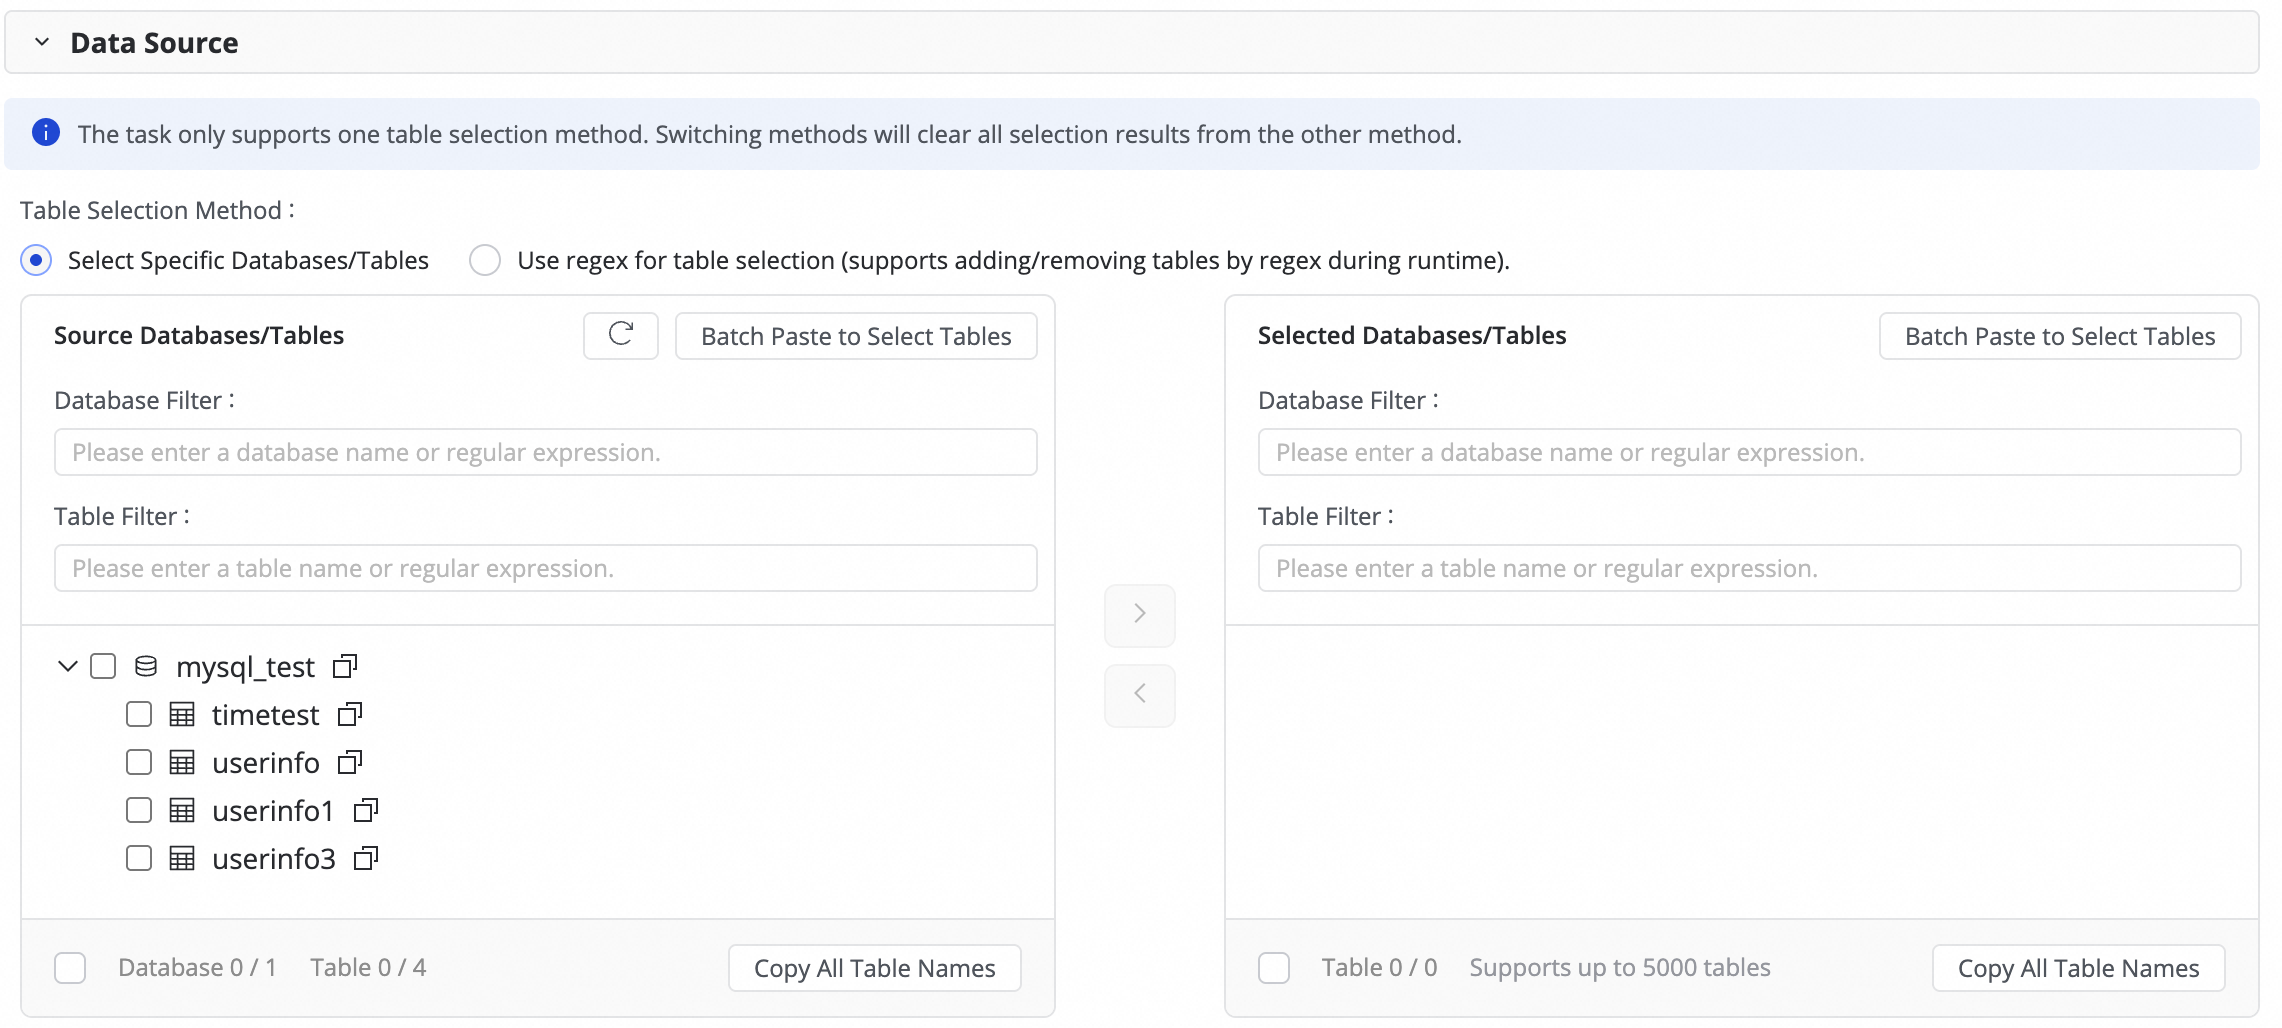
Two table selection modes are available: Select specified tables and Use a regular expression to select tables. The regular expression mode also adds and removes matching tables while the task is running. Switching modes clears all tables selected in the other mode. To add tables in bulk, click Batch paste tables in the upper-right corner.
If there are many databases or tables, you can use Database Filtering or Table filtering and configure regular expressions to select the tables you want to synchronize.
2. Destination
Click the Configuration button next to Partition Initialization Configuration to uniformly initialize partitions for new destination tables. Changes made here apply to all new destination tables and do not affect existing tables.
3. Full and incremental control
Configure the task execution frequency.
If you select "Full synchronization" or "Incremental synchronization", you can choose to run the task as a One-time task or a Recurring task.
If you select both "Full synchronization" and "Incremental synchronization", the system uses a built-in mode: "One-time full synchronization for the first run, followed by recurring incremental synchronization". This option cannot be changed.
Synchronization steps
Full and incremental control
Behavior
Use case
Full synchronization
One-time
After the task starts, it synchronizes all data from the source table once to the destination table or a specified partition.
Data initialization, system migration
Recurring
Based on the configured scheduling cycle, it periodically synchronizes all data from the source table to the destination table or a specified partition.
Data reconciliation, T+1 full snapshots
Incremental synchronization
One-time
After the task starts, it synchronizes incremental data once to a specified partition based on the incremental condition you define.
Manual repair of a specific data batch
Recurring
After the task starts, it periodically synchronizes incremental data to a specified partition based on the configured scheduling cycle and incremental condition.
Daily ETL, building history tables
Full synchronization & Incremental synchronization
(Built-in mode, not selectable)
First run: Automatically performs a one-time schema migration and full synchronization of historical data.
Subsequent runs: Periodically synchronizes incremental data to a specified partition based on the configured scheduling cycle and incremental condition.
One-click data ingestion into a data warehouse or data lake
NoteFor batch database synchronization, the system generates instances for recurring tasks in the same way as for tasks set to Start immediately after deployment. For more information, see Instance generation method: Start immediately after deployment.
You can define the partition generation method in the subsequent Value assignment step. You can use constants or dynamically generate partitions using system-predefined variables and scheduling parameters.
The configurations for the scheduling cycle, incremental condition, and partition generation method are interdependent. For more information, see 6. Incremental condition.
Configure scheduling parameters.
If your task involves recurring synchronization, click Scheduling Parameters for Periodical Scheduling to configure them. These parameters can be used later when configuring the incremental condition and field value assignment in the destination table mapping.
4. Destination table mapping
Define the mapping rules between source and destination tables, and specify the data writing method through the recurring configuration and incremental condition.

The top of the page contains the Search database name and Search source table search boxes. The page also provides the Show all, Show only unrefreshed tables, and Show only tables that failed to refresh filter options. The Actions column of each row contains a Remove link. The Batch remove and Batch modify buttons appear below the table.
Actions | Description | ||||||||||||
Refresh mapping | The system automatically lists the source tables you selected, but you must refresh the mapping to apply the destination table properties.
| ||||||||||||
Edit field type mapping (optional) | The system has a default mapping between source and destination field types. You can click Edit Mapping of Field Data Types in the upper-right corner to customize the mapping. After configuration, click Apply and Refresh Mapping. When editing field type mappings, ensure that the conversion rules are correct. Otherwise, type conversion may fail, resulting in dirty data and affecting task execution. | ||||||||||||
Customize destination table name mapping (optional) | The system has a default table name generation rule:
This feature supports the following scenarios:
| ||||||||||||
Customize destination database name mapping (optional) | Some destination data sources, such as Hologres, support defining mapping rules for destination databases. The configuration method is the same as for Customize destination table name mapping. | ||||||||||||
Customize destination schema name mapping (optional) | Some destination data sources, such as Hologres, support defining mapping rules for destination schemas. The configuration method is the same as for Customize destination table name mapping. | ||||||||||||
Edit destination table schema (optional) | The system automatically generates the destination table schema based on the source table schema. You do not usually need to modify it. For special requirements, you can customize it as follows:
| ||||||||||||
Value assignment for destination table fields | You must manually assign values to partition fields and any newly added fields. Standard fields are automatically mapped based on matching names in the source and destination tables. Follow these steps:
You can assign constants or variables. In the Value Type for Table fields and Partition fields, you can switch between the following types:
Both variables and scheduling parameters are automatically replaced with date-specific values when the task is scheduled to run. | ||||||||||||
Set source sharding column | In the source sharding column, you can select a field from the source table or choose Disable. When the synchronization task runs, DataWorks splits the task into multiple subtasks based on this field to enable concurrent, batched data reading. It is recommended to use the table's primary key as the source sharding column. String, floating-point, and date types are not supported. Currently, the source sharding column is supported only for MySQL sources. | ||||||||||||
Customize advanced parameters | Modify these parameters only if you fully understand them. Incorrect settings can cause task delays, resource contention, or data loss. You can set individual writer-side configurations and runtime configurations for subtasks. | ||||||||||||
Table type | Table Type: MaxCompute supports standard tables, PK Delta Tables, and Append Delta Tables. If the destination table status is "To be created", you can select the table type when editing the destination table schema. The type of an existing table cannot be changed. For more information about Delta Tables, see Delta Table. |
 button and combining Manually enter and Built-in Variable. Supported variables include the source data source name, source database name, and source table name.

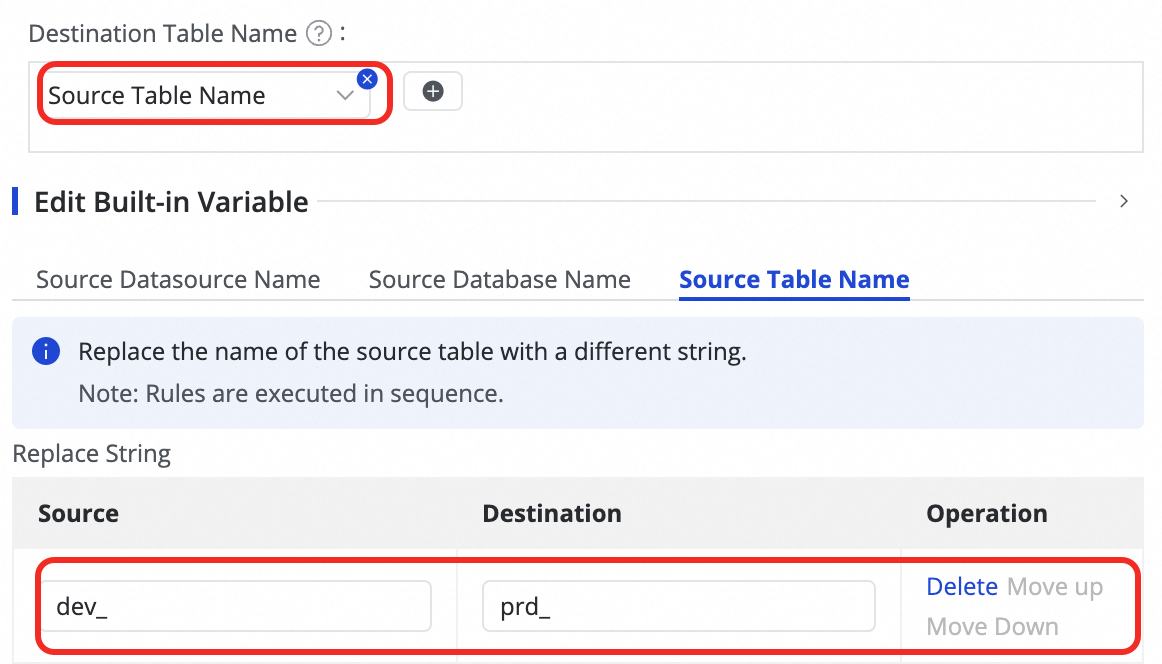

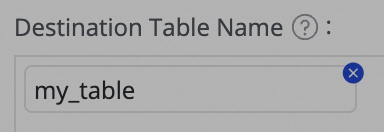

 button in the Target Table column to add a field.
 tooltip on the interface.
5. Recurring configuration
If incremental synchronization is configured as Recurring, you need to complete the recurring configuration for the destination table. This includes settings like Scheduling Frequency, Data Timestamp, and Resource Group for Scheduling. The scheduling configuration for this synchronization task is consistent with the node scheduling configuration in DataStudio. For parameter details, see Configure node scheduling.
If a one-time synchronization involves a large number of tables, we recommend staggering their execution times in the schedule to prevent task buildup and resource contention.
6. Incremental condition
If the task needs to synchronize incremental data, you must configure an incremental condition. This condition determines which data each scheduled instance synchronizes.
Function and syntax
Function: The incremental condition is essentially a
WHEREclause that filters the source data.Syntax: When configuring, you only need to enter the conditional expression that follows the
WHEREkeyword. Do not include theWHEREkeyword itself.
Use scheduling parameters for incremental synchronization
To achieve periodic incremental synchronization, you can use scheduling parameters in the incremental condition. For example, configuring the condition as
STR_TO_DATE('${bizdate}', '%Y%m%d') <= columnName AND columnName < DATE_ADD(STR_TO_DATE('${bizdate}', '%Y%m%d'), INTERVAL 1 DAY)Write to a specific partition
By combining the incremental condition with the destination table's partition field, you can ensure that each batch of incremental data is written to the correct partition.
For example, using the incremental condition from the previous step, you can set the partition field to
ds=${bizdate}and configure the destination table to be partitioned by day. This way, each daily instance synchronizes only the data from the corresponding date in the source and writes it to the matching partition in the destination table.
By properly combining the time range specified by the incremental condition, the time interval for partition generation, and the scheduling cycle from the recurring configuration, you can create an automated T+n incremental ETL pipeline where business rules and physical partitions are strictly aligned.
If a batch database synchronization task runs into an exception or error (for example, if incorrect partition parameter configuration causes data not to be synchronized), first click Stop outside the task to fully stop it. Then correct the partition parameter or value assignment configuration—including any settings related to the source table sharding column—before you republish and start the task again. Avoid rerunning the task directly, as this can leave the task in an inconsistent state.
Step 4: Configure advanced settings
Advanced parameters
To fine-tune the task for custom synchronization requirements, modify the advanced parameters.
Click Advanced configuration in the upper-right corner to go to the advanced parameter configuration page.
Modify the parameter values based on the tooltips. The meaning of each parameter is explained next to its name.
You can also use AI-assisted configuration by entering natural language instructions, such as adjusting task concurrency. The AI model generates recommended parameter values, which you can then review and accept.
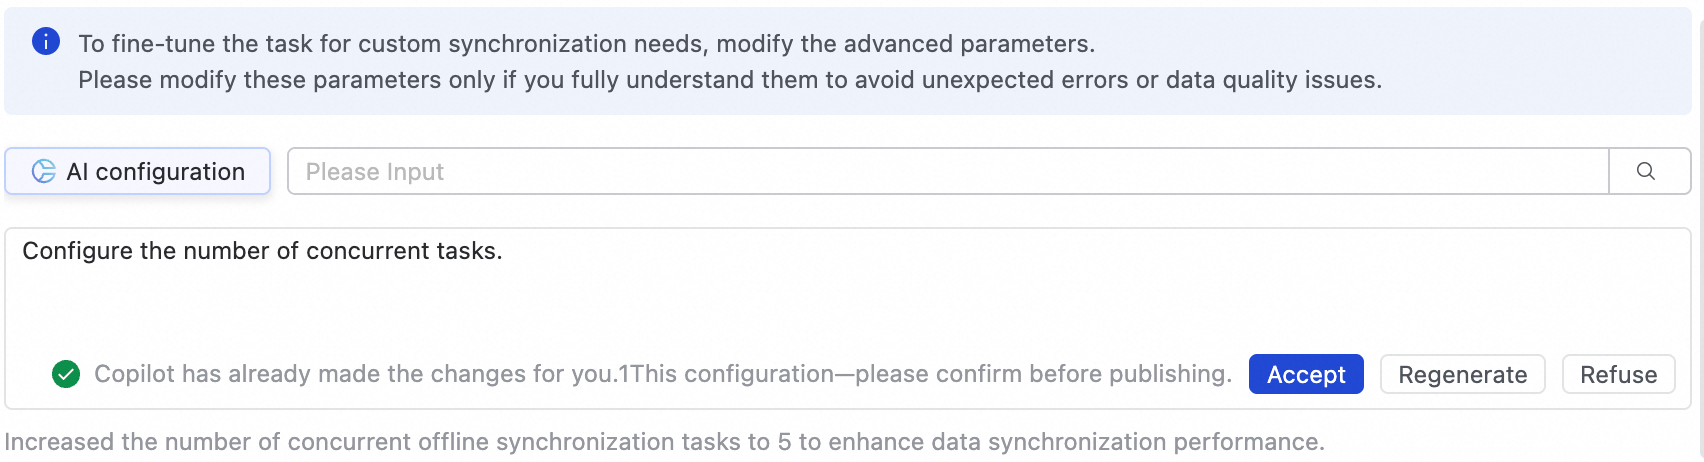
Modify these parameters only if you fully understand them. Incorrect settings can cause task delays, resource contention, or data loss.
Engine parameters
You do not normally need to configure engine parameters. If changes are required, use them only with guidance from technical support.
Step 5: Deploy and run the task
After completing all configurations, click Save at the bottom of the page to finish configuring the task.
You cannot debug batch synchronization tasks directly. You must Deploy them to Operation Center to run them. Therefore, any new or edited tasks must be deployed for the changes to take effect.
During deployment, if you select Start immediately after deployment, the task starts automatically. Otherwise, after deployment is complete, go to the page and manually start the task from the Actions column.
Click the Name/ID of the task in the Tasks to view the detailed execution process.
If clicking Start produces no response after deployment, or the progress bar does not update, first check the run log of the corresponding subtask in Operation Center to get specific error details. Also confirm whether you selected Start immediately after deployment during deployment, or manually clicked Start after deployment from the Actions column.
Step 6: Configure alert rules
You must configure alert rules for batch database synchronization tasks on their corresponding subtasks in Operation Center.
On the page, get the Task ID of the target task.
In the column, find the corresponding full-database offline subtask based on the ID of the integration task (for example, if the integration task ID is
34862, the incremental synchronization auto triggered subtask is namedoffline_odps_cyc_sync_mysql_test_timetest_to_mysql_test_timetest_34862), and click to go to the Rule Management page.Click Create Custom Rule and set the Rule Object, Trigger Method, and Alert Details. For more information, see Rule Management.
You can search for the subtask ID you obtained in the Rule Object to find the target task and set an alert for it.
Manage synchronization tasks
Edit a task
On the page, find the created synchronization task. In the Operation column, click More, then click Edit to modify the task information. The steps are the same as for task configuration.
For a task that is not running, you can directly modify the configuration, save it, and deploy it for the changes to take effect.
For a task that is running, if you edit and deploy it without selecting Start immediately after deployment, the original action button changes to Apply Updates. You must click this button for the changes to take effect in the production environment.
After you click Apply Updates, the system performs three steps on the changes: Stop, Deploy, and Restart.
If you add a table:
After you click Apply Updates, a synchronization subtask for the new table is added. The task's schema migration and one-time full synchronization start immediately, followed by incremental synchronization according to the schedule.
If you switch the destination table (which is equivalent to deleting the old table and adding a new one):
After you click Apply Updates, the old table's subtask is deleted, a new subtask is created, and the new task's schema migration and one-time full synchronization start immediately. The new task then performs incremental synchronization according to the schedule.
If other information is modified:
The table's schema migration and one-time full synchronization remain unchanged. Newly generated instances for incremental synchronization will use the updated configuration, while already generated instances are not affected.
Unmodified tables are not affected and will not be re-run.
View tasks
After creating a synchronization task, view the task list and basic information on the synchronization task page.

For each task, the synchronization task list displays the Task name, Task ID, Data source and Destination, Task type, and Status. The following columns show the status of the Schema migration, Full synchronization, and Incremental synchronization subtask stages, followed by the Group.
In the Actions column, you can Start or Stop the synchronization task. In the More menu, you can perform operations such as Edit and View.
For a running task, you can see the basic status in the Execution Overview. You can also click the corresponding overview area to view execution details.
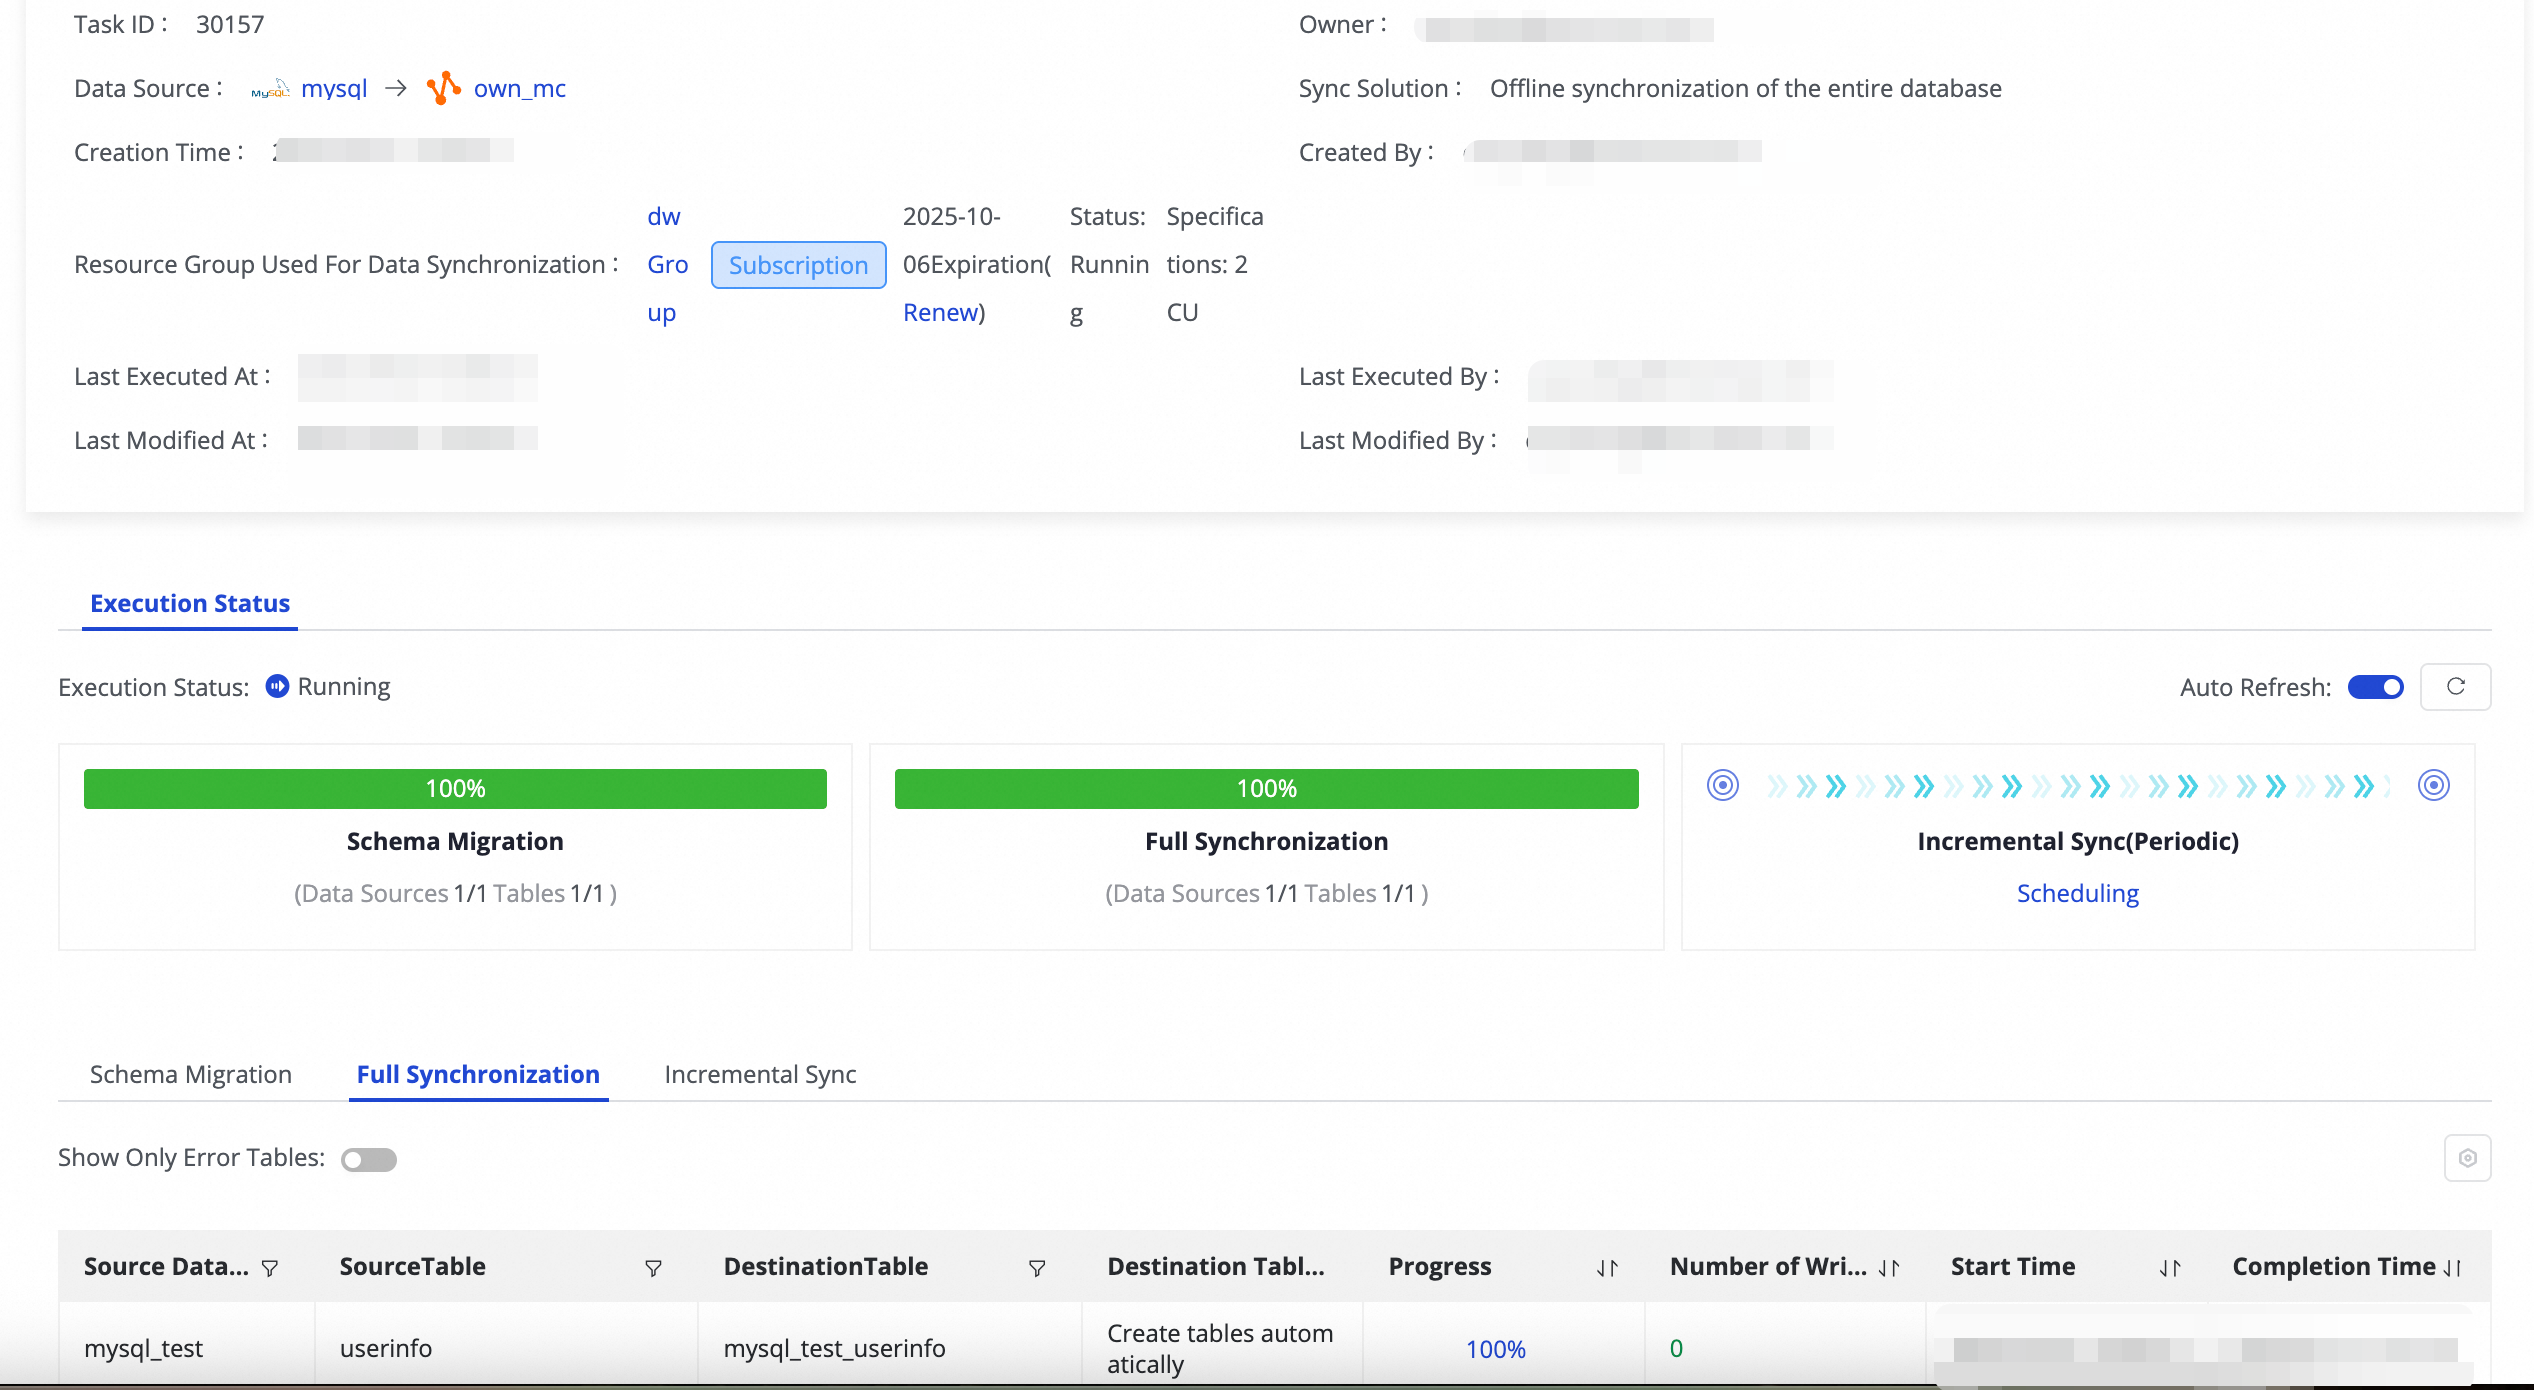
The Basic information section of the task details page shows the task ID, data source, synchronization solution, synchronization resource group, status, and specifications. The Execution status section uses progress bars to show the progress and completion percentage of the Schema migration, Full synchronization, and Incremental synchronization stages. Click a stage tab to view the synchronization details of each table. The details include the source database, source table, destination table, connection method, progress, and number of records written.
Quotas and limitations
Debugging limitation: You cannot debug batch synchronization tasks directly in Data Integration or DataStudio. You must deploy them to Operation Center to run them.
Sharding column limitation: The Set source sharding column feature currently supports only MySQL sources. The sharding column field must be of a numeric type; string, floating-point, or date types are not supported.
Schema change limitation: When you edit the destination table schema, renaming columns is not supported. For an existing destination table, you cannot change its Table type.
Field-level operation limitation: Deleting, filtering, or skipping specific fields (such as XML-format fields) is not supported, and custom field mapping is not supported either. If you need to remove fields or apply complex transformations, use a single-table offline synchronization task instead, or process the data with a code node (Spark or Python).
Case sensitivity limitation: By default, table and field names are converted to lowercase before being written to the destination, so case-sensitive transfer (for example, for PostgreSQL) is not supported. If synchronization fails because the source contains case-sensitive tables, we recommend renaming the source tables to lowercase, or using single-table offline synchronization instead.
Metadata description limitation: The description of a source table cannot be directly displayed or mapped to the destination. You can only manually configure field descriptions when creating a new destination table.
Next steps
After the task starts, click the task name to view run details and perform operations, maintenance (O&M), and tuning.
FAQ
For frequently asked questions about batch database synchronization tasks, see FAQ about full and incremental synchronization tasks.
Q: If a single table fails to synchronize in a batch database synchronization task, does it affect the other tables?
A: If there is no upstream or downstream dependency between the tables in a Data Integration task, the failure of one table's synchronization does not affect the synchronization of the other tables. Only the subtask for that specific table fails, while the other tables continue to run normally.
Q: What do I do if added fields in the source table are not synchronized to the destination table in a batch database synchronization (offline) task?
A: Batch database synchronization (offline) does not automatically detect DDL changes on the source. Therefore, added source fields are not automatically reflected in the destination. To synchronize the added fields, delete the destination table first. Then, on the task editing page, go to Destination table mapping, click Batch refresh mappings to reload the source table schema, and rerun full synchronization. If your business requires automatic synchronization of added source fields, use real-time batch database synchronization instead. Its advanced settings provide DDL support settings, where you can configure processing policies for the following DDL events: create table, drop table, add column, drop column, rename table, rename column, modify column type, and truncate table. The add column event is processed normally by default.