The Data Push feature in DataWorks allows you to query and push database data to various channels. In addition to business data, you can also push database monitoring metrics. In this example, you will schedule a daily push of Hologres monitoring data at 09:00 to help you track the instance status.
Prerequisites
Create a DataWorks Workspace (standard mode is used in this example). For details, see Create a workspace.
Create a Hologres Data Source. For details, see Associate a Hologres computing resource.
Prepare a DataWorks Resource Group and bind it to the Workspace. For details, see Use serverless resource groups.
Limitations
Data size limits vary based on the destination:
DingTalk: The maximum payload size is 20 KB.
Lark: The maximum payload size is 20 KB, and images must be smaller than 10 MB.
WeCom: Each bot is limited to sending 20 messages/minute.
Teams: The maximum payload size is 28 KB.
Email: Each Data Push task supports only one email body. If an email body has already been added, you cannot add another one. For other limits, see the SMTP restrictions of your email service provider.
Region limits: China (Hangzhou), China (Shanghai), China (Beijing), China (Shenzhen), China (Chengdu), China (Hong Kong), Singapore, Japan (Tokyo), US (Silicon Valley), US (Virginia), and Germany (Frankfurt).
Step 1: Create a data push target
Push tasks send query results to specific channels. You must create a push target before you can create a push task.
Go to the DataService Studio page.
Log on to the DataWorks console. In the top navigation bar, select the desired region. In the left-side navigation pane, choose . On the page that appears, select the desired workspace from the drop-down list and click Go to DataService Studio.
In the lower-left corner of the Service Development page, click
 (Settings). On the Push Target Management tab, click Create Data Push Target.
Configure the parameters:
Type: Select the channel type, such as DingTalk, Lark, WeCom, or Teams.
Destination Name: Enter a custom name for the new destination.
Webhook: Enter the webhook URL for the selected destination.
NoteFor information about how to obtain a Lark bot webhook, see Configure a Lark Webhook trigger.
For information about how to obtain a Teams webhook, see Create Incoming Webhooks using Microsoft Teams workflow.
Step 2: Create a data push task
Navigate to DataService Studio.
Log on to the DataWorks console. Switch to the region where your data source is located. In the left-side navigation pane, choose . Select your Workspace from the drop-down list and click Go to DataService Studio.
Create a data push task.
In the left-side navigation pane of DataService Studio, choose . On the Data Push page, click the
 icon and select Create Data Push Task. Enter a name for the task and click OK.
Step 3: Configure the practice
This topic describes seven scenarios. Select the one that best suits your requirements.
Practice content | Description |
Practice 1: Identify users with the most and slowest queries | The SQL queries the following:
|
Practice 2: Query high-resource consumption queries in the last 12 hours | Identifies queries with high resource consumption from the last 12 hours. Adjust the time range as needed. |
Practice 3: Query hourly query volume and total data reads in the last 3 hours | Queries the hourly query volume for the last 3 hours to identify data volume changes. |
Queries the number of new queries from yesterday. Adjust the time partition to query last week or month. | |
Practice 5: Compare data access volume in the last 3 hours with the same period yesterday | Compares the data access volume in the last 3 hours with the same period yesterday. Adjust the time range for longer comparisons. |
Practice 6: Identify queries with high duration in each stage (last 30 minutes) | Identifies queries with long durations by stage. Adjust the time range as needed. |
Queries the earliest failed queries within a period for troubleshooting. |
Practice 1: Identify users with the most and slowest queries
Double-click the push task created earlier to open the configuration page.
Configure the Select Table section.
Data Source Type: Select Hologres.
Data Source Name: Select the Hologres Data Source created in Prerequisites.
Data Source Environment: Select Development Environment.
Write Query SQL.
Write the SQL to identify the user with the most slow queries and the top 50 slow queries.
-- Identify the user with the highest number of slow queries
SELECT usename AS topuser, count(1) AS topuser_counts
FROM hologres.hg_query_log
WHERE query_start >= '${date_start}'
	AND query_start < '${date_end}'
GROUP BY usename
ORDER BY topuser_counts DESC
LIMIT 1;


-- Identify the top 50 slow queries
SELECT usename, datname, duration, application_name
FROM hologres.hg_query_log
WHERE query_start >= '${date_start}'
	AND query_start < '${date_end}'
ORDER BY duration DESC
LIMIT 50;
Configure assignment parameters.
After you finish writing the SQL statements, the fields from the query result are automatically added to the section. If the output parameters fail to parse or are incorrect, you can turn off Automatically Parse Parameters and manually Add Parameter.
You can use
${Variable name}to define custom variables (dynamic parameters) in your SQL. You can assign time expressions or constants to these Assignment Parameters. For details, see Configure the push content.Configure these two assignment parameters:
${date_start}and${date_end}.
Configure push content.
Configure the push content in Table or Markdown format. For Markdown, you can include output or assignment parameters using the
${Parameter name}placeholder. For Table format, you can directly select the output parameters to display. For details, see Configure the push content.
Data push settings.
Scheduling Cycle: Select
Dayfrom the drop-down list.Scheduling Time: Select
09:00.Timeout Definition: Select System Default.
Effective Date: Select Permanent.
Scheduling Resource Group: Select the generic Resource Group prepared earlier in Prerequisites.
Data Push Target: Select the push target created in Step 1: Create a data push target.
NoteConfigure other settings as needed. For details, see Push settings.
Test the data push task.
Click Save to save the configuration, then click Test to verify the task in the development environment.
Once tested, publish the task.
Practice 2: Query high-resource consumption queries in the last 12 hours
Double-click the push task created earlier to open the configuration page.
Configure the Select Table section.
Data Source Type: Select Hologres.
Data Source Name: Select the Hologres Data Source created in Prerequisites.
Data Source Environment: Select Development Environment.
Write Query SQL.
Use the following SQL statement to identify queries with high resource consumption from the last 12 hours:
SELECT status AS "Status",
       duration AS "Duration(ms)",
       query_start AS "Start Time",
       (read_bytes/1048576)::text || ' MB' AS "Read Volume",
       (memory_bytes/1048576)::text || ' MB' AS "Memory",
       (shuffle_bytes/1048576)::text || ' MB' AS "Shuffle",
       (cpu_time_ms/1000)::text || ' s' AS "CPU Time",
       physical_reads AS "Physical Reads",
       query_id AS "QueryID",
       query::char(30)
 FROM hologres.hg_query_log
 WHERE query_start >= now() - interval '12 hour'
 AND duration > 1000
 ORDER BY duration DESC,
          read_bytes DESC,
          shuffle_bytes DESC,
          memory_bytes DESC,
          cpu_time_ms DESC,
          physical_reads DESC
LIMIT 100;
Configure parameters.
Configure push content.
Configure the push content in Table or Markdown format. For Markdown, you can include output or assignment parameters using the
${Parameter name}placeholder. For Table format, you can directly select the output parameters to display. For details, see Configure the push content.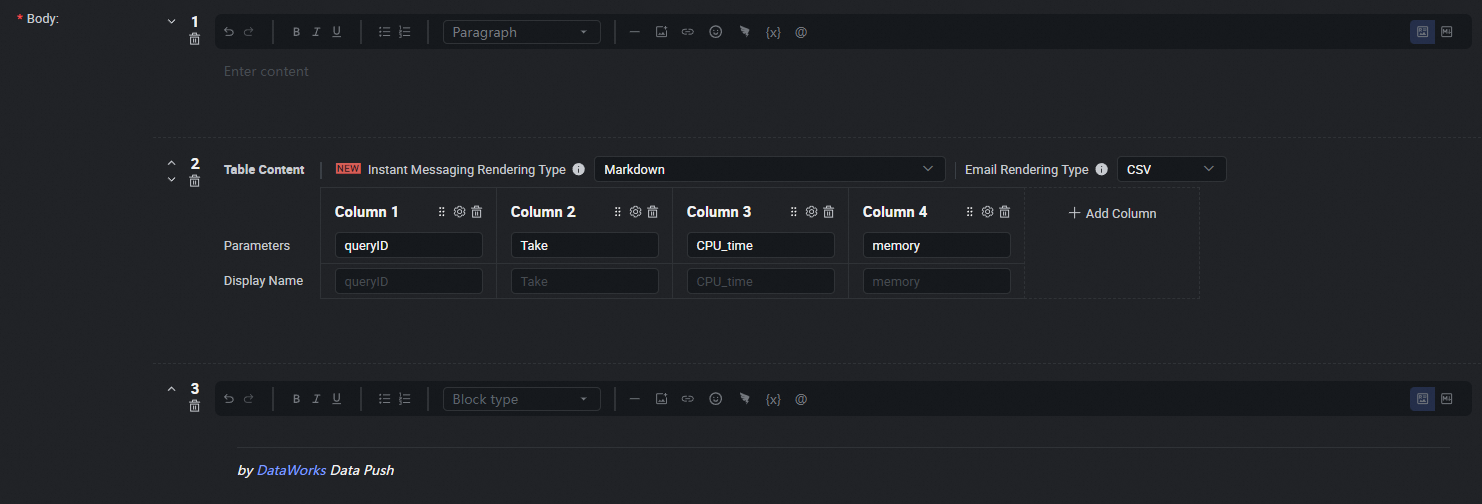
Data push settings.
Scheduling Cycle: Select
Dayfrom the drop-down list.Scheduling Time: Select
09:00.Timeout Definition: Select System Default.
Effective Date: Select Permanent.
Scheduling Resource Group: Select the generic Resource Group prepared earlier in Prerequisites.
Data Push Target: Select the push target created in Step 1: Create a data push target.
NoteConfigure other settings as needed. For details, see Push settings.
Test the data push task.
Click Save to save the configuration, then click Test to verify the task in the development environment.
Once tested, publish the task.
After you finish writing the SQL statements, the fields from the query result are automatically added to the section. If the output parameters fail to parse or are incorrect, you can turn off Automatically Parse Parameters and manually Add Parameter.
Practice 3: Query hourly query volume and total data reads in the last 3 hours
Double-click the push task created earlier to open the configuration page.
Configure the Select Table section.
Data Source Type: Select Hologres.
Data Source Name: Select the Hologres Data Source created in Prerequisites.
Data Source Environment: Select Development Environment.
Write Query SQL.
Use the following SQL statement to query the hourly query volume and total read volume for the last 3 hours:
SELECT
    date_trunc('hour', query_start) AS query_start,
    count(1) AS query_count,
    sum(read_bytes/1048576)::text || ' MB' AS read_MB,
    sum(cpu_time_ms/1000)::text || ' s' AS cpu_time_s
FROM
    hologres.hg_query_log
WHERE
    query_start >= now() - interval '3 h'
GROUP BY 1;
Configure parameters.
After you finish writing the SQL statements, the fields from the query result are automatically added to the section. If the output parameters fail to parse or are incorrect, you can turn off Automatically Parse Parameters and manually Add Parameter.
Configure push content.
Configure the push content in Table or Markdown format. For Markdown, you can include output or assignment parameters using the
${Parameter name}placeholder. For Table format, you can directly select the output parameters to display. For details, see Configure the push content.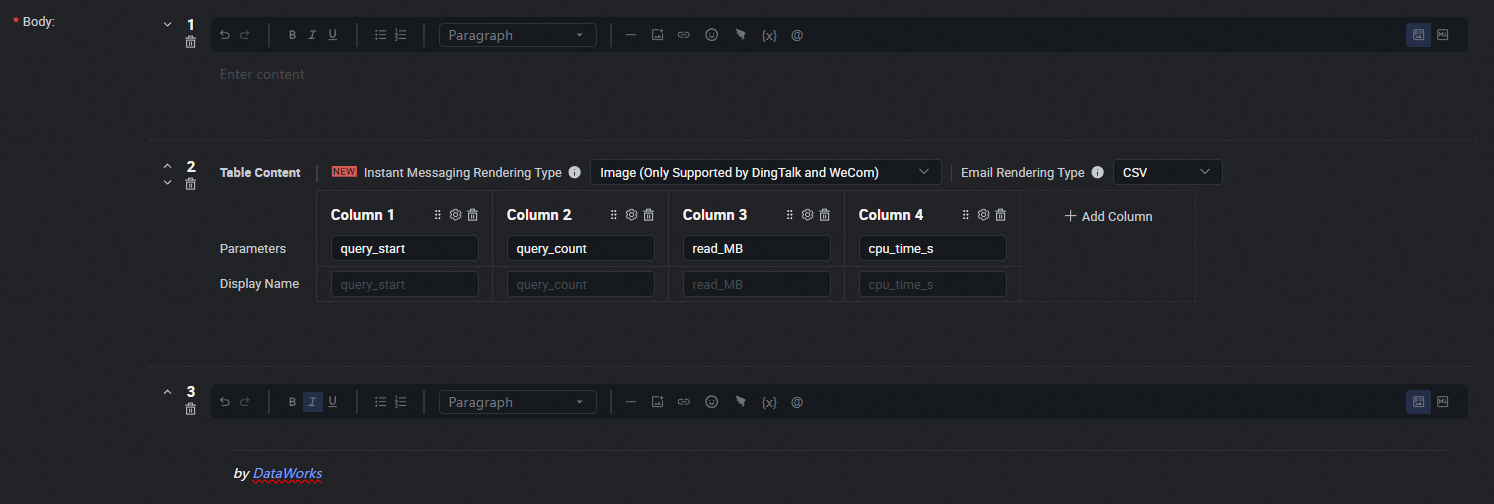
Data push settings.
Scheduling Cycle: Select
Dayfrom the drop-down list.Scheduling Time: Select
09:00.Timeout Definition: Select System Default.
Effective Date: Select Permanent.
Scheduling Resource Group: Select the generic Resource Group prepared earlier in Prerequisites.
Data Push Target: Select the push target created in Step 1: Create a data push target.
NoteConfigure other settings as needed. For details, see Push settings.
Test the data push task.
Click Save to save the configuration, then click Test to verify the task in the development environment.
Once tested, publish the task.
Practice 4: Query the number of new queries from yesterday
Double-click the push task created earlier to open the configuration page.
Configure the Select Table section.
Data Source Type: Select Hologres.
Data Source Name: Select the Hologres Data Source created in Prerequisites.
Data Source Environment: Select Development Environment.
Write Query SQL.
Use the following SQL statement to query the number of new queries from yesterday:
SELECT
    COUNT(1) AS "new_queries"
FROM ( SELECT DISTINCT
        t1.digest
    FROM
        hologres.hg_query_log t1
    WHERE
        t1.query_start >= CURRENT_DATE - INTERVAL '1 day'
        AND t1.query_start < CURRENT_DATE
        AND NOT EXISTS (
            SELECT
                1
            FROM
                hologres.hg_query_log t2
            WHERE
                t2.digest = t1.digest
                AND t2.query_start < CURRENT_DATE - INTERVAL '1 day')
        AND digest IS NOT NULL
 ) AS a;
Configure parameters.
Configure push content.
Configure the push content in Table or Markdown format. For Markdown, you can include output or assignment parameters using the
${Parameter name}placeholder. For Table format, you can directly select the output parameters to display. For details, see Configure the push content.
Data push settings.
Scheduling Cycle: Select
Dayfrom the drop-down list.Scheduling Time: Select
09:00.Timeout Definition: Select System Default.
Effective Date: Select Permanent.
Scheduling Resource Group: Select the generic Resource Group prepared earlier in Prerequisites.
Data Push Target: Select the push target created in Step 1: Create a data push target.
NoteConfigure other settings as needed. For details, see Push settings.
Test the data push task.
Click Save to save the configuration, then click Test to verify the task in the development environment.
Once tested, publish the task.
After you finish writing the SQL statements, the fields from the query result are automatically added to the section. If the output parameters fail to parse or are incorrect, you can turn off Automatically Parse Parameters and manually Add Parameter.
Practice 5: Compare data access volume in the last 3 hours with the same period yesterday
Double-click the push task created earlier to open the configuration page.
Configure the Select Table section.
Data Source Type: Select Hologres.
Data Source Name: Select the Hologres Data Source created in Prerequisites.
Data Source Environment: Select Development Environment.
Write Query SQL.
Use the following SQL statement to compare the data access volume in the last 3 hours with the same period yesterday:
SELECT
    query_date,
    count(1) AS query_count,
    sum(read_bytes) AS read_bytes,
    sum(cpu_time_ms) AS cpu_time_ms
FROM
    hologres.hg_query_log
WHERE
    query_start >= now() - interval '180min'
GROUP BY
    query_date
UNION ALL
SELECT
    query_date,
    count(1) AS query_count,
    sum(read_bytes) AS read_bytes,
    sum(cpu_time_ms) AS cpu_time_ms
FROM
    hologres.hg_query_log
WHERE
    query_start >= now() - interval '1d 180min'
    AND query_start <= now() - interval '1d'
GROUP BY
    query_date;
Configure parameters.
Configure push content.
Configure the push content in Table or Markdown format. For Markdown, you can include output or assignment parameters using the
${Parameter name}placeholder. For Table format, you can directly select the output parameters to display. For details, see Configure the push content.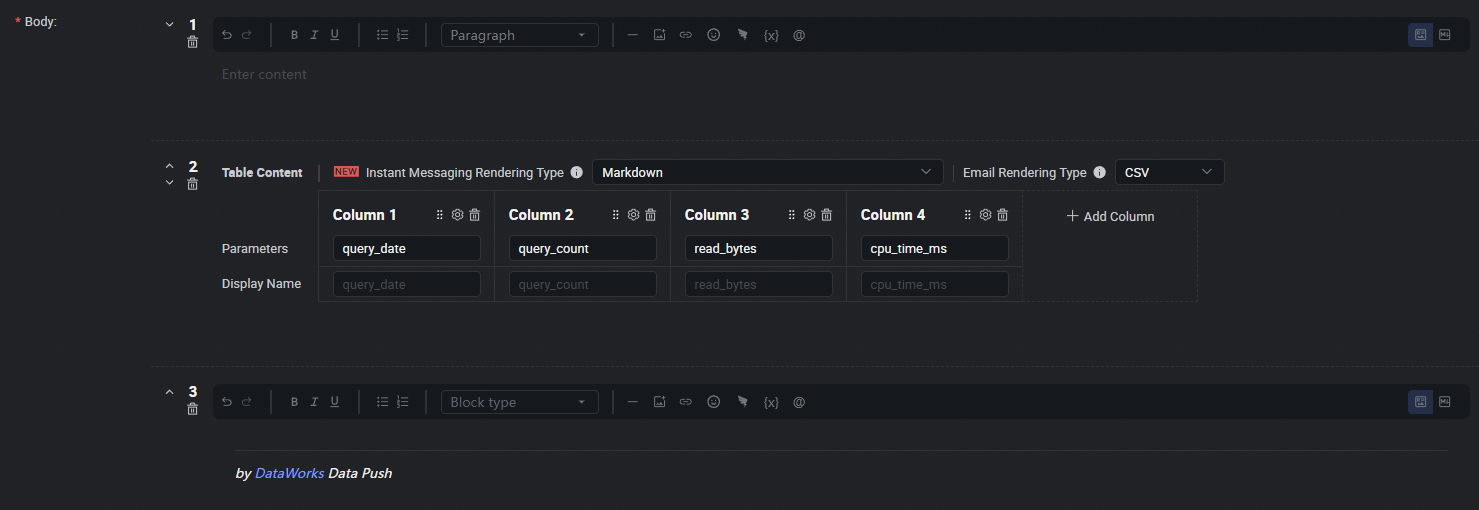
Data push settings.
Scheduling Cycle: Select
Dayfrom the drop-down list.Scheduling Time: Select
09:00.Timeout Definition: Select System Default.
Effective Date: Select Permanent.
Scheduling Resource Group: Select the generic Resource Group prepared earlier in Prerequisites.
Data Push Target: Select the push target created in Step 1: Create a data push target.
NoteConfigure other settings as needed. For details, see Push settings.
Test the data push task.
Click Save to save the configuration, then click Test to verify the task in the development environment.
Once tested, publish the task.
After you finish writing the SQL statements, the fields from the query result are automatically added to the section. If the output parameters fail to parse or are incorrect, you can turn off Automatically Parse Parameters and manually Add Parameter.
Practice 6: Identify queries with high duration in each stage (last 30 minutes)
Double-click the push task created earlier to open the configuration page.
Configure the Select Table section.
Data Source Type: Select Hologres.
Data Source Name: Select the Hologres Data Source created in Prerequisites.
Data Source Environment: Select Development Environment.
Write Query SQL.
Use the following SQL statement to identify queries with long durations in each stage over the last 30 minutes:
SELECT
    status AS "Status",
    duration AS "Duration (ms)",
    optimization_cost AS "Optimization Duration (ms)",
    start_query_cost AS "Start Query Duration (ms)",
    get_next_cost AS "Execution Duration (ms)",
    duration - optimization_cost - start_query_cost - get_next_cost AS "Other Duration (ms)",
    query_id AS "QueryID"
FROM
    hologres.hg_query_log
WHERE
    query_start >= now() - interval '30 min'
ORDER BY
    duration DESC,
    start_query_cost DESC,
    optimization_cost,
    get_next_cost DESC,
    duration - optimization_cost - start_query_cost - get_next_cost DESC
LIMIT 100;
Configure parameters.
Configure push content.
Configure the push content in Table or Markdown format. For Markdown, you can include output or assignment parameters using the
${Parameter name}placeholder. For Table format, you can directly select the output parameters to display. For details, see Configure the push content.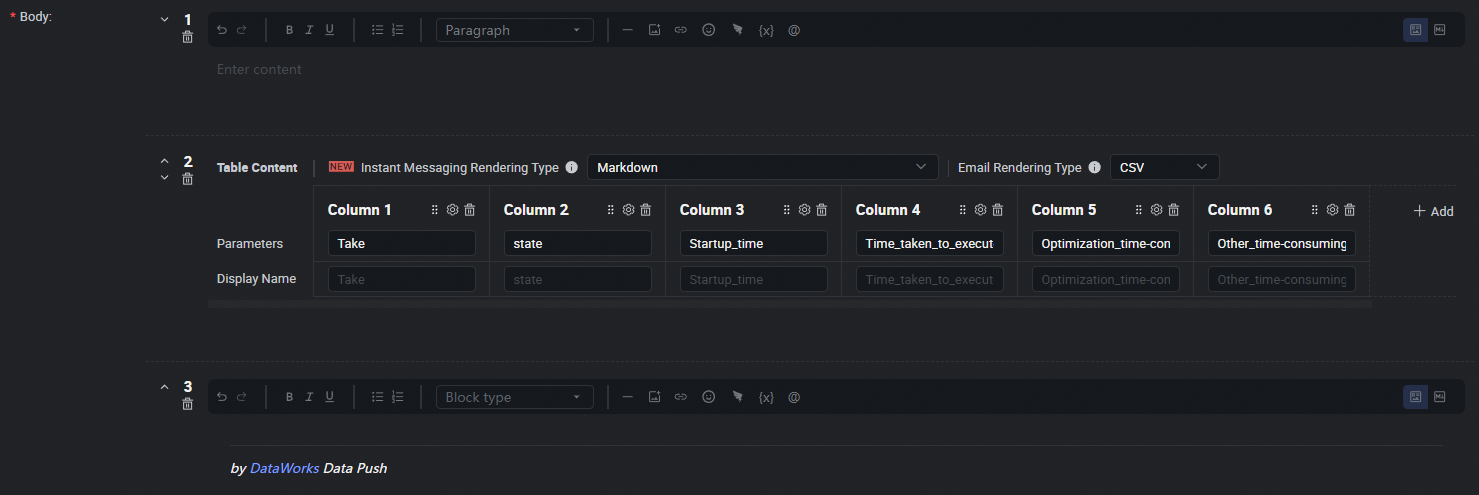
Data push settings.
Scheduling Cycle: Select
Dayfrom the drop-down list.Scheduling Time: Select
09:00.Timeout Definition: Select System Default.
Effective Date: Select Permanent.
Scheduling Resource Group: Select the generic Resource Group prepared earlier in Prerequisites.
Data Push Target: Select the push target created in Step 1: Create a data push target.
NoteConfigure other settings as needed. For details, see Push settings.
Test the data push task.
Click Save to save the configuration, then click Test to verify the task in the development environment.
Once tested, publish the task.
After you finish writing the SQL statements, the fields from the query result are automatically added to the section. If the output parameters fail to parse or are incorrect, you can turn off Automatically Parse Parameters and manually Add Parameter.
Practice 7: Query the first failed query
Double-click the push task created earlier to open the configuration page.
Configure the Select Table section.
Data Source Type: Select Hologres.
Data Source Name: Select the Hologres Data Source created in Prerequisites.
Data Source Environment: Select Development Environment.
Write Query SQL.
Use the following SQL statement to query the earliest failed queries:
SELECT
    status AS "Status",
    regexp_replace(message, '\n', ' ')::char(150) AS "Error Message",
    duration AS "Duration (ms)",
    query_start AS "Start Time",
    query_id AS "QueryID",
    query::char(100) AS "Query"
FROM
    hologres.hg_query_log
WHERE
    query_start BETWEEN '2024-07-10 17:00:00'::timestamptz AND '2024-07-10 17:42:00'::timestamptz + interval '2 min'
    AND status = 'FAILED'
ORDER BY
    query_start ASC
LIMIT 100;
Configure parameters.
Configure push content.
Configure the push content in Table or Markdown format. For Markdown, you can include output or assignment parameters using the
${Parameter name}placeholder. For Table format, you can directly select the output parameters to display. For details, see Configure the push content.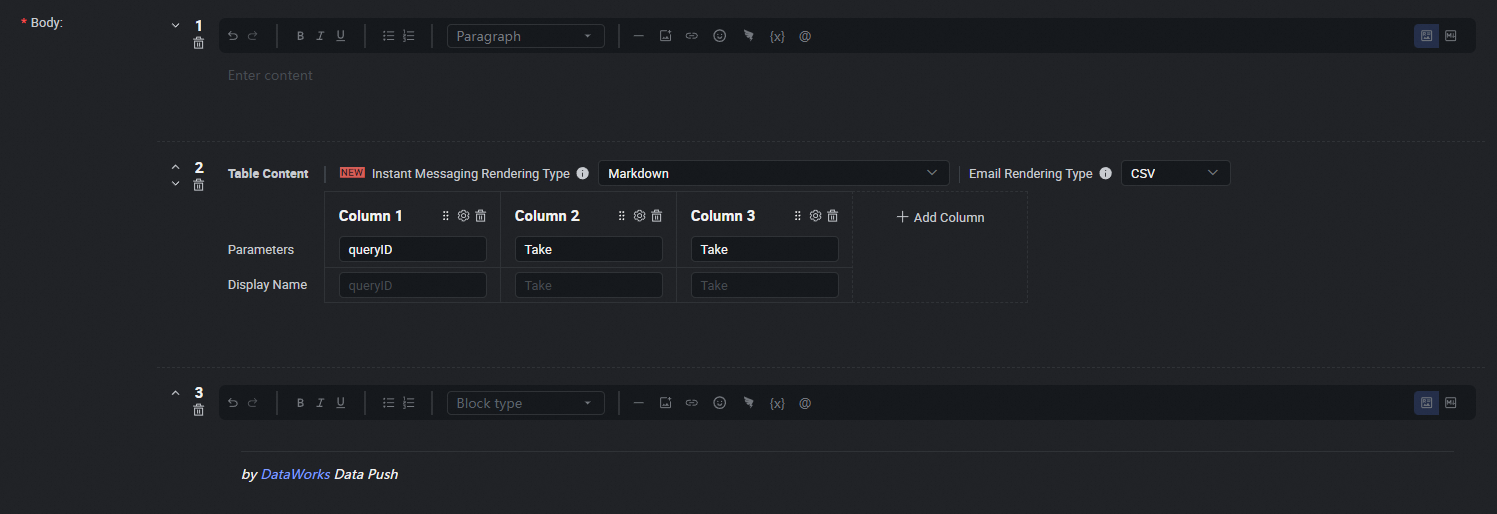
Data push settings.
Scheduling Cycle: Select
Dayfrom the drop-down list.Scheduling Time: Select
09:00.Timeout Definition: Select System Default.
Effective Date: Select Permanent.
Scheduling Resource Group: Select the generic Resource Group prepared earlier in Prerequisites.
Data Push Target: Select the push target created in Step 1: Create a data push target.
NoteConfigure other settings as needed. For details, see Push settings.
Test the data push task.
Click Save to save the configuration, then click Test to verify the task in the development environment.
Once tested, publish the task.
After you finish writing the SQL statements, the fields from the query result are automatically added to the section. If the output parameters fail to parse or are incorrect, you can turn off Automatically Parse Parameters and manually Add Parameter.
Next steps
You can now manage the created task. For details, see Publish Push Task.