Data Integration lets you synchronize an entire database from a MySQL Source to Elasticsearch in real time. This topic uses MySQL as the Source and Elasticsearch as the Destination to demonstrate how to configure a real-time synchronization task that combines Full Synchronization with Incremental Synchronization (change data capture or CDC).
Prerequisites
Data sources
You have created MySQL and Elasticsearch data sources. For more information, see Configure a data source.
You have enabled binary logging for the MySQL data source. For more information, see Prerequisites.
Resource group: You have purchased a Serverless resource group.
Network connectivity: You have established a network connection between the resource group and the data sources. For more information, see Overview of network connection solutions.
Configure the task
Step 1: Create a synchronization task
Go to the Data Integration page.
Log on to the DataWorks console. In the top navigation bar, select the desired region. In the left-side navigation pane, choose . On the page that appears, select the desired workspace from the drop-down list and click Go to Data Integration.
In the left-side navigation pane, click Synchronization Task. At the top of the page, click Create Synchronization Task and configure the task information:
Source Type: Select
MySQLas the source.Destination Type: Select
Elasticsearchas the destination.Specific Type: Select
Real-time synchronization for an entire database.Synchronization Mode:
Schema Migration: Automatically creates matching index structures (such as indices and field mappings) in the Destination, but does not include data.
Full Synchronization (Optional): Copies all historical data from the specified source tables to the Destination.
Incremental Sync (Optional): After the full synchronization is complete, continuously captures and synchronizes data changes (inserts, updates, and deletes) from the Source to the Destination.
Step 2: Configure data sources and compute resources
For Source, select your
MySQLdata source. For Destination, select yourElasticsearchdata source.In the Running Resources section, select the Resource Group for the synchronization task and assign Resource Group CUs to the task.
NoteIf the task log displays a message like
Please confirm whether there are enough resources..., it means the resource group has insufficient compute units (CUs) to start or run the task. To provide more compute resources, increase the CUs allocated to the task in the Resource group configuration panel.For recommended resource settings, see Recommended CUs for Data Integration. Adjust the settings based on your actual needs.
Ensure that both the Source and Destination data sources pass the Connectivity Check check.
Step 3: Configure the synchronization solution
1. Configure the data source
In the Source databases and tables section, select the source tables to synchronize and click the
 icon to move them to the Selected databases and tables list. If you have a large number of databases or tables, you can use the Database Filtering or Table filtering and enter a regular expression to select the required tables.
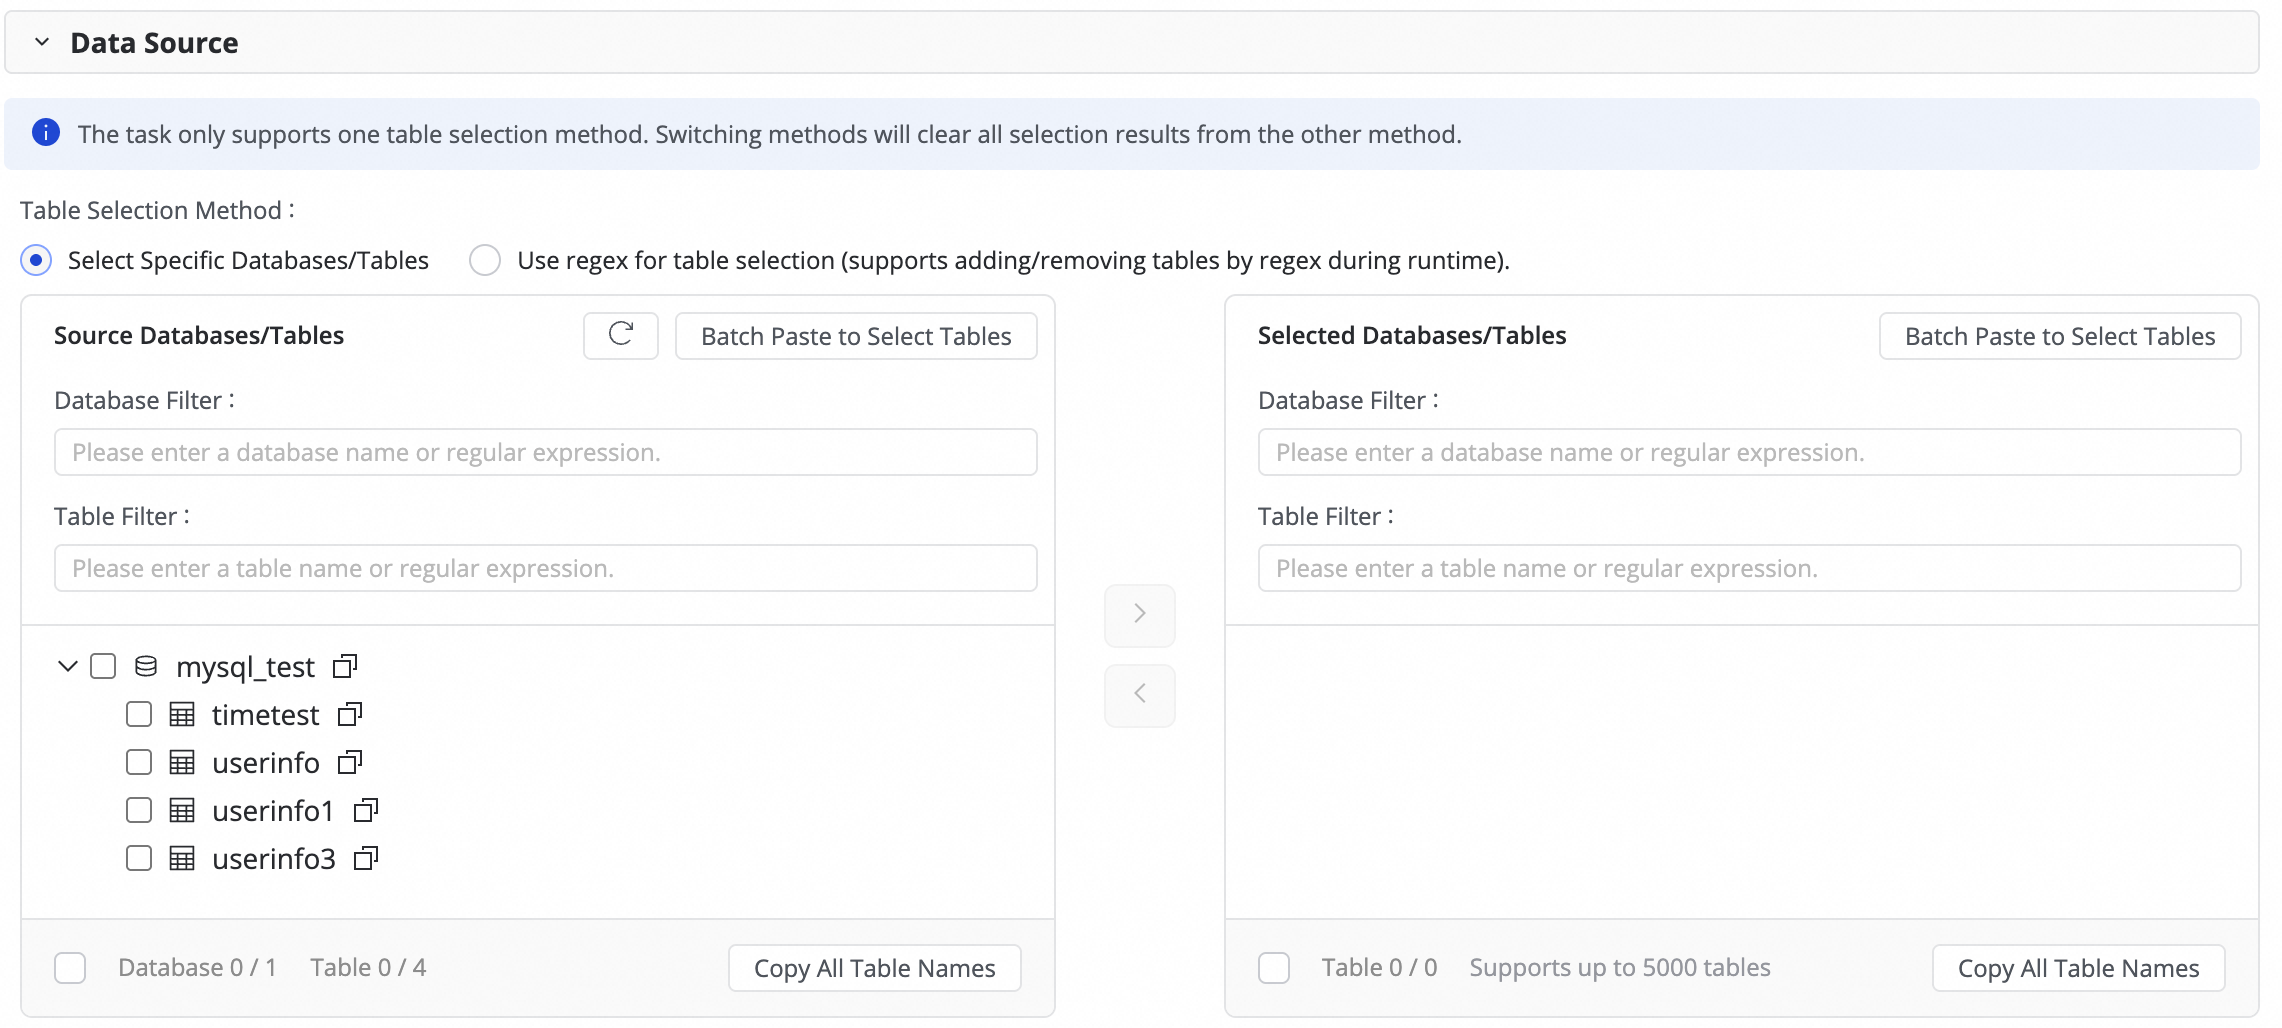
To write data from multiple sharded databases and tables with identical schemas to a single destination index, you can use a regular expression to select tables.
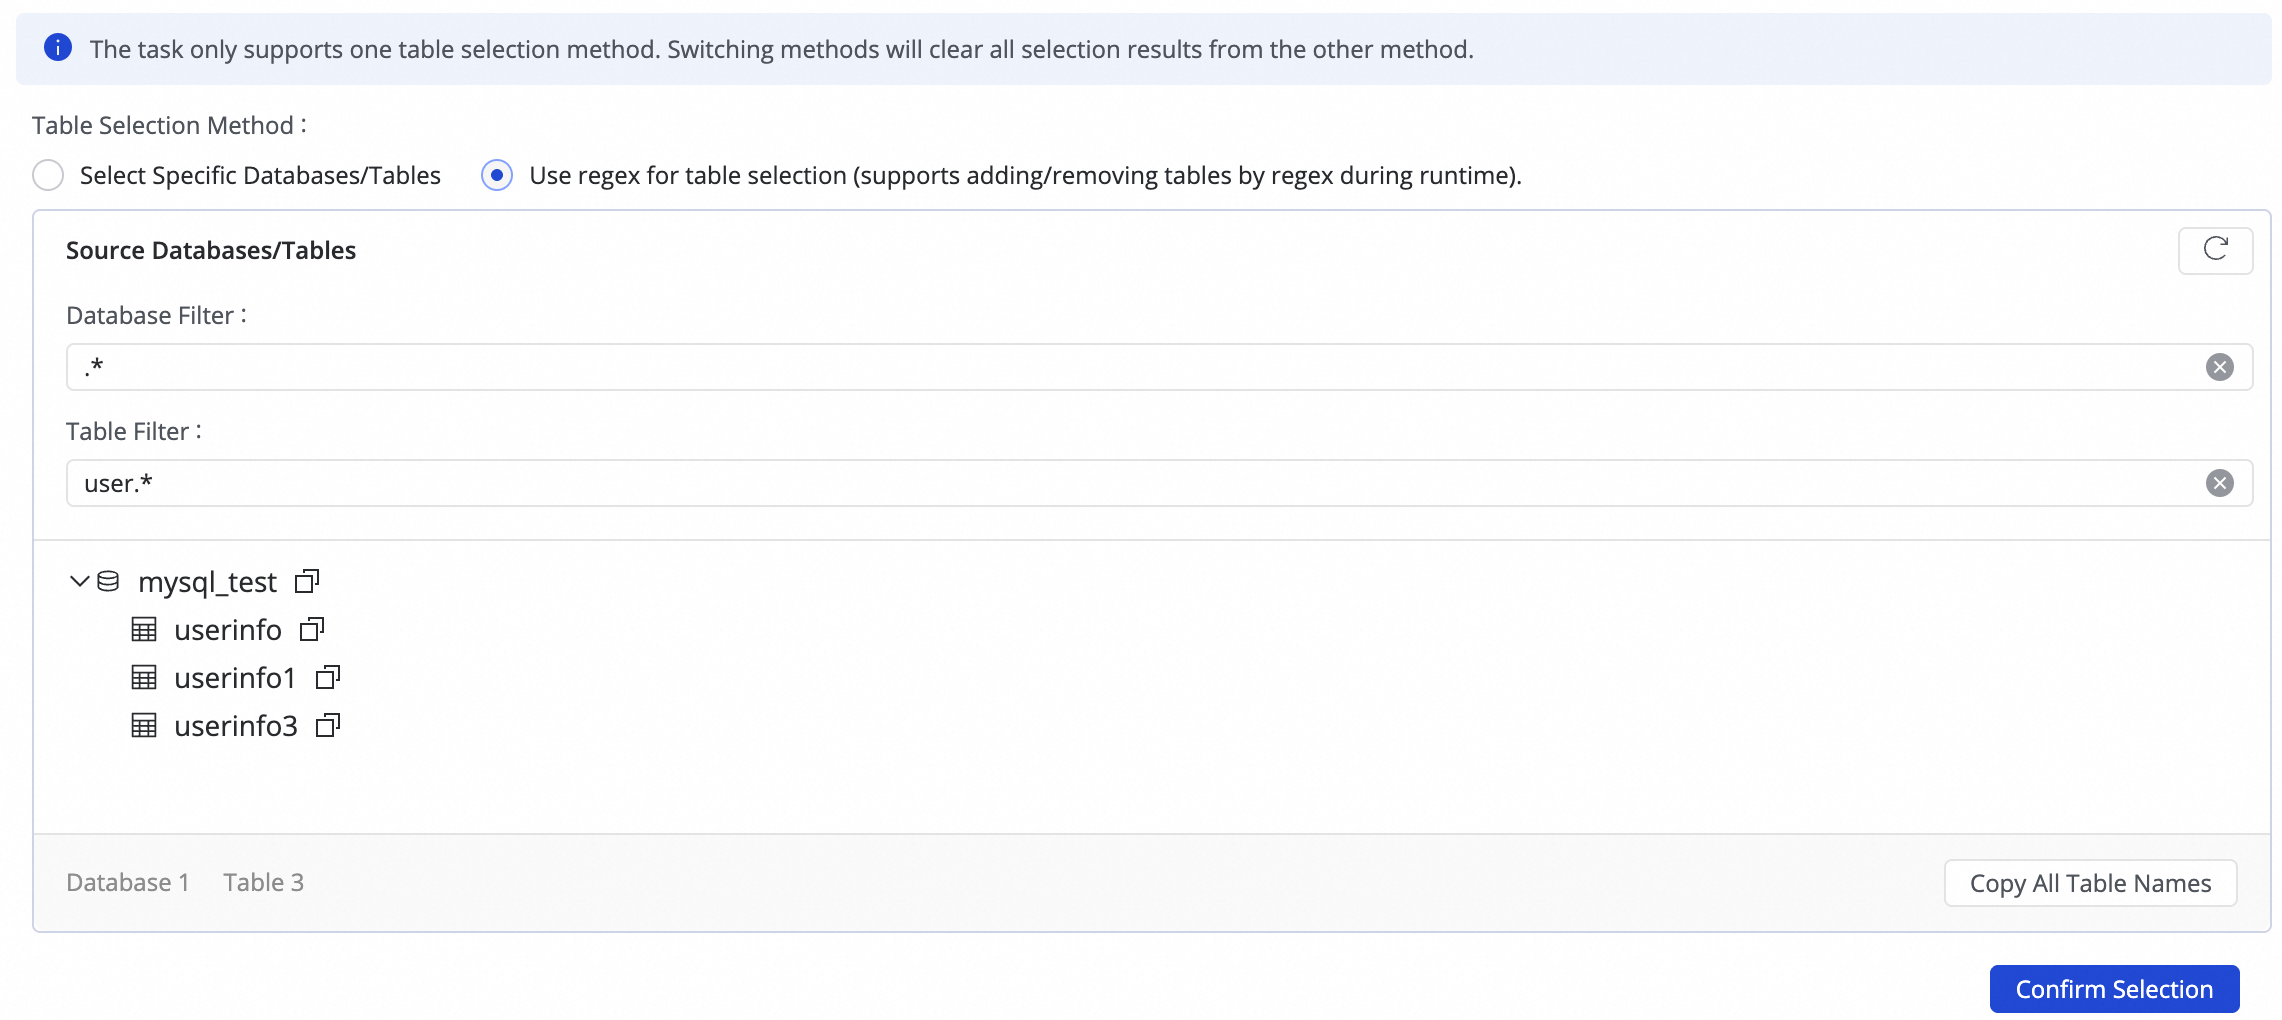
Enter a regular expression in the source table configuration. DataWorks automatically identifies and collects data from all matching source tables and writes it to the destination index mapped by the expression.NoteThis method is suitable for merging and synchronizing sharded tables, similar to database and table sharding synchronization. It improves configuration efficiency by eliminating the need for multiple many-to-one synchronization rules.
2. Destination index mapping
Actions | Description | ||||||||||||
Refresh | The system automatically lists your selected source tables, but you must refresh the mapping to confirm the destination index attributes.
| ||||||||||||
Custom Mapping Rule for Destination Index Name (Optional) | The system has a default index naming rule:
This feature supports the following scenarios:
| ||||||||||||
Edit field type mapping (Optional) | The system provides a default mapping between Source type and Destination type. You can click Edit Mapping of Field Data Types in the upper-right corner of the table to customize the source-to-destination field type mapping. After configuration, click Apply and Refresh Mapping. When editing field type mappings, ensure the conversion rules are correct. Incorrect rules can lead to type conversion failures, generate Dirty Data, and affect task execution. | ||||||||||||
Edit destination index (Optional) | The system uses the index name mapping rule to either create a new destination index or reuse an existing one with the same name. DataWorks automatically generates the destination index structure based on the source table schema. In most cases, no manual intervention is needed. When a destination index has a status of To be created, you can add new fields to its structure. Perform the following steps:
| ||||||||||||
Value assignment | Source fields are automatically mapped if their names match fields in the Destination. You must manually assign values for the newly added fields and destination index properties from the previous step. Perform the following steps:
You can assign constants or variables. Switch the type in the Value Type menu. The following options are supported:
| ||||||||||||
Source split column | In the Source Split Column, you can select a field from the source table or select Not Split. When the synchronization task runs, it is split into multiple tasks based on this field to read data concurrently and in batches. Use the table's primary key as the source split column. String, float, and date types are not supported. Currently, the source split column is only supported for MySQL sources. | ||||||||||||
Skip full synchronization | If you enabled Full Synchronization for the task, you can selectively disable it for a specific table. This is useful if the full data for that table has already been synchronized to the destination through other means. | ||||||||||||
Full condition | Applies a filter to the source data during the full synchronization phase. Enter only the WHERE clause content, without the | ||||||||||||
Configure DML Rule | DML message handling allows you to filter and control the change data ( |
 icon and combining options from Manual Input and Built-in Variable. Supported variables include the source data source name, source database name, and source table name.


 icon in the Destination Index Name column and edit the Statement Used to Create Index to add a field.
Step 4: Configure advanced settings
Configure advanced parameters
To fine-tune the task and meet custom synchronization requirements, go to the Advanced Parameters tab to modify advanced parameters.
In the upper-right corner of the page, click Advanced Settings to go to the advanced parameter configuration page.
Modify the parameter values according to the descriptions provided.
You can also use AI-powered configuration. Input a command in natural language, such as adjusting the task concurrency, and the large language model will generate recommended parameter values. You can then choose whether to accept the AI-generated parameters.
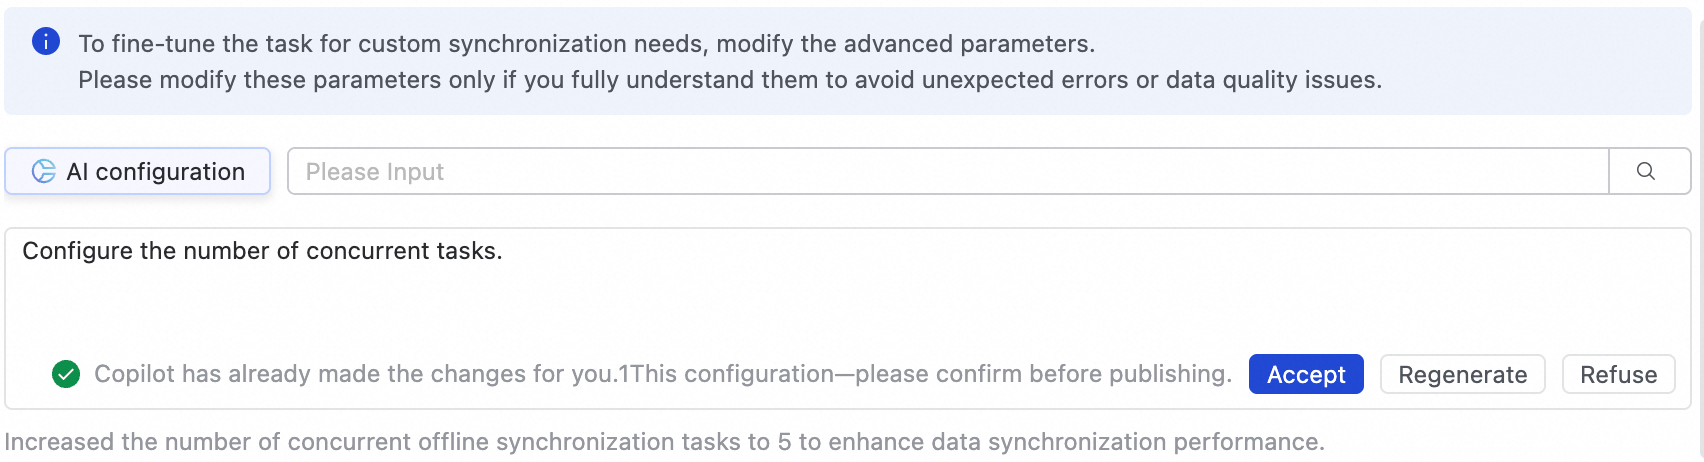
Modify these parameters only if you fully understand their purpose. Incorrect settings can cause task delays, excessive resource consumption that blocks other tasks, data loss, or other unexpected issues.
DDL handling configuration
Some real-time synchronization pipelines can detect schema changes (DDL operations) in the source table and notify the destination. The destination can then apply the same changes or take other actions, such as sending an alert, ignoring the change, or terminating the task.
In the upper-right corner of the page, click Configure DDL Capability to set a handling policy for each type of change. The supported policies vary by data channel.
Process normally: The Destination processes the DDL change from the Source.
Ignore: The change message is ignored, and no modification is made to the Destination.
Error: Terminates the real-time synchronization task and sets its status to Error.
Alert: An alert is sent to the user when this type of change occurs at the Source. You must configure a DDL notification rule in Configure Alert Rule.
When a new column is added at the Source and synchronized to the Destination via DDL, the system does not backfill data for that column in existing rows of the destination index.
Step 5: Publish and run the task
After completing all configurations, click Save at the bottom of the page to save the task configuration.
Real-time database synchronization tasks cannot be debugged directly and must be published to the Operation Center to run. Therefore, you must Deploy any new or edited task for the changes to take effect.
During publishing, if you select Start immediately after deployment, the task will start automatically. Otherwise, after publishing is complete, you must go to the page and manually start the task from the Actions column.
Click the Name/ID of the task in the Tasks to view detailed execution information.
Step 7: Other configurations
Alarm configuration
1. Add Alarm
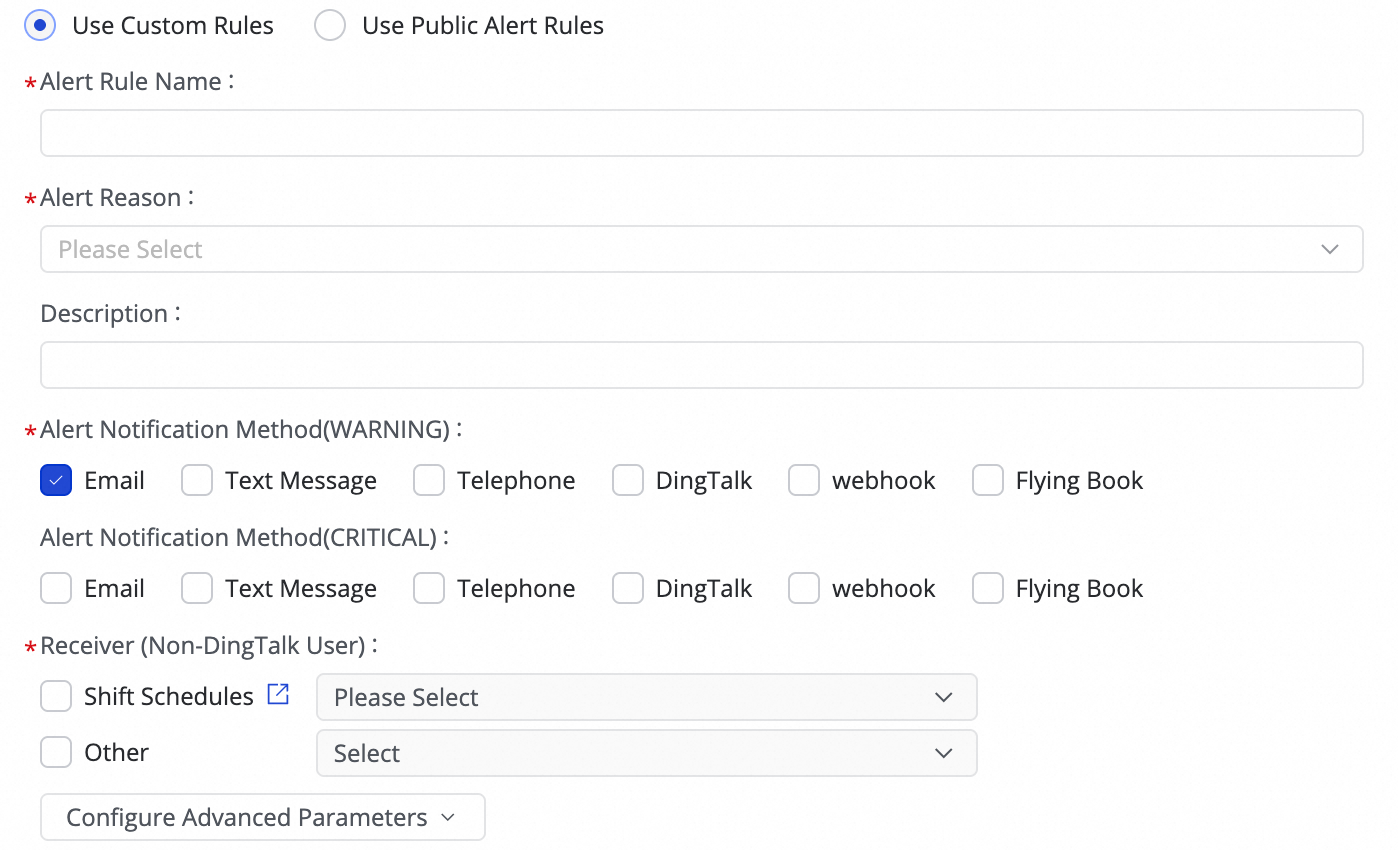
(1) Click Create Rule to configure alarm rules.
Set Alert Reason to monitor metrics like Business delay, Failover, Task status, DDL Notification, and Task Resource Utilization for the task. You can set CRITICAL or WARNING alarm levels based on specified thresholds.
By setting Configure Advanced Parameters, you can control the time interval for sending alarm messages to prevent alert fatigue and message backlogs.
If you select Business delay, Task status, or Task Resource Utilization as the alarm reason, you can also enable recovery notifications to notify recipients when the task returns to normal.
(2) Manage alarm rules.
For created alarm rules, you can use the alarm switch to control whether the alarm rule is enabled. Send alarms to specific recipients based on the alarm level.
2. View Alarm
Expand in the task list to enter the alarm event page and view the alarm information that has occurred.
Resource group configuration
You can manage the resource group used by the task and its configuration in the Configure Resource Group panel in the upper-right corner of the interface.
1. View and switch resource groups
Click Configure Resource Group to view the resource group currently bound to the task.
To change the resource group, switch to another available resource group here.
2. Adjust resources and troubleshoot "insufficient resources" errors
If the task log displays a message such as
Please confirm whether there are enough resources..., the available computing units (CUs) of the current resource group are insufficient to start or run the task. You can increase the number of CUs occupied by the task in the Configure Resource Group panel to allocate more computing resources.
For recommended resource settings, see Data Integration Recommended CUs. Adjust the settings based on actual conditions.
Advanced parameter configuration
For custom synchronization requirements, click Configure in the Advanced Settings column to modify advanced parameters.
Click Advanced Settings in the upper-right corner of the interface to enter the advanced parameter configuration page.
Modify the parameter values according to the prompts. The meaning of each parameter is explained after the parameter name.
Understand parameters fully before modification to prevent issues like task delays, excessive resource consumption blocking other tasks, or data loss.
Manage the task
Edit the task
On the page, find the created synchronization task. In the Operation column, click More, then click Edit to modify the task information. The steps are the same as for configuring a new task.
For tasks that are not running, you can directly modify the configuration, save it, and publish the task to the production environment to apply the changes.
For Running tasks, if you edit and publish the task without selecting Start immediately after deployment, the action button changes to Apply Updates. You must click this button for the changes to take effect in the production environment.
When you click Apply Update, the system performs the following actions in sequence: Stop, Publish, and Restart.
If the change involves adding a table or switching an existing table:
You cannot select a Checkpoint when applying the update. After you confirm, the system performs Schema Migration and Full Data Initialization for the new table. Once the full initialization is complete, it begins incremental synchronization along with the other original tables.
If you modify other information:
You can select a Checkpoint when applying the update. After you confirm, the task resumes from the specified Checkpoint. If you do not specify a Checkpoint, it resumes from the last recorded Checkpoint.
Unmodified tables are not affected. After the update and restart, they will resume from their last recorded Checkpoint.
View the task
After creating a synchronization task, you can view a list of all created tasks and their basic information on the Synchronization Task page.
In the Actions column, you can Start or Stop a synchronization task. Under More, you can perform other operations such as Edit and View.

For a running task, you can see its basic status in the Execution Overview. Click a specific area in the overview to view detailed execution information.
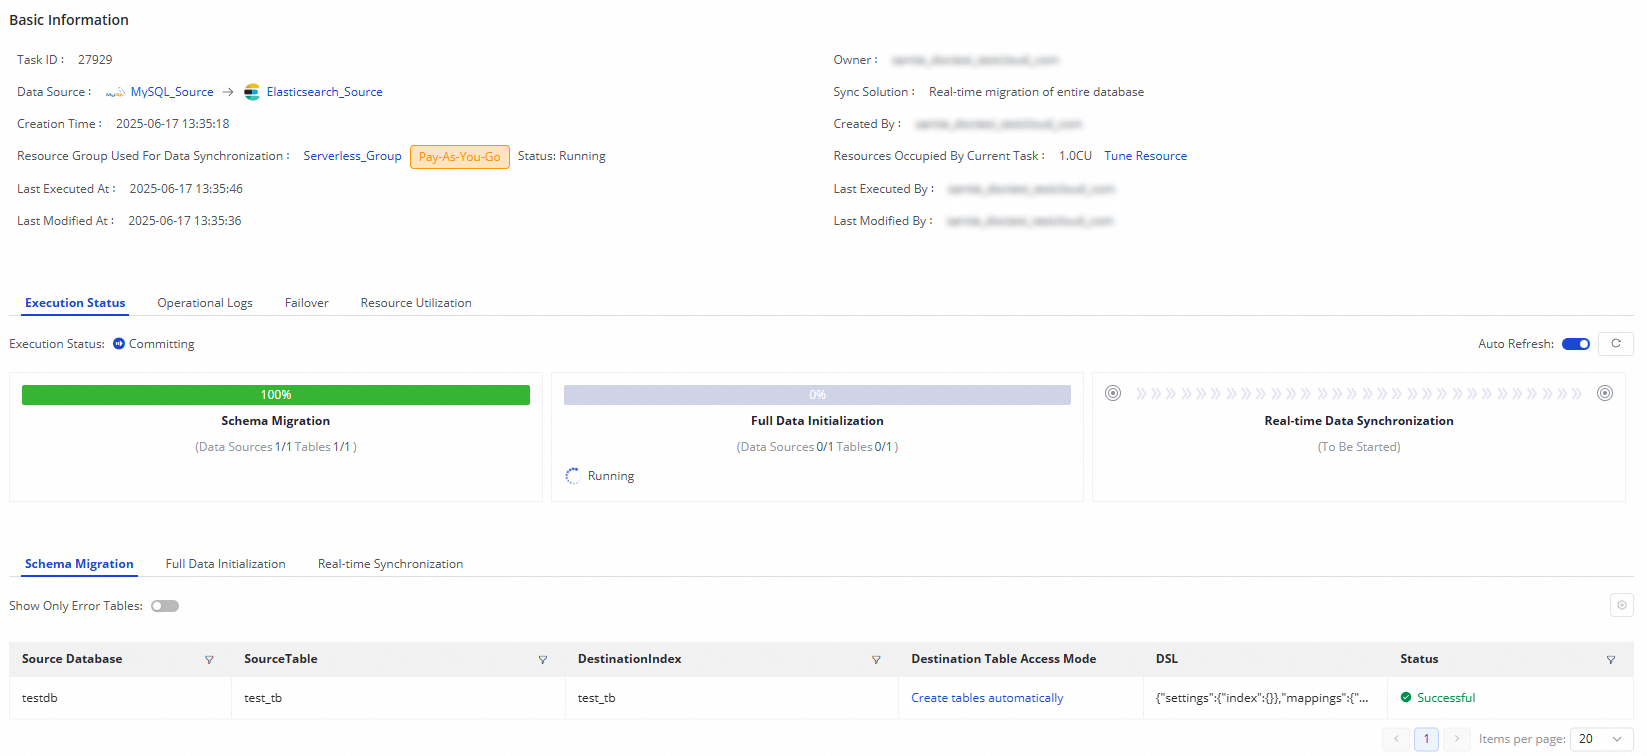
A real-time database synchronization task from MySQL to Elasticsearch consists of three steps:
Schema Migration: Includes the creation method for the destination index (existing index/auto-created index). If the index is auto-created, the DDL statement is displayed.
Full Data Initialization: Includes information about the tables being synchronized, their progress, and the number of rows written.
Real-time Synchronization: Includes real-time synchronization statistics, such as real-time progress, DDL records, DML records, and alert information.
Rerun the synchronization task
In some special cases, if you add tables to or remove tables from the source, or change the schema or name of a destination table, you can click More in the Operation column of the synchronization task and then click Rerun to rerun the task after the change. During the rerun process, the synchronization task synchronizes data only from the newly added tables to the destination or only from the mapped source table to the destination table whose schema or name is changed.
If you want to rerun the synchronization task without modifying the configuration of the task, click More in the Actions column and then click Rerun to rerun the task to perform full synchronization and incremental synchronization again.
If you want to rerun the synchronization task after you add tables to or remove tables from the task, click Complete after the change. In this case, Apply Updates is displayed in the Actions column of the synchronization task. Click Apply Updates to trigger the system to rerun the synchronization task. During the rerun process, the synchronization task synchronizes data from the newly added tables to the destination. Data in the original tables is not synchronized again.
Breakpoint resume
Use cases
Manually resetting the Checkpoint when starting or restarting a task is useful in the following scenarios:
Task recovery and data continuation: If a task is interrupted, you may need to manually specify the interruption time as the new starting Checkpoint to ensure data resumes accurately from that point.
Data troubleshooting and rollback: If you find missing or abnormal data after synchronization, you can roll back the Checkpoint to a time before the issue occurred to reprocess and fix the problematic data.
Major task configuration changes: After making significant changes to the task configuration, such as modifying the destination index structure or field mappings, we recommend resetting the Checkpoint to a specific time to ensure data accuracy under the new configuration.
Instructions
When you click Start, choose whether to Whether to reset the site in the pop-up window:
Do not reset the Checkpoint: The task resumes from the last stop time (the last Checkpoint).
Reset the Checkpoint and select a time: The task starts from the specified time. Ensure the selected time is not earlier than the earliest available time in the source's binary log (binlog).
If you encounter an error indicating that the Checkpoint is invalid or does not exist, try the following solutions:
Reset the Checkpoint: When starting the real-time synchronization task, reset the Checkpoint and select the earliest available time from the source database.
Adjust the log retention period: If the database Checkpoint has expired, consider increasing the log retention period in the database settings, for example, to 7 days.
Resynchronize data: If data has been lost, consider performing a new full synchronization or configure an offline synchronization task to manually synchronize the missing data.
FAQ
For frequently asked questions about real-time database synchronization, see Data Integration FAQ and Data Integration errors.