The dimension table feature allows you to create MaxCompute tables in the production environment, import data from your on-premises machine to MaxCompute tables, and modify MaxCompute tables in a visualized manner.
Prerequisites
- MaxCompute is activated. For more information, see Activate MaxCompute and DataWorks .
- A MaxCompute compute engine is associated with your DataWorks workspace. For more information, see Create and manage workspaces.
- A MaxCompute table is created. For more information, see Create a MaxCompute table.
Limits
- To create a dimension table, you must be an administrator, an owner, or a developer of a DataWorks workspace. For more information, see Add workspace members and assign roles to them.
- For a MaxCompute table that is created by using the dimension table feature, all fields in the MaxCompute table are of the STRING type. If you want to use fields of other data types, execute DDL statements to create a MaxCompute table on the DataStudio page. For more information, see Table operations.
Create a dimension table
- Go to the DataAnalysis page.
- In the left-side navigation pane, click
 .
. - In the New Dimension Table section of the page that appears, click
 .
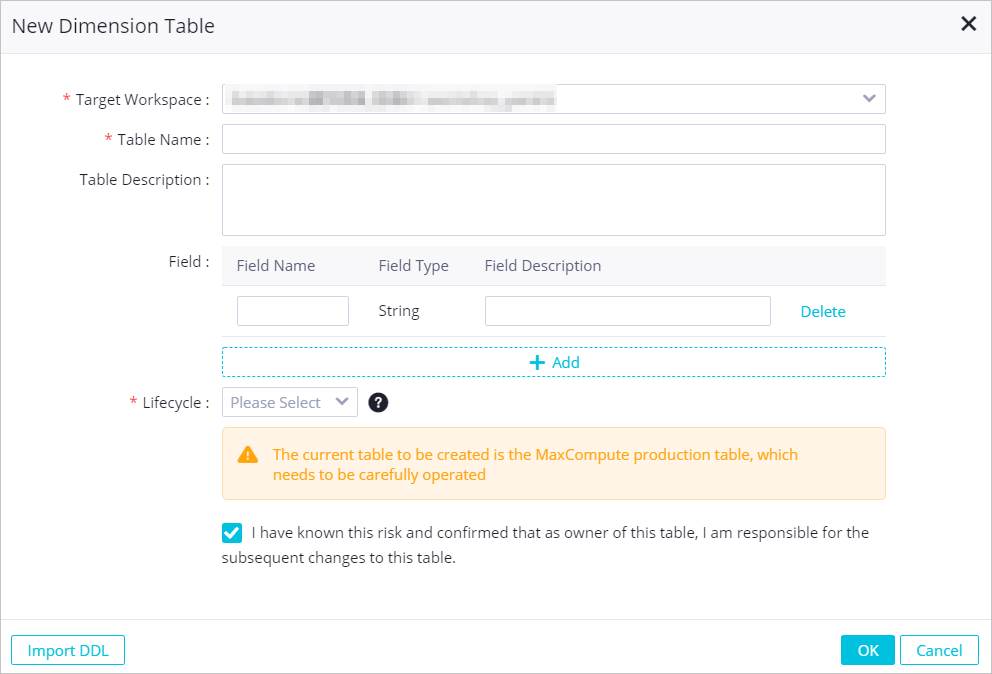
. - In the New Dimension Table dialog box, configure parameters.

Parameter Description Target Workspace The DataWorks workspace to which the MaxCompute table that is created by using the dimension table feature belongs. Table Name The name of the dimension table. A MaxCompute table in the production environment is created. Note The table name can contain only letters, digits, and underscores (_), and must start with a letter.Table Description The description of the table, such as the purpose or properties. Field The fields in the table. Only fields of the STRING type can be added. Lifecycle The lifecycle of the table. The table occupies storage resources in MaxCompute. To make sure that the resources can be recycled, select an appropriate lifecycle for the table from the Lifecycle drop-down list. If the specified lifecycle is exceeded, the table is deleted. - Select I have known this risk and confirmed that as owner of this table, I am responsible for the subsequent changes to this table. and click OK. On the dimension table editing page, view and modify information about the table. For more information, see Edit a MaxCompute table. MaxCompute tables that are created in DataAnalysis are maintained in the production environment. The creator of a MaxCompute table is responsible for the creation and maintenance of the table.
View and manage a dimension table
- In the left-side navigation pane of the DataAnalysis page, click
 .
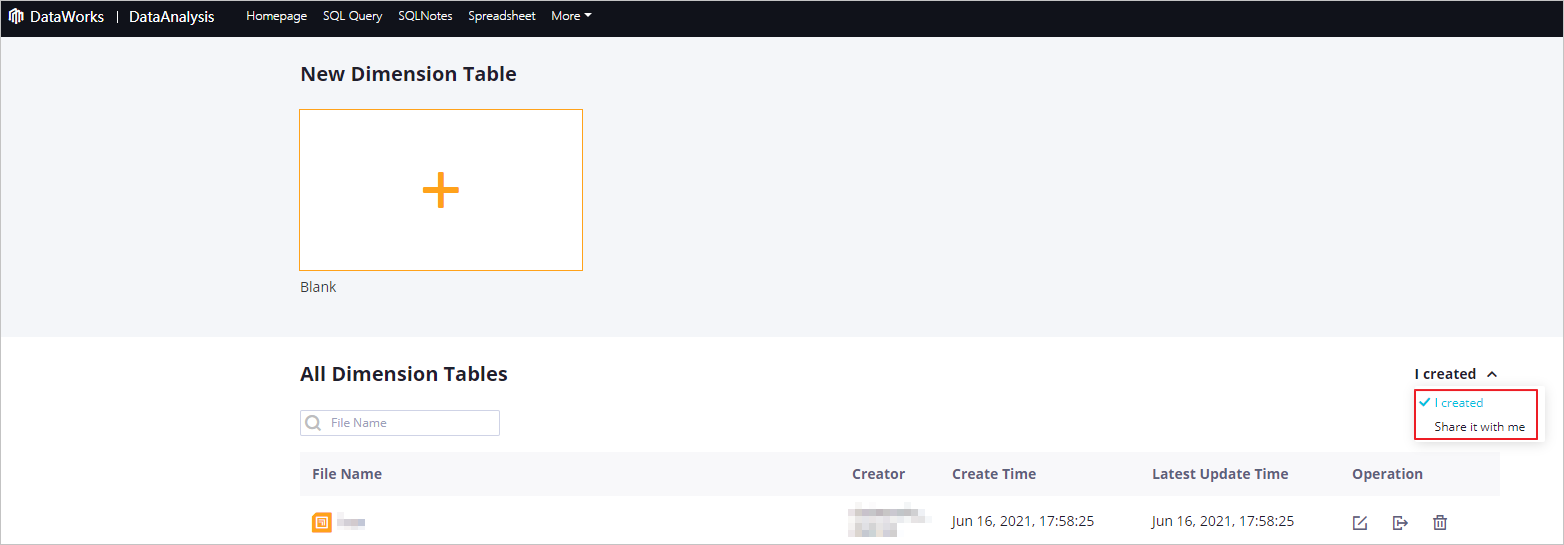
. - In the All Dimension Tables section of the page that appears, select I created or Share it with me from the drop-down list in the upper-right corner to view the tables in the corresponding category.

You can also share dimension tables with specific users. For more information, see Share a MaxCompute table.
- Click the name of a desired table in the File Name column or click the
 icon in the Operation column that corresponds to the table to go to the dimension table editing page. In the All Dimension Tables section, you can also perform the following operations on a dimension table:
- Change the owner of a dimension table: Find the dimension table whose owner you want to change and click the
 icon in the Operation column. In the Change Owner dialog box, select an owner from the New Owner drop-down list and click OK.
 - Delete a dimension table: Find the dimension table that you want to delete and click the
 icon in the Operation column. In the Delete message, click OK.
- Change the owner of a dimension table: Find the dimension table whose owner you want to change and click the