The MaxCompute data source acts as a data hub. It provides a bidirectional channel to read data from and write data to MaxCompute.
Features
A MaxCompute data source in DataWorks can use a Tunnel Endpoint address to access the Tunnel service of a MaxCompute project. This lets you synchronize the project's data through uploads and downloads. Using the Tunnel service for uploads and downloads involves the DownloadTable operation.
For MaxCompute data sources created after December 11, 2023, if the DataWorks service is in a different region from the MaxCompute project that you want to access, you cannot directly synchronize data from the MaxCompute project using the Tunnel Endpoint address. In this scenario, you must purchase a Cloud Enterprise Network (CEN) instance to connect the networks of the DataWorks service and the MaxCompute project. After the networks are connected, you can perform cross-region data synchronization. For more information about CEN and its related operations, see Cloud Enterprise Network.
Offline read
MaxCompute Reader supports reading from partitioned and standard tables. It does not support reading from virtual views or synchronizing foreign tables.
When you perform an offline read from a MaxCompute partitioned table, you cannot directly map partition fields. To synchronize partition field values, you must add a custom field, manually enter the partition name, and then perform field mapping.
You can specify partitions using scheduling parameters for automatic replacement. This is useful for scenarios where you need to synchronize partitions based on the scheduling time.
For example, consider a partitioned table named t0 with the fields id and name. The hash partition is pt, and the subpartition is ds. To read data from the partition where pt=<data timestamp> and ds=hangzhou, you must specify the partition values as pt=${scheduling parameter} and ds=hangzhou in the data source configuration. Then, you can map the id and name fields during the field mapping configuration.
You can write partition fields to a target table by adding them as custom fields.
MaxCompute Reader supports data filtering using the WHERE clause.
Offline write
MaxCompute Writer does not support the VARCHAR type if the data contains null values.
If you write data to a
DeltaTable, set Visible After Sync to Yes. Otherwise, the task fails when the concurrency is greater than 1.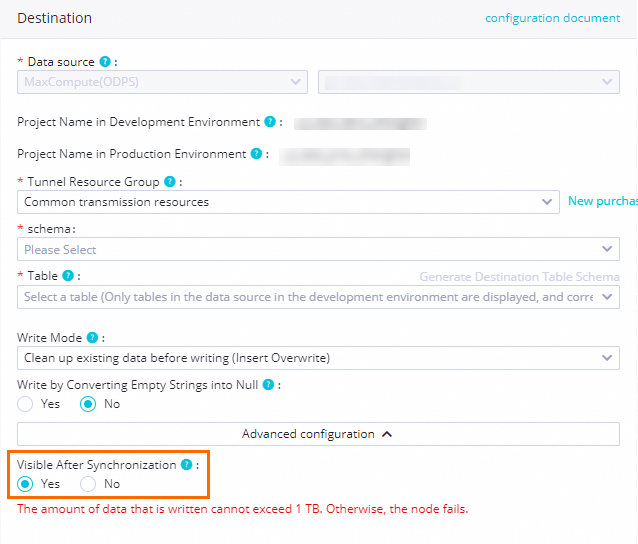
Real-time write
Real-time data synchronization tasks support serverless resource groups (recommended) and exclusive resource groups for Data Integration.
Real-time data synchronization tasks do not support tables without a primary key.
When you perform real-time synchronization to the default MaxCompute data source (usually
odps_first), a temporary AccessKey (AK) is used by default. The temporary AK expires after seven days, which causes the task to fail. The platform automatically restarts the task when it detects a failure caused by an expired temporary AK. If you have configured monitoring alerts for this type of failure, you will receive an alert.For a one-click real-time synchronization task to MaxCompute, you can query the full historical data only on the day of configuration. Incremental data can be queried in MaxCompute only after the merge is completed the next day.
A one-click real-time synchronization task to MaxCompute generates a full partition every day. To prevent excessive data from consuming storage resources, the MaxCompute table automatically created by this solution has a default lifecycle of 30 days. If this duration does not meet your business requirements, you can click the MaxCompute table name during task configuration to modify its lifecycle.
Data Integration uses the MaxCompute engine's data channel for data uploads and downloads. For details about the data channel's Service-Level Agreement (SLA), see Data Transmission Service (Upload) Scenarios and Tools. You should evaluate your data synchronization solution based on the SLA of the MaxCompute engine's data channel.
For one-click real-time synchronization to MaxCompute in instance mode, the exclusive resource group for Data Integration must have at least 8 vCPUs and 16 GB of memory.
Only user-created MaxCompute data sources in the same region as the current workspace are supported. You can successfully connect to cross-region MaxCompute projects when you test the data source connectivity. However, when a synchronization task runs, an "engine not found" error occurs during the table creation phase in MaxCompute.
When MaxCompute is the destination for full database synchronization, the supported synchronization methods depend on the table type. For standard tables, only full and incremental (near real-time) synchronization of an entire database is supported. For Delta Tables, both real-time synchronization and full and incremental (near real-time) synchronization of an entire database are supported.
NoteWhen you use a user-created MaxCompute data source, the DataWorks project must still be attached to a MaxCompute engine. Otherwise, you cannot create MaxCompute SQL nodes, which causes the creation of the 'done' node for full synchronization to fail.
Notes
If a column in the target table is not mapped to a source column, its value is set to null after the synchronization task is complete. This occurs even if a default value was specified for the target column when the table was created.
Supported field types
MaxCompute 1.0, MaxCompute 2.0, and Hive-compatible data types are supported. The following sections describe the supported field types for each data type version.
Supported fields for data type 1.0
Field type | Offline read | Offline write | Real-time write |
BIGINT | Supported | Support | Supported |
DOUBLE | Support | Supported | Support |
DECIMAL | Help and Support | Support | Supported |
STRING | Supported | Supported | Supported |
DATETIME | Supported | Supported | Supported |
BOOLEAN | Supported | Supported | Supported |
ARRAY | Supported | Supported | Supported |
MAP | Supported | Supported | Support |
STRUCT | Supported | Supported | Supported |
Supported fields for data type 2.0 and Hive-compatible data types
Field type | Offline read (MaxCompute Reader) | Offline write (MaxCompute Writer) | Real-time write |
TINYINT | Supported | Supported | Supported |
SMALLINT | Supported | Supported | Supported |
INT | Supported | Supported | Supported |
BIGINT | Support | Support | Supported |
BINARY | Support | Supported | Supported |
FLOAT | Supported | Supported | Supported |
DOUBLE | Supported | Supported | Support |
DECIMAL(pecision,scale) | Supported | Supported | Support |
VARCHAR(n) | Supported | Supported | Supported |
CHAR(n) | Not supported | Supported | Supported |
STRING | Supported | Supported | Supported |
DATE | Supported | Supported | Supported |
DATETIME | Supported | Supported | Supported |
TIMESTAMP | Supported | Supported | Supported |
BOOLEAN | Supported | Supported | Supported |
ARRAY | Supported | Supported | Supported |
MAP | Supported | Supported | Supported |
STRUCT | Supported | Supported | Supported |
Data type mapping
The following table lists the data type mappings for MaxCompute Reader.
Type category | Data Integration type | Database data type |
Integer | LONG | BIGINT, INT, TINYINT, and SMALLINT |
Boolean | BOOLEAN | BOOLEAN |
Date and time | DATE | DATETIME, TIMESTAMP, and DATE |
Floating-point | DOUBLE | FLOAT, DOUBLE, and DECIMAL |
Binary | BYTES | BINARY |
Complex | STRING | ARRAY, MAP, and STRUCT |
If data conversion fails or data fails to be written to the destination data source, the data is considered dirty data. You can handle this using the dirty data record threshold.
Prerequisites
Before you read data from or write data to a MaxCompute table, you can enable the required properties.
Connect to MaxCompute and enable project-level configurations
Log on to the MaxCompute client. For more information, see Connect using the local client (odpscmd).
Enable project-level configurations for MaxCompute. Confirm that you have the required permissions. You can use a Project Owner account to perform these operations. For more information about MaxCompute permissions, see Role planning.
Enable ACID attributes
You can use a Project Owner account to run the following command on the client to enable ACID attributes. For more information about ACID semantics in MaxCompute, see ACID semantics.
setproject odps.sql.acid.table.enable=true;(Optional) Enable data type 2.0
To use the timestamp type from MaxCompute data type 2.0, you can use a Project Owner account to run the following command on the client to enable data type 2.0.
setproject odps.sql.type.system.odps2=true;(Optional) Grant permissions
When you attach a MaxCompute compute resource to a workspace, a MaxCompute data source is created in DataWorks by default. You can use this data source to synchronize data within the current workspace. To synchronize data from this MaxCompute data source in another workspace, you must ensure that the access account specified for the data source in the other workspace has access permissions to this MaxCompute project. For more information about cross-account authorization, see Cross-account authorization (MaxCompute and Hologres).
Create a MaxCompute data source
Before you develop a data synchronization task, you must create a MaxCompute data source for your MaxCompute project in DataWorks. For more information about how to create a MaxCompute data source, see Attach a MaxCompute compute resource.
Workspaces in standard mode support data source isolation. You can add and isolate data sources for the development and production environments to ensure data security. For more information, see Isolate data sources in development and production environments.
If a MaxCompute data source named odps_first in your workspace was not manually created on the Data Source page, it is the default data source that was created for the first MaxCompute engine attached to your workspace before the data source feature was updated. If you select this data source for data synchronization, you are reading data from or writing data to that MaxCompute engine's project.
You can view the name of the MaxCompute project that is used by the data source on the data source configuration page to confirm which project the data is read from or written to. For more information, see Data Source Management.
Develop a data synchronization task
For information about the entry point for and the procedure of configuring a synchronization task, see the following configuration guides.
Configure an offline synchronization task for a single table
For the procedure, see Configure a task in the codeless UI and Configure a task in the code editor.
For all parameters and a script demo for configuration in the code editor, see Appendix: Script demo and parameter description.
Configure a real-time synchronization task for a single table
For the procedure, see Configure a real-time synchronization task in Data Integration and Configure a real-time synchronization task in DataStudio.
Configure a full database synchronization task
For the procedure, see Offline synchronization of an entire database, Real-time synchronization of an entire database, and Full and incremental (near real-time) synchronization of an entire database.
FAQ
Notes on adding a row or field for source table field mapping when reading MaxCompute (ODPS) data
How do I synchronize partition fields when reading MaxCompute (ODPS) data?
How do I synchronize data from multiple partitions when reading MaxCompute (ODPS) data?
How to filter columns, reorder columns, and fill empty values in MaxCompute
For more FAQs about Data Integration, see Data Integration.
Appendix: Script demo and parameter description
Configure a batch synchronization task by using the code editor
If you want to configure a batch synchronization task by using the code editor, you must configure the related parameters in the script based on the unified script format requirements. For more information, see Configure a task in the code editor. The following information describes the parameters that you must configure for data sources when you configure a batch synchronization task by using the code editor.
Reader script demo
When you run the task, delete the comments from the following code.
{
    "type":"job",
    "version":"2.0",
    "steps":[
        {
            "stepType":"odps",// The plug-in name.
            "parameter":{
                "partition":[],// The partition from which to read data.
                "isCompress":false,// Specifies whether to compress data.
                "datasource":"",// The data source.
                "column":[// The columns of the source table.
                    "id"
                ],
                "where": "",// If you use a WHERE clause for data filtering, enter the specific clause.
                "enableWhere":false,// Specifies whether to use a WHERE clause for data filtering.
                "table":""// The table name.
            },
            "name":"Reader",
            "category":"reader"
        },
        {
            "stepType":"stream",
            "parameter":{
            },
            "name":"Writer",
            "category":"writer"
        }
    ],
    "setting":{
        "errorLimit":{
            "record":"0"// The number of error records.
        },
        "speed":{
            "throttle":true,// If throttle is set to false, the mbps parameter does not take effect, and the data rate is not limited. If throttle is set to true, the data rate is limited.
            "concurrent":1, // The number of concurrent jobs.
            "mbps":"12"// The data rate limit. 1 mbps = 1 MB/s.
        }
    },
    "order":{
        "hops":[
            {
                "from":"Reader",
                "to":"Writer"
            }
        ]
    }
}
To specify the Tunnel Endpoint for MaxCompute, you can manually configure the data source in the code editor. Replace "datasource":"", in the preceding example with the specific data source parameters. The following code provides an example.
"accessId":"*******************",
"accessKey":"*******************",
"endpoint":"http://service.eu-central-1.maxcompute.aliyun-inc.com/api",
"odpsServer":"http://service.eu-central-1.maxcompute.aliyun-inc.com/api",
"tunnelServer":"http://dt.eu-central-1.maxcompute.aliyun.com",
"project":"*****",
Reader script parameters
Parameter | Description | Required | Default value |
datasource | The name of the data source. You can add a data source in the code editor. The value of this parameter must be the same as the name of the added data source. | Yes | None |
table | The name of the source table. The name is not case-sensitive. | Yes | None |
partition | The partition from which to read data.
For example, a partitioned table named test has four partitions: pt=1,ds=hangzhou, pt=1,ds=shanghai, pt=2,ds=hangzhou, and pt=2,ds=beijing. The following examples show how to configure the partitions to read data:
You can also set conditions to retrieve partition data based on your requirements:
Note
| Required for partitioned tables. Do not specify this parameter for standard tables. | None |
column | The columns to read from the MaxCompute source table. For example, a table named test has the fields id, name, and age:
| Yes | None |
enableWhere | Specifies whether to use a WHERE clause for data filtering. | No | false |
where | If you use a WHERE clause for data filtering, enter the specific clause. | No | None |
Writer script demo
The following code provides a sample script configuration.
{
    "type":"job",
    "version":"2.0",// The version number.
    "steps":[
        {
            "stepType":"stream",
            "parameter":{},
            "name":"Reader",
            "category":"reader"
        },
        {
            "stepType":"odps",// The plug-in name.
            "parameter":{
                "partition":"",// The partition information.
                "truncate":true,// The cleanup rule.
                "compress":false,// Specifies whether to compress data.
                "datasource":"odps_first",// The data source name.
            "column": [// The source column names.
                "id",
                "name",
                "age",
                "sex",
                "salary",
                "interest"
                ],
                "table":""// The table name.
            },
            "name":"Writer",
            "category":"writer"
        }
    ],
    "setting":{
        "errorLimit":{
            "record":"0"// The number of error records. This is the maximum number of dirty data records allowed.
        },
        "speed":{
            "throttle":true,// If throttle is set to false, the mbps parameter does not take effect, and the data rate is not limited. If throttle is set to true, the data rate is limited.
            "concurrent":1, // The number of concurrent jobs.
            "mbps":"12"// The data rate limit. 1 mbps = 1 MB/s.
        }
    },
    "order":{
        "hops":[
            {
                "from":"Reader",
                "to":"Writer"
            }
        ]
    }
}
To specify the Tunnel Endpoint for MaxCompute, you can manually configure the data source in the code editor. Replace "datasource":"", in the preceding example with the specific data source parameters. The following code provides an example.
"accessId":"<yourAccessKeyId>",
 "accessKey":"<yourAccessKeySecret>",
 "endpoint":"http://service.eu-central-1.maxcompute.aliyun-inc.com/api",
 "odpsServer":"http://service.eu-central-1.maxcompute.aliyun-inc.com/api",
"tunnelServer":"http://dt.eu-central-1.maxcompute.aliyun.com",
"project":"**********",
Writer script parameters
Parameter | Description | Required | Default value |
datasource | The name of the data source. You can add a data source in the code editor. The value of this parameter must be the same as the name of the added data source. | Yes | None |
table | The name of the destination table. The name is not case-sensitive. You cannot specify multiple tables. | Yes | None |
partition | The partition information for the destination table. You must specify the lowest-level partition. For example, to write data to a three-level partitioned table, you must specify the lowest-level partition, such as pt=20150101, type=1, and biz=2.
| Required for partitioned tables. Do not specify this parameter for standard tables. | None |
column | The list of fields to import. To import all fields, you can set the parameter to
| Yes | None |
truncate | Configure Because data cleanup is performed using MaxCompute SQL, which does not guarantee atomicity, the truncate option is not an atomic operation. If multiple tasks simultaneously clear partitions in the same Table or Partition, concurrency timing issues may occur. Pay close attention to this. To prevent such issues, avoid running multiple DDL jobs on the same partition at the same time. Alternatively, create the partitions before you start multiple concurrent jobs. | Yes | None |
emptyAsNull | Specifies whether to convert empty strings to NULL before writing. | No | false |
consistencyCommit | Visible after sync.
| No | false |