The TDH Inceptor output component writes data to a TDH Inceptor data source. When you sync data from other data sources to a TDH Inceptor data source, configure this output component after the source component is configured.
Limits
The TDH Inceptor output component supports writing data to TDH Inceptor tables in ORC, Parquet, and text file formats. Data integration for transactional tables in ORC format is not supported.
Prerequisites
A TDH Inceptor data source is created. For more information, see Create a TDH Inceptor data source.
The account used to configure the properties of the TDH Inceptor output component requires read-through permission for the data source. If you do not have this permission, you must request it. For more information, see Apply for data source permissions.
Procedure
On the Dataphin home page, choose Developer > Data Integration from the top menu bar.
In the top menu bar on the integration page, select a Project. If you are in Dev-Prod mode, you must also select an Environment.
In the navigation pane on the left, click Batch Pipeline. In the Batch Pipeline list, click the offline pipeline that you want to configure to open its configuration page.
In the upper-right corner of the page, click Component Library to open the Component Library panel.
In the navigation pane on the left of the Component Library panel, select Outputs. From the list of output components on the right, find the TDH Inceptor component and drag it to the canvas.
Click and drag the
 icon of the target input, transform, or flow component to connect it to the current TDH Inceptor output component.
Click the
 icon on the TDH Inceptor output component card to open the TDH Inceptor Output Configuration dialog box.
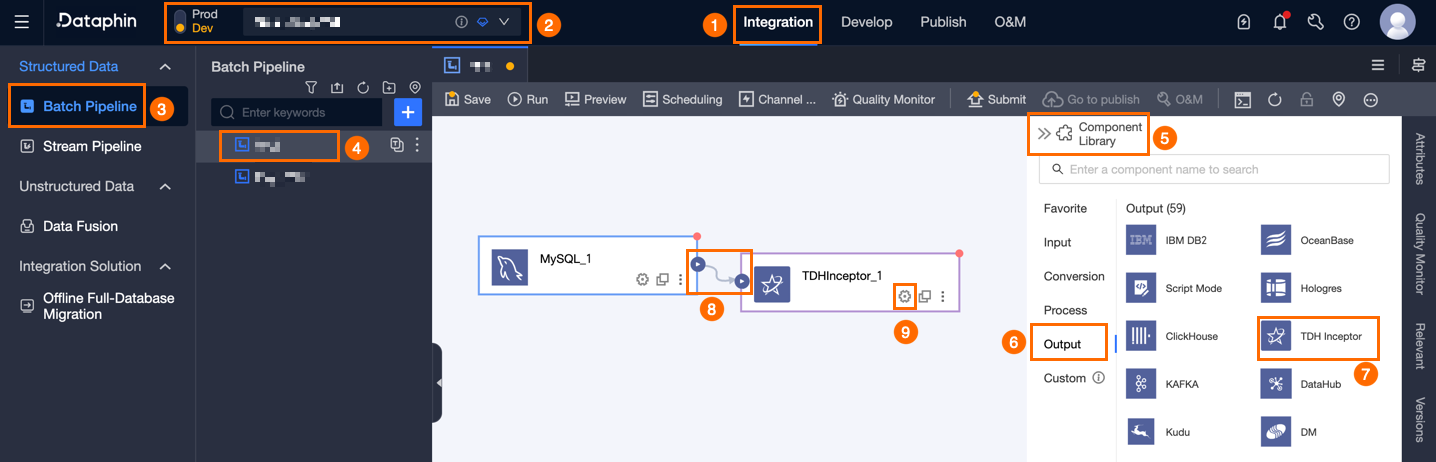
In the TDH Inceptor Output Configuration dialog box, configure the parameters.
Parameter
Description
Basic Settings
Step Name
The name of the TDH Inceptor output component. Dataphin automatically generates a name, which you can change. The naming conventions are as follows:
Can contain only Chinese characters, letters, underscores (_), and digits.
Cannot exceed 64 characters in length.
Datasource
The drop-down list displays all TDH Inceptor data sources, including those for which you have write permissions and those for which you do not. Click the
 icon to copy the data source name.
For data sources where you do not have write permissions, click Request next to the data source to request them. For more information, see Apply for, renew, or release permissions on a data source.
If you do not have a TDH Inceptor data source, click Create Data Source to create one. For more information, see .
Table
Select the destination table for data output. You can enter a keyword to search for the table. Click the
 icon to copy the table name.
If the destination table does not exist in the TDH Inceptor data source, you can use the One-Click Table Creation feature to quickly generate it. The steps are as follows:
Click One-Click Table Creation. Dataphin automatically generates the code to create the destination table. This includes the destination table name, which defaults to the source table name, and field types, which are based on an initial conversion from Dataphin fields.
You can modify the SQL script for creating the destination table as needed. Then, click Create. After the destination table is created, Dataphin automatically uses it as the destination table for data output.
NoteIf a table with the same name exists in the development environment, Dataphin reports an error when you click Create.
Policy for missing production table
Specifies the policy when the production table does not exist. Valid values: Do not handle and Automatic creation. Default value: Automatic creation. If you select Do not handle, the production table is not created when the node is published. If you select Automatic creation, a table with the same name is created in the destination environment when the node is published.
Do not handle: If the destination table does not exist, a message is displayed when you submit the node, but you can still publish it. In this case, you must manually create the destination table in the production environment before you can run the node.
Automatic creation: You must edit the table creation statement. The creation statement for the selected table is filled in by default, and you can adjust it. The table name in the creation statement uses the placeholder
${table_name}. Only this placeholder is supported. It is replaced with the actual table name during execution.If the destination table does not exist, it is first created according to the table creation statement. If the creation fails, the check fails during publishing. You can modify the creation statement based on the error message and then publish again. If the destination table already exists, the creation statement is not executed.
NoteThis parameter is supported only in projects in Dev-Prod mode.
File Encoding
The file encoding method. Valid values: UTF-8 and GBK.
Compression Format
The file compression format. Valid values: zlib and hadoop-snappy.
Loading Policy
The policy for writing data to the destination table. Valid values:
Append data: If a primary key or constraint violation occurs, the system reports a dirty data error.
Overwrite data: If a primary key or constraint violation occurs, the system first deletes the original data and then inserts the entire new row.
Field Separator
The field separator for file storage. Default value: comma (,).
Partition
If you selected a partitioned table, you must select a partition for the data table. The default partition is ds=${bizdate}.
Hadoop Parameter Configuration (Optional)
Adjusts write parameters for different table types. Separate multiple parameters with commas (,). The format is
{"key1":"value1", "key2":"value2"}. For example, in a scenario where the output table is in ORC format and has many fields, you can adjust the{"hive.exec.orc.default.buffer.size"}parameter based on the memory size. If you have enough memory, try increasing this value to improve write performance. If you are low on memory, try decreasing this value to reduce garbage collection (GC) time and improve write performance. The default value is 16384 Byte (16 KB). The value should not exceed 262144 Byte (256 KB). When writing to a Hudi table, you can use the{"hoodie.parquet.compression.codec":"snappy"}parameter to change the compression format to snappy.Prepared Statement
An SQL script to execute on the database before data import. Maximum length: 128 characters.
Completion Statement
An SQL script to execute on the database after data import. Maximum length: 128 characters.
Field Mapping
Input Fields
Displays the input fields.
Output Fields
Displays all fields of the selected table. To exclude certain fields from the output to downstream components, delete them:
To delete a few fields, you can click the
 icon in the Actions column to delete unnecessary fields.
To delete many fields, click Field Management. On the Field Management page, select multiple fields, and then click the
 icon to move the Selected Input Fields to the Unselected Input Fields list.
Quick Mapping
Maps input fields from the source table to output fields of the destination table. Supported mapping methods:
Map by name: Maps fields that have the same name.
Map by row index: Maps fields in the same row position, regardless of field names.
Click Confirm to complete the property configuration for the TDH Inceptor output component.