The InfluxDB writer writes data to an InfluxDB data source. After you configure the source in a sync task, configure the InfluxDB writer as the target.
Prerequisites
-
You have created an InfluxDB data source. For more information, see Create an InfluxDB data source.
-
The account used to configure the InfluxDB writer must have write permission on the data source. If you do not have the required permission, apply for it. For more information, see Apply for, renew, or return data source permissions.
Procedure
-
In the top navigation bar of the Dataphin homepage, choose Develop > Data Integration.
-
In the top navigation bar of the data integration page, select a Project. If you are using Dev-Prod mode, you also need to select an environment.
-
In the left-side navigation pane, click Batch Integration. In the Batch Integration list, click the Batch Channel that you want to configure to open its configuration page.
-
In the upper-right corner of the page, click Component Library to open the Component Library panel.
-
In the Component Library panel, select Writer from the left-side navigation pane. In the list of writer components on the right, find and drag the InfluxDB component onto the canvas.
-
Click and drag the
 icon from the source component to the InfluxDB Writer to create a connection.
 -
Click the
 icon on the InfluxDB Writer card to open the InfluxDB Output Configuration dialog box.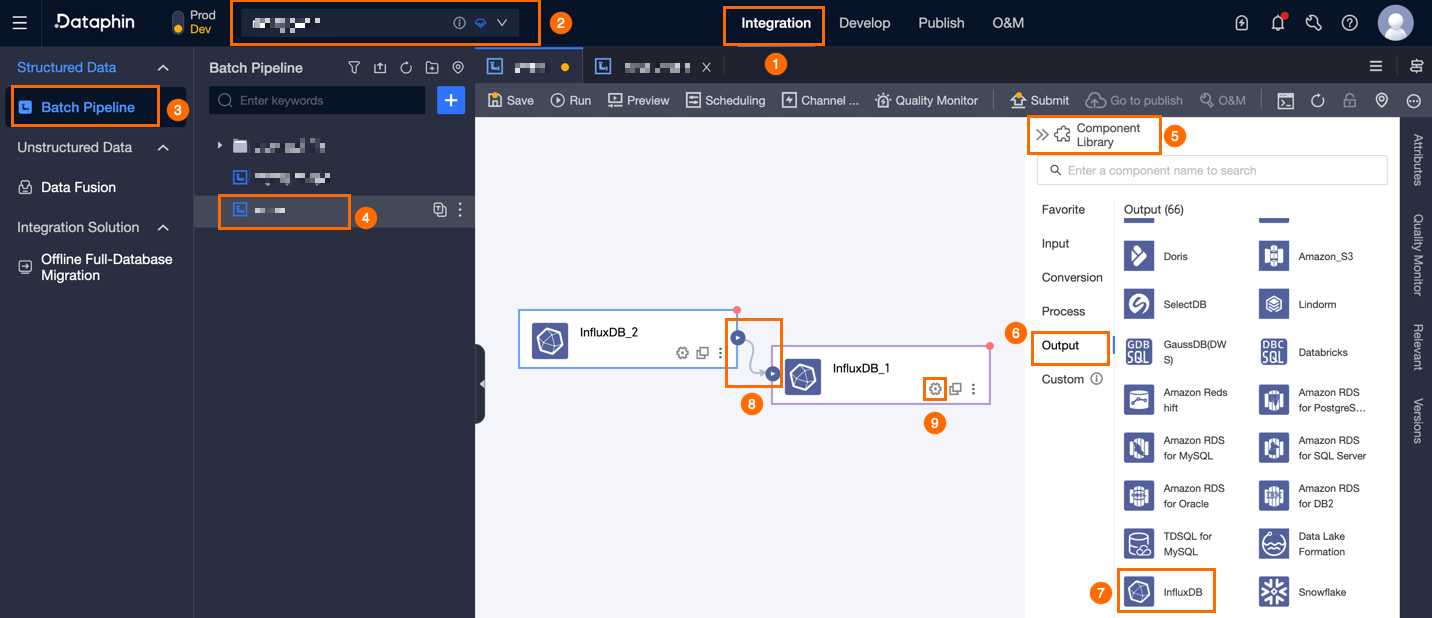
-
In the InfluxDB Output Configuration dialog box, configure the following parameters.
Parameter
Description
Basic Settings
Step Name
The name of the InfluxDB writer. Dataphin automatically generates a name that you can change. The name must meet the following requirements:
-
Can contain only Chinese characters, letters, underscores (_), and digits.
-
Must be no more than 64 characters in length.
Data Source
Select an InfluxDB data source from the drop-down list. All available InfluxDB data sources are listed, regardless of whether you have write permission. Click the
 icon to copy the data source name.
-
If you do not have write permission for a data source, click Apply next to its name to request the permission. For more information, see Apply for data source permissions.
-
If no InfluxDB data source exists, click the
 icon to create one. For more information, see Create an InfluxDB data source.
Bucket (Optional)
Select a bucket from the data source. If you do not specify a bucket, the default bucket configured for the data source is used.
Measurement
Select or enter the target measurement name. The name can contain letters, digits, underscores (_), hyphens (-), and periods (.). If the measurement does not exist, it is created automatically.
Field Mapping
Input Fields
Lists the input fields from the upstream component.
Output Fields
Lists the output fields. You can perform the following operations:
-
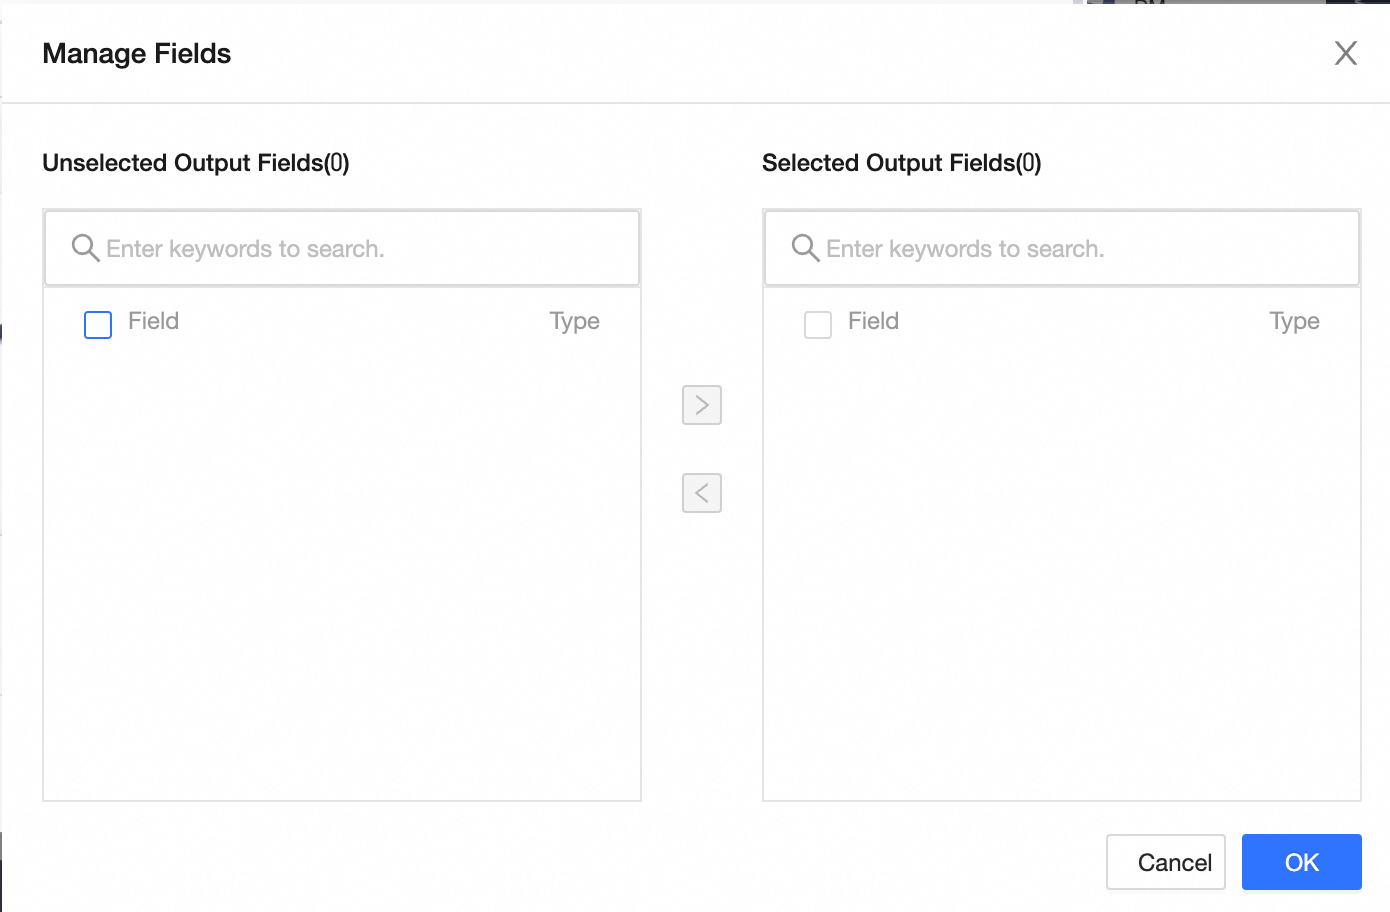
Field Management: Click Field Management to select output fields.
-
Click the
 icon to move a field from Selected Input Fields to Unselected Input Fields.
 -
Click the
 icon to move a field from Unselected Input Fields to Selected Input Fields.
-
-
Batch Add: Click Batch Add to add fields in bulk in JSON, TEXT, or DDL format.
-
Use the JSON format to add fields in bulk. Example:
// Example: [{ "name": "user_id", "type": "String" }, { "name": "user_name", "type": "String" }]Note'name' specifies the field's name and 'type' specifies its data type. For example,
"name":"user_id","type":"String"imports a String field named user_id. -
Use the TEXT format to add fields in bulk. Example:
// Example: user_id,String user_name,String-
A row delimiter separates each field. The default is a newline character (\n). You can also use a semicolon (;) or a period (.).
-
A column delimiter separates the field name from the field type. The default is a comma (,).
-
-
Use the DDL format to add fields in bulk. Example:
CREATE TABLE tablename (
    id INT PRIMARY KEY,
    name VARCHAR(50),
    age INT
);
-
-
New output field: Click + New output field, enter a name in the Field column, select a Type, and then click the
 icon to save the new field.
Mapping
Maps input fields to output fields. The Quick Mapping options include row mapping and name mapping.
-
Name mapping: Maps input and output fields with the same name.
-
Row mapping: Maps fields by row position. Use this when source and destination fields are in the same order but have different names.
-
-
Click Confirm to save the InfluxDB Writer configuration.