The Redis output component writes data from external databases or storage systems connected to the big data platform to Redis for data integration and reprocessing.
Prerequisites
Before you begin, make sure you have completed the following tasks:
A Redis data source is created. For more information, see Create a Redis data source.
The account used to configure the Redis output component has read-through permission on the data source. If not, request the permission. For more information, see Apply for, Renew, and Return Data Source Permissions.
Procedure
In the top menu bar of the Dataphin homepage, choose Development > Data Integration.
In the top menu bar of the Data Integration page, select a Project. If you are in Dev-Prod mode, you also need to select an environment.
In the navigation pane on the left, click Batch Pipeline. In the Batch Pipeline list, click the desired offline pipeline to open its configuration page.
Click the Component Library in the upper-right corner of the page to open the Component Library panel.
In the navigation pane on the left of the Component Library panel, select Output. In the list of output components on the right, find and drag the Redis component to the canvas.
Click and drag the
 icon of the target upstream component to connect it to the current Redis output component.
Click the
 icon on the Redis output component card to open the Redis Output Configuration dialog box.
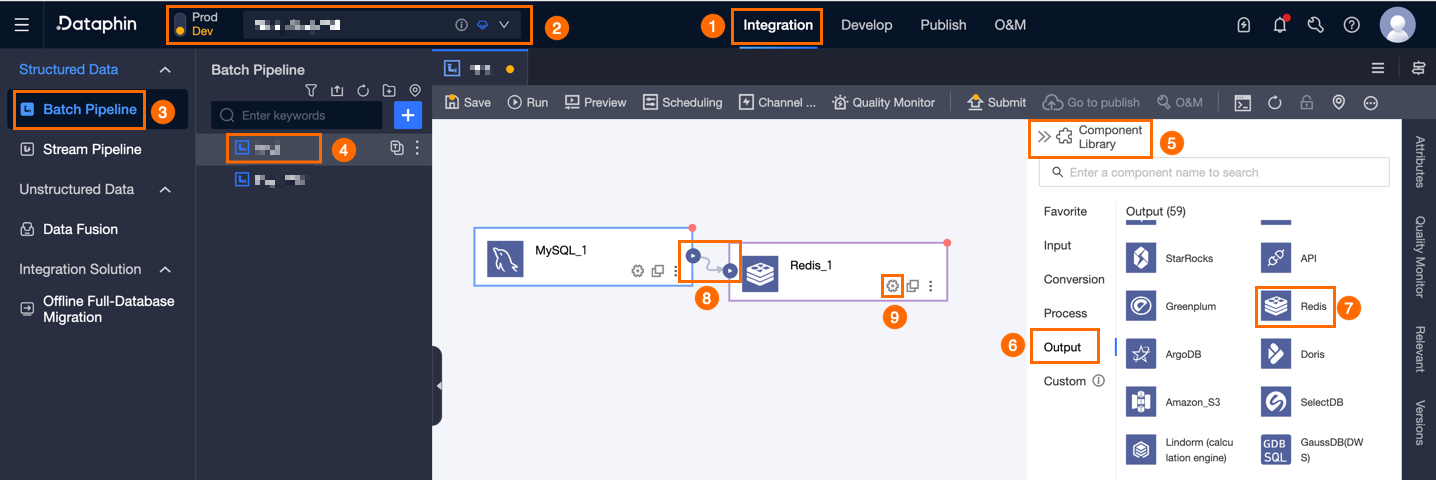
In the Redis Output Configuration dialog box, configure the parameters as described in the following table.
Parameter
Description
Basic settings
Step name
The name of the Redis output component. Dataphin automatically generates a name, which you can change as needed. Naming rules:
Can contain only Chinese characters, letters, digits, and underscores (_).
Cannot exceed 64 characters.
Datasource
Lists all Redis data sources, including those with and without write-through permission. To copy the data source name, click the
 icon.
icon.For a data source without write-through permission, click Request to request the permission. For more information, see Request, renew, and return data source permissions.
If no Redis data source exists, click Create Data Source to create one. For more information, see Create a Redis data source.
DB
Not required in cluster mode. In standalone mode, specify the DB. Valid values: integers from 0 to 255. Default value: 0.
Key column
The column to use as the key.
Key separator
The separator for the key. Takes effect when more than one key column is selected. Multi-character separators are supported. Example:
\u0001.Write data type
The data type of the value to write to Redis.
Write mode
The write mode.
Write in JSON format
Available only when Write data type is set to String. Select Yes to write the names and values of the value columns to the destination Redis instance in JSON format based on the configured field mapping. Select No to write the values separated by the value separator.
Value separator
The separator for the value. Multi-character separators are supported. Example:
\u0001.Advanced settings
Cache expiration time
The cache expiration time. Supported options: Validity Period, Expiration Time - Constant, and Expiration Time - From Field.
Validity period: Enter the validity period of the data in seconds.
Expiration time - constant: Select a specific time. The data expires after this time.
Expiration time - from field: Select a field that contains the expiration time. The data expires after the time specified in this field.
Write timeout
The timeout period for writing data to Redis. Default value: 300 seconds.
Key prefix
A prefix for the key. The prefix can contain Chinese and English characters, digits, and underscores (_).
Field mapping
Input fields
The input fields from the upstream component.
Output fields
The output fields. You can add output fields manually.
Click Batch Add to configure fields in batches in JSON or TEXT format. Examples:
JSON format
"column":[
            {
              "index":5,
              "name":"test1",
              "type":"STRING"
            },
            {
              "index":2,
              "name":"partition",
              "type":"STRING"
            }
          ]
TEXT format
paper_no,String
phone_no,String
vip_no,String
Row delimiter: Separates the information of each field. The default delimiter is a line feed (\n). Other supported delimiters are
\n ; ..Column delimiter: Separates the field name from the field type. The default delimiter is a comma (`,`). The field type is optional.
You can also perform the following operations on added fields:
Click the Actions column
 icon to edit existing fields.
Click the Actions column's
 icon to delete existing fields.
Mapping
Select the field mapping between upstream input fields and destination table fields. Quick mapping options include Same Name Mapping and Same Row Mapping.
Click Confirm to complete the Redis output component configuration.