An API output component writes data from an external database to an API. You can also use it to copy and push data from a storage system connected to a big data platform to an API for data integration and reprocessing.
Prerequisites
An API data source has been created. For more information, see Create an API data source.
The account that you use to configure the API output component must have write-through permission for the data source. If you do not have the required permission, you must request it. For more information, see Apply for, Renew, and Return Data Source Permissions.
Procedure
From the top menu bar on the Dataphin home page, choose Develop > Data Integration.
On the top menu bar of the Data Integration page, select a project. If you are in Dev-Prod mode, you must also select an environment.
In the navigation pane on the left, click Batch Pipeline. In the Batch Pipeline list, click the offline pipeline that you want to develop to open its configuration page.
In the upper-right corner of the page, click Component Library to open the Component Library panel.
In the left navigation pane of the Component Library panel, select Outputs. Find the API component in the list on the right and drag it to the canvas.
Click and drag the
 icon of the input, transform, or flow component to connect it to the API output component.
Click the
 icon on the API output component card to open the API Output Configuration dialog box.
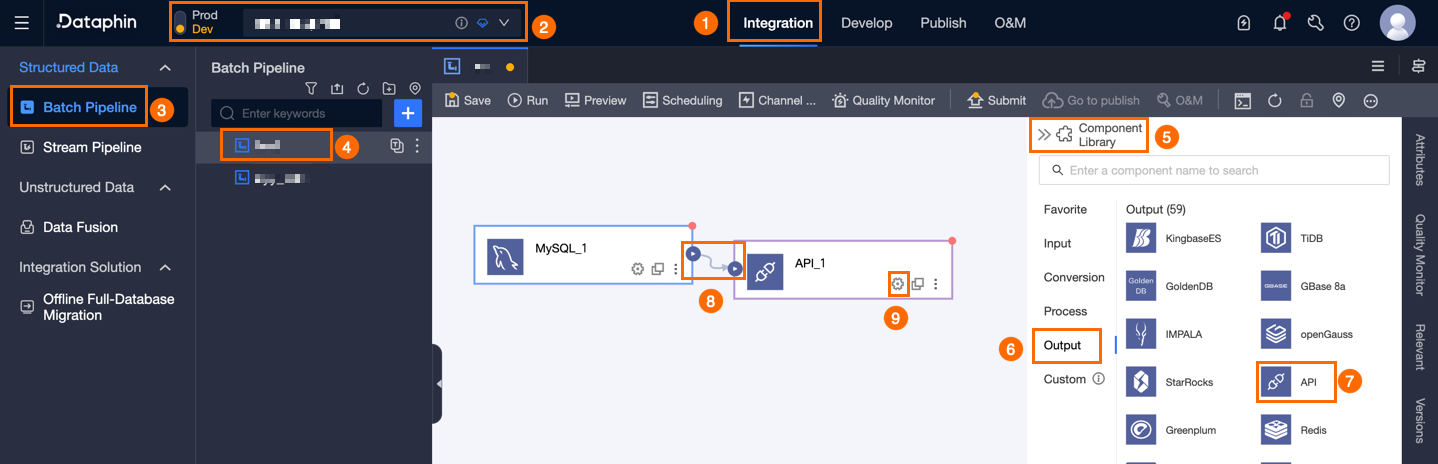
Parameter
Description
Step Name
The name of the API output component. Dataphin automatically generates a step name, which you can change. The naming conventions are as follows:
The name can contain only Chinese characters, letters, underscores (_), and digits.
The name can be up to 64 characters long.
Data Source
The drop-down list displays all API data sources, including those for which you do not have write-through permission.
For a data source for which you do not have write-through permission, click Request next to the data source to request the permission. For more information, see Apply for, Renew, and Return Data Source Permissions permissions on a data source.
If you do not have an API data source, click the
 icon to create one. For more information, see Create an API data source.
Request Method
The request method configured for the API data source. The default value is POST.
POST: You can configure Params, Headers, and Body. These parameters can be empty.
PUT: You can configure Params and Headers. These parameters can be empty.
Request Data Structure
The format of the JSON data passed in the request.
Single Record: A single request transmits one data record. The number of requests equals the number of data records.
Array Data: A single request transmits a batch of data in an array. The amount of data in each request is determined by the batch size. If you select this option, you can configure the batch read size.
Batch read size: The number of data records in a single request.
URL Path (Optional)
Enter the path in the URL. The path parameter is concatenated with the URL configured in the data source to form the request URL. For example, if the URL configured in the data source is
https://www.aliyun.comand the URL path is/home, the request URL ishttps://www.aliyun.com/home.JSON Write Path (Optional)
The path to which data is written in the JSON object, such as
data.result. The path is automatically added before the output field name to form the full path for writing.Request Parameters
Request parameters include Params, Headers, Body (supported only when the request method is POST), and Sign.
Params, Headers, and Body
Parameter Name: Supports Chinese characters, letters, and special characters.
Parameter Type: Select Constant, UNIX Timestamp, or Random Number.
Parameter Value: If you set Parameter Type to Constant, the parameter value can be Chinese characters, letters, or special characters. If you set Parameter Type to UNIX timestamp, the parameter value is automatically generated. If you set Parameter Type to Random Number, the parameter value can be automatically generated as a 16-bit, 32-bit, 64-bit, or 128-bit random number.
Data Type: You can configure the data type only in the Body section. You can select String, Long, JSON, Double, Boolean, or Date. The default value is String.
Actions:
Create: Click +Create to add a parameter row. Click the
 icon to save the parameter before you can create another one. Click the
  icon to cancel entering the parameter.
Edit: In the Actions column of a configured parameter, click the
 icon to edit its settings.
Move: In the Actions column of a configured parameter, click the
 icon to move it to a different list. For example, if the parameter is in the Param list, you can move it to the Header or Body list. You cannot move the parameter if a parameter with the same name already exists in the target list. You cannot move the parameter if the target list is Body and the input method for Body is JSON.
Delete: In the Actions column of a configured parameter, click the
 icon to delete it. You cannot delete the parameter if it is referenced by a signature configuration.
For Body, you can set the input format to JSON or Key-Value.
JSON: Enter the JSON code in the JSON code editing area. Click the
 icon to automatically format the code.
Key-Value: Click Create. Enter the parameter name and value, and select the parameter type and data type.
Signature
Signatures are disabled by default. To use signatures, enable them and configure the signature generation rules.
Signature Name: The key value for request parameter encapsulation.
Signature Location: Select Params, Header, or Body. Body is supported only when the request method is POST.
Generation Function: Select MD5HEX, HMAC-MD5, SHA1HEX, HMAC-SHA256, HMAC-SHA1, SHA256, SHA256HEX, SHA512HEX, or HMAC_SHA512.
Key: Select a key from Administration > Data Security > Key Management, or manually enter a key.
If the Asset Security module is not purchased for the current Dataphin instance, you can only manually enter a key. If the Asset Security module is purchased, you can only select a key from Administration > Data Security > Key Management. If no keys are available in the drop-down list, click Go To Register to go to the Key Management page and register a key.
NoteThis parameter is optional if you set Generation Function to MD5HEX, SHA1HEX, SHA256, SHA256HEX, or SHA512HEX.
Concatenation Content: Select Parameter Value Only or Parameter Name + Parameter Value. The default is Parameter Name + Parameter Value.
Parameter Value Only, Parameter Name + Parameter Value
Referenced Parameters: Select multiple key-value (KV) parameters from the parameter lists.
Concatenation Order: Select Dictionary Order or Selection Order. The default is Dictionary Order.
Connector (Optional): Configure a Parameter Separator or a Key-value Connector.
Parameter Separator: Specify a custom parameter separator. The default value is
&.Key-value Connector: Specify a custom key-value connector. The default value is
=. You cannot configure this parameter if Concatenation content is set to Parameter Value Only.
Concatenation Example: Displays the concatenated string based on the preceding configurations. If a timestamp or random number is used in the parameters, a temporarily generated value is displayed.
Custom
Signature String: Enter a custom signature string. Enter the
@sign to trigger parameter suggestions. You can then select a parameter. When you switch the Concatenation content from Parameter Value Only or Parameter Name + Parameter Value to Custom, if referenced parameters are included, the system concatenates them based on the concatenation order and connector, and then populates the signature string.The signature string can contain the key, parameters from Params, Header, or Body, and constants. If you select Key, the system adds
#{secret}to the string. If you select All Params, All Headers, or All Body, the system adds all parameters from the corresponding list to the string on separate lines inK:Vformat. For example, for a parameter namedid, the system addsid:#{id}. If Body is in JSON mode, selecting it passes the complete JSON to the system, which then uses the#{body_json}placeholder in the string.
Input Fields
Displays the input fields based on the output of the upstream component.
Output Fields
Displays the output fields. You can configure output fields by using Batch Add or Create Output Field.
Batch Add: Click Batch Add to add fields in batches in JSON or TEXT format.
To add fields in batches in JSON format, use the following example:
// Example: [{"name": "user_id","type": "String"}, {"name": "user_name","type": "String"}]NoteThe `name` parameter specifies the name of the imported field, and the `type` parameter specifies the data type of the field after it is imported. For example,
"name":"user_id","type":"String"specifies that the field named user_id is imported and its data type is set to String.To add fields in batches in TEXT format, use the following example:
// Example:
user_id,String
user_name,String
The row delimiter separates the information of each field. The default value is a line feed (\n). You can also use a semicolon (;) or a period (.).
The column delimiter separates the field name from the field type. The default value is a comma (,).
Create an output field.
Click +Create Output Field. Then, enter a value for Serial Number and Column, and select a Type. Click the
icon to save the current row. Click the  icon to delete the current row.
Copy upstream fields.
Click Copy Upstream Fields. The system automatically generates output fields based on the upstream field names.
Manage output fields.
You can also perform the following operations on added fields:
In the Actions column, click the
 icon to edit an existing field.
In the Actions column, click the
 icon to delete an existing field.
Mapping
Select field mappings between the upstream input and the target table fields. Mapping supports Same Row Mapping and Same Name Mapping.
Same Name Mapping: Maps fields that have the same name.
Same Row Mapping: Maps fields that are in the same row. Use this when the field names in the source and target tables are different but the data in the corresponding rows needs to be mapped.
Click Confirm to complete the configuration of the API output component.