The Kafka output component writes data from an external database into Kafka, and copies and pushes data from a connected storage system through the big data platform into Kafka for data integration and reprocessing.
Prerequisites
A Kafka data source has been created. For more information, see Create Kafka Data Source.
The account that configures the Kafka output component must have read-through permission on the data source. If you do not have this permission, request data source access. For more information, see Apply for, Renew, and Return Data Source Permissions.
Procedure
On the Dataphin home page, in the top menu bar, select Development > Data Integration.
In the top menu bar of the integration page, select Project (Dev-Prod mode requires selecting Environment).
In the navigation pane on the left, click Batch Pipeline. In the Batch Pipeline list, click the offline pipeline you want to develop to open its configuration page.
Click Component Library in the upper right corner of the page to open the Component Library panel.
In the Component Library panel's left-side navigation pane, select Output. Then, find the KAFKA component in the output component list on the right and drag it to the canvas.
Click and drag the
 icon of the target input, transform, or flow component to connect it to the KAFKA output component.
Click the
 icon on the Kafka output component card to open the KAFKA Output Configuration dialog box.
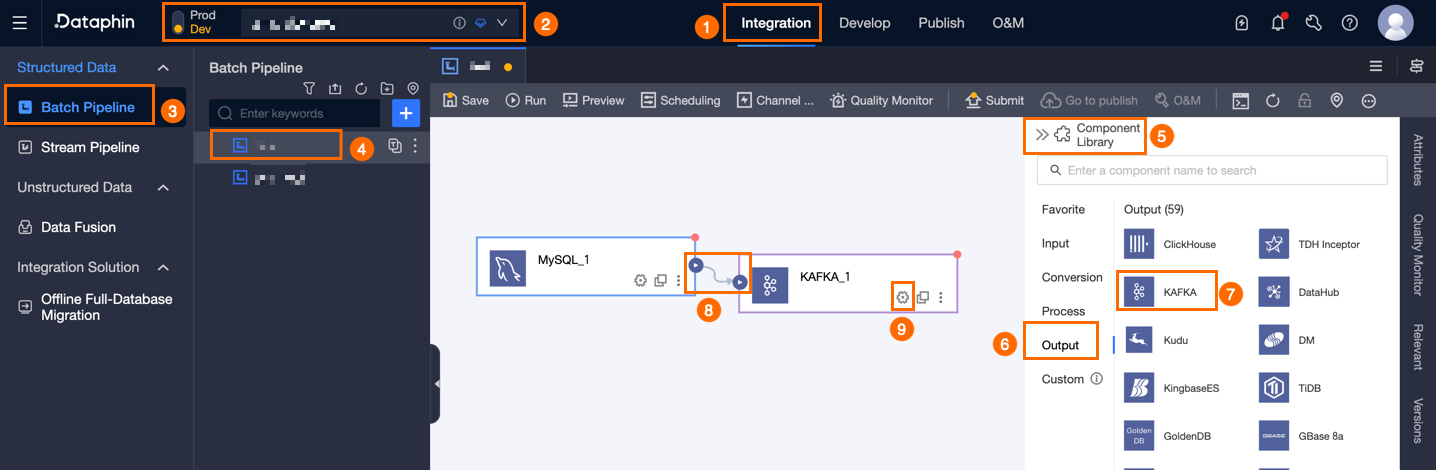
In the KAFKA Output Configuration dialog box, set the parameters as detailed in the table below.
Parameter
Description
Basic Settings
Step Name
The name of the Kafka output component. Dataphin generates a default step name, which you can modify to suit your business scenario. The naming conventions are as follows:
Can only contain Chinese characters, letters, underscores (_), and numbers.
Cannot exceed 64 characters.
Datasource
The drop-down list shows all Kafka-type data sources, including those you have write-through permission on and those you do not. Click the
 icon to copy the data source name.
For data sources without write-through permission, you can click Request after the data source to request write-through permission for the data source. For more information, see Apply for, Renew, and Return Data Source Permissions.
If you do not have a Kafka-type data source, click Create Data Source to create a data source. For more information, see Create Kafka Data Source.
Topic
Select a topic. If no match is found, you can enter a topic name manually. Click the
 icon to copy the selected topic name.
If the Kafka data source does not contain the required Topic, you can use the Create Topic feature to quickly create one. The procedure is as follows:
Click Create Topic. In the Create Topic dialog box, configure the following parameters.
Topic Name: Enter a name for the Topic. All characters are supported.
Number Of Partitions: Enter an integer greater than or equal to 1. The default value is 1.
Number Of Replicas: Enter an integer greater than or equal to 1. The default value is 2.
Topic Parameters (Optional): Enter the parameters for creating the Topic in
key=valueformat. Separate multiple parameters with line breaks.Create Topic In Production Environment: If you select this option, the Topic is also created in the production environment. If a Topic with the same name already exists in the production environment, you do not need to select this option.
Click Create.
Key Column
Specify the key column.
If multiple columns are selected, the values of all configured column ordinal numbers will be concatenated with a comma as the Key of the Kafka record.
If not selected, the Key of the Kafka record is null, and the data is written to each partition of the topic in turn.
Write Mode
The format in which all columns of a source record are concatenated as the Value of the Kafka record. Valid values: text and json. Default value: text.
text: Concatenate all columns according to the separator specified in the configuration item.
json: Concatenate all columns into a JSON string according to the target table field name.
NoteIf valueIndex is configured, this configuration item is invalid.
For example, the source record has three columns with values a, b, and c:
When the write mode is configured as text and the separator is configured as #, the Value of the Kafka record written is the string a#b#c.
When the write mode is configured as JSON and the target table field is configured as ["col1","col2","col3"], the Value of the Kafka record written is the string {"col1":"a","col2":"b","col3":"c"}.
Value Separator
The separator used between column values in the Kafka record Value.
When Write Mode is json, Value separator configuration is not supported.
When Write Mode is text, you can configure a single or multiple characters as the separator. Unicode characters can be configured in the \u0001 format, and escape characters such as \t and \n are supported. The default is \t (horizontal tab character), and Value separator configuration is supported.
Key Type and Value Type
Select the type of Key and Value for Kafka.
When Key Column is not selected or multiple columns are selected, the options for Key Type and Value Type include BYTEARRAY, STRING, and KAFKA AVRO (selectable when the data source is configured with schema.registry).
When Key Column selects one column, the options for Key Type and Value Type include BYTEARRAY, DOUBLE, FLOAT, INTEGER, LONG, SHORT, STRING, and KAFKA AVRO (selectable when the data source is configured with schema.registry).
Advanced Configuration
Optional parameters you can configure as needed:
keyfieldDelimiter: Key separator, the connecting character when the Kafka key column is multiple columns, default is empty.
valueIndex: Configure the columns in Kafka Writer as Value, for example, valueIndex=[0,1,2,3], the numbers in [ ] represent the seqnumber of the input component's field.
When the write mode is text, by default, all columns are concatenated as Value, using the separator configured separator for splitting. The value type can only be BYTEARRAY or STRING.
When the write mode is JSON, write as key-value pairs into JSON.
partition=0: Specify the partition number for writing to the specified partition of the Kafka topic, which is an integer greater than or equal to 0, default is 0.
nullKeyFormat=null: When the source column value specified by the key is null, replace it with the string specified by this configuration item. If not configured, no replacement is made.
nullValueFormat=null: When the source column value is null, replace it with the string specified by this configuration item when assembling the Kafka record Value. If not configured, no replacement is made.
acks=all: The acks configuration when initializing Kafka Producer, which determines the confirmation method for successful writing. A value of 0 does not confirm successful writing, a value of 1 confirms the successful writing of the primary replica, and a value of all confirms the successful writing of all replicas. The default is acks=all.
keySchema: If the topic is configured with schema.registry, please enter the key schema. The default is empty.
valueSchema: If the topic is configured with schema.registry, please enter the value schema. The default is empty.
Field Mapping
Input Field
Displays the output fields of the upstream component.
Output Field
The output fields of the target table. You can configure output fields through Batch Add and Create Output Field:
Batch Add: Click Batch Add, supporting batch configuration in JSON and TEXT formats.
Batch configuration in JSON format, for example:
// Example: [{"name": "user_id","type": "String"}, {"name": "user_name","type": "String"}]Notename specifies the name of the imported field, and type specifies the data type of the field after it is imported. For example,
"name":"user_id","type":"String"imports the field named user_id and sets its data type to String.Batch configuration in TEXT format, for example:
// Example:
user_id,String
user_name,String
The row delimiter is used to separate the information of each field, with the default being a line feed (\n). It supports line feed (\n), semicolon (;), and period (.).
The column delimiter is used to separate the field name and field type, with the default being a comma (,).
Create Output Field.
Click +create Output Field, and fill in Column and select Type according to the page prompts.
Copy Ancestor Table Field.
Click Copy Ancestor Table Field, and the system will automatically generate output fields based on the upstream field names.
Manage Output Field.
You can also perform the following operations on the added fields:
Click the Actions column's
 icon to edit existing fields.
Click the Actions column
 icon to delete the existing field.
Mapping
Maps input fields of the source table to output fields of the target table for data synchronization. Two mapping modes are available:
Same-name Mapping: Map fields with the same field name.
Same-row Mapping: Maps fields by their row position, regardless of field names. Use this when source and target field names differ.
Click Confirm to finalize the Kafka output component configuration.