Dataphin allows users to customize RDBMS (relational database) components for various business scenarios and perform data synchronization. This tutorial demonstrates how to customize an RDBMS database component using MySQL as an example and synchronize data accordingly.
Prerequisites
An RDS MySQL instance is activated within a virtual private cloud (VPC). For more information, see Step 1:Create an ApsaraDB RDS for MySQL instance and configure databases.
The database and account for the RDS MySQL instance are created, and you have recorded the database name, username, and password. For more information, see Create a Database and Account.
The MySQL database driver is downloaded.
Background information
RDBMS databases, such as MySQL, Oracle, SQL Server, PostgreSQL, Vertica, DRDS, DB2, OceanBase, PolarDB, SAP HANA, and TeraData, are relational databases. This tutorial focuses on MySQL to guide you through the customization of an RDBMS database and data synchronization.
Operation flow
The steps to customize and apply MySQL database components are as follows:
Step | Description |
Configure the network between the RDS MySQL instance and Dataphin, and create the source and target tables for data synchronization. | |
Define the custom data source type test_rdbms_mysql. Once defined, you can find the custom data source component under the development module in the component library. | |
Based on the custom data source component type (test_rdbms_mysql), create a data source instance of type test_rdbms_mysql. After creating the data source instance, you can import the business data of the RDS MySQL instance into the Dataphin instance. | |
Create an offline pipeline task using the custom data source component type (test_rdbms_mysql) and the corresponding data source instance (test_rdbms_mysql). Once the task is established, execute it to facilitate data integration through data synchronization. |
Step 1: Configure the network and create data tables
Establish a network connection between the RDS MySQL instance and the Dataphin instance.
Add the RDS MySQL instance's public address and port to the Dataphin project space's sandbox whitelist:
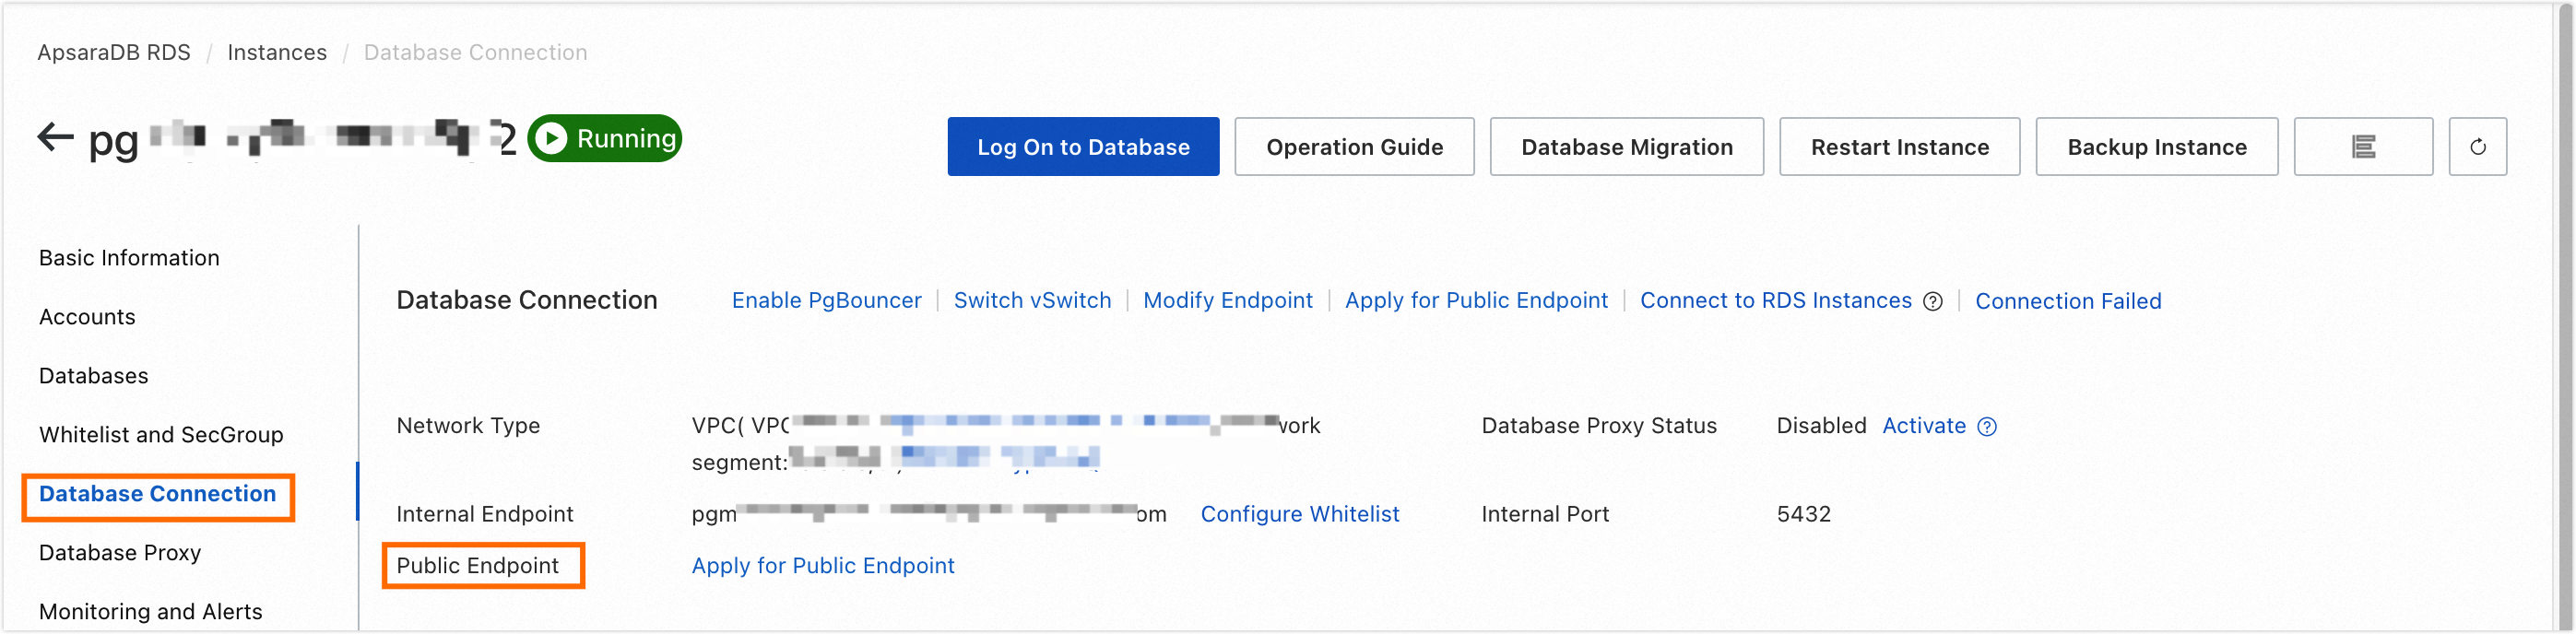
Retrieve the public address and port of the RDS MySQL instance.
Navigate to the Database Connection page to obtain the public address and port of the RDS MySQL instance.
Include the RDS MySQL instance's public address and port in the Dataphin project space's sandbox whitelist. For details on adding to a sandbox whitelist, see Add Project Members.
Incorporate Dataphin's IP into the RDS MySQL instance's whitelist. For guidance on adding Dataphin's IP to the whitelist, refer to Step 2: Connect to an ApsaraDB RDS for MySQL instance.
Region
IP Whitelist
China (Shanghai)
100.104.228.128/26 and 100.104.115.192/26
China (Shenzhen)
100.104.48.128/26
China (Beijing)
100.104.238.64/26
China (Shanghai), China (Shenzhen), China (Beijing)
100.104.0.0/16
Set up the source and target data tables for data synchronization.
Connect to the MySQL instance using the command line, and proceed to create the source and target data tables required for data synchronization. For instructions on establishing a connection to the MySQL instance, see Use a client or the CLI to connect to an ApsaraDB RDS for MySQL instance.
Below is the SQL code to create the source data table:
create table xin_test_scr2
(
id string,
name string
);

insert into xin_test_scr2 values('1001','huayu1'),('1002','huayuyu2'),
Below is the SQL code to create the target data table:
create table xin_test_det_1
(
id string,
name string
);
Step 2: Create a custom data source
Log on to the Dataphin Console.
In the Dataphin Console, select your workspace region and then click Enter Dataphin>>.
Navigate to the custom component page.
On the Dataphin home page, click Management Center.
Within the Management Center, select Datasource Management from the top menu bar.
On the custom source type page, click + Create Offline Custom Source Type.
On the Create Offline Custom Source Type page, fill in the required parameters as follows:
Parameter
Description
Basic Configuration
Type
Set the Type to RDBMS Database.
Name
Specify the Name as test_rdbms_mysql.
ImportantNote that the system does not support creating custom components with duplicate names, as the name serves as an identifier for the component type.
Type Code
Enter a unique Type Code for backend identification, such as rdbms_mysql.
Resource Configuration
Driver Name
Input the Driver Name as com.mysql.jdbc.Driver.
Driver Upload
Upload the driver file you have downloaded, such as mysql-connector-java-5.1.47. For more information, see Prerequisites.
Description Information
Description
Provide a description, for example, Mysql-5.1.47 Database.
To finalize, click Create.
Step 3: Create a data source instance
Navigate to the data source management page and click + Create Data Source at the top right of the page.
In the Create Data Source dialog box, select Custom Datasource under the test_rdbms_mysql data source category.
In the Create Test_rdbms_mysql Data Source dialog box, configure the following parameters:
Parameter
Description
Datasource Name
Enter the Datasource Name as test_rdbms_mysql.
Datasource Description
Provide a brief description for the data source.
Datasource Configuration
Set up the data source:
For Basic mode, select Production Datasource.
For Dev-Prod mode, configure the data source as follows:
Click Production + Development Datasource to set up the data source for both production and development environments.
Select Production Datasource for the production environment, then click Development Datasource to configure the development environment's data source.
NoteThe system allows Production Datasource and Development Datasource to be configured as the same or separate data sources.
Tag
Optionally, assign a tag to categorize the data source.
Choose either Production Datasource or Production + Development Datasource based on your development mode.
Link Address
Input the data source's link address.
Use the following format for the link address:
jdbc:mysql://{Public Endpoint}:3306/{DatabaseName}.Replace {Public Endpoint} with the public address.
Replace {DatabaseName} with the name of the database.
Username
Enter the username for database access.
Password
Enter the password for database access.
Click Test Connection to verify the data source connectivity.
ImportantImportant: Non-RDBMS data sources do not support connection testing. Ensure the accuracy of the data source connection details.
To complete the process, click OK.
Step 4: Create and develop an offline pipeline task
Navigate to the data source page, hover over the upper left
 icon, and click Integration.
On the Data Integration page, access the Create Pipeline Development Script dialog box.
Select Offline Management from the left-side navigation pane to proceed to the offline pipeline development page.
On the offline pipeline development page, click
 and choose Offline Single Pipeline to open the Create Pipeline Development Script dialog box.
In the Create Pipeline Development Script dialog box, set the parameters as follows:
Parameter
Description
Pipeline Name
Specify as test.
Schedule Type
Choose Manual Node.
Description
Provide a brief description, such as Test Custom Component.
Select Directory
The default is Batch Pipeline.
Click OK to confirm the settings.
On the test offline pipeline page, click the upper right
 and select Customize.
Drag the Custom_test_rdbms_mysql_input_config and Custom_test_rdbms_mysql_output_config components to the left side of the pipeline canvas.
Connect the input and output components and click
 to configure them as illustrated below:
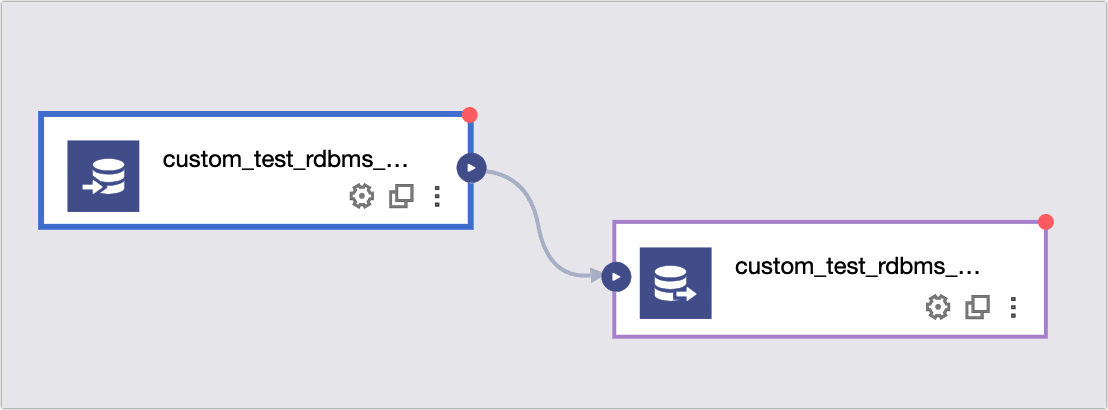
Configure the custom_test_rdbms_mysql_input_component:
Parameter
Description
Step Name
Maintain the default name for this tutorial. Alternatively, you can rename it following the convention that allows only letters, numbers, and hyphens (-), with a maximum length of 64 characters.
You may also alter the step name, adhering to the naming convention that permits only letters, numbers, and hyphens (-), with a maximum length of 64 characters.
Data Source
Select the test_rdbms_mysql data source.
Table
Specify the source table as xin_test_src2.
Input Filter
This tutorial does not require any configuration.
Input filtering involves specifying criteria for input fields, like
ds=${bizdate}.Input filtering can be used in two primary scenarios:
Define a fixed data segment.
Apply parameter filters.
Output Fields
Define the fields to be synchronized. For this tutorial, add the Id and Name fields from the source table Xin_test_scr2 as output fields:
In the Output Fields section, click Create Output Field.
For the Output Field, enter id and select Type as String.
Click Create Output Field again.
For the next Output Field, enter name and select Type as String.
Configure the custom_test_rdbms_mysql_output_component:
Parameter
Description
Step Name
Maintain the default name for this tutorial. Alternatively, you can rename it following the convention that allows only letters, numbers, and hyphens (-), with a maximum length of 64 characters.
You may also alter the step name, adhering to the naming convention that permits only letters, numbers, and hyphens (-), with a maximum length of 64 characters.
Data Source
Select the test_rdbms_mysql data source.
Table
Specify the target table as xin_test_dst_1.
Parsing Scheme
No parsing scheme selection is required for this tutorial. Parsing schemes, which are optional, include special processing methods before and after data output, such as preparation statements executed before import and completion statements executed after import.
The parsing scheme is optional and encompasses methods for processing data before and after output. It consists of enter preparation statements, which are SQL scripts executed prior to import, and enter completion statements, which are SQL scripts run post-import.
Input Fields
The input fields from the input component are displayed by default.
Output Fields
Definethe fields to be synchronized. For this tutorial, add the Id and Name fields from the source table Xin_test_scr2 as output fields:
In the Output Fields section, click Create Output Field.
For the Output Field, enter id and select Type as String.
Click Create Output Field again.
For the next Output Field, enter name and select Type as String.
Mapping Relationship
Click Quick Mapping and choose Same Name Mapping. This establishes the mapping relationship between the output fields of the input component and the output fields of the output component, which includes options for same name mapping and same row mapping:
The mapping relationship defines how the output fields of the input component correspond to the output fields of the output component. This includes mappings of identical names and identical rows:
Same Name Mapping: Maps fields with identical names.
Same Row Mapping: Maps fields in the same row, where the input field becomes the final output field.
Click OK to save the component configurations.
To execute the offline pipeline task, click the Run button on the canvas toolbar and verify that the task runs successfully.