Pods in ACK clusters use private IP addresses by default. In scenarios such as multi-tenant data isolation or security isolation, a pod may need an independent public IP address. You can mount an Elastic IP Address (EIP) on a pod using annotations.
Background information
By default, pods access the Internet through an Internet NAT gateway (Enable Internet access for a cluster). Inbound traffic typically flows through a LoadBalancer Service. However, some scenarios require a pod to have its own public IP address:
-
Dynamic port allocation: UDP game servers or RTSP protocols allocate random ports per client. An independent IP address prevents port conflicts.
-
SNAT bypass: When an external service requires a fixed IP in its allowlist, the shared SNAT egress IP may be blocked.
-
Direct IP identity: End-to-end connections with external systems, such as real-time communication protocols, require an independent IP address.
Limits
-
Understand the limits on EIPs before you start.
-
With automatic EIP allocation, EIPs may be repeatedly requested and released when pods are recreated or Container Network Interface (CNI) execution fails, which can trigger EIP limits. To avoid this, specify an EIP by setting the pod annotation
network.alibabacloud.com/allocated-eip-id.
Procedure
To mount an EIP on a pod, install the ack-extend-network-controller component from the Component Management page.

Step 1: Install or upgrade the component
If the component is already installed through Helm or ACK Marketplace, uninstall it before proceeding.
-
Log on to the ACS console. In the left navigation pane, click Clusters.
-
On the Clusters page, click the name of the target cluster. In the left navigation pane, click Add-ons.
-
In the search box, search for ACK Extend Network Controller and click Install in the lower-right corner of the component card.
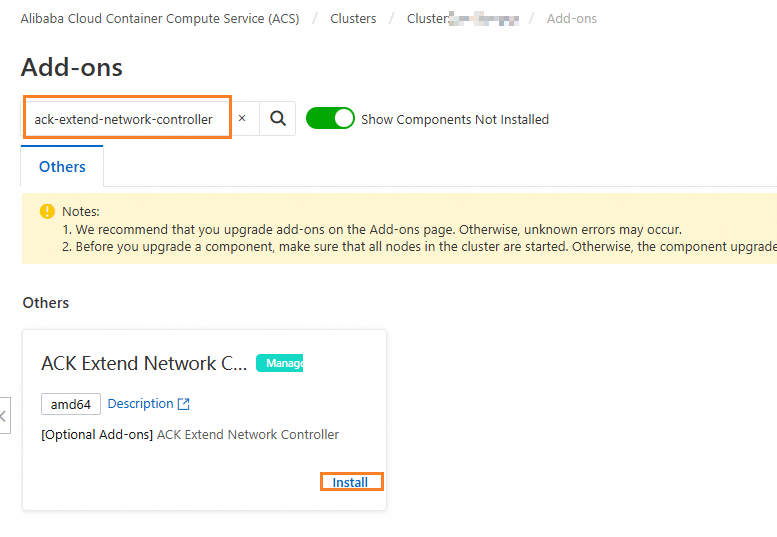
-
In the dialog box that appears, configure the parameters based on the following table. Then, click OK.
Parameter
Description
enableControllers
Features to enable:
-
eip: enables the EIP feature.
-
ipv6gw: enables the IPv6 feature.
-
natgw: enables the DNAT gateway feature.
eip and ipv6gw are selected by default and require no additional RAM permissions.
natgw requires RAM permissions. For more information, see Configure RAM permissions required for DNAT.
natGwPool
DNAT configuration.
customStatefulWorkloadKinds
Custom stateful container types. Kubernetes StatefulSets and directly created pods are supported by default. To add other container types, click + Add.
-
Step 2: Enable the EIP feature
You can mount an EIP on a pod by adding annotations to the pod configuration. For a full list of supported annotations, see Annotations for attaching an EIP to a pod.
You can automatically allocate a new EIP or specify an existing EIP instance. The two methods differ in annotations and release behavior: auto-allocated EIPs are released by default when the pod is deleted; specified EIPs are retained. For more information about EIP release policies, see Configure the EIP release policy.
Automatically allocate an EIP
-
On the Clusters page, click the name of the target cluster and choose Workloads > Deployments in the navigation pane on the left.
-
In the upper-right corner of the page, click Create From YAML.
-
Use the following sample YAML to create a deployment named example.
-
After the deployment is created, open the deployment details page. Click a pod name such as example-78d17b7xxx-adxxx to view the pod Details page. The Annotations section shows the EIP information. Click Edit to view the EIP details in the pod YAML.
-
After you complete the example, delete the deployment. Because no EIP instance ID was specified, the auto-allocated EIP is released by default when the pod is deleted.
Specify an EIP instance
-
Prepare an EIP instance. Apply for an EIP.
-
On the Clusters page, click the name of the target cluster and choose Workloads > StatefulSets in the navigation pane on the left.
-
In the upper-right corner of the page, click Create From YAML.
-
Use the following sample YAML to create a StatefulSet named example.
-
After the StatefulSet is created, open the StatefulSet details page. Click a pod name such as example-0 to view the pod Details page. The Annotations section shows the attached EIP information. Click Edit to view the EIP details in the pod YAML.
-
After you complete the example, delete the StatefulSet. Because an EIP instance ID was specified, the EIP is retained when the pod is deleted.
Related operations
The VPC controller attaches an EIP after the pod IP address is allocated. The pod may become Ready before the EIP is attached, which can cause service interruptions or connection timeouts. Use the following methods to ensure the EIP is attached before the pod accepts traffic.
Use readiness gates to check the EIP attachment status
With readinessGates configured, the VPC controller sets the pod conditions after the EIP is attached. The pod does not enter the Ready state until the EIP attachment completes.
kind: Pod
...
spec:
  readinessGates:
  - conditionType: "k8s.aliyun.com/eip"
status:
  conditions:
  - lastProbeTime: "2022-12-12T03:45:48Z"
    lastTransitionTime: "2022-12-12T03:45:48Z"
    reason: Associate eip succeed
    status: "True"
    type: k8s.aliyun.com/eip
...
Use initContainers to check the EIP attachment status
Configure initContainers for the pod to check whether the EIP is allocated in initContainers. Sample code for configuring initContainers:
apiVersion: v1
kind: Pod
metadata:
  name: example
  annotations:
    network.alibabacloud.com/pod-with-eip: "true"
spec:
  containers:
  - name: example
    image: registry-cn-hangzhou.ack.aliyuncs.com/ack-demo/busybox:1.28
    command: ['sh', '-c', 'echo The app is running! && sleep 3600']
  initContainers:
  - name: init
    image: registry-cn-hangzhou.ack.aliyuncs.com/ack-demo/busybox:1.28
    command: ['timeout', '-t' ,'60', 'sh','-c', "until grep -E '^k8s.aliyun.com\\/pod-ips=\\S?[0-9]+\\S?' /etc/podinfo/annotations; do echo waiting for annotations; sleep 2; done"]
    volumeMounts:
    - name: podinfo
      mountPath: /etc/podinfo
  volumes:
  - name: podinfo
    downwardAPI:
      items:
      - path: "labels"
        fieldRef:
          fieldPath: metadata.labels
      - path: "annotations"
        fieldRef:
          fieldPath: metadata.annotations
Configure RAM permissions required for DNAT
The DNAT feature requires ack-extend-network-controller to access Alibaba Cloud OpenAPI. Configure the following RAM permissions.
-
Log on to the Resource Access Management (RAM) console. In the navigation pane on the left, click Access Policies and then click Create Policy.
-
On the Create Policy page, click Script Editor, paste the following content into the
Statementsection of the code editor, and then click OK. Set the Policy Name to DNAT-Policy and click OK again.{ "Effect": "Allow", "Action": [ "ecs:DescribeNetworkInterfaces", "vpc:DescribeNatGateways", "vpc:DescribeForwardTableEntries", "vpc:CreateForwardEntry", "vpc:DescribeEipAddresses", "vpc:DeleteForwardEntry", "vpc:DescribeRouteTableList", "vpc:DescribeRouteEntryList" ], "Resource": [ "*" ], "Condition": {} } -
In the navigation pane on the left, click Roles. In the search box, search for AliyunCCNECRole. In the Actions column, click Grant Permission.
-
In the search box of the Access Policy section, search for and select DNAT-Policy. Then, click Confirm.