In Kubernetes 1.27 and earlier, you can temporarily change the container parameters for a running pod only by updating the PodSpec and resubmitting it, which deletes and recreates the pod. ACK provides a feature that lets you dynamically modify pod resource parameters using Cgroups files. This feature lets you temporarily change the CPU, memory, and disk I/O isolation parameters of a pod on a single machine without restarting the pod.
This feature is intended only for temporary adjustments. For example, if the memory usage of a pod gradually increases, you can increase the memory limit of the pod without restarting it to avoid triggering the out of memory (OOM) killer. For formal and routine O&M operations, we recommend that you use the following features: Enable the CPU Burst performance optimization policy, Enable CPU topology-aware scheduling, and Resource profiling.
Prerequisites
-
A kubectl client is connected to the ACK cluster. For more information, see Connect to an ACK cluster using kubectl.
-
You have installed the ack-koordinator component, version 0.5.0 or later. For more information, see ack-koordinator (ack-slo-manager).
Billing
The ack-koordinator component is free to install and use. However, additional fees may be incurred in the following scenarios.
ack-koordinator is an unmanaged component that consumes resources on worker nodes after installation. You can specify the amount of resources requested by each module when you install the component.
By default, ack-koordinator exposes monitoring metrics for features such as resource profiling and fine-grained scheduling in Prometheus format. When you configure the component, if you enable the Enable Prometheus monitoring metrics for ACK-Koordinator option and use Managed Service for Prometheus, these metrics are considered custom metrics and will incur charges. The fees depend on factors such as the size of your cluster and the number of applications. We recommend that you read the Prometheus instance billing documentation for Managed Service for Prometheus to understand the free quota and billing policy for custom metrics before you enable this feature. You can use usage query to monitor and manage your resource usage.
Modify the memory limit
If the memory usage of a pod increases, you can temporarily and dynamically modify the memory limit of the container using a Cgroups file to prevent the OOM killer from being triggered. This example creates a container with an initial memory limit of 1 GB. It then verifies that you can successfully modify the memory limit of the container using Cgroups without restarting the pod.
If you use this feature in a cluster of version 1.22 or later, ensure that the ack-koordinator component version is v1.5.0-ack1.14 or later. Other component versions support only clusters of version 1.22 or earlier.
For regular adjustments to the CPU limit, you can use the CPU Burst policy to automatically adjust the CPU resource elasticity of the pod. For more information, see Enable the CPU Burst policy. If you still need to temporarily adjust the CPU limit, see the procedure in Migrate from resource-controller to ack-koordinator.
-
Create a file named pod-demo.yaml with the following content.
apiVersion: v1 kind: Pod metadata: name: pod-demo spec: containers: - name: pod-demo image: registry-cn-beijing.ack.aliyuncs.com/acs/stress:v1.0.4 resources: requests: cpu: 1 memory: "50Mi" limits: cpu: 1 memory: "1Gi" # The memory limit of the container is 1 GB. command: ["stress"] args: ["--vm", "1", "--vm-bytes", "256M", "-c", "2", "--vm-hang", "1"] -
Run the following command to deploy pod-demo to the cluster.
kubectl apply -f pod-demo.yaml -
Run the following command to view the initial memory limit of the container.
# The specific path can be constructed from the pod UID and container ID.
cat /sys/fs/cgroup/memory/kubepods.slice/kubepods-burstable.slice/kubepods-burstable-podaf44b779_41d8_43d5_a0d8_8a7a0b17****.slice/memory.limit_in_bytes
Expected output:
# This corresponds to 1 GB, which is 1 × 1024 × 1024 × 1024 = 1073741824.
1073741824
The output shows that the initial memory limit of the container is 1 GB. This matches the
spec.containers.resources.limits.memorysetting in Step 1. -
Create a file named cgroups-sample.yaml with the following content to specify the new memory limit for the container.
apiVersion: resources.alibabacloud.com/v1alpha1 kind: Cgroups metadata: name: cgroups-sample spec: pod: name: pod-demo namespace: default containers: - name: pod-demo memory: 5Gi # Specify a memory limit of 5 GB for the pod. -
Run the following command to deploy cgroups-sample.yaml to the cluster.
kubectl apply -f cgroups-sample.yaml -
Run the following command to view the updated memory limit of the container.
# The specific path can be constructed from the pod UID.
cat /sys/fs/cgroup/memory/kubepods.slice/kubepods-burstable.slice/kubepods-burstable-podaf44b779_41d8_43d5_a0d8_8a7a0b17****.slice/memory.limit_in_bytes
Expected output:
# This corresponds to 5 GB, which is 5 × 1024 × 1024 × 1024 = 5368709120
5368709120
The expected output shows the container's memory limit is 5 GB, which matches the value specified in Step 4 for
spec.pod.containers.memory. This confirms the modification was successful. -
Run the following command to check the status of the pod.
kubectl describe pod pod-demoExpected output:
Events:
  Type    Reason          Age   From               Message
  ----    ------          ----  ----               -------
  Normal  Scheduled       36m   default-scheduler  Successfully assigned default/pod-demo to cn-hangzhou.192.168.0.50
  Normal  AllocIPSucceed  36m   terway-daemon      Alloc IP 192.XX.XX.51/24 took 4.490542543s
  Normal  Pulling         36m   kubelet            Pulling image "registry-cn-beijing.ack.aliyuncs.com/acs/stress:v1.0.4"
  Normal  Pulled          36m   kubelet            Successfully pulled image "registry-cn-beijing.ack.aliyuncs.com/acs/stress:v1.0.4" in 2.204s (2.204s including waiting). Image size: 7755078 bytes.
  Normal  Created         36m   kubelet            Created container pod-demo
  Normal  Started         36m   kubelet            Started container pod-demo
The output shows that the Events list contains no information about a pod restart and the pod is running as normal.
Modify the CPU core binding scope
If your application is CPU-intensive and requires better resource isolation, you can modify the CPU core binding scope to specify which CPU cores the pod can use.
This example creates a pod that is not bound to any specific CPU cores. It then verifies that you can successfully modify the CPU core binding scope of the pod using a Cgroups file without restarting the pod.
For regular CPU core binding, we recommend that you use the CPU topology-aware scheduling feature to provide better performance for CPU-sensitive workloads. For more information, see Enable CPU topology-aware scheduling.
-
Create a file named pod-cpuset-demo.yaml with the following content.
apiVersion: v1 kind: Pod metadata: name: pod-cpuset-demo spec: containers: - name: pod-cpuset-demo image: registry-cn-beijing.ack.aliyuncs.com/acs/stress:v1.0.4 resources: requests: memory: "50Mi" limits: memory: "1000Mi" cpu: 0.5 command: ["stress"] args: ["--vm", "1", "--vm-bytes", "556M", "-c", "2", "--vm-hang", "1"] -
Run the following command to deploy pod-cpuset-demo.yaml to the cluster.
kubectl apply -f pod-cpuset-demo.yaml -
Run the following command to view the current CPU core binding of the container.
# The actual path can be constructed from the pod UID and container ID.
cat /sys/fs/cgroup/cpuset/kubepods.slice/kubepods-burstable.slice/kubepods-burstable-podf9b79bee_eb2a_4b67_befe_51c270f8****.slice/cri-containerd-aba883f8b3ae696e99c3a920a578e3649fa957c51522f3fb00ca943dc2c7****.scope/cpuset.cpus
Expected output:
0-31The output shows that before CPU binding, the available CPU core range is 0 to 31, which means there are no CPU constraints.
-
Create a file named cgroups-sample-cpusetpod.yaml with the following content to specify the CPU core binding information.
apiVersion: resources.alibabacloud.com/v1alpha1 kind: Cgroups metadata: name: cgroups-sample-cpusetpod spec: pod: name: pod-cpuset-demo namespace: default containers: - name: pod-cpuset-demo cpuset-cpus: 2-3 # Bind the pod to CPU cores 2 and 3. -
Run the following command to deploy cgroups-sample-cpusetpod.yaml to the cluster.
kubectl apply -f cgroups-sample-cpusetpod.yaml -
Run the following command to view the updated CPU core binding of the container.
# The actual path can be constructed from the pod UID and container ID.
cat /sys/fs/cgroup/cpuset/kubepods.slice/kubepods-burstable.slice/kubepods-burstable-podf9b79bee_eb2a_4b67_befe_51c270f8****.slice/cri-containerd-aba883f8b3ae696e99c3a920a578e3649fa957c51522f3fb00ca943dc2c7****.scope/cpuset.cpus
Expected output:
2-3The expected output indicates that the container is successfully attached to CPU 2 and CPU 3. This is consistent with the
spec.pod.containers.cpuset-cpussetting in Step 4, which confirms that the modification was successful. -
Run the following command to check the status of the pod.
kubectl describe pod pod-cpuset-demoExpected output:
Events:
  Type    Reason          Age   From               Message
  ----    ------          ----  ----               -------
  Normal  Scheduled       7m7s  default-scheduler  Successfully assigned default/pod-cpuset-demo to cn-hangzhou.192.XX.XX.50
  Normal  AllocIPSucceed  7m5s  terway-daemon      Alloc IP 192.XX.XX.56/24 took 2.060752512s
  Normal  Pulled          7m5s  kubelet            Container image "registry-cn-beijing.ack.aliyuncs.com/acs/stress:v1.0.4" already present on machine
  Normal  Created         7m5s  kubelet            Created container pod-cpuset-demo
  Normal  Started         7m5s  kubelet            Started container pod-cpuset-demo
  Normal  CPUSetBind      84s   koordlet           set cpuset 2-3 to container pod-cpuset-demo success
The output shows that the Events list contains no information about a pod restart. The pod is running as normal.
Modify disk IOPS parameters
To control disk IOPS, you must use worker nodes that run the Alibaba Cloud Linux operating system.
This example creates an I/O-intensive test application. It then verifies that you can limit the throughput of the pod and modify the disk I/O limit of the container using a Cgroups file without restarting the pod.
When you use blkio limits in a cgroup v1 environment, the operating system kernel limits only the direct I/O of the container. It cannot limit buffered I/O. To limit buffered I/O, you must enable the cgroup writeback feature for cgroup v1 in Alibaba Cloud Linux. For more information, see Enable the cgroup writeback feature. This feature is not supported in cgroup v2 environments.
-
Create an I/O-intensive test application using the following YAML content.
The host directory /mnt is mounted for use inside the pod and corresponds to the disk device name /dev/vda1.
apiVersion: apps/v1 kind: Deployment metadata: name: fio-demo labels: app: fio-demo spec: selector: matchLabels: app: fio-demo template: metadata: labels: app: fio-demo spec: containers: - name: fio-demo image: registry.cn-zhangjiakou.aliyuncs.com/acs/fio-for-slo-test:v0.1 command: ["sh", "-c"] # Use the Fio tool to perform a write test on disk IOPS. args: ["fio -filename=/data/test -direct=1 -iodepth 1 -thread -rw=write -ioengine=psync -bs=16k -size=2G -numjobs=10 -runtime=12000 -group_reporting -name=mytest"] volumeMounts: - name: pvc mountPath: /data # Mount to the /data path. volumes: - name: pvc hostPath: path: /mnt -
Run the following command to deploy fio-demo to the cluster.
kubectl apply -f fio-demo.yaml -
Deploy the Cgroups file that controls disk IOPS to limit the throughput of the pod.
-
Create a file named cgroups-sample-fio.yaml with the following YAML content to specify the bytes per second (BPS) limit for the /dev/vda1 device.
apiVersion: resources.alibabacloud.com/v1alpha1 kind: Cgroups metadata: name: cgroups-sample-fio spec: deployment: name: fio-demo namespace: default containers: - name: fio-demo blkio: # BPS limit, such as 1048576, 2097152, or 3145728. device_write_bps: [{device: "/dev/vda1", value: "1048576"}] -
Run the following command to view the updated disk I/O limit of the container.
# The actual path can be constructed from the pod UID and container ID.
cat /sys/fs/cgroup/blkio/kubepods.slice/kubepods-besteffort.slice/kubepods-besteffort-pod0840adda_bc26_4870_adba_f193cd00****.slice/cri-containerd-9ea6cc97a6de902d941199db2fcda872ddd543485f5f987498e40cd706dc****.scope/blkio.throttle.write_bps_device
Expected output:
253:0 1048576The output shows that the current disk speed limit is set to
1048576.
-
-
View the disk monitoring data for the corresponding node.
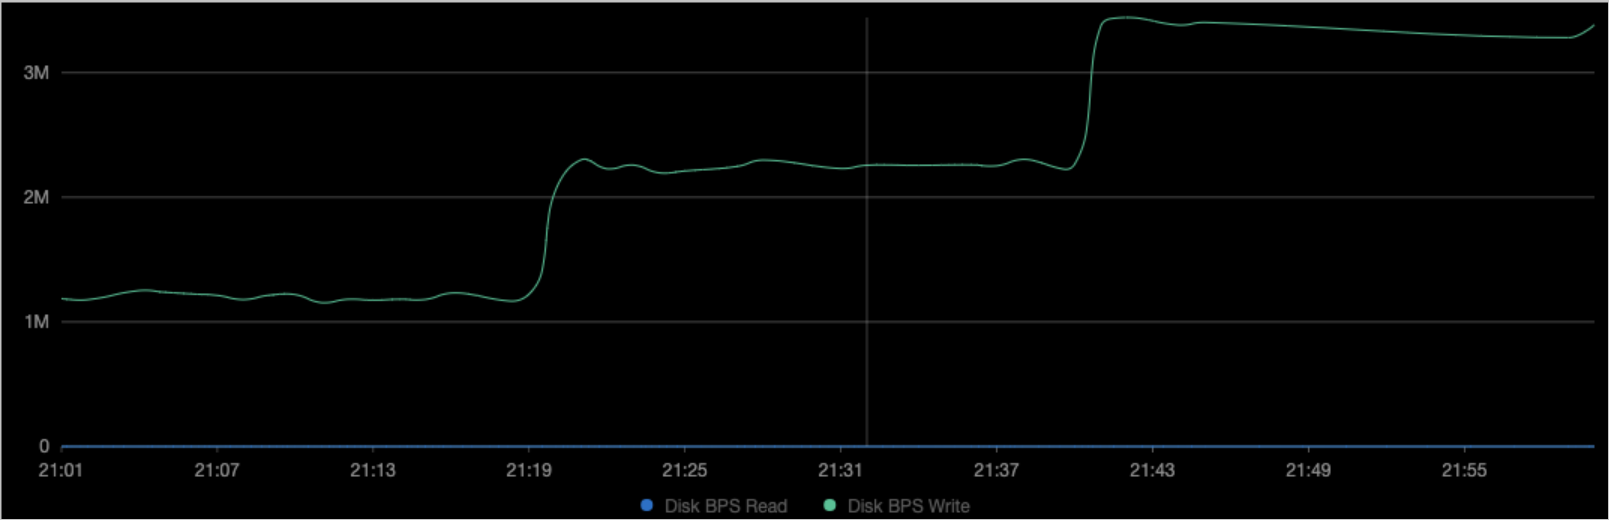
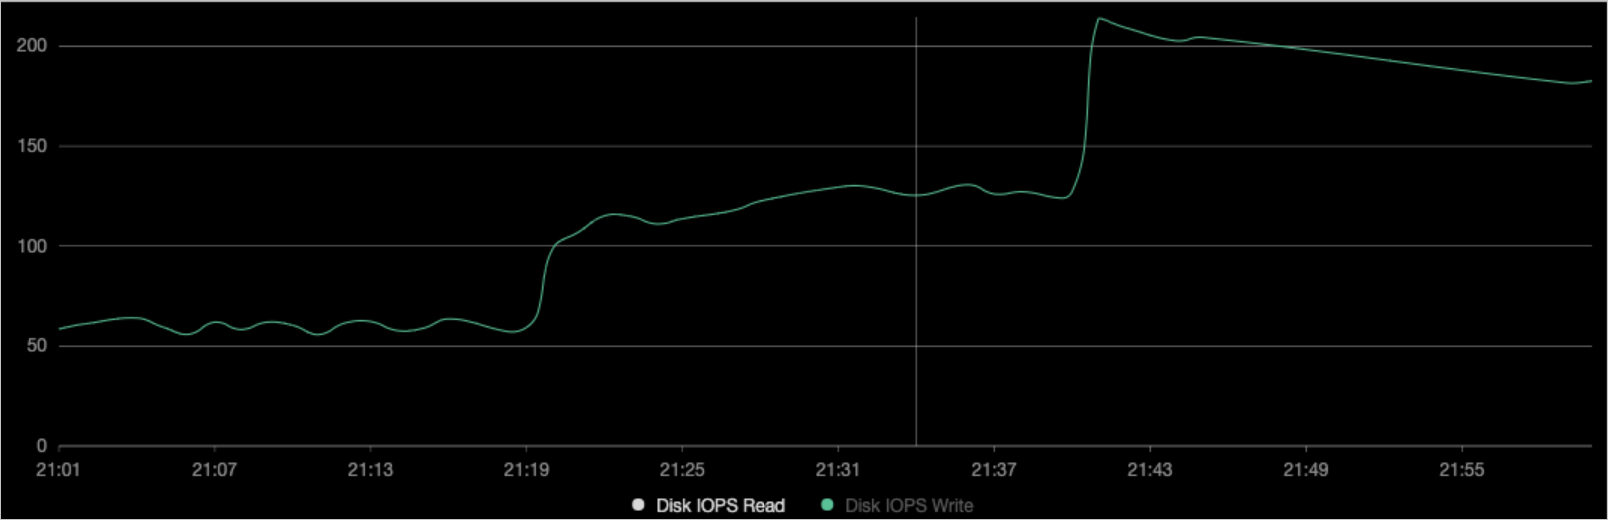
As shown in the preceding figures, the throughput BPS (File System Write) of the container matches the
device_write_bpslimit set in Step 3. The pod was not restarted during the modification.NoteYou can also enable the Alibaba Cloud Prometheus dashboard. For more information, see Connect to and configure Alibaba Cloud Prometheus Monitoring. Then, on the Prometheus Monitoring page, choose Operations > Prometheus Monitoring. On the Application Monitoring tab, you can filter for the sample application to view its disk data.
Dynamically modify pod resource parameters at the deployment level
The dynamic modification of resource parameters at the pod level, as described in the preceding sections, also works at the deployment level. Modifications at the pod level take effect through the spec.pod field in the Cgroups file, and modifications at the deployment level take effect through the spec.deployment field. The following example shows how to modify the CPU core binding scope for a deployment. The operations for other scenarios are similar.
-
Create a file named go-demo.yaml with the following content.
The deployment contains two instances of a stress testing program. Each instance uses 0.5 CPU cores.
apiVersion: apps/v1 kind: Deployment metadata: name: go-demo labels: app: go-demo spec: replicas: 2 selector: matchLabels: app: go-demo template: metadata: labels: app: go-demo spec: containers: - name: go-demo image: registry-cn-beijing.ack.aliyuncs.com/acs/stress:v1.0.4 command: ["stress"] args: ["--vm", "1", "--vm-bytes", "556M", "-c", "1", "--vm-hang", "1"] imagePullPolicy: Always resources: requests: cpu: 0.5 limits: cpu: 0.5 -
Run the following command to deploy go-demo to the cluster.
kubectl apply -f go-demo.yaml -
Create a file named cgroups-cpuset-sample.yaml with the following content to specify the CPU binding information.
apiVersion: resources.alibabacloud.com/v1alpha1 kind: Cgroups metadata: name: cgroups-cpuset-sample spec: deployment: # This is for a Deployment. name: go-demo namespace: default containers: - name: go-demo cpuset-cpus: 2,3 # Bind the pod to CPU cores 2 and 3. -
Run the following command to deploy cgroups-cpuset-sample to the cluster.
kubectl apply -f cgroups-cpuset-sample.yaml -
Run the following command to view the updated CPU core binding of the container.
# The actual path can be constructed from the pod UID and container ID.
cat /sys/fs/cgroup/cpuset/kubepods.slice/kubepods-burstable.slice/kubepods-burstable-pod06de7408_346a_4d00_ba25_02833b6c****.slice/cri-containerd-733a0dc93480eb47ac6c5abfade5c22ed41639958e3d304ca1f85959edc3****.scope/cpuset.cpus
Expected output:
2-3The output shows that the container is bound to CPU cores 2 and 3. This matches the
spec.deployment.containers.cpuset-cpussetting in the Cgroups file.