CPU limits prevent containers from consuming more than their allocated share of compute time. But the Linux kernel enforces these limits across 100-millisecond scheduling cycles—meaning a container can exhaust its quota in one cycle even when its average usage over the past second looks fine. The result is CPU throttling: threads are suspended until the next cycle, which adds latency that doesn't appear in second-level metrics.
CPU Burst addresses this by letting containers accumulate unused CPU quota and spend it during short-lived demand spikes. ack-koordinator monitors throttling events and dynamically adjusts cgroup quota parameters—without changing the CPU limit in the pod spec. This reduces tail latency for latency-sensitive workloads without requiring you to raise CPU limits across the board.
To get the most out of this topic, familiarize yourself with the CFS Scheduler and node CPU management policies.
How it works
CPU is a time-sharing resource. The kernel uses the Completely Fair Scheduler (CFS) to allocate CPU time in fixed scheduling cycles. The cycle length is controlled by cpu.cfs_period_us (typically 100 ms). The CPU time a container can use per cycle is controlled by cpu.cfs_quota_us. A container with a CPU limit of 4 gets 400 ms of CPU time per 100-ms cycle.
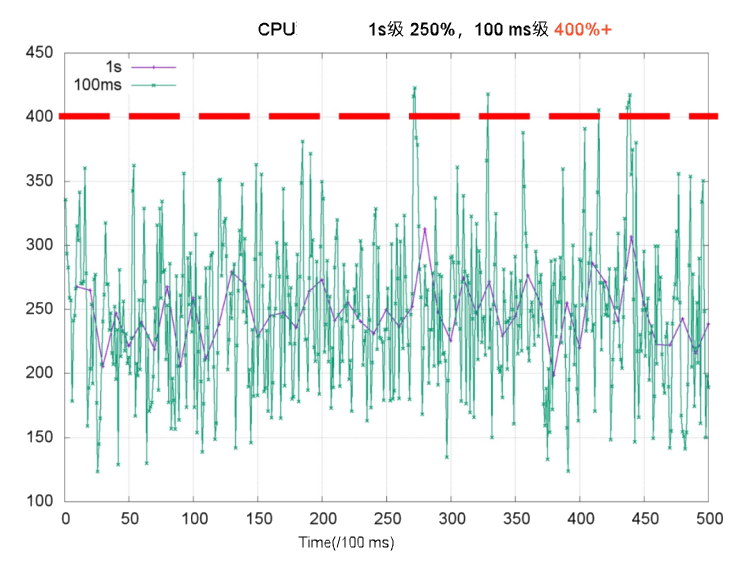
The problem is that CPU usage is bursty at the millisecond level, even when second-level averages look low. The chart below illustrates this: the purple line shows per-second CPU usage staying well below 4 cores, while the green line shows millisecond-level usage spiking above 4 cores in some periods. When those spikes exhaust the CFS quota, the kernel throttles the container.
Throttling forces threads to wait for the next scheduling cycle, which increases response time (RT) and causes long-tail latency. The table below shows what this looks like in practice for a web service container with a CPU limit of 2 on a 4-core node.
<table> <thead> <tr> <td><p>Even when overall CPU usage over the last second is low, throttling forces Thread 2 to wait for the next scheduling cycle to finish processing req 2. This increases request RT. This is a common cause of long-tail RT.<img></p></td> <td><p>After enabling CPU Burst, the container accumulates unused CPU time. It uses that time during bursts. This boosts performance and lowers latency.<img></p><p></p></td> </tr> </thead> <colgroup></colgroup> <colgroup></colgroup> <tbody></tbody> </table>
When demand spikes beyond what accumulated quota can cover—such as a sudden traffic surge—ack-koordinator resolves the CPU bottleneck within seconds while keeping total node load within safe limits.
ack-koordinator adjusts only the cfs quota parameter in the node cgroup. It does not change the CPU limit field in the pod spec.
Use cases
Throttling despite low average utilization. CPU usage stays below the CPU limit most of the time, but short bursts within scheduling cycles still trigger throttling. CPU Burst lets the container spend accumulated quota during those bursts, reducing throttling and improving service quality.
Slow startup due to CPU-intensive initialization. The container needs high CPU during startup and loading, then settles at a lower steady state. CPU Burst lets the container use extra CPU time during startup without requiring a permanently high CPU limit.
Billing
ack-koordinator is free to install and use. Extra charges may apply in these two cases:
-
Worker node resources: ack-koordinator is an unmanaged component. After installation, it runs on your worker nodes and consumes their resources. Configure resource requests for each module during installation.
-
Prometheus metrics: ack-koordinator exposes resource profiling and scheduling metrics in Prometheus format. If you enable the Enable Prometheus monitoring metrics for ACK-Koordinator option and use Alibaba Cloud Prometheus, these metrics count as custom metrics and incur charges. Review the Prometheus instance pricing before enabling, and use usage queries to monitor consumption.
Prerequisites
Before you begin, ensure that you have:
-
An ACK managed cluster Pro edition running Kubernetes 1.18 or later. See Create an ACK managed cluster and Manually upgrade a cluster.
-
ack-koordinator version 0.8.0 or later installed on the cluster. See ack-koordinator.
Use Alibaba Cloud Linux as the node operating system. Its kernel-level CPU Burst support provides finer-grained quota control. See Do I need to use Alibaba Cloud Linux to enable the CPU Burst policy?.
Enable CPU Burst
CPU Burst can be enabled at three scopes. Configuration at a narrower scope takes precedence: pod annotations override namespace-level ConfigMaps, which override the cluster-level ConfigMap.
| Scope | Method | Priority |
|---|---|---|
| Single pod | Pod annotation | Highest |
| Namespace | ack-slo-pod-config ConfigMap |
Middle |
| Entire cluster | ack-slo-config ConfigMap |
Lowest |
Enable for a specific pod
Add the annotation under metadata in the pod YAML. For a Deployment or other workload, set the annotation in template.metadata instead.
annotations:
  # Enable CPU Burst for this pod.
  koordinator.sh/cpuBurst: '{"policy": "auto"}'
  # Disable CPU Burst for this pod.
  koordinator.sh/cpuBurst: '{"policy": "none"}'
Enable for an entire cluster
-
Create
configmap.yamlwith the following content.apiVersion: v1 data: cpu-burst-config: '{"clusterStrategy": {"policy": "auto"}}' #cpu-burst-config: '{"clusterStrategy": {"policy": "cpuBurstOnly"}}' #cpu-burst-config: '{"clusterStrategy": {"policy": "none"}}' kind: ConfigMap metadata: name: ack-slo-config namespace: kube-system -
Apply the ConfigMap. Use PATCH if
ack-slo-configalready exists in thekube-systemnamespace to avoid overwriting other settings.-
If the ConfigMap exists: ``
bash kubectl patch cm -n kube-system ack-slo-config --patch "$(cat configmap.yaml)"`` -
If it does not exist: ``
bash kubectl apply -f configmap.yaml``
-
Enable for a specific namespace
-
Create
configmap.yamlwith the following content.apiVersion: v1 kind: ConfigMap metadata: name: ack-slo-pod-config namespace: koordinator-system # Create this namespace manually before first use. data: # Enable or disable CPU Burst for selected namespaces. cpu-burst: | { "enabledNamespaces": ["allowed-ns"], "disabledNamespaces": ["blocked-ns"] } # Enables CPU Burst for all pods in the allowed-ns namespace. Policy is auto. # Disables CPU Burst for all pods in the blocked-ns namespace. Policy is none. -
Apply the ConfigMap. Use PATCH if
ack-slo-pod-configalready exists in thekoordinator-systemnamespace to avoid overwriting other settings.-
If the ConfigMap exists: ``
bash kubectl patch cm -n koordinator-system ack-slo-pod-config --patch "$(cat configmap.yaml)"`` -
If it does not exist: ``
bash kubectl apply -f configmap.yaml``
-
Verify with a load test
This example uses an Apache HTTP Server pod to demonstrate that CPU Burst reduces access latency.
-
Create
apache-demo.yamlwith the following content. The annotation enables CPU Burst for this pod.apiVersion: v1 kind: Pod metadata: name: apache-demo annotations: koordinator.sh/cpuBurst: '{"policy": "auto"}' # Enable CPU Burst. spec: containers: - command: - httpd - -D - FOREGROUND image: registry.cn-zhangjiakou.aliyuncs.com/acs/apache-2-4-51-for-slo-test:v0.1 imagePullPolicy: Always name: apache resources: limits: cpu: "4" memory: 10Gi requests: cpu: "4" memory: 10Gi nodeName: $nodeName # Replace with the actual node name. hostNetwork: False restartPolicy: Never schedulerName: default-scheduler -
Deploy the Apache HTTP Server.
kubectl apply -f apache-demo.yaml -
Run a load test using wrk2. Replace
$target_ip_addresswith the IP address of the Apache pod.# Download and extract the open-source wrk2 tool. See https://github.com/giltene/wrk2. # The Apache image has Gzip compression enabled to simulate server-side request processing. # Adjust QPS pressure by changing the -R parameter. ./wrk -H "Accept-Encoding: deflate, gzip" -t 2 -c 12 -d 120 --latency --timeout 2s -R 24 http://$target_ip_address:8010/static/file.1m.test
Results
The tables below compare p99 response time, CPU throttling ratio, and average pod CPU utilization—with and without CPU Burst—on both Alibaba Cloud Linux and CentOS.
-
All disabled: CPU Burst policy set to
none. -
All enabled: CPU Burst policy set to
auto.
The values below are theoretical. Actual results depend on your environment.
<table> <thead> <tr> <td><p><b>Alibaba Cloud Linux</b></p></td> <td><p><b>All disabled</b></p></td> <td><p><b>All enabled</b></p></td> </tr> </thead> <colgroup></colgroup> <colgroup></colgroup> <colgroup></colgroup> <tbody> <tr> <td><p>apache RT-p99</p></td> <td><p>107.37 ms</p></td> <td><p>67.18 ms (-37.4%)</p></td> </tr> <tr> <td><p>CPU Throttled Ratio</p></td> <td><p>33.3%</p></td> <td><p>0%</p></td> </tr> <tr> <td><p>Average Pod CPU utilization</p></td> <td><p>31.8%</p></td> <td><p>32.6%</p></td> </tr> </tbody> </table><table> <thead> <tr> <td><p><b>CentOS</b></p></td> <td><p><b>All disabled</b></p></td> <td><p><b>All enabled</b></p></td> </tr> </thead> <colgroup></colgroup> <colgroup></colgroup> <colgroup></colgroup> <tbody> <tr> <td><p>apache RT-p99</p></td> <td><p>111.69 ms</p></td> <td><p>71.30 ms (-36.2%)</p></td> </tr> <tr> <td><p>CPU Throttled Ratio</p></td> <td><p>33%</p></td> <td><p>0%</p></td> </tr> <tr> <td><p>Average Pod CPU utilization</p></td> <td><p>32.5%</p></td> <td><p>33.8%</p></td> </tr> </tbody> </table>
Enabling CPU Burst reduces p99 response time by roughly 37% and brings the CPU throttling ratio to 0%, with negligible change in average CPU utilization.
Advanced configuration
Configure advanced parameters in either a pod annotation or a ConfigMap. Pod annotations take precedence, followed by namespace-level ConfigMaps, then the cluster-level ConfigMap.
# Example ConfigMap ack-slo-config.
data:
  cpu-burst-config: |
    {
      "clusterStrategy": {
        "policy": "auto",
        "cpuBurstPercent": 1000,
        "cfsQuotaBurstPercent": 300,
        "sharePoolThresholdPercent": 50,
        "cfsQuotaBurstPeriodSeconds": -1
      }
    }

# Example pod annotation.
koordinator.sh/cpuBurst: '{"policy": "auto", "cpuBurstPercent": 1000, "cfsQuotaBurstPercent": 300, "cfsQuotaBurstPeriodSeconds": -1}'The Annotation and ConfigMap columns indicate whether each parameter supports configuration via pod annotation or ConfigMap. ![]() means supported.
means supported. ![]() means not supported.
means not supported.
<table> <thead> <tr> <td><p><b>Parameter</b></p></td> <td><p><b>Type</b></p></td> <td><p><b>Description</b></p></td> <td><p><b>Annotation</b></p></td> <td><p><b>ConfigMap</b></p></td> </tr> </thead> <colgroup></colgroup> <colgroup></colgroup> <colgroup></colgroup> <colgroup></colgroup> <colgroup></colgroup> <tbody> <tr> <td><p><code>policy</code></p></td> <td><p>string</p></td> <td> <ul> <li><p><code>none</code> (default): Disable CPU Burst. All related parameters reset to their initial values.</p></li> <li><p><code>cpuBurstOnly</code>: Enable only the Alibaba Cloud Linux kernel-level CPU Burst elasticity.</p></li> <li><p><code>cfsQuotaBurstOnly</code>: Enable only CFS quota elasticity. Works with all kernel versions.</p></li> <li><p><code>auto</code>: Automatically enable both elasticities—Alibaba Cloud Linux kernel features and CFS quota elasticity.</p></li> </ul></td> <td><p><img></p></td> <td><p><img></p></td> </tr> <tr> <td><p><code>cpuBurstPercent</code></p></td> <td><p>int</p></td> <td><p>Default: <code>1000</code>. Unit: percent.</p><p>For Alibaba Cloud Linux kernel-level CPU Burst elasticity, this sets how much CPU Burst amplifies beyond the CPU limit. Maps to the cgroup parameter <code>cpu.cfs_burst_us</code>. For details, see <a href="https://www.alibabacloud.com/help/en/document_detail/306980.html#task-2108025">Enable CPU Burst using the cgroup v1 interface</a>.</p><p>For example, with the default setting, <code>CPU Limit = 1</code> sets <code>cpu.cfs_quota_us</code> to 100,000. Then <code>cpu.cfs_burst_us</code> becomes 1,000,000—a 10x increase.</p></td> <td><p><img></p></td> <td><p><img></p></td> </tr> <tr> <td><p><code>cfsQuotaBurstPercent</code></p></td> <td><p>int</p></td> <td><p>Default: <code>300</code>. Unit: percent.</p><p>When CFS quota elasticity is enabled, this sets the maximum allowed increase for the cgroup parameter <code>cpu.cfs_quota_us</code>. Default is 3x.</p></td> <td><p><img></p></td> <td><p><img></p></td> </tr> <tr> <td><p><code>cfsQuotaBurstPeriodSeconds</code></p></td> <td><p>int</p></td> <td><p>Default: <code>-1</code>. Unit: seconds. -1 means unlimited.</p><p>When CFS quota elasticity is enabled, this sets how long a pod can consume CPU at the increased quota (<code>cfsQuotaBurstPercent</code>). After this period, the pod's <code>cpu.cfs_quota_us</code> resets to its original value. Other pods are unaffected.</p></td> <td><p><img></p></td> <td><p><img></p></td> </tr> <tr> <td><p><code>sharePoolThresholdPercent</code></p></td> <td><p>int</p></td> <td><p>Default: <code>50</code>. Unit: percent.</p><p>When CFS quota elasticity is enabled, this sets the safe CPU usage threshold for the node. If usage exceeds this threshold, all pods with increased <code>cpu.cfs_quota_us</code> reset to their original values.</p></td> <td><p><img></p></td> <td><p><img></p></td> </tr> </tbody> </table>
-
When
policyis set tocfsQuotaBurstOnlyorauto,cpu.cfs_quota_uschanges dynamically based on throttling events. -
During stress testing, monitor pod CPU usage or set
policytocpuBurstOnlyornoneto disable automatic CFS quota adjustment. This keeps elasticity stable in production.
FAQ
I used CPU Burst with the older ack-slo-manager protocol. Does it still work after upgrading to ack-koordinator?
Yes. The older annotation key was alibabacloud.com/cpuBurst. ack-koordinator fully supports this legacy protocol, so upgrades are seamless.
ack-koordinator's compatibility period for the earlier protocol version ended on July 30, 2023. Upgrade the resource parameters of the earlier protocol version to the latest version.
ack-koordinator is compatible with the following protocol versions.
<table> <thead> <tr> <td><p><span>ack-koordinator</span><b> version</b></p></td> <td><p><b>alibabacloud.com protocol</b></p></td> <td><p><b>koordinator.sh protocol</b></p></td> </tr> </thead> <colgroup></colgroup> <colgroup></colgroup> <colgroup></colgroup> <tbody> <tr> <td><p>≥0.2.0</p></td> <td><p>Supported</p></td> <td><p>Not supported</p></td> </tr> <tr> <td><p>≥0.8.0</p></td> <td><p>Supported</p></td> <td><p>Supported</p></td> </tr> </tbody> </table>
Why does CPU throttling still occur after enabling CPU Burst?
The most common cause is a configuration syntax error that prevents the policy from taking effect. Check your annotation or ConfigMap against the examples in Advanced configuration.
If the configuration is valid, throttling can still occur when CPU demand hits the cfsQuotaBurstPercent ceiling. Adjust your CPU request and limit values to better match actual workload needs.
Two other factors to be aware of:
-
cpu.cfs_quota_usis updated only after ack-koordinator detects a throttling event, so there is a small delay.cpu.cfs_burst_us, by contrast, is applied immediately and responds faster. For best results, use Alibaba Cloud Linux. -
When node-wide CPU utilization exceeds
sharePoolThresholdPercent, ack-koordinator resetscpu.cfs_quota_usfor all pods to prevent any single pod from causing interference. SetsharePoolThresholdPercentto a value that reflects your actual node load patterns.
Do I need to use Alibaba Cloud Linux to enable the CPU Burst policy?
CPU Burst works on all Alibaba Cloud Linux and CentOS kernels. Alibaba Cloud Linux is recommended: its kernel-level cpu.cfs_burst_us support lets ack-koordinator provide finer-grained CPU elasticity than CFS quota adjustment alone. For details, see Enable CPU Burst using the cgroup v1 interface.
After enabling CPU Burst, why does my application report different thread counts?
ack-koordinator dynamically adjusts cpu.cfs_quota_us—the container's CPU time quota for each scheduling cycle—in response to load changes. Many applications, including those using Java's Runtime.getRuntime().availableProcessors(), read cpu.cfs_quota_us to calculate available CPU cores. When the quota changes, the reported core count changes too, causing thread pool sizes and other quota-dependent parameters to fluctuate.
Fix this by making your application read from the fixed limits.cpu value in the pod spec instead.
-
Inject
limits.cpuas an environment variable usingresourceFieldRef.env: - name: CPU_LIMIT valueFrom: resourceFieldRef: resource: limits.cpu -
Update your application startup logic to read
CPU_LIMITwhen calculating and setting thread pool size. This keeps thread counts stable regardless of how ack-koordinator adjusts the CFS quota.