Container Network File System (CNFS) abstracts Alibaba Cloud file storage into a Kubernetes object (CRD) for independent management. This includes operations such as creating, deleting, mounting, monitoring, and scaling out file systems. You can use CNFS to manage NAS file systems independently to improve their performance and Quality of Service (QoS).This topic describes how to use CNFS to manage NAS file systems and apply them to workloads.
Prerequisites
File Storage NAS is activated.
When you log on to the File Storage NAS product page for the first time, activate the service as prompted.
An ACK Pro managed cluster is created. The cluster version must be 1.20 or later. If you use kubectl to manage CNFS, cluster version 1.20 is supported. For more information, see Create an ACK managed cluster.
The versions of the storage-related components csi-plugin, csi-provisioner, and storage-operator meet the following requirements:
The csi-plugin and csi-provisioner components are version v1.20.5-ff6490f-aliyun or later.
The storage-operator component is version v1.18.8.56-2aa33ba-aliyun or later. If you use the console to manage CNFS, the version must be v1.26.2-1de13b6-aliyun or later.
Capacity NAS and Performance NAS file systems are supported. Advanced and Extreme NAS file systems are not supported. If you want to use KMS to encrypt a NAS file system, you must first activate the KMS service. For more information, see Activate Key Management Service.
Function introduction
You can use one of the following methods to manage NAS file systems with CNFS:
Method 1: Use CNFS to create a default NAS file system
Create a default NAS file system using CNFS and dynamically mount it to a workload using a volume.
Method 2: Use CNFS to create a custom NAS file system
Create a custom NAS file system using CNFS and mount it to a workload using a static or dynamic volume.
Method 3: Use CNFS to configure an existing NAS file system
Configure an existing NAS file system using CNFS and mount it to a workload using a static or dynamic volume.
Method 1: Use CNFS to create a default NAS file system
A Capacity NAS or Performance NAS file system is created based on the VPC where the current cluster is located. Extreme NAS file systems are not supported. If the current region does not support Capacity NAS file systems, a Performance NAS file system is created. By default, files are not encrypted.
kubectl
Use the following YAML file to create a default CNFS file system. The file system is automatically mounted to a NAS file system and attached to a Deployment and a StatefulSet.
Parameter | Description |
description | The description of the file system. |
type | The type of the volume that you want to create. |
reclaimPolicy | The reclaim policy. Only the Retain policy is supported. If you delete the CNFS, the NAS file system is not deleted. |
parameters.encryptType | Optional. The encryption method.
|
parameters.enableTrashCan | Specifies whether to enable the recycle bin feature.
|
Console
Create a CNFS.
Log on to the ACK console. In the left navigation pane, click Clusters.
On the Clusters page, click the name of the cluster that you want to manage. In the navigation pane on the left, choose Volumes > Container Network File System (CNFS).
On the Container Network File System (CNFS) page, click Create CNFS File System.
In the Create CNFS File System panel, enter a name for the CNFS, select NAS as the file system, select Create Default NAS File System, and click OK.
NoteYou can enable End-to-end Data Acceleration as needed. This feature uses elastic acceleration for mounting. For more information, see Enable the distributed cache feature for CNFS NAS clients.
On the page that lists the container network file systems, click the target file system to view its details. Then, click the NAS ID to go to the details page of the NAS file system.
Click the Mount Targets tab. In the Mount Target list, hover over the
 in the Mount Target column to view the mount target address.
Create a dynamic StorageClass.
On the Clusters page, find the cluster you want and click its name. In the left-side pane, choose .
On the StorageClasses page, click Create in the upper-left corner.
In the Create panel, configure the StorageClass parameters and click OK.
Parameter
Description
Example
Name
The name of the StorageClass. For the format requirements, refer to the prompts on the page.
alibabacloud-cnfs-nas
PV Type
Select NAS.
NAS
Select Mount Target
The mount target address of the default NAS file system that is created using CNFS in Step 1. For more information about how to view a mount target address, see Manage mount targets.
64888******-e*****.cn-qingdao.nas.aliyuncs.com
Reclaim Policy
The reclaim policy. Only the Retain policy is supported. If you delete the CNFS, the NAS file system is not deleted.
Retain
Mount Options
The optional parameters for mounting a NAS file system, such as the NFS protocol version.
We recommend that you use NFS v3. Extreme NAS file systems support only NFS v3. For more information about the NFS protocol, see NFS protocol.
nolock,tcp,noresvport
vers=3
Mount Path
The mount path in the NAS file system.
/
Create a PVC.
In the left-side navigation pane of the details page, choose .
On the Persistent Volume Claims page, click Create in the upper-left corner.
In the Create PVC panel, configure the parameters and click Create.
Parameter
Description
Example
PVC Type
Select NAS.
NAS
Name
The name of the PVC to be created. The name must be unique in the cluster.
cnfs-nas-pvc
Allocation Mode
The method of using the volume.
Use StorageClass for Dynamic Provisioning
Existing Storage Class
Click Select, find the target StorageClass, click Select in the Actions column to select the StorageClass.
alibabacloud-cnfs-nas
Capacity
The capacity of the volume to be created.
NoteThe capacity of the PVC to be created cannot exceed the capacity of the volume to be mounted.
70 Gi
Access Mode
The default value is ReadWriteMany. You can also select ReadWriteOnce or ReadOnlyMany.
ReadWriteMany
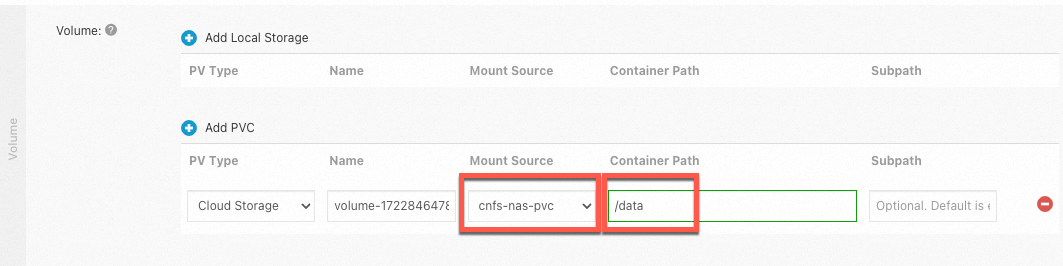
Mount the PVC to the target application.
When you create a workload, such as a Deployment or a StatefulSet, you can specify a PVC to mount to a container in the Volume section of the Container page. For more information about the parameters, see Create a Deployment and Create a StatefulSet.
The following example shows how to mount a NAS file system that is created using CNFS to the /data path in a container.
Method 2: Use CNFS to create a custom NAS file system
kubectl
Create a custom NAS file system.
Create a custom NAS file system.
cat <<EOF | kubectl apply -f -
apiVersion: storage.alibabacloud.com/v1beta1
kind: ContainerNetworkFileSystem
metadata:
  name: cnfs-nas-filesystem
spec:
  description: "cnfs"
  type: nas
  reclaimPolicy: Retain
  parameters:
    filesystemType: standard
    storageType: Capacity
    protocolType: NFS
    encryptType: SSE-KMS
    enableTrashCan: "true"
    trashCanReservedDays: "5"
    vSwitchId: vsw-2ze9l3ppwzg6bl02j****
EOF
Parameter
Description
description
The description of the file system.
type
The type of the volume that you want to create.
reclaimPolicy
The reclaim policy. Only the Retain policy is supported. If you delete the CNFS, the NAS file system is not deleted.
parameters.filesystemType
The type of the file system. Default value: standard.
parameters.storageType
The storage type. If you set filesystemType to standard, you can select Performance or Capacity NAS file system.
parameters.protocolType
The file transfer protocol is NFS. Only NFS v3 is supported.
parameters.encryptType
Optional. The encryption method.
None: no encryption.
SSE-KMS: uses KMS encryption on the NAS server.
parameters.enableTrashCan
Specifies whether to enable the recycle bin feature.
true: enables the feature.
false: does not enable the feature.
parameters.trashCanReservedDays
The maximum retention period of files in the recycle bin. The default value is 7 days. In this example,
trashCanReservedDays: 5indicates that files in the recycle bin are retained for a maximum of 5 days.parameters.vSwitchId
The ID of the vSwitch that is used by the created NAS file system.
View the NAS file system that you created.
kubectl get cnfsExpected output:
NAME                  AGE
cnfs-nas-filesystem   6d
View the details of the NAS file system.
kubectl get cnfs/cnfs-nas-filesystem -o yamlExpected output:
Bind the NAS file system by creating a static PV or a dynamic StorageClass.
Create a static PV.
Use the following content to create a PV object that references the NAS file system.
cat <<EOF | kubectl apply -f -
apiVersion: v1
kind: PersistentVolume
metadata:
  name: cnfs-nas-pv
  labels:
    alicloud-pvname: cnfs-nas-pv
spec:
  capacity:
    storage: 5Gi
  accessModes:
    - ReadWriteMany
  csi:
    driver: nasplugin.csi.alibabacloud.com
    volumeHandle: cnfs-nas-pv # Must be the same as the name of the PV.
    volumeAttributes:
      containerNetworkFileSystem: cnfs-nas-filesystem
      path: "/"
  mountOptions:
    - nolock,tcp,noresvport
    - vers=3
EOF
Parameter
Description
containerNetworkFileSystem
The name of the CNFS that you want to use.
path
The path used by the mounted volume in the CNFS.
Check whether the PV is created.
kubectl get pvExpected output:
NAME          CAPACITY   ACCESS MODES     RECLAIM POLICY   STATUS      CLAIM   STORAGECLASS   REASON   AGE
cnfs-nas-pv   5Gi        RWX              Retain           Available                                   4s
Create a dynamic StorageClass.
Use the following content to create a StorageClass object that references the NAS file system.
cat <<EOF | kubectl apply -f - apiVersion: storage.k8s.io/v1 kind: StorageClass metadata: name: alibabacloud-nas-cnfs mountOptions: - nolock,tcp,noresvport - vers=3 parameters: volumeAs: subpath containerNetworkFileSystem: nas-load-mount-target path: "/" provisioner: nasplugin.csi.alibabacloud.com reclaimPolicy: Retain allowVolumeExpansion: true EOFNoteallowVolumeExpansion: The valid values are true and false. This parameter specifies whether to enable the quota and scale-out features.
Create a PVC.
Use the following content to create a PVC that references the NAS file system.
cat <<EOF | kubectl apply -f -
apiVersion: v1
kind: PersistentVolumeClaim
metadata:
  name: cnfs-nas-pvc
spec:
  accessModes:
    - ReadWriteMany
  storageClassName: alibabacloud-nas-cnfs
  resources:
    requests:
      storage: 70Gi
EOF
Create an application.
Use the following content to create an application that references the PVC.
cat <<EOF | kubectl apply -f -
apiVersion: apps/v1
kind: Deployment
metadata:
  name: cnfs-nas-deployment
  labels:
    app: nginx
spec:
  selector:
    matchLabels:
      app: nginx
  template:
    metadata:
      labels:
        app: nginx
    spec:
      containers:
        - name: nginx
          image: anolis-registry.cn-zhangjiakou.cr.aliyuncs.com/openanolis/nginx:1.14.1-8.6
          ports:
            - containerPort: 80
          volumeMounts:
            - name: cnfs-nas-pvc
              mountPath: "/data"
      volumes:
        - name: cnfs-nas-pvc
          persistentVolumeClaim:
            claimName: cnfs-nas-pvc
EOF
View the status of the application that you created.
kubectl get podExpected output:
NAME                             READY   STATUS    RESTARTS   AGE
cnfs-nas-deployment-86959b****   1/1     Running   0          2s
The output shows that the Deployment is in the Running state. This indicates that CNFS is successfully used in the Deployment.
Console
Create a CNFS.
Log on to the ACK console. In the left navigation pane, click Clusters.
On the Clusters page, click the name of the cluster that you want to manage. In the navigation pane on the left, choose Volumes > Container Network File System (CNFS).
On the Container Network File System (CNFS) page, click Create CNFS File System.
In the Create CNFS File System dialog box, configure the parameters and click OK.
Enter a name for the CNFS, set File System to NAS, select Select Existing NAS File System, and then click Create NAS File System on the right to create a custom NAS file system. For more information, see Create a General-purpose NAS file system in the console.
NoteYou can enable End-to-end Data Acceleration as needed. This feature uses elastic acceleration for mounting. For more information, see Enable the distributed cache feature for CNFS NAS clients.
Bind the NAS file system by creating a static PV or a dynamic StorageClass.
Create a static PV.
On the Clusters page, find the cluster you want and click its name. In the left navigation pane, choose .
On the Persistent Volumes page, click Create.
In the Create PV panel, configure the parameters and click the OK button.
Parameter
Description
Example
PV Type
Select NAS.
NAS
Name
The name of the volume to be created. The volume name must be unique in the cluster.
cnfs-nas-pv
Capacity
The capacity of the volume to be created. Note that NAS file systems do not limit the usage. This parameter is not the usage quota of the NAS file system, but only the capacity declaration of the created volume.
5 Gi
Access Mode
ReadWriteMany and ReadWriteOnce are supported. The default value is ReadWriteMany.
ReadWriteMany
Enable CNFS
Specifies whether to use the CNFS feature.
Enable
Select CNFS
After you enable the CNFS feature, select the CNFS that you created in Step 1.
cnfs-nas-filesystem
Advanced Options (Optional)
After you expand this section, you can configure the following parameters:
Mount Path: The mount path in the NAS file system. The root directory is /. After you set this parameter, the volume is mounted to the specified subdirectory.
If the subdirectory does not exist in the root directory of the NAS file system, the subdirectory is created by default and then mounted.
You can leave this parameter empty. By default, the volume is mounted to the root directory of the NAS file system.
Reclaim Policy: The reclaim policy. CNFS supports only the Retain policy.
Enable CNFS Acceleration: After you enable the CNFS feature, you can specify whether to enable the CNFS acceleration feature. For more information about CNFS acceleration, see Enable the distributed cache feature for CNFS NAS clients.
/
Retain
Enable CNFS acceleration
Label
Add a label to the volume.
cnfs-nas-pv
Create a dynamic StorageClass.
On the Clusters page, find the cluster you want and click its name. In the left-side pane, choose .
On the StorageClasses page, click Create in the upper-left corner.
In the Create panel, configure the StorageClass parameters and click OK.
Parameter
Description
Example
Name
The name of the StorageClass. For the format requirements, refer to the prompts on the page.
alibabacloud-cnfs-nas
PV Type
Select NAS.
NAS
Select Mount Target
The mount target address of the default NAS file system that is created using CNFS in Step 1. For more information about how to view a mount target address, see Manage mount targets.
64888******-e*****.cn-qingdao.nas.aliyuncs.com
Reclaim Policy
The reclaim policy. Only the Retain policy is supported. If you delete the CNFS, the NAS file system is not deleted.
Retain
Mount Options
The optional parameters for mounting a NAS file system, such as the NFS protocol version.
We recommend that you use NFS v3. Extreme NAS file systems support only NFS v3. For more information about the NFS protocol, see NFS protocol.
nolock,tcp,noresvport
vers=3
Mount Path
The mount path in the NAS file system.
/
Create a PVC.
In the left-side navigation pane of the details page, choose .
On the Persistent Volume Claims page, click Create in the upper-left corner.
In the Create PVC panel, configure the parameters and click Create.
Parameter
Description
Example
PVC Type
Select NAS.
NAS
Name
The name of the PVC to be created. The name must be unique in the cluster.
cnfs-nas-pvc
Allocation Mode
The method of using the volume.
Use StorageClass for Dynamic Provisioning
Existing Storage Class
Click Select, find the target StorageClass, click Select in the Actions column to select the StorageClass.
alibabacloud-cnfs-nas
Capacity
The capacity of the volume to be created.
NoteThe capacity of the PVC to be created cannot exceed the capacity of the volume to be mounted.
70 Gi
Access Mode
The default value is ReadWriteMany. You can also select ReadWriteOnce or ReadOnlyMany.
ReadWriteMany
Mount the PVC to the target application.
When you create a workload, such as a Deployment or a StatefulSet, you can specify a PVC to mount to a container in the Volume section of the Container page. For more information about the parameters, see Create a Deployment and Create a StatefulSet.
The following example shows how to mount a NAS file system that is created using CNFS to the /data path in a container.
Method 3: Use CNFS to configure an existing NAS file system
kubectl
Create a CNFS that uses an existing NAS file system.
Use the following content to create a CNFS that uses an existing NAS file system.
# If a NAS file system exists, load the created NAS file system.
cat <<EOF | kubectl apply -f -
apiVersion: storage.alibabacloud.com/v1beta1
kind: ContainerNetworkFileSystem
metadata:
  name: cnfs-nas-filesystem
spec:
  description: "cnfs"
  type: nas
  reclaimPolicy: Retain
  parameters:
    server: 17f7e4****-h****.cn-beijing.nas.aliyuncs.com
EOF
Parameter
Description
description
A brief description of the file system.
type
The type of storage to be created.
reclaimPolicy
The reclaim policy. CNFS supports only the Retain policy. If you delete the CNFS, the NAS file system is not deleted.
parameters.server
The URL of the NAS mount target.
View the NAS file system.
kubectl get cnfsExpected output:
NAME                  AGE
cnfs-nas-filesystem   6d
View the details of the NAS file system.
kubectl get cnfs/cnfs-nas-filesystem -o yamlExpected output:
Apply CNFS to the NAS volume. For more information, see Step 2 to Step 4 of the kubectl procedure in Method 2: Use CNFS to create a custom NAS file system.
Console
Create a CNFS.
Log on to the ACK console. In the left navigation pane, click Clusters.
On the Clusters page, click the name of the cluster that you want to manage. In the navigation pane on the left, choose Volumes > Container Network File System (CNFS).
On the Container Network File System (CNFS) page, click Create CNFS File System.
In the Create CNFS File System panel, configure the parameters and click OK.
Enter a name for the CNFS, set the file system to NAS, select Select Existing NAS File System, and then select an existing NAS mount target from the drop-down list.
NoteYou can enable End-to-end Data Acceleration as needed. This feature uses elastic acceleration for mounting. For more information, see Enable the distributed cache feature for CNFS NAS clients.
Apply CNFS to the NAS volume. For more information, see Step 2 to Step 4 of the console procedure in Method 2: Use CNFS to create a custom NAS file system.
References
For more information about how to monitor NAS storage resources on nodes, see Overview of container storage monitoring.