PyTorch is a deep learning framework that you can use to train models. This topic describes how to use Triton or TorchServe to deploy a PyTorch model as an inference service.
Prerequisites
A Kubernetes cluster that contains GPU nodes has been created. For more information, see Add GPU nodes to a cluster.
The Kubernetes cluster can access the Internet. For more information, see Allow cluster nodes to access the Internet.
The Arena component has been installed. For more information, see Configure the Arena client.
Step 1: Deploy a PyTorch model
(Recommended) Use Triton to deploy
This method uses a Bidirectional Encoder Representations from Transformers (BERT) model that is trained with PyTorch 1.16. You must convert the model to TorchScript, store it in the triton directory of a persistent volume claim (PVC), and then deploy the model using nvidia triton server.
The model directory structure that is required by triton is as follows:
└── chnsenticorp # Model name.
    ├── 1623831335 # Model version.
    │   └── model.savedmodel # Model file.
    │       ├── saved_model.pb
    │       └── variables
    │           ├── variables.data-00000-of-00001
    │           └── variables.index
    └── config.pbtxt # Triton configuration.
Run a standalone PyTorch training job and convert the PyTorch model to TorchScript. For more information, see Use Arena to submit a standalone PyTorch training job.
Run the following command to query the GPU resources available in the cluster:
arena top nodeExpected output:
NAME                      IPADDRESS      ROLE    STATUS  GPU(Total)  GPU(Allocated)
cn-beijing.192.168.0.100  192.168.0.100  <none>  Ready   1           0
cn-beijing.192.168.0.101  192.168.0.101  <none>  Ready   1           0
cn-beijing.192.168.0.99   192.168.0.99   <none>  Ready   1           0
---------------------------------------------------------------------------------------------------
Allocated/Total GPUs of nodes which own resource nvidia.com/gpu In Cluster:
0/3 (0.0%)
The preceding output shows that the cluster has three GPU-accelerated nodes on which you can deploy the model.
Upload the model to a bucket in Object Storage Service (OSS).
ImportantThis example shows how to upload the model to OSS from a Linux system. If you use other operating systems, see ossutil.
Create a bucket named
examplebucket.Run the following command to create a bucket named
examplebucket:ossutil64 mb oss://examplebucketIf the following output is displayed, the bucket named
examplebucketis created:0.668238(s) elapsed
Upload the model to the
examplebucketbucket.ossutil64 cp model.savedmodel oss://examplebucket
Create a persistent volume (PV) and a PVC.
Use the following template to create a file named
pytorch-pv-pvc.yaml.apiVersion: v1 kind: PersistentVolume metadata: name: model-csi-pv spec: capacity: storage: 5Gi accessModes: - ReadWriteMany persistentVolumeReclaimPolicy: Retain csi: driver: ossplugin.csi.alibabacloud.com volumeHandle: model-csi-pv # Must be the same as the PV name. volumeAttributes: bucket: "Your Bucket" url: "Your oss url" akId: "Your Access Key Id" akSecret: "Your Access Key Secret" otherOpts: "-o max_stat_cache_size=0 -o allow_other" --- apiVersion: v1 kind: PersistentVolumeClaim metadata: name: model-pvc namespace: inference spec: accessModes: - ReadWriteMany resources: requests: storage: 5GiParameter
Description
bucket
The name of the OSS bucket. The name must be globally unique within OSS. For more information, see Bucket naming conventions.
url
The URL used to access an OSS file. For more information, see Obtain the URL of a single file or multiple files.
akId
The AccessKey ID and AccessKey secret used to access OSS. We recommend that you use a RAM user to access OSS. For more information, see Create an AccessKey pair.
akSecret
otherOpts
Custom parameters for mounting the OSS bucket.
-o max_stat_cache_size=0: Disables the attribute cache. Each time you access a file, the latest attribute information is retrieved from OSS.-o allow_other: Allows other users to access the mounted file system.
For more information about parameter settings, see ossfs-supported parameter options.
Run the following command to create the PV and PVC.
kubectl apply -f pytorch-pv-pvc.yaml
Run the following command to deploy the model using
nvidia triton server.arena serve triton \ --name=bert-triton \ --namespace=inference \ --gpus=1 \ --replicas=1 \ --image=nvcr.io/nvidia/tritonserver:20.12-py3 \ --data=model-pvc:/models \ --model-repository=/models/tritonExpected output:
configmap/bert-triton-202106251740-triton-serving created
configmap/bert-triton-202106251740-triton-serving labeled
service/bert-triton-202106251740-tritoninferenceserver created
deployment.apps/bert-triton-202106251740-tritoninferenceserver created
INFO[0001] The Job bert-triton has been submitted successfully
INFO[0001] You can run `arena get bert-triton --type triton-serving` to check the job status
Use TorchServe to deploy
Use the torch-model-archiver to package the PyTorch model into the .mar format, which is required by TorchServe. For more information, see torch-model-archiver.
Upload the model to a bucket in Object Storage Service (OSS).
ImportantThis example shows how to upload the model to OSS from a Linux system. If you use other operating systems, see ossutil.
Create a bucket named
examplebucket.Run the following command to create a bucket named
examplebucket:ossutil64 mb oss://examplebucketIf the following output is displayed, the bucket named
examplebucketis created:0.668238(s) elapsed
Upload the model to the
examplebucketbucket.ossutil64 cp model.savedmodel oss://examplebucket
Create a persistent volume (PV) and a PVC.
Use the following template to create a file named
pytorch-pv-pvc.yaml.apiVersion: v1 kind: PersistentVolume metadata: name: model-csi-pv spec: capacity: storage: 5Gi accessModes: - ReadWriteMany persistentVolumeReclaimPolicy: Retain csi: driver: ossplugin.csi.alibabacloud.com volumeHandle: model-csi-pv # Must be the same as the PV name. volumeAttributes: bucket: "Your Bucket" url: "Your oss url" akId: "Your Access Key Id" akSecret: "Your Access Key Secret" otherOpts: "-o max_stat_cache_size=0 -o allow_other" --- apiVersion: v1 kind: PersistentVolumeClaim metadata: name: model-pvc namespace: inference spec: accessModes: - ReadWriteMany resources: requests: storage: 5GiParameter
Description
bucket
The name of the OSS bucket. The name must be globally unique within OSS. For more information, see Bucket naming conventions.
url
The URL used to access an OSS file. For more information, see Obtain the URL of a single file or multiple files.
akId
The AccessKey ID and AccessKey secret used to access OSS. We recommend that you use a RAM user to access OSS. For more information, see Create an AccessKey pair.
akSecret
otherOpts
Custom parameters for mounting the OSS bucket.
-o max_stat_cache_size=0: Disables the attribute cache. Each time you access a file, the latest attribute information is retrieved from OSS.-o allow_other: Allows other users to access the mounted file system.
For more information about parameter settings, see ossfs-supported parameter options.
Run the following command to create the PV and PVC.
kubectl apply -f pytorch-pv-pvc.yaml
Run the following command to deploy the PyTorch model.
arena serve custom \ --name=torchserve-demo \ --gpus=1 \ --replicas=1 \ --image=pytorch/torchserve:0.4.2-gpu \ --port=8000 \ --restful-port=8001 \ --metrics-port=8002 \ --data=model-pvc:/data \ 'torchserve --start --model-store /data/models --ts-config /data/config/ts.properties'NoteThe image can be an official image or a custom TorchServe image.
The path specified for the
--model-storeparameter must match the actual path of your PyTorch model.
Expected output:
service/torchserve-demo-202109101624 created
deployment.apps/torchserve-demo-202109101624-custom-serving created
INFO[0001] The Job torchserve-demo has been submitted successfully
INFO[0001] You can run `arena get torchserve-demo --type custom-serving` to check the job status
Step 2: Verify the inference service deployment
Run the following command to check the deployment status of the PyTorch model.
arena serve list -n inferenceExpected output:
NAME            TYPE        VERSION       DESIRED  AVAILABLE  ADDRESS        PORTS
bert-triton     Triton      202106251740  1        1          172.16.70.14   RESTFUL:8000,GRPC:8001
Run the following command to view the details of the inference service.
arena serve get bert-triton -n inferenceExpected output:
Name:       bert-triton
Namespace:  inference
Type:       Triton
Version:    202106251740
Desired:    1
Available:  1
Age:        5m
Address:    172.16.70.14
Port:       RESTFUL:8000,GRPC:8001


Instances:
  NAME                                                             STATUS   AGE  READY  RESTARTS  NODE
  ----                                                             ------   ---  -----  --------  ----
  bert-triton-202106251740-tritoninferenceserver-667cf4c74c-s6nst  Running  5m   1/1    0         cn-beijing.192.168.0.89
The output shows that the model was successfully deployed using
nvidia triton serverand provides two API ports: 8001 for gRPC and 8000 for RESTful.An inference service that is deployed using
nvidia triton serverprovides a ClusterIP by default. You must configure a public Ingress to directly access the service.On the Clusters page, click the name of the target cluster. In the left navigation pane, choose .
From the Namespace list at the top of the page, select the
inferencenamespace specified in Step 2.In the upper-right corner of the page, click Create Ingress.
Set Service Name to the name from Step 1:
bert-triton.Set the RESTful Port to 8501.
Configure other parameters as needed. For more information, see Create and use an Nginx Ingress to expose a service.
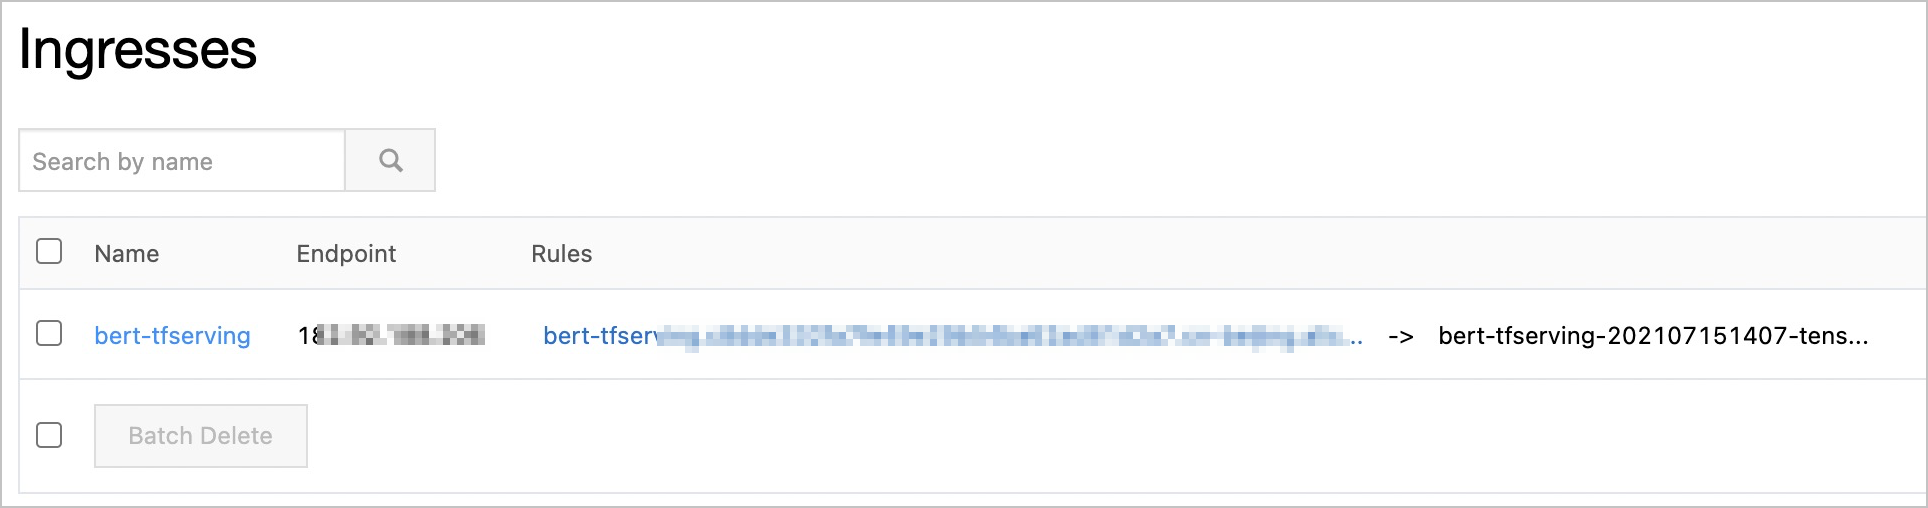
After the Ingress is created, find the Ingress address in the Rules column on the Ingresses page.
Use the Ingress address that you obtained to run the following command and call the inference service API. The
nvidia triton serverfollows the KFServing API specification. For more information, see the NVIDIA Triton Server API documentation.curl "http://<Ingress address>"Expected output:
{
    "name":"chnsenticorp",
    "versions":[
        "1623831335"
    ],
    "platform":"tensorflow_savedmodel",
    "inputs":[
        {
            "name":"input_ids",
            "datatype":"INT64",
            "shape":[
                -1,
                128
            ]
        }
    ],
    "outputs":[
        {
            "name":"probabilities",
            "datatype":"FP32",
            "shape":[
                -1,
                2
            ]
        }
    ]
}