When a data center accesses a virtual private cloud (VPC) through multiple virtual border router (VBRs) connected to an Enterprise Edition transit router, you can use routing policies to configure route priorities if VBRs are in the same region. Designate one VBR as the primary and the other as the backup, with seamless switchover to the backup VBR if the primary becomes unavailable.
Background
According to the route priority, when two VBRs in the same region are connected to an Enterprise Edition transit router (Enterprise Edition) and advertise routes with the same destination CIDR block to the transit router, they form rqual-cost multi-path routing (ECMP) if the attributes are identical. Traffic from VPCs to data center will be transmitted through both VBR instances.
However, ECMP may not be supported due to network planning or the limits of on-premises gateway devices. In such cases, you can only access VPCs through active and standby routes. This may cause inconsistency between the traffic path accessing the VPC and that accessing the data center, resulting in asymmetric routing.
To avoid this issue, modify the route attributes of the data center on Alibaba Cloud to specify active/standby routes. This ensures that traffic to the data center is also transmitted through active/standby routes, maintaining consistent traffic paths for both directions.
Based on the route priority, there are multiple ways to specify active and standby routes. This topic describes how to use routing policies to achieve this.

Scenario
An company has connected its data center to the cloud through two Express Connect circuits in the China (Hangzhou) region and has established network connection through an Enterprise Edition transit router. The company's network planning does not support accessing VPCs from the data center through ECMP. It needs to modify the traffic path to ensure that traffic between the data center and VPCs is transmitted through active and standby connections. Traffic should flow through the active connection, automatically switch to the standby one when the active one is interrupted, and automatically resume transmission through the active connection when it recovers.
In this scenario, both VBR1 and VBR2 use static routes.

Prerequisites
Before you begin, make sure the data center has been connected to the cloud and network connection has been established between the data center and VPC. View the CIDR blocks and network configurations in the following table.
this scenario has already completed the data center access to the cloud and network communication between the data center and VPCs. You can view the CIDR blocks and completed network configurations involved in this scenario in the following table.
Instance/Resource | CIDR block/IP address | Network configurations | |
VPC |
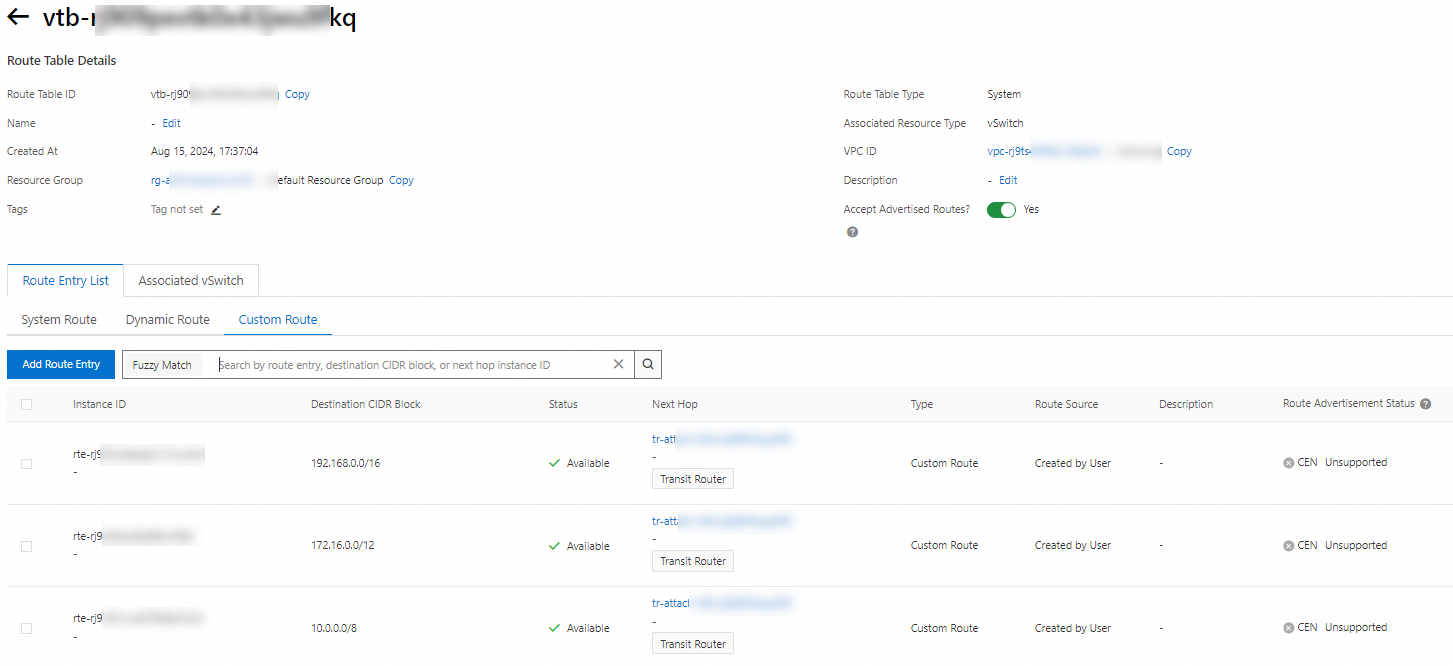
| The VPC is connected to the transit router in US (Silicon Valley) with all Advanced Configuration options enabled. This allows the transit router to automatically add the following three custom route entries to the VPC system route table.
| |
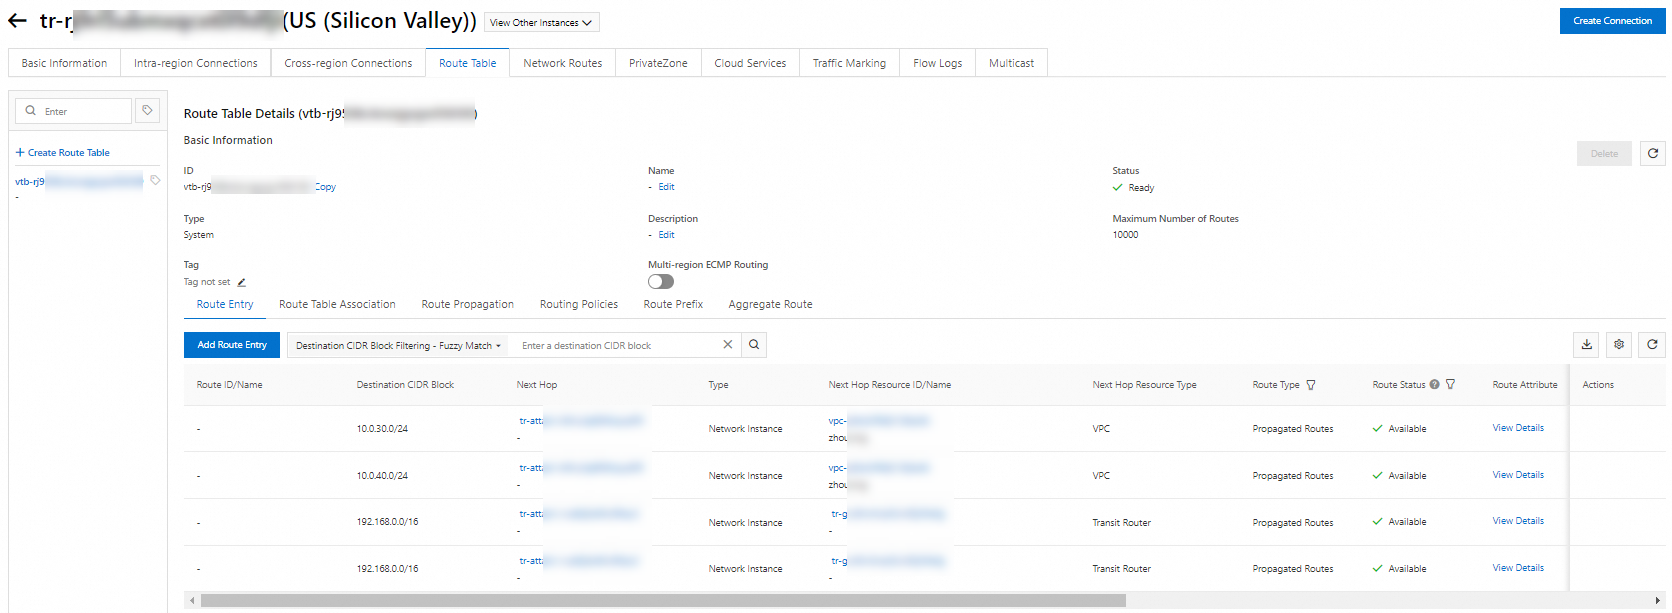
US (Silicon Valley) TR | - | An inter-region connection has been created between the US (Silicon Valley) and Germany (Frankfurt) transit routers. Ensure the US (Silicon Valley) transit router has learned the route to the data center (192.168.0.0/16).
| |
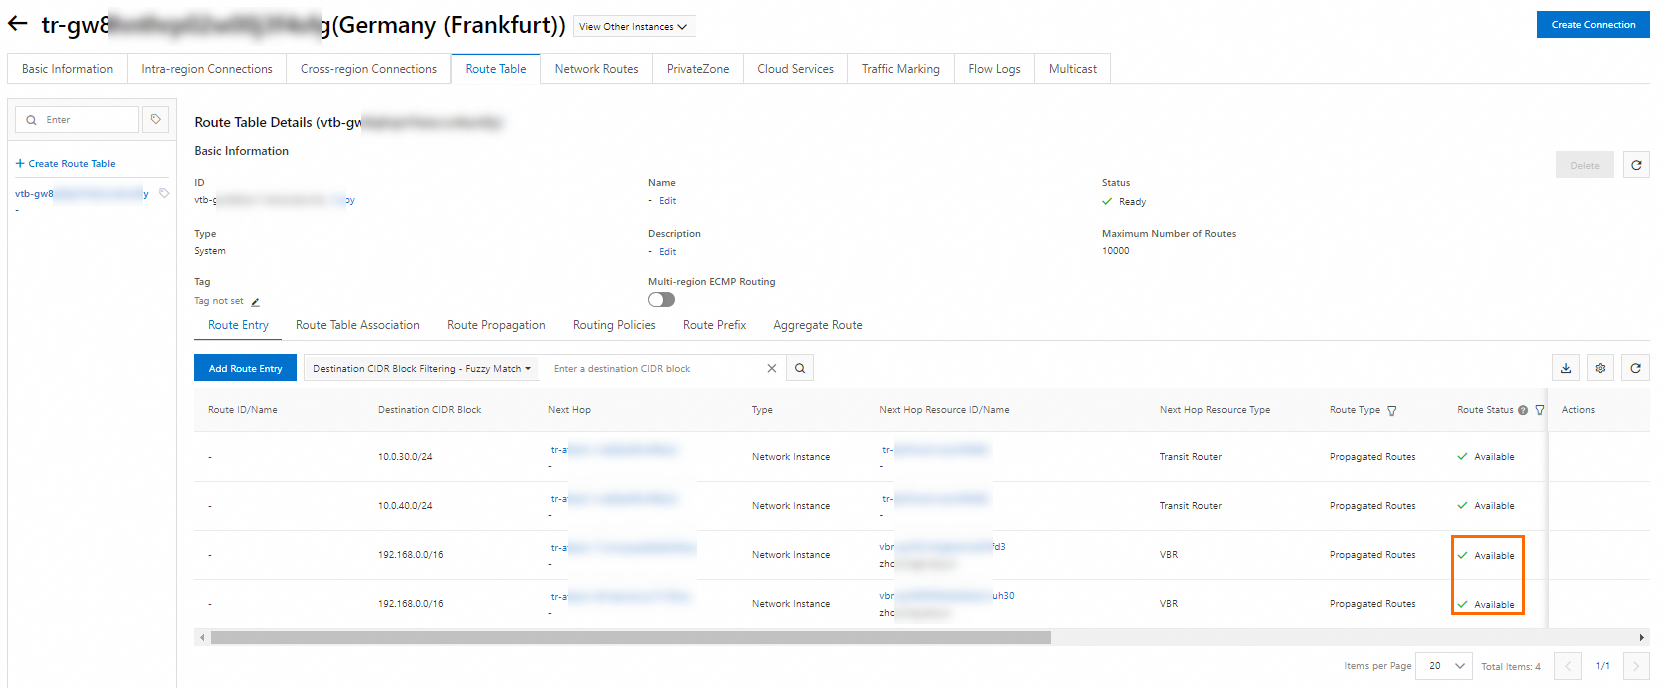
Germany (Frankfurt) TR | - | VBR1 and VBR2 have been connected to Germany (Frankfurt) transit router. Ensure that the Germany (Frankfurt) transit router has learned the route to the data center (192.168.0.0/16) through both VBR1 and VBR2, with both routes in the Active state. Ensure the Germany (Frankfurt) transit router has learned the VPC routes (10.0.30.0/24, 10.0.40.0/24) through the inter-region connection.
| |
VBR1 |
|
| VBR1 has learned the VPC routes (10.0.30.0/24, 10.0.40.0/24) through the Germany (Frankfurt) transit router.
|
VBR2 |
|
| VBR2 has learned the VPC routes (10.0.30.0/24, 10.0.40.0/24) through the Germany (Frankfurt) transit router.
|
Data center |
|
| |


Procedure
Step 1: Specify routes to the data center
Configure routing policies.
Configure routing policies under the transit router to which the VBR instances are connected. Use routing policies to modify route attributes to specify active/standby routes.
Log on to the CEN console. On the Instances page, find the CEN instance to which the transit router belongs, and click the CEN instance ID.
On the tab, click the ID of the transit router to which the VBR instances are connected.
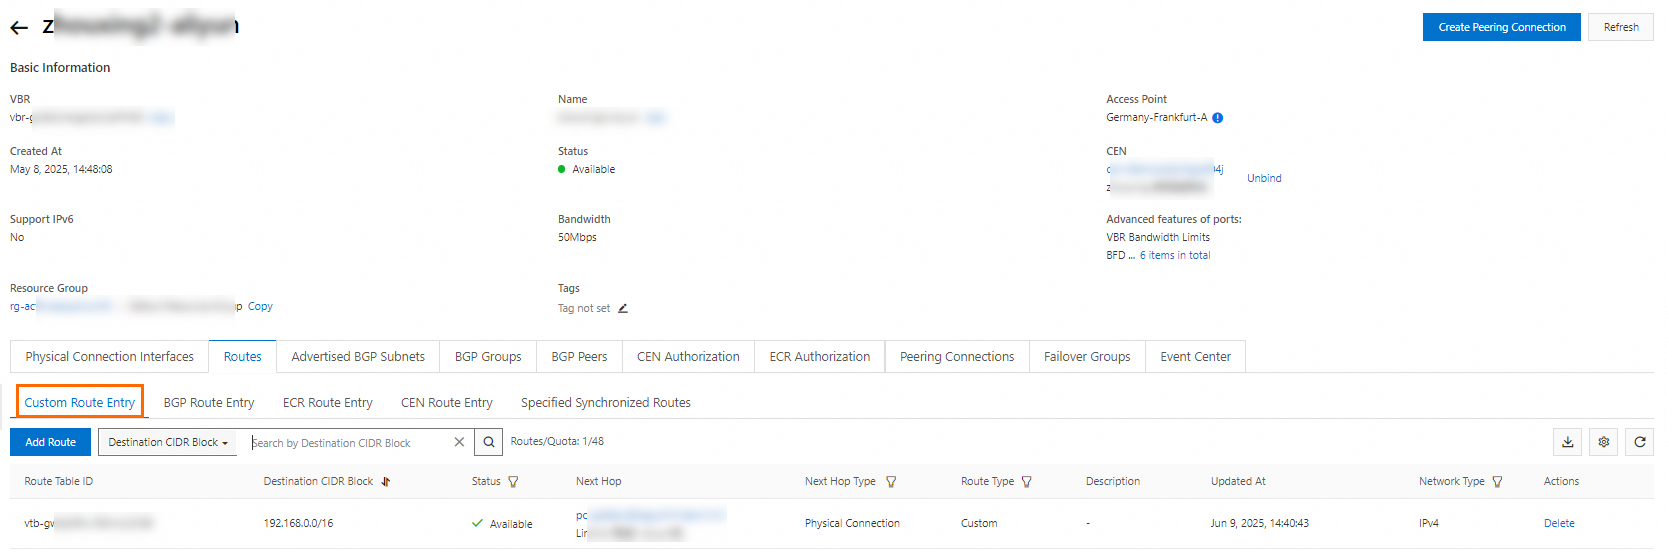
On the transit router instance details page, click the Route Table tab. Under the transit router route table, click the Routing Policies tab, and then click Add Routing Policy.
Configure two routing policies according to the following information. Keep other configurations as default.
Routing Policy 1
Routing Policy 2
For routes from VBR1, specify Route Priority as 10. A smaller value indicates a higher priority.
For routes from VBR2, specify Route Priority as 20, designating routes from VBR2 as backup.
Policy Priority: 10.
Associated Route Table: Route table of transit router.
Direction: Egress Regional Gateway.
Match Conditions: Select Source Instance ID and enter the VBR1 ID.
Policy Action: Select Allow.
Action Object: Click Add Action Object, select Route Priority, and enter 10.
Routing Policy Priority: 20.
Associated Route Table: Route table of transit router.
Direction: Egress Regional Gateway.
Match Conditions: Select Source Instance ID and enter the VBR2 ID.
Policy Action: Select Allow.
Action Object: Click Add Action Object, select Route Priority, and enter 20.
After the routing policies are configured, click the Routes tab. You can see that the route from VBR2 has changed to Backup.

Configure health checks for VBR instances.
To enable automatic switching between active and standby connections, you must configure health checks for VBR instances in the CEN console. When the health check for the active connection fails, the transit router automatically switches traffic to the standby one. When the active connection recovers, traffic is switched back to the active one.
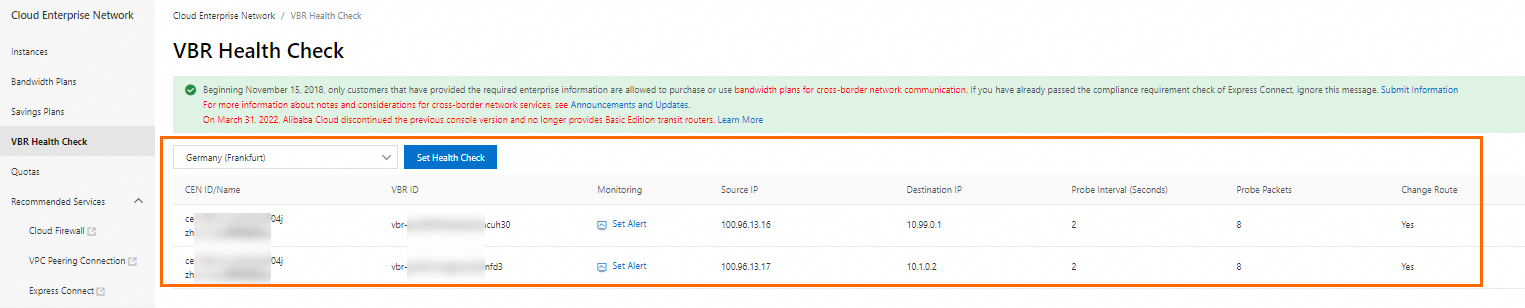
In the left-side navigation pane, click VBR Health Check.
On the VBR Health Check page, select the region where the VBR instances are located, and then click Set Health Check.
Configure health checks for VBR1 and VBR2 according to the following table. Keep other configurations as default.
Health Check 1
Health Check 2
Instances: Select the CEN instance to which the transit router belongs.
Virtual Border Router (VBR): Select VBR1.
Source IP: Select Automatic IP Address.
Destination IP: Select the Client IPv4 Peer IP of VBR1.
Switch Route: Enabled.
Instances: Select the CEN instance to which the transit router belongs.
Virtual Border Router (VBR): Select VBR2.
Source IP: Select Automatic IP Address.
Destination IP: Select the Client IPv4 Peer IP of VBR2.
Switch Route: Enabled.
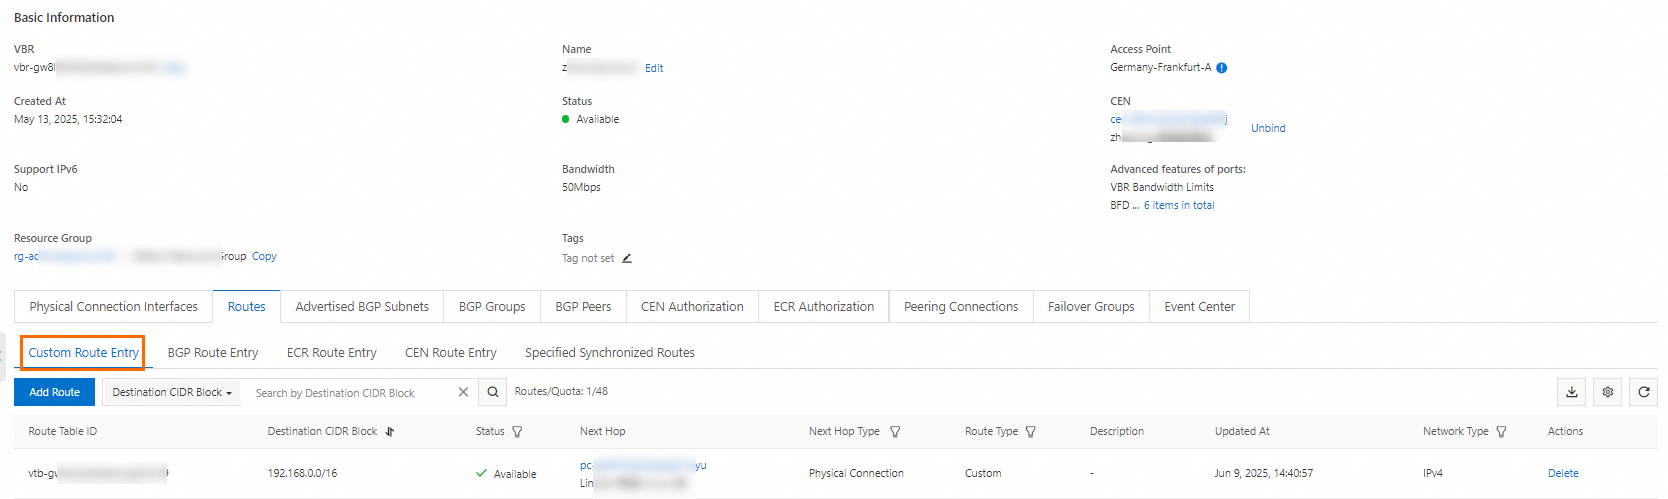
Configure return routes for VBR health checks in the data center.
You must manually configure route entries in the data center with the destination CIDR block set to the health check source IP address, with a subnet mask of 32 and the next hop pointing to the corresponding Express Connect circuit. Otherwise, health check probe ping messages cannot return through the same circuit, which may cause Alibaba Cloud to incorrectly determine that the Express Connect circuit link is unavailable.
(Optional) Configure alert rules for VBR instances.
When health checks detect a failure in the active/standby connections, routes are automatically switched but you do not get notifications. We recommended configuring alert rules for VBRs to get alert notifications when an Express Connect circuit fails.
Step 2: Specify routes to the VPC
The data center can now access the VPC through either CPE1 or CPE2. To ensure consistent traffic paths for accessing both the VPC and the data center, you must specify active and standby routes in the data center for accessing the VPC, ensuring that the data center accesses the VPC primarily through CPE1. Then, add a health check and configure routes to ensure that when the CPE1 is interrupted, the data center automatically accesses the VPC through CPE2. When the CPE1 connection recovers, it automatically resumes accessing the VPC through CPE1.
Step 3: Test connections
After configuring routes, you can use the Express Connect fault drill feature to interrupt the active connection and test whether the automatic switching works. During testing, run the traceroute -I <target IP address> command on both the data center client and the ECS instance to track the traffic path and check whether traffic is transmitted along the expected path.
The
-Iparameter indicates sending test messages using the ICMP protocol. Ensure that access control rules and ECS security group rules of the data center have allowed the ICMP protocol, permitting ICMP traffic between your IDC and VPC networks.The data center client in this topic uses CentOS Stream 9 64-bit operating system. If your operating system does not support the
traceroutecommand, install it first.If your device cannot track traffic flows using the
traceroutecommand, view the VBR connection by using the monitoring chart in the CEN console.
Run the
traceroute -I <target IP address>command on both the ECS instance and the data center client to check the traffic transmission path.Log on to the Express Connect console to configure the fault drill and interrupt the active connection. After the fault drill starts, check the traffic path on both the ECS instance and the data center client. The configuration details are as follows:
Region: Select Germany (Frankfurt).
Drill Resource: Select Virtual Border Router (VBR).
Instance List: Select VBR1.
Drill Mode: Select Start Now.
Drill Duration: 5 minutes.
After the fault drill ends, the active connection will automatically recover. Check the traffic path on both the ECS instance and the data center client.
As shown in the following figure, the traffic paths for accessing the VPC and accessing the data center are consistent. Both are transmitted through the active connection first. Traffic is automatically switched to the standby connection when the active one is interrupted, and automatically switched back to the active one when it recovers. There will be a brief traffic interruption during the switching process.
Device
View current traffic path
Interrupt the active connection
Active connection recovers
Data center


ECS


FAQs
How do I configure active and standby routes with a Basic Edition transit router?
Follow the steps above to configure active and standby routes with a Basic Edition transit router. The interface may differ from that of an Enterprise Edition transit router. See the related documentation.
If you cannot track traffic flow using the traceroute command, view the VBR instance monitoring chart in the Express Connect console.