Use DataWorks batch data synchronization to load data from MaxCompute into ApsaraDB for ClickHouse. The steps below use MaxCompute as the source, but DataWorks supports many other data source types.
Prerequisites
Before you begin, ensure that you have:
A DataWorks workspace with MaxCompute as the compute engine. See Create a workspace.
An exclusive resource group for Data Integration, created and configured. See Use exclusive resource groups for Data Integration.
An ApsaraDB for ClickHouse cluster with a database account (username and password). See Create an ApsaraDB for ClickHouse cluster and Manage database accounts.
Database login permissions configured. See Set up account permissions.
(RAM users only) A role assigned by the Alibaba Cloud account owner. See Add members to a workspace.
Constraints
ApsaraDB for ClickHouse supports only exclusive resource groups for Data Integration. Shared resource groups are not supported.
To re-synchronize a table that was previously synced, clear the existing data first by running
TRUNCATE TABLE <table_name>;in the ClickHouse database.
Sync data from MaxCompute to ApsaraDB for ClickHouse
Step 1: Add data sources
Add data sources for both MaxCompute and ApsaraDB for ClickHouse in DataWorks.
For instructions, see Associate a MaxCompute computing resource and Associate a ClickHouse computing resource.
Step 2: Create a MaxCompute table
Log on to the DataWorks console.
In the left-side navigation pane, click Workspaces.
In the top navigation bar, select the region where your workspace is located. On the Workspaces page, find your workspace and choose Shortcuts > Data Development in the Actions column.
On the DataStudio page, move the pointer over the
 icon and choose Create Table > MaxCompute > Table.
In the Create Table dialog box, select a path from the Path drop-down list and enter a table name. This example uses
odptabletest1. Click Create.In the General section, configure the table properties.
Configuration item Description Display name The display name of the table. Theme A subject acts as a folder. Define level-1 and level-2 folders to classify the table by business purpose. If no subject exists, create one. See Define table subjects. 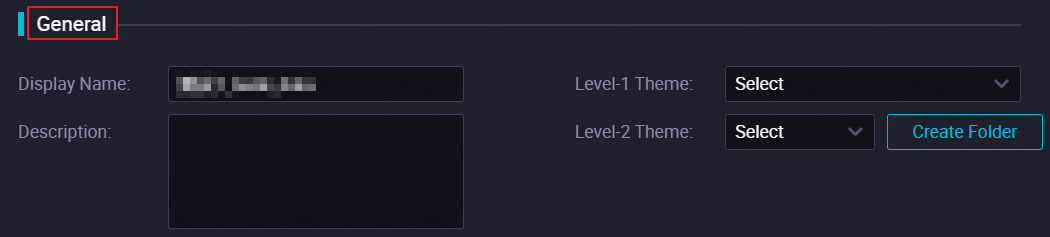
Click DDL in the toolbar.
In the DDL dialog box, enter the following statement and click Generate Table Schema:
CREATE TABLE IF NOT EXISTS odptabletest1
(
  v1  TINYINT,
  v2  SMALLINT
);
Click Commit to Development Environment, then click Commit to Production Environment.
Step 3: Write data to the MaxCompute table
On the DataStudio page, click Ad Hoc Query in the left-side navigation pane.
Move the pointer over the
 icon and choose Create > ODPS SQL.
In the Create Node dialog box, select a path from the Path drop-down list and enter a name for the node. Click Confirm.
In the node editor, enter the following statement to insert data into the MaxCompute table:
insert into odptabletest1 values (1,"a"),(2,"b"),(3,"c"),(4,"d");Click the
 icon in the toolbar.
In the Estimate MaxCompute Computing Cost dialog box, click Run.
Step 4: Create an ApsaraDB for ClickHouse table
Create a destination table whose column types match the MaxCompute source table.
Log on to the ApsaraDB for ClickHouse console.
In the top navigation bar, select the region where your cluster is deployed.
On the Clusters page, click the tab for your cluster edition and click the cluster ID.
On the Cluster Information page, click Log On to Database in the upper-right corner.
In the Log on to Database Instance dialog box, enter your database account credentials and click Login.
Run the following statement to create the destination table:
create table default.dataworktest ON CLUSTER default (
  v1 Int,
  v2 String
) ENGINE = MergeTree ORDER BY v1;
The schema type of the ApsaraDB for ClickHouse table must match the schema type of the MaxCompute table.
Step 5: Create a workflow
Skip this step if you already have a workflow.
On the DataStudio page, click Scheduled Workflow in the left-side navigation pane.
Move the pointer over the
icon and select Create Workflow.In the Create Workflow dialog box, enter a workflow name.
ImportantThe name must be 1–128 characters and can contain letters, digits, underscores (_), and periods (.).
Click Create.
Step 6: Create a batch synchronization node
Click the workflow, then right-click Data Integration.
Choose Create Node > Offline synchronization.
In the Create Node dialog box, enter a node name and select a path.
ImportantThe node name must be 1–128 characters and can contain letters, digits, underscores (_), and periods (.).
Click Confirm.
Step 7: Configure the source and destination
Source: Select a data source type. This example uses MaxCompute.
Parameter Description Connection The type and name of the data source. Production project name The name of the project in the production environment. Read-only. Table The source table to synchronize. Partition key column The partition to read for daily incremental data. For example, set to ${bizdate}for date-based partitions. DataWorks cannot automatically map fields in partitioned MaxCompute tables — specify each partition manually when configuring MaxCompute Reader. See MaxCompute Reader.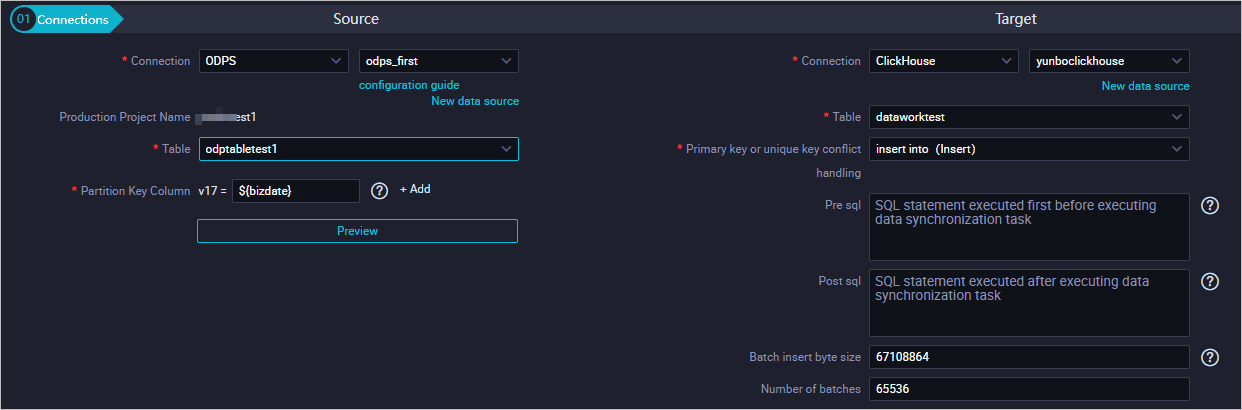
Target: Select ClickHouse.
Parameter Description Connection The type and name of the data source. Select ClickHouse. Table The destination table in ApsaraDB for ClickHouse. Primary key or unique key conflict handling Set to insert into (Insert). Pre sql SQL statement to run before the synchronization task starts. Post sql SQL statement to run after the synchronization task completes. Batch insert byte size Maximum number of bytes per insert batch. Number of batches Number of records to insert per batch. (Optional) Mappings: Select field mappings. Each field on the left (source) maps to a field on the right (destination). For parameter details, see Configure mappings between source fields and destination fields.

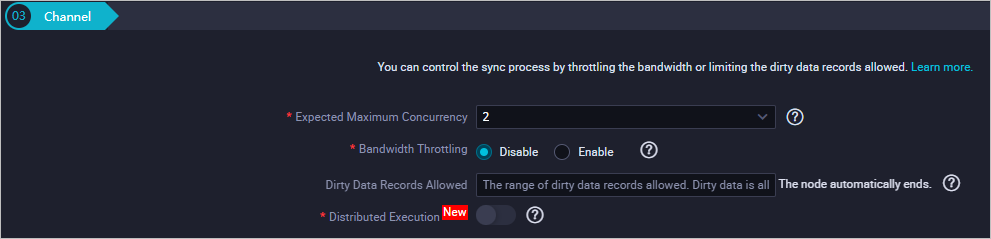
(Optional) Channel: Configure the maximum transmission rate and dirty data check rules. For parameter details, see Configure channel control policies.
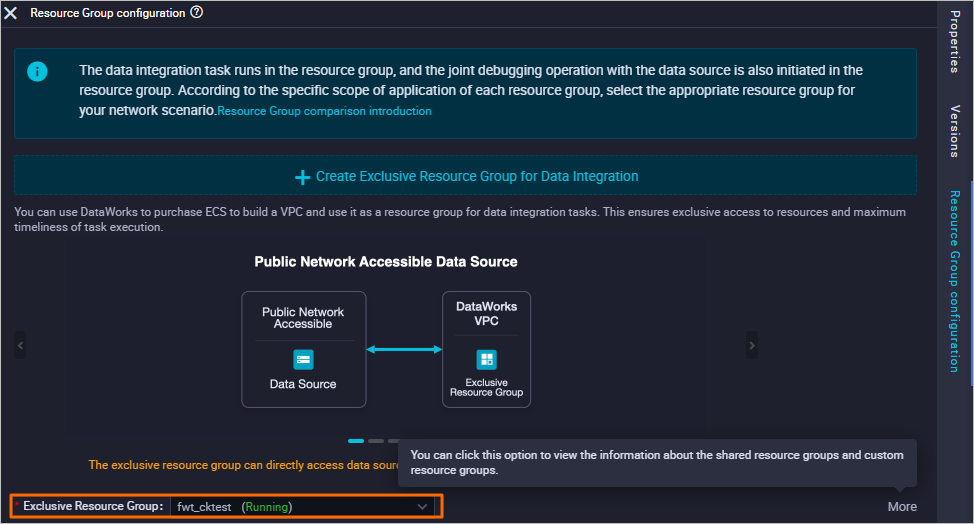
Step 8: Configure the resource group
On the right panel, click Resource Group configuration and select a group from the Exclusive Resource Group drop-down list.
Step 9: Save and run the synchronization task
Click the
 icon in the toolbar to save the task.
Click the
 icon to run the task.
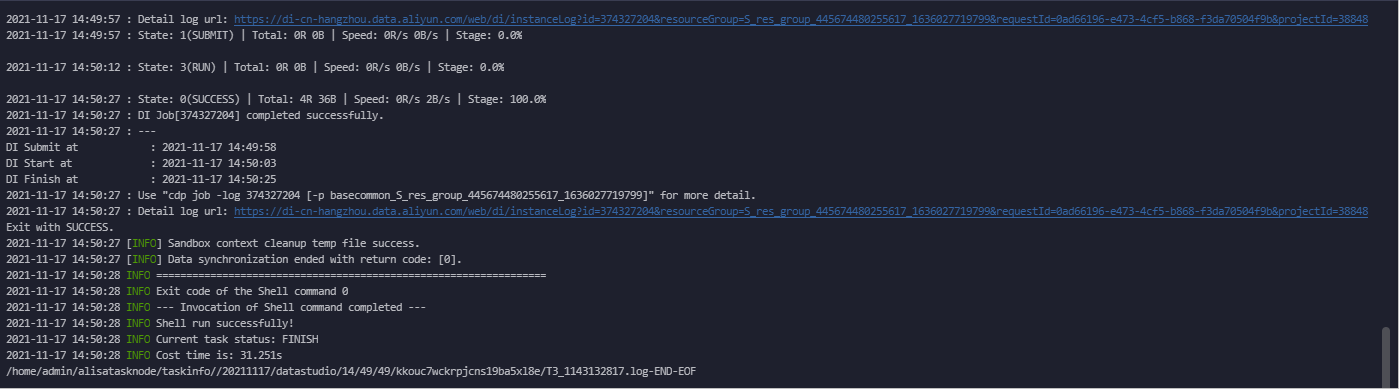
Verify the sync result
Log on to the ApsaraDB for ClickHouse console.
In the top navigation bar, select the region where your cluster is deployed.
On the Clusters page, click the tab for your cluster edition and click the cluster ID.
On the Cluster Information page, click Log On to Database in the upper-right corner.
In the Log on to Database Instance dialog box, enter your credentials and click Login.
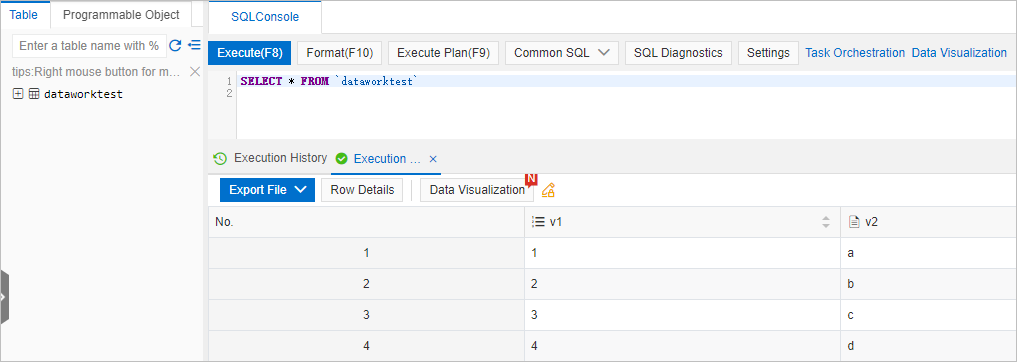
Run the following query and click Execute(F8):
SELECT * FROM dataworktest;If the synchronization succeeded, the query returns the four rows inserted in step 3.