When you plan to switch the version of an Alibaba Cloud ClickHouse community-compatible edition cluster, you can use the instance migration feature in the Alibaba Cloud ClickHouse console to migrate data. This feature supports both full and incremental data migration to ensure data integrity.
Prerequisites
-
The source and destination clusters must meet the following requirements:
-
Both are community-compatible edition clusters.
NoteIf you need to migrate from a community-compatible edition cluster to an enterprise edition cluster, or vice versa, see Migrate a ClickHouse community-compatible edition cluster to an enterprise edition cluster.
-
Both clusters are in the Running state.
-
You have a database account and password for each cluster.
-
Both clusters have the same tiered storage policy for hot and cold data.
-
Both clusters use the same VPC, are in the same region, and their IP addresses are in each other's whitelists. If this condition is not met, you must resolve the network connectivity issue first. For more information, see How to resolve network connectivity issues between a destination cluster and a data source.
NoteYou can view the IP address of an Alibaba Cloud ClickHouse instance by running the
SELECT * FROM system.clusters;command. For information about how to configure a whitelist, see Configure a whitelist.
-
-
The destination cluster must also meet the following requirements:
-
The version is later than or equal to the source cluster version. For information about the latest version, see Community-compatible edition.
-
The available disk space (excluding cold storage) is at least 1.2 times the used disk space (excluding cold storage) of the source cluster.
-
-
Each local table in the source cluster must have a unique distributed table.
Usage notes
-
Migration speed: Typically, the migration speed for a single node in the destination cluster is greater than 20 MB/s. If the data write speed for a single node in the source cluster is also greater than 20 MB/s, you must evaluate whether the migration speed of the destination cluster can keep up with the write speed of the source cluster. If it cannot, the migration might never complete.
-
During the migration, the destination cluster pauses merge operations, but the source cluster does not.
-
Supported migration content includes clusters, databases, tables, data dictionaries, materialized views, user permissions, and cluster configurations.
-
Only data dictionaries created by using SQL statements are migrated. Data dictionaries created by using XML files are not supported.
To check, run the following command:
SELECT * FROM system.dictionaries WHERE (database = '') OR isNull(database);. If a result is returned, it indicates that data dictionaries created by using XML files exist. -
If a data dictionary accesses an external service, ensure that the service is available and its whitelist is configured to allow access from the cluster. If the data source for a data dictionary is an internal table of the current Alibaba Cloud ClickHouse instance and the
HOSTparameter is set to an IP address, the dictionary may fail to work after migration because the IP address changes. In this case, you must confirm the newHOSTof the Alibaba Cloud ClickHouse instance and manually recreate the data dictionary.
-
-
Tables that use the Kafka or RabbitMQ engine are not migrated.
-
Data volume:
-
Cold data: The migration of cold data is relatively slow. We recommend that you clear unnecessary cold data from the source cluster to ensure that the total size does not exceed 1 TB. Otherwise, a prolonged migration might fail.
-
Hot data: If the total size of hot data exceeds 10 TB, the migration task is likely to fail. We do not recommend using this migration method in this scenario.
-
-
If your data does not meet these conditions, consider performing a manual migration.
Migration content:
To prevent data from being split between the source and destination clusters, delete the Kafka and RabbitMQ engine tables from the source cluster before you create them in the destination cluster. Alternatively, use different consumer groups.
For non-MergeTree tables, such as external tables and Log tables, only the table schemas are migrated.
If the source cluster contains non-MergeTree tables, these tables in the destination cluster will contain only schemas and no business data after the migration. To migrate the business data for these tables, use the remote function. For more information, see Migrate data by using the remote function.
Impact on clusters
-
Source cluster: During the migration, you can read data from and write data to the source cluster. However, DDL operations, such as creating, deleting, or modifying the metadata of databases and tables, are not supported.
Important-
To ensure the migration completes, data writes to the source cluster are automatically paused within the configured write-stop window when the estimated remaining time is 10 minutes or less.
-
Data writes automatically resume on the source cluster after all data is migrated within the write-stop window, or when the time window ends, even if the migration is not complete.
-
-
Destination cluster: After the migration is complete, the destination cluster performs frequent merge operations for a period. This increases I/O utilization and may lead to higher latency for your business requests. We recommend that you plan for the potential impact of this increased latency. Calculate the merge duration yourself. For more information, see Calculate the merge duration after migration.
Procedure
Perform the following operations on the destination cluster, not the source cluster.
Step 1: Record and clean up Kafka/RabbitMQ engine tables
If the source cluster does not contain Kafka/RabbitMQ engine tables, skip Steps 1, 5, 6, and 7, and start from Step 2.
Before starting the migration, record the definitions of all Kafka/RabbitMQ engine tables and their downstream materialized views in the source cluster, handle implicit tables, and then delete these tables to avoid migration errors.
-
Log on to the source cluster and query all Kafka and RabbitMQ engine tables along with their downstream dependencies.
/* create_table_query: table definition dependencies_database: database of the table that depends on this table dependencies_table: table that depends on this table From dependencies_database and dependencies_table, you can identify the materialized views that depend on Kafka/RabbitMQ tables */ SELECT * FROM system.tables WHERE engine IN ('RabbitMQ', 'Kafka'); -
View the materialized view definition to check whether its target table is an implicit table.
/* View the materialized view definition. If the target table of the materialized view is an implicit table, pay special attention: Dropping the materialized view will also drop the implicit table, causing data loss. Example: If CREATE MATERIALIZED VIEW [db.]table_name [TO[db.]name] does not specify TO, the system automatically creates an implicit table, possibly in the format '.inner_id.<TABLE_UUID>' or '.inner.<TABLE>' */ SELECT * FROM system.tables WHERE database='<DATABASE>' AND name = '<MATERIALIZED_VIEW_NAME>'; -
If the target table of a materialized view is an implicit table, RENAME the target table to a new name to prevent data loss when the materialized view is dropped later.
-- Rename the implicit target table to a new name to protect data RENAME TABLE <DATABASE>.`.inner_id.<TABLE_UUID>` TO <DATABASE>.<new_target_table_name>; -
Delete the Kafka/RabbitMQ engine tables and their downstream materialized views.
-- Drop materialized views first
DROP TABLE <DATABASE>.<MATERIALIZED_VIEW_NAME>;
-- Then drop Kafka/RabbitMQ engine tables
DROP TABLE <DATABASE>.<KAFKA_OR_RABBITMQ_TABLE_NAME>;
Make sure to save all recorded DDL statements. You will need them to rebuild these tables on both the source cluster and the destination cluster later. If you performed a RENAME operation, use the TO clause pointing to the renamed target table when rebuilding the materialized view. For more information, see CREATE MATERIALIZED VIEW.
Step 2: Create a migration task
-
Log on to the Alibaba Cloud ClickHouse console.
-
On the Clusters page, click the Clusters of Community-compatible Edition tab, and then click the ID of the destination cluster.
-
In the left-side navigation pane, click .
-
Click Create Migration Task.
-
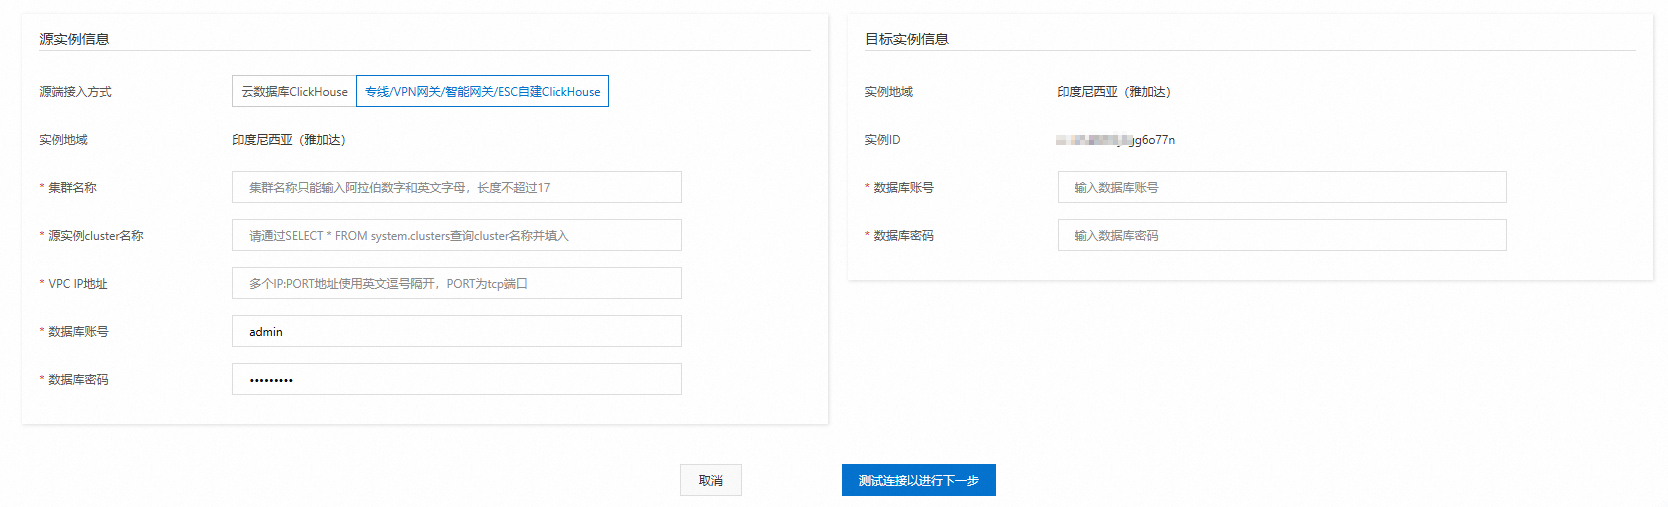
Configure the source and destination instances.
Configure the required information and click Test Connectivity and Proceed.
NoteIf the connection test is successful, proceed to the next step. If the test fails, reconfigure the source and destination instances as prompted.
-
Confirm the migration content.
Review the migration content, and then click Next: Pre-detect and Start Synchronization.
-
The system runs a pre-check and starts the task.
The system performs Instance Status Detection, Storage Space Detection, and Local Table and Distributed Table Detection on the source and destination instances.
-
If the pre-check is successful:
-
Review the impact on the instances during migration.
-
Set the Time of Stopping Data Writing.
Note-
Writes to the source cluster must be stopped for the last 10 minutes of the migration to ensure data consistency.
-
To ensure a high success rate, we recommend that you set the write-stop duration to at least 30 minutes.
-
A migration task must be completed within five days of its creation. Therefore, the end date for the Time of Stopping Data Writing must be no later than
current date + 5 days. -
To minimize the impact on your business, we recommend that you set the write-stop window to your off-peak hours.
-
-
Click Completed.
NoteAfter clicking this button, the task is created and started.
-
-
If the pre-check fails, follow the prompts to resolve the issues and retry the data migration. The following table describes the pre-check items and their requirements.
Check item
Requirement
Instance Status Detection
Ensure that no management tasks, such as scaling or configuration changes, are running on the source or destination cluster. You cannot start the migration if a task is in progress.
Storage Space Detection
The available storage space of the destination cluster must be at least 1.2 times the used storage space of the source cluster.
Local Table and Distributed Table Detection
The check fails if a local table in the source cluster does not have a corresponding distributed table or if the distributed table is not unique. You must delete any extra distributed tables or create a unique distributed table for each local table.
-
-
Step 3: Assess migration completion
If the write speed of the source cluster is less than 20 MB/s, you can skip this step.
If the write speed of the source cluster is greater than 20 MB/s, you must check the actual write speed of the destination cluster to assess if the migration can complete. The destination cluster's write speed must keep up with the source cluster's. To do this, follow these steps:
-
Check the disk throughput of the destination cluster to determine its actual write speed. For more information, see View cluster monitoring information.
-
Compare the write speeds of the destination and source clusters.
-
If the write speed of the destination cluster is greater than that of the source cluster, the migration is highly likely to succeed. Proceed to Step 4.
-
If the write speed of the destination cluster is less than that of the source cluster, the migration is highly likely to fail. We recommend that you cancel the migration task and perform a manual migration.
-
Step 4: View the migration task
-
On the Clusters page, click the Clusters of Community-compatible Edition tab, and then click the ID of the destination cluster.
-
In the left-side navigation pane, click Data Migration and Synchronization > Migration from ClickHouse.
On the instance migration list page, view the Migration Status, Running Information, and Data Write-Stop Window for the task.
NoteWhen the estimated remaining time in the Running Information column is 10 minutes or less and the Migration Status is Migrating, a write-stop is triggered on the source cluster to ensure data consistency. The rules are as follows:
-
If the trigger time is within the configured write-stop window, writes to the source cluster are stopped.
-
If the trigger time is outside the configured write-stop window but is on or before the
task start (that is, task creation) date + 5 days, you can modify the write-stop window to continue the migration. -
If the trigger time is outside the configured write-stop window and is after the
task start (that is, task creation) date + 5 days, the migration fails. You must cancel the migration task, clear the migrated data from the destination cluster, and create a new migration task.
Important-
If the source cluster contains Kafka/RabbitMQ engine tables: when the migration task enters the data migration phase (that is, table schema migration is complete), perform Step 5 to rebuild Kafka/RabbitMQ engine tables on the source cluster so that incremental data resumes flowing and is synchronized to the destination cluster.
-
Shortly before the configured write-stop window, perform Step 6 to delete the Kafka/RabbitMQ engine tables and their downstream materialized views on the source cluster to prevent message backlog during the write-stop period from causing data inconsistency.
-
Step 5: Rebuild Kafka/RabbitMQ engine tables on the source cluster
After the migration task enters the data migration phase (that is, table schema migration is complete), use the previously saved DDL statements to rebuild the Kafka/RabbitMQ engine tables and their downstream materialized views on the source cluster. Once rebuilt, incremental data resumes flowing and is automatically synchronized to the destination cluster.
If you performed a RENAME operation on implicit target tables earlier, use the TO clause pointing to the renamed target table when rebuilding the materialized view. For more information, see CREATE MATERIALIZED VIEW.
-- Rebuild Kafka/RabbitMQ engine tables on the source cluster
CREATE TABLE <database>.<kafka_or_rabbitmq_table_name> (...)
ENGINE = Kafka/RabbitMQ
SETTINGS ...;
-- Rebuild materialized view (pointing to the renamed target table)
CREATE MATERIALIZED VIEW <database>.<materialized_view_name> TO <database>.<new_target_table_name>
AS SELECT ... FROM <database>.<kafka_or_rabbitmq_table_name>;Step 6: Delete Kafka/RabbitMQ engine tables on the source cluster
Shortly before the configured write-stop window, delete the Kafka/RabbitMQ engine tables and their downstream materialized views on the source cluster to stop incremental data writes and ensure consistency of the final data synchronization.
-- Delete materialized views first
DROP TABLE <database>.<materialized_view_name> ON CLUSTER default;

-- Then delete Kafka/RabbitMQ engine tables
DROP TABLE <database>.<kafka_or_rabbitmq_table_name> ON CLUSTER default;
Step 7: Rebuild Kafka/RabbitMQ engine tables on the destination cluster
After the migration task is complete, use the previously saved DDL statements to rebuild the Kafka/RabbitMQ engine tables and their downstream materialized views on the destination cluster to restore the incremental data consumption pipeline.
If you performed a RENAME operation on implicit target tables earlier, use the TO clause pointing to the renamed target table when rebuilding the materialized view. For more information, see CREATE MATERIALIZED VIEW.
-- Rebuild Kafka/RabbitMQ engine tables on the destination cluster
CREATE TABLE <database>.<kafka_or_rabbitmq_table_name> (...)
ENGINE = Kafka/RabbitMQ
SETTINGS ...;
-- Rebuild materialized view
CREATE MATERIALIZED VIEW <database>.<materialized_view_name> TO <database>.<target_table_name>
AS SELECT ... FROM <database>.<kafka_or_rabbitmq_table_name>;Step 8: (Optional) Cancel the migration task
-
On the Clusters page, click the Clusters of Community-compatible Edition tab, and then click the ID of the destination cluster.
-
In the left-side navigation pane, click Data Migration and Synchronization > Migration from ClickHouse.
-
In the Actions column for the migration task, click Cancel Migration.
-
In the Cancel Migration dialog box, click OK.
Note-
After canceling the migration, the task list is not updated immediately. Refresh the page periodically to check the task status.
-
After the task is canceled, its Migration Status changes to Completed.
-
Before you start a new migration, you must clear the migrated data from the destination cluster to prevent data duplication.
-
Step 9: (Optional) Modify the write-stop window
-
On the Clusters page, click the Clusters of Community-compatible Edition tab, and then click the ID of the destination cluster.
-
In the left-side navigation pane, click Data Migration and Synchronization > Migration from ClickHouse.
-
In the Actions column for the migration task, click Modify Data Write-Stop Time Window.
-
In the Modify Data Write-Stop Time Window dialog box, select a new Time of Stopping Data Writing.
NoteThe rules for setting the Time of Stopping Data Writing are the same as those for creating a migration task.
-
Click OK.
Related documentation
To learn how to migrate data from a self-managed ClickHouse cluster to Alibaba Cloud ClickHouse, see Migrate data from a self-managed ClickHouse cluster to an Alibaba Cloud ClickHouse community-compatible edition cluster.