Traffic scheduling uses Differentiated Services Code Point (DSCP) values to mark inter-region network traffic and enforce a bandwidth cap for each traffic type. This ensures dedicated inter-region bandwidth for each service and improves overall network efficiency.
Introduction
Overview
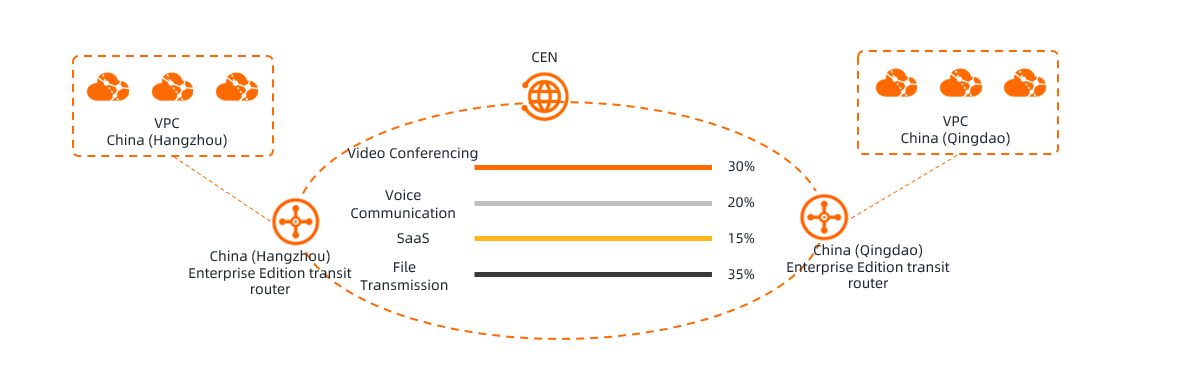
When enterprises use Cloud Enterprise Network (CEN) for inter-region communication, an inter-region connection often carries traffic from multiple services, such as video conferencing, voice calls, SaaS applications, and file transfers. These services have different network requirements. For example:
Video conferencing and voice call traffic requires real-time transmission. High packet loss and frequent jitter can degrade communication quality.
SaaS application traffic requires timely responses. Network congestion degrades the user experience.
File transfer traffic requires high throughput and sufficient bandwidth, but is less sensitive to network performance metrics such as latency and jitter.
The total bandwidth of an inter-region connection is fixed. When traffic is transmitted over an inter-region connection, different services often compete for bandwidth. This can lead to low network utilization and poor communication quality. For example, a large file transfer can consume a large amount of bandwidth, which can cause high latency for video conferencing and voice calls, or even interrupt them. Traffic scheduling lets you classify traffic and allocate bandwidth to different services. This improves communication quality and network utilization.
How it works
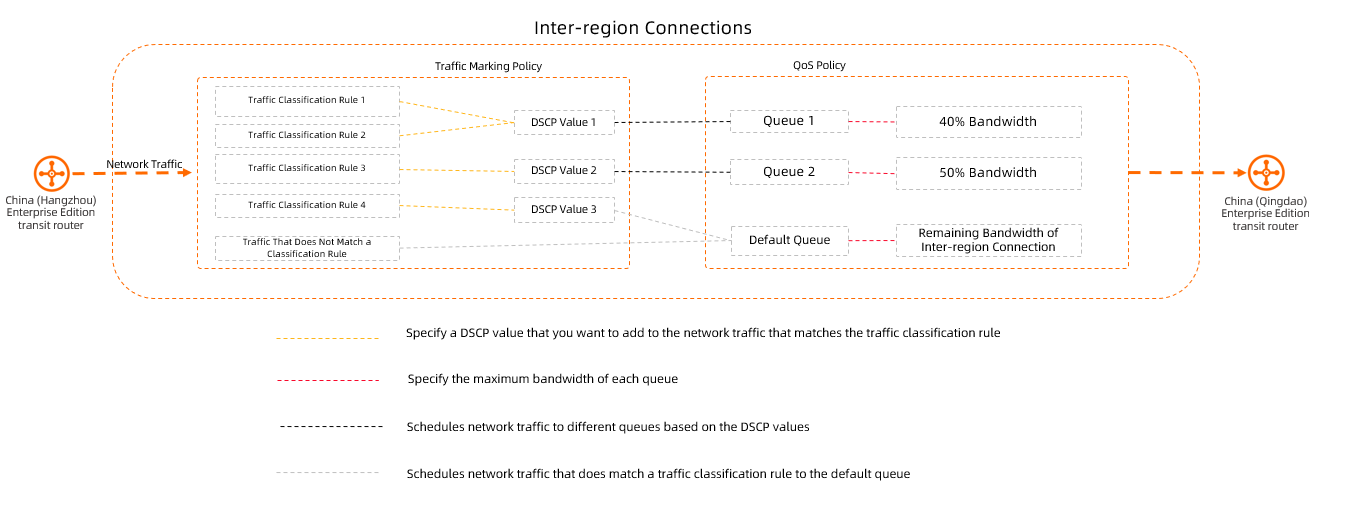
The traffic scheduling feature consists of two main components: traffic marking policies and QoS policies.
Traffic marking policy
A traffic marking policy uses traffic classification rules to identify and mark matching traffic with a Differentiated Services Code Point (DSCP) value.
After traffic enters an inter-region connection, the system matches the traffic against traffic marking policies in descending order of priority. If the traffic matches any traffic classification rule in a traffic marking policy, the traffic is considered a match for the policy. The system then adds the DSCP value specified in the policy to the data packets. If the traffic does not match any traffic marking policy, the system does not add a DSCP value.

Example
An inter-region connection is configured with the traffic marking policies shown in the following table. When traffic from the source CIDR block 10.0.10.0/24 to the destination CIDR block 192.168.30.0/24 enters the inter-region connection, it matches Traffic Marking Policy 2 (Rule 3). The system does not continue to match Traffic Marking Policy 3 (Rule 5) because Traffic Marking Policy 2 has a higher priority. The system adds a DSCP value of 9 to the data packets.
Traffic marking policy name
Priority
Specified DSCP
Traffic classification rule name
Source CIDR block
Destination CIDR block
Traffic Marking Policy 1
5
6
Rule 1
192.168.10.0/24
192.168.30.0/24
Rule 2
192.168.20.0/24
192.168.30.0/24
Traffic Marking Policy 2
10
9
Rule 3
10.0.0.0/16
192.168.30.0/24
Rule 4
172.16.0.0/16
192.168.30.0/24
Traffic Marking Policy 3
15
12
Rule 5
10.0.10.0/24
192.168.30.0/24
Rule 6
10.0.20.0/24
192.168.30.0/24
QoS policy
A QoS policy classifies traffic into different queues based on their DSCP values. You can assign dedicated bandwidth to each queue, which prevents other traffic from consuming it.
Each QoS policy contains a default queue. The system automatically sends traffic to the default queue if it either does not match a traffic classification rule or is marked but not assigned to a specific queue. The default queue uses the remaining bandwidth of the inter-region connection. In a QoS policy, the combined bandwidth of all queues cannot exceed the total bandwidth of the inter-region connection.
Limitations
The traffic scheduling feature is available only for inter-region connections on an Enterprise Edition transit router.
The traffic scheduling feature applies only to the outbound direction of an Enterprise Edition transit router.
For example, consider an inter-region connection between the China (Hangzhou) and China (Qingdao) regions. If you configure the traffic scheduling feature on the transit router in the China (Hangzhou) region, the feature guarantees bandwidth only for traffic from China (Hangzhou) to China (Qingdao). It does not guarantee bandwidth for traffic in the reverse direction, from China (Qingdao) to China (Hangzhou).
ImportantTo ensure a consistent inter-region bandwidth experience, configure matching traffic marking policies and QoS policies for both traffic directions.
The following table lists the quotas for the traffic scheduling feature.
Resource
Default limit
Adjustable
Maximum number of traffic classification rules per transit router
500
Not adjustable
Maximum number of queues per QoS policy
64
Not adjustable
Example scenario
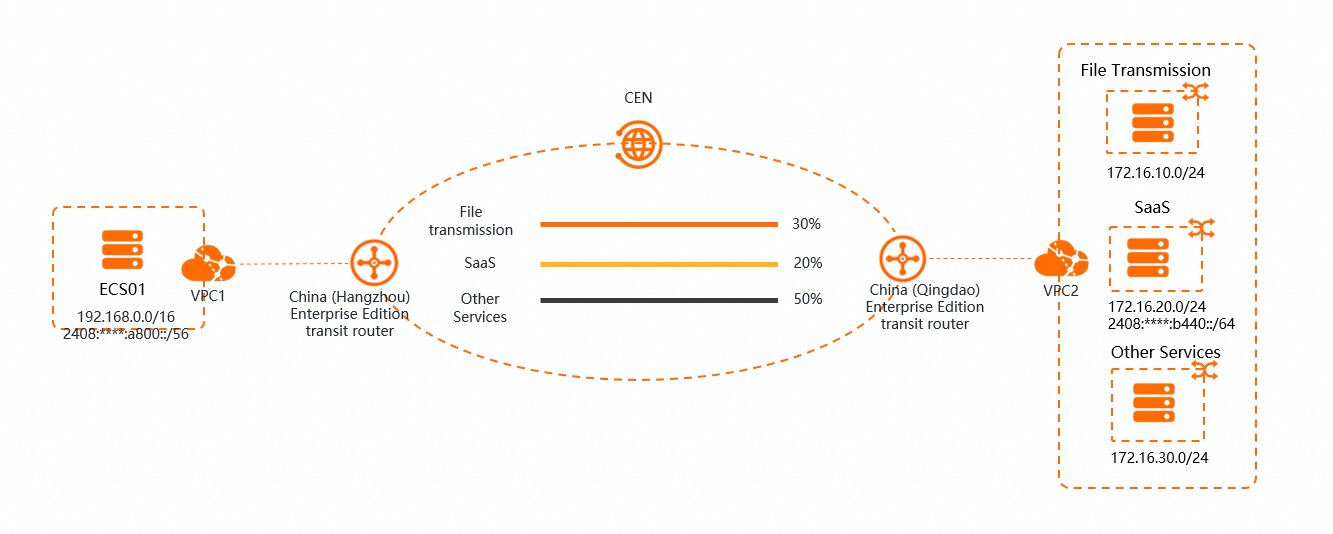
This topic uses the scenario in the preceding figure to demonstrate the traffic scheduling feature. An enterprise has a virtual private cloud (VPC), VPC1, in the China (Hangzhou) region and another VPC, VPC2, in the China (Qingdao) region. The enterprise creates an application client, ECS01, on an Elastic Compute Service (ECS) instance in VPC1. In VPC2, the enterprise deploys a file transfer service, an office SaaS service, and other services. VPC1 and VPC2 are interconnected through a Cloud Enterprise Network (CEN) instance and an Enterprise Edition transit router. However, when ECS01 in VPC1 accesses the file transfer service and the office SaaS service, it frequently experiences slow responses and interrupted file transfers. After a preliminary investigation, the enterprise finds that other services are consuming excessive inter-region bandwidth. As a result, the file transfer and office SaaS services have insufficient bandwidth and cannot function properly.
The enterprise plans to use the traffic scheduling feature of the inter-region connection to allocate a fixed bandwidth for each traffic type. This ensures reliable communication for critical services. The network configuration and bandwidth plan for this example are shown in the following table.
Service | Service CIDR block | Peer CIDR block | Inter-region bandwidth percentage |
File transfer | 172.16.10.0/24 | 192.168.0.0/16 | 30% |
Office SaaS | 2408:****:b440::/64 | 2408:****:a800::/56 | 20% |
Other services | 172.16.30.0/24 | 192.168.0.0/16 | 50% |
Prerequisites
You have enabled inter-region traffic forwarding using CEN and an Enterprise Edition transit router. For setup instructions, see Connect VPCs that belong to different accounts.
Step 1: Create a traffic marking policy
A traffic marking policy uses traffic classification rules to identify traffic and marks matching packets with a Differentiated Services Code Point (DSCP) value.
Log on to the CEN console.
On the CEN Instance page, click the ID of the CEN instance that you want to manage.
On the tab, click the ID of the transit router instance for the inter-region connection.
On the transit router instance details page, click the Traffic Marking tab.
On the Traffic Marking tab, click Create Traffic Marking Policy.
On the Create Traffic Marking Policy page, configure the following parameters and click OK.
Basic Settings
Parameter
Description
Policy Name
The name of the traffic marking policy.
Policy Description
The description of the traffic marking policy.
Policy Priority
The matching priority of the traffic marking policy. Valid values: 1 to 100. A smaller value indicates a higher priority.
As traffic enters an inter-region connection, the system evaluates traffic marking policies in descending order of priority. If traffic matches a rule in a policy, the system applies that policy and marks the packets with the policy's DSCP value. If traffic matches no policy, the system does not mark the packets.
DSCP
If a packet matches a traffic classification rule, the system sets the DSCP field in the IP packet to distinguish service types.
When you create a QoS policy, you can use this DSCP value to queue traffic.
Valid values: 0 to 63. Each traffic marking policy on a transit router must have a unique DSCP value.
Traffic Classification Rules
You can add traffic classification rules by using the Manual or Automatic method.
Manual add
For Method, select Manual and configure the following parameters.
Parameter
Description
Address Type
The address type of traffic packets. Valid values:
IPv4: matches only IPv4 traffic.
IPv6: matches only IPv6 traffic.
If you leave this parameter empty, the rule matches both IPv4 and IPv6 traffic.
Rule name
The name of the traffic classification rule.
Protocol
The protocol of traffic packets.
Traffic classification rules can match various protocols, such as HTTP, HTTPS, UDP, TCP, and SSH. For a list of supported protocols, see the console.
When you select an application-layer protocol such as HTTP, HTTPS, or SSH, the system automatically fills the destination port with the corresponding well-known port number, for example, 80 for HTTP and 443 for HTTPS. You cannot modify the destination port. To specify a custom destination port, select TCP or UDP.
Source CIDR Block
The source CIDR block of traffic packets.
Matches traffic from a source IP address within this CIDR block. If you leave this parameter empty, the rule matches all source IP addresses.
Source Ports
The source port of traffic packets.
Matches traffic from a source port within this range. If you leave this parameter empty, the rule matches all source ports.
Valid values: -1 and 1 to 65535. The format is as follows:
Enter 1/200 to specify ports 1 to 200.
Enter 80/80 to specify port 80.
Enter -1/-1 to match all source ports.
You can specify -1 only in the -1/-1 format.
Destination CIDR Block
The destination CIDR block of traffic packets.
Matches traffic to a destination IP address within this CIDR block. If you leave this parameter empty, the rule matches all destination IP addresses.
Destination Ports
The destination port of traffic packets.
Matches traffic to a destination port within this range. If you leave this parameter empty, the rule matches all destination ports.
When you select an application-layer protocol such as HTTP or HTTPS, the system determines the destination port automatically and you do not need to configure it.
Valid values: -1 and 1 to 65535. The format is as follows:
Enter 1/200 to specify ports 1 to 200.
Enter 80/80 to specify port 80.
Enter -1/-1 to match all destination ports.
You can specify -1 only in the -1/-1 format.
DSCP
Matches the existing DSCP value of a packet arriving at the transit router. If you leave this parameter empty, the rule matches packets with any DSCP value. Leave this parameter empty if you have not set a DSCP value on your ECS instances or in your IDCs.
ImportantDifferences between DSCP values in a policy and a rule:
Specified DSCP in a traffic marking policy: The transit router remarks all traffic that matches the classification rules. This overwrites any existing DSCP value. You can use this new DSCP value to queue traffic when you create a QoS policy.
DSCP in a classification rule: This parameter matches traffic already marked on an ECS instance or in an on-premises IDC. To mark the DSCP field of a data packet on an ECS instance, you can use the Traffic Control (
tc) tool provided by the Linux kernel.
Description
The description of the traffic classification rule.
Quick add
For the quick add method, you can specify a VPC instance to set its CIDR block as the Source CIDR Block or Destination CIDR Block. You only need to specify the Source CIDR Block and Destination CIDR Block. After you click Auto Generate, the system automatically configures the Protocol, Source Ports, Destination Ports, and DSCP for the traffic classification rule.
For Method, select Automatic. Configure the Rule Name, Source CIDR Block, and Destination CIDR Block, and then click Auto Generate.
ImportantAfter you click Auto Generate, you must select the rules that are automatically generated. The system adds the selected traffic classification rules only after you click OK at the bottom of the current page. If you do not select any of the generated rules after you click Auto Generate, the system will not add any traffic classification rules when you click OK at the bottom of the current page.
To add multiple traffic classification rules, add the CIDR blocks that you want to configure to the Source CIDR Block and Destination CIDR Block fields, and then click Auto Generate. The system lists all possible traffic classification rules based on the Source CIDR Block and Destination CIDR Block that you specified. You can then select the traffic classification rules that you want to add.
After you click Auto Generate, if you need to reconfigure the traffic classification rules, you can reconfigure the Rule Name, Source CIDR Block, and Destination CIDR Block, click Auto Generate, and then select the traffic classification rules that you want to add.
Parameter
Description
Rule Name
The name of the traffic classification rule.
Source CIDR Block
Quickly specify the source CIDR block of the traffic classification rule.
Click Quick Add next to the input box. In the Source CIDR Block dialog box, select the CIDR block of a VPC instance from the list on the left and click the
 icon to use the selected CIDR block. Then, click OK.
To deselect a CIDR block, select it from the list on the right and click the
 icon.
icon.Destination CIDR Block
Quickly specify the destination CIDR block of the traffic classification rule.
Click Quick Add next to the input box. In the Destination CIDR Block dialog box, select the CIDR block of a VPC instance from the list on the left and click the
icon to use the selected CIDR block. Then, click OK.To deselect a CIDR block, select it from the list on the right and click the
icon.Protocol
The system automatically configures the Protocol, Source Ports, Destination Ports, and DSCP parameters, and you cannot modify them. The default settings are as follows:
Protocol: Matches all protocols by default.
Source Ports: Matches all source ports by default.
Destination Ports: Matches all destination ports by default.
DSCP: Matches all DSCP values by default.
Source Ports
Destination Ports
DSCP
Repeat Step 3 to Step 6 to configure corresponding traffic marking policies on the transit router instance in the peer region.
This example uses the manual method to add traffic marking policies in the China (Hangzhou) and China (Qingdao) regions. The following table describes the configurations.
NoteIn the following table, "None" indicates that the parameter is left unconfigured, causing the system to apply the default matching rule.
Region
China (Hangzhou)
China (Qingdao)
Configuration item
Traffic marking policy 1
Traffic marking policy 2
Traffic marking policy 3
Traffic marking policy 1
Traffic marking policy 2
Traffic marking policy 3
Policy name
File
SaaS
Other
File
SaaS
Other
Priority
5
10
15
5
10
15
Specified DSCP
5
10
15
5
10
15
Traffic classification rule
Address Type
None
IPv6
None
None
IPv6
None
Protocol
None
HTTP
HTTPS
None
TCP
TCP
Source CIDR block
192.168.0.0/16
2408:****:a800::/56
192.168.0.0/16
172.16.10.0/24
2408:****:b440::/64
172.16.30.0/24
Source port
1/200
None
1/200
25/25
80/80
443/443
Destination CIDR block
172.16.10.0/24
2408:****:b440::/64
172.16.30.0/24
192.168.0.0/16
2408:****:a800::/56
192.168.0.0/16
Destination port
25/25
80/80
443/443
1/200
None
1/200
DSCP
25
30
None
25
30
None
Traffic marking policy description
Matches traffic from source port range 1 to 200 of the 192.168.0.0/16 CIDR block to destination port 25 of the 172.16.10.0/24 CIDR block with an existing DSCP value of 25. The policy marks matching traffic with DSCP value 5.
Matches HTTP traffic from the 2408:****:a800::/56 CIDR block to destination port 80 of the 2408:****:b440::/64 CIDR block with an existing DSCP value of 30. The policy marks matching traffic with DSCP value 10.
Matches HTTPS traffic from source port range 1 to 200 of the 192.168.0.0/16 CIDR block to destination port 443 of the 172.16.30.0/24 CIDR block. The policy marks matching traffic with DSCP value 15.
Matches traffic from source port 25 of the 172.16.10.0/24 CIDR block to destination port range 1 to 200 of the 192.168.0.0/16 CIDR block with an existing DSCP value of 25. The policy marks matching traffic with DSCP value 5.
Matches TCP traffic from source port 80 of the 2408:****:b440::/64 CIDR block to the 2408:****:a800::/56 CIDR block with an existing DSCP value of 30. The policy marks matching traffic with DSCP value 10.
Matches TCP traffic from source port 443 of the 172.16.30.0/24 CIDR block to destination port range 1 to 200 of the 192.168.0.0/16 CIDR block. The policy marks matching traffic with DSCP value 15.
Step 2: Create a QoS policy
A QoS policy uses the DSCP values from a traffic marking policy to map traffic to different queues. You can then assign a bandwidth limit to each queue.
Log on to the CEN console.
On the CEN Instance page, click the ID of the CEN instance that you want to manage.
On the tab, click the ID of the transit router instance for the inter-region connection.
On the transit router instance details page, click the Inter-Region Connections tab.
On the Inter-Region Connections tab, find the target inter-region connection and click Set in the QoS Policy column.
On the Configure Cross-region QoS Policy page, configure the following parameters, and then click OK.
Parameter
Description
Basic Settings
Policy Name
The name of the QoS policy.
Policy Description
The description of the QoS policy.
Inter-region Connection
Select the inter-region connection to which you want to apply the QoS policy.
Guaranteed bandwidth allocation mode
Select how to allocate guaranteed bandwidth. You can allocate bandwidth by percentage or by absolute value.
NoteYou cannot change this setting after the policy is created. To change the mode, delete the policy and create a new one.
Queues
Queue Name
The name of the queue.
Queue Description
The description of the queue.
Matching DSCP
The Differentiated Services Code Point (DSCP) value in the traffic packets.
This is the DSCP value that you specified in the DSCP field of the traffic marking policy. Traffic with a matching DSCP value is directed to this queue.
A single queue can match multiple DSCP values. Separate the values with a comma (,).
Bandwidth Cap
The maximum inter-region bandwidth that traffic in this queue can use.
If you set the By Percentage to by percentage, this value is a percentage. For example, a value of 30 means the queue's bandwidth limit is 30% of the total inter-region connection bandwidth.
If you set the By Absolute Value to by absolute value, this value is in Mbps. For example, a value of 30 means the queue's bandwidth limit is 30 Mbps.
Repeat Step 3 to Step 6 to configure a matching QoS policy on the transit router instance in the peer region.
In this example, the QoS policies for the China (Hangzhou) and China (Qingdao) regions are configured as shown in the following table.
Region
Policy name
Inter-region connection
Guaranteed bandwidth allocation mode
Queue
Queue name
Matching DSCP
Bandwidth limit
(Calculated as a percentage. For example, 30 indicates 30% of the inter-region connection bandwidth.)
China (Hangzhou)
QoS-Policy-HZ
Select the inter-region connection between China (Hangzhou) and China (Qingdao).
Select By Percentage.
Queue-File
5
30
Queue-SaaS
10
20
Queue-Other
15
50
China (Qingdao)
QoS-Policy-QD
Queue-File
5
30
Queue-SaaS
10
20
Queue-Other
15
50
After you configure the policies, the inter-region connection guarantees bandwidth for different types of traffic based on the queue settings.
Step 3: Verify traffic in the target queue
In the Monitoring column for the target inter-region connection, click the  icon. From the Queue drop-down list, select the target queue. A corresponding traffic trend indicates that the traffic has been routed successfully.
More operations
Edit a traffic marking policy
After you create a traffic marking policy, you can modify its name, description, and classification rules. The priority and DSCP value cannot be modified.
Log on to the CEN console.
On the CEN Instance page, click the ID of the CEN instance that you want to manage.
On the tab, click the ID of the transit router instance for the inter-region connection.
On the transit router instance details page, click the Traffic Marking tab. For the target traffic marking policy, click Edit in the Actions column.
In the Traffic Marking Policy Details panel, edit the name, description, and classification rules.
You can only add or delete classification rules. To modify an existing rule, you must delete it and create a new one.
Delete a traffic marking policy
To delete a traffic marking policy, you must first delete all its associated classification rules. The following section describes how to delete the traffic classification rules and then the traffic marking policy.
Log on to the CEN console.
On the CEN Instance page, click the ID of the CEN instance that you want to manage.
On the tab, click the ID of the transit router instance for the inter-region connection.
On the transit router instance details page, click the Traffic Marking tab. For the target traffic marking policy, click Edit in the Actions column.
In the Traffic Marking Policy Details panel, go to the Traffic Classification Rules section. For the classification rule that you want to delete, click Delete in the Actions column, then click OK in the Delete Traffic Classification Rule dialog box.
If the policy contains multiple classification rules, repeat this step to delete all of them.
In the upper-right corner of the Traffic Marking Policy Details panel, click Delete, then click OK in the Delete Traffic Marking Policy dialog box.
Edit a QoS policy
After you create a QoS policy, you can modify its name, description, and queue information.
Log on to the CEN console.
On the CEN Instance page, click the ID of the CEN instance that you want to manage.
On the tab, click the ID of the transit router instance for the inter-region connection.
On the transit router instance details page, click the Inter-Region Connections tab. For the target inter-region connection, click details in the QoS Policy column.
In the Cross-region QoS Policy Details panel, edit the name, description, and queue information.
Delete a QoS policy
To delete a QoS policy, you must first delete all its queues. The following section describes how to delete the queues and then the QoS policy.
Log on to the CEN console.
On the CEN Instance page, click the ID of the CEN instance that you want to manage.
On the tab, click the ID of the transit router instance for the inter-region connection.
On the transit router instance details page, click the Inter-Region Connections tab. For the target inter-region connection, click details in the QoS Policy column.
In the Cross-region QoS Policy Details panel, go to the Queues section. For the queue that you want to delete, click Delete in the Actions column, then click OK in the Delete Queue From QoS Policy dialog box.
In the upper-right corner of the Cross-region QoS Policy Details panel, click Delete, then click OK in the Delete QoS Policy dialog box.
References
Traffic marking policy APIs
CreateTrafficMarkingPolicy: Creates a traffic marking policy.
AddTrafficMatchRuleToTrafficMarkingPolicy: Adds a traffic classification rule to a traffic marking policy.
RemoveTrafficMatchRuleFromTrafficMarkingPolicy: Removes a traffic classification rule from a traffic marking policy.
DeleteTrafficMarkingPolicy: Deletes a traffic marking policy.
ListTrafficMarkingPolicies: Lists traffic marking policies.
QoS policy APIs
CreateCenInterRegionTrafficQosPolicy: Creates an inter-region traffic QoS policy.
CreateCenInterRegionTrafficQosQueue: Creates a queue in a QoS policy.
UpdateCenInterRegionTrafficQosPolicyAttribute: Updates the name and description of a QoS policy.
UpdateCenInterRegionTrafficQosQueueAttribute: Updates the configuration of a queue in a QoS policy.
DeleteCenInterRegionTrafficQosQueue: Deletes a queue from a QoS policy.
DeleteCenInterRegionTrafficQosPolicy: Deletes a QoS policy.
ListCenInterRegionTrafficQosQueues: Lists the queues in a QoS policy.
ListCenInterRegionTrafficQosPolicies: Lists QoS policies.