Associated forwarding
When a network instance sends traffic through an Enterprise Edition transit router, the transit router must know which route table to consult. Associated forwarding lets you bind each network instance connection to a specific route table, giving you per-connection control over how outbound traffic is forwarded.
Associated forwarding controls which route table a transit router uses to forward outbound traffic from a network instance. To populate route tables with routes from connected network instances, configure route propagation separately.
Limits
Only route tables of Enterprise Edition transit routers support associated forwarding. To check which edition your transit router uses, see View the edition of a transit router.
Each network instance can be associated with only one route table of an Enterprise Edition transit router.
How it works
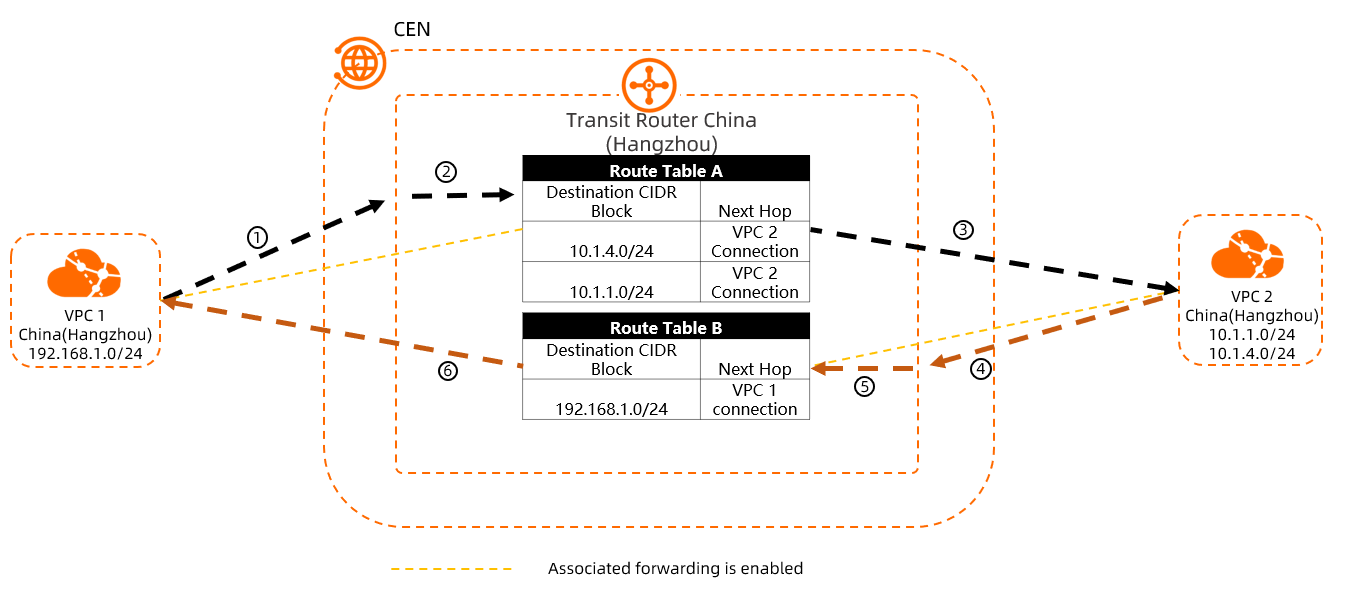
In this example, a transit router in the China (Hangzhou) region is connected to VPC1 and VPC2. The VPC1 connection is associated with Route Table A, and the VPC2 connection is associated with Route Table B.
A client in VPC1 (CIDR block 192.168.1.0/24) initiates a request to a server in VPC2 (CIDR block 10.1.1.0/24). The transit router processes the traffic as follows:
| Step | Description |
|---|---|
| 1 | VPC1 sends a request to 10.1.1.0/24. |
| 2 | The transit router looks up Route Table A (associated with the VPC1 connection) for a route to 10.1.1.0/24. If the route exists, the request is forwarded. If not, VPC1 cannot reach the destination. |
| 3 | Route Table A contains a route to 10.1.1.0/24. The transit router forwards the request to VPC2. |
| 4 | VPC2 receives the request and sends an echo reply to VPC1. |
| 5 | The transit router looks up Route Table B (associated with the VPC2 connection) for a route to 192.168.1.0/24. If the route exists, the reply is forwarded. If not, VPC2 cannot send the reply. |
| 6 | Route Table B contains a route to 192.168.1.0/24. The transit router forwards the echo reply to VPC1. |
Create an association
Before you begin, make sure that:
An Enterprise Edition transit router exists and is connected to the network instance.
You have the required permissions to manage route tables in the CEN console.
Log on to the CEN console.
On the Instances page, click the ID of the CEN instance.
On the Basic Information tab, click Transit Router, then click the ID of the transit router.
On the transit router details page, click the Route Table tab.
In the left panel, click the ID of the route table. On the route table details page, click the Route Table Association tab.
Click Create Association. In the Add Association dialog box, configure the following parameters and click OK.
Parameter Description Route Table The current route table. Selected by default. Transit Router The current transit router. Selected by default. Association The network instance connection to associate with this route table. The transit router uses this route table to forward traffic for the selected connection.
To create an association using the API, call AssociateTransitRouterAttachmentWithRouteTable.
Delete an association
After you delete the association, the network instance can no longer use the transit router to reach other networks. If route synchronization is enabled for the network instance, routes are automatically withdrawn when the association is deleted. Proceed with caution.
Log on to the CEN console.
On the Instances page, click the ID of the CEN instance.
On the Basic Information tab, click Transit Router, then click the ID of the transit router.
On the transit router details page, click the Route Table tab.
In the left panel, click the ID of the route table. On the route table details page, click the Route Table Association tab.
On the Route Table Association tab, find the connection and click Delete in the Actions column.
In the Delete Association message, confirm the information and click OK.
To delete an association using the API, call DissociateTransitRouterAttachmentFromRouteTable.
What's next
To query all associations on a transit router, call ListTransitRouterRouteTableAssociations.
To control which routes are advertised into a route table from each connected network instance, configure route propagation on the route table.