When you use a transit router to connect network instances, route entries can accumulate quickly across multiple virtual private clouds (VPCs), virtual border routers (VBRs), and VPN connections — making route tables difficult to manage. The aggregate route feature lets you consolidate multiple specific routes into a single entry. This reduces route table size and eliminates the need to update each network instance separately when routing requirements change.
Limits
Only Enterprise Edition transit routers support aggregate routes. Adding an aggregate route to an Enterprise Edition transit router does not interrupt traffic forwarding.
Aggregate routes can be advertised to the following types of network instances that are attached to the Enterprise Edition transit router: virtual private cloud (VPC), virtual border router (VBR), Express Connect Router (ECR), virtual private network (VPN), and inter-region transit router (TR).
Aggregate routes cannot be aggregated into other aggregate routes. For example, if you add an aggregate route with destination CIDR block 10.0.0.0/16 and another with 10.0.0.0/8, the transit router advertises 10.0.0.0/16 to network instances even though it is a subnet of 10.0.0.0/8.
An aggregate route cannot have the same destination CIDR block as an existing route entry in the transit router route table.
Aggregate routes advertised to network instances consume the custom route entry quota of the instance route tables. For example, a single route table of a VPC supports at most 200 custom route entries by default. To raise the quota, go to the VPC quota management page in the Alibaba Cloud VPC console or the Quota Center console.
The resource quota and quota limit of aggregate routes are described in the following table.
Resource
Default limit
Adjustable
Maximum number of aggregate routes that can be created in one route table of an Enterprise Edition transit router
20
No
Add an aggregate route
After you add an aggregate route to a route table of an Enterprise Edition transit router, the transit router advertises it only to network instances that are connected to the transit router and have route synchronization enabled. Once advertised, specific routes whose destination CIDR blocks fall within the aggregate route's CIDR block are automatically withdrawn from the instance route tables.
Prerequisites
Before you begin, ensure that you have:
Route synchronization enabled for the network instances. For more information, see Enable route synchronization.
Associated forwarding enabled between the instances and the Enterprise Edition transit router. For more information, see Create an association.
Procedure
Log on to the CEN console.
On the CEN Instance page, click the ID of the CEN instance that you want to manage.
Go to the Basic Information > Transit Router tab and click the ID of the transit router that you want to manage.
Click the Route Table tab.
In the left-side section, click the ID of the route table that you want to manage. Click the Aggregate Route tab, then click Add Aggregate Route.
In the Add Aggregate Route dialog box, set the following parameters and click OK.
Parameter
Description
Name
Enter a name for the aggregate route.
Destination CIDR Block
Enter the destination CIDR block for the aggregate route. For example, enter
10.1.0.0/16to aggregate more specific routes such as10.1.0.0/24and10.1.1.0/24.Route Type
Select the type of aggregate route. Default value: Static. Routes advertised to network instances are custom routes, with the next hops set to the instance connections.
Target Range
Select the instance types to which the aggregate route is advertised. Valid values: VPC, VBR, Inter-region, VPN, ECR. After you add the aggregate route, it is automatically advertised to instances that are in associated forwarding correlation with the Enterprise Edition transit router and have route synchronization enabled.
Description
(Optional) Enter a description for the aggregate route.
After adding the aggregate route:
Click Details in the Status column to view the advertisement status and description. If an aggregate route fails to be advertised, fix the issue and re-advertise it. For more information, see Re-advertise an aggregate route.
On the Network Routes tab, check the Status column to view the status of specific routes. The Status column of the route entry may display Suppressed. This indicates that the route was not added to the route table because an aggregate route is configured, and actual traffic is forwarded according to the aggregated route entry.
Re-advertise an aggregate route
If an aggregate route fails to be advertised — for example, due to insufficient route quotas or route overlapping — fix the issue and manually re-advertise the route.
If the following solutions can fix the issues, the aggregate route is re-advertised automatically without manual action:
Deleting associated forwarding correlations
Disabling route synchronization
Deleting route tables
Deleting aggregate routes
Procedure
Log on to the CEN console.
On the CEN Instance page, click the ID of the CEN instance that you want to manage.
Go to the Basic Information > Transit Router tab and click the ID of the transit router that you want to manage.
Click the Route Table tab.
In the left-side section, click the ID of the route table that you want to manage.
Click the Aggregate Route tab, find the aggregate route, and click Re-apply in the Actions column.
Modify an aggregate route
If the new aggregate route has a smaller destination CIDR block than the existing one, specific routes outside the new CIDR block are re-advertised to instances. Check the route quota on instance route tables before proceeding — if the quota is insufficient, some routes may fail to be advertised and services may be interrupted.
You cannot directly modify an aggregate route's destination CIDR block in the CEN console. Instead, add a new aggregate route with the desired CIDR block, then delete the existing one.
Add an aggregate route with the destination CIDR block you want.
Delete the existing aggregate route.
Behavior when increasing the CIDR block (for example, from /22 to /20): Specific routes whose destination CIDR blocks fall within the new, larger CIDR block are withdrawn from the instances.
Behavior when decreasing the CIDR block (for example, from /20 to /23): Specific routes that fall outside the new, smaller CIDR block are re-advertised to the instances.
Examples
The following examples show how routes change when you resize the destination CIDR block of an aggregate route.
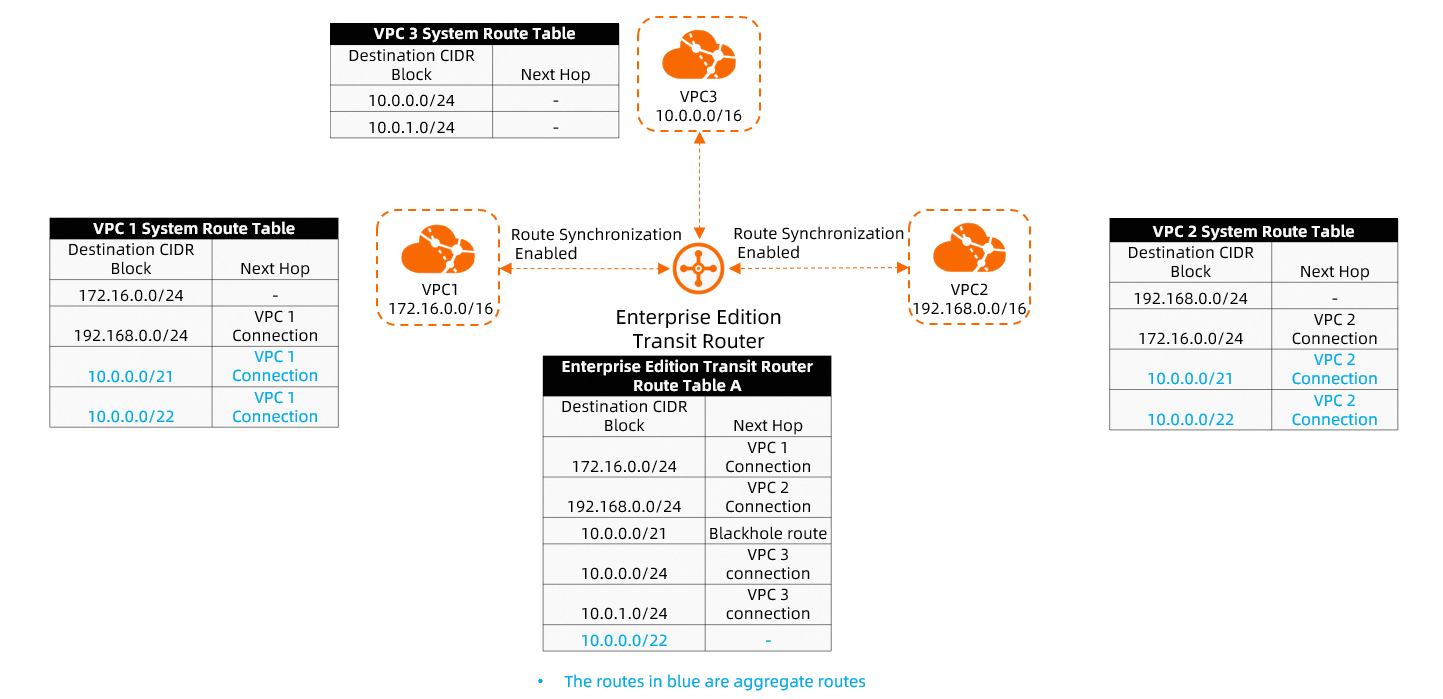
Route Table A of an Enterprise Edition transit router is associated with VPC1, VPC2, and VPC3. Route Table A contains routes with destination CIDR blocks 10.0.0.0/21, 10.0.0.0/24, and 10.0.1.0/24. After you add an aggregate route 10.0.0.0/22 and enable route synchronization for VPC1 and VPC2, the routes 10.0.0.0/22 and 10.0.0.0/21 are advertised to VPC1 and VPC2.
Increase the destination CIDR block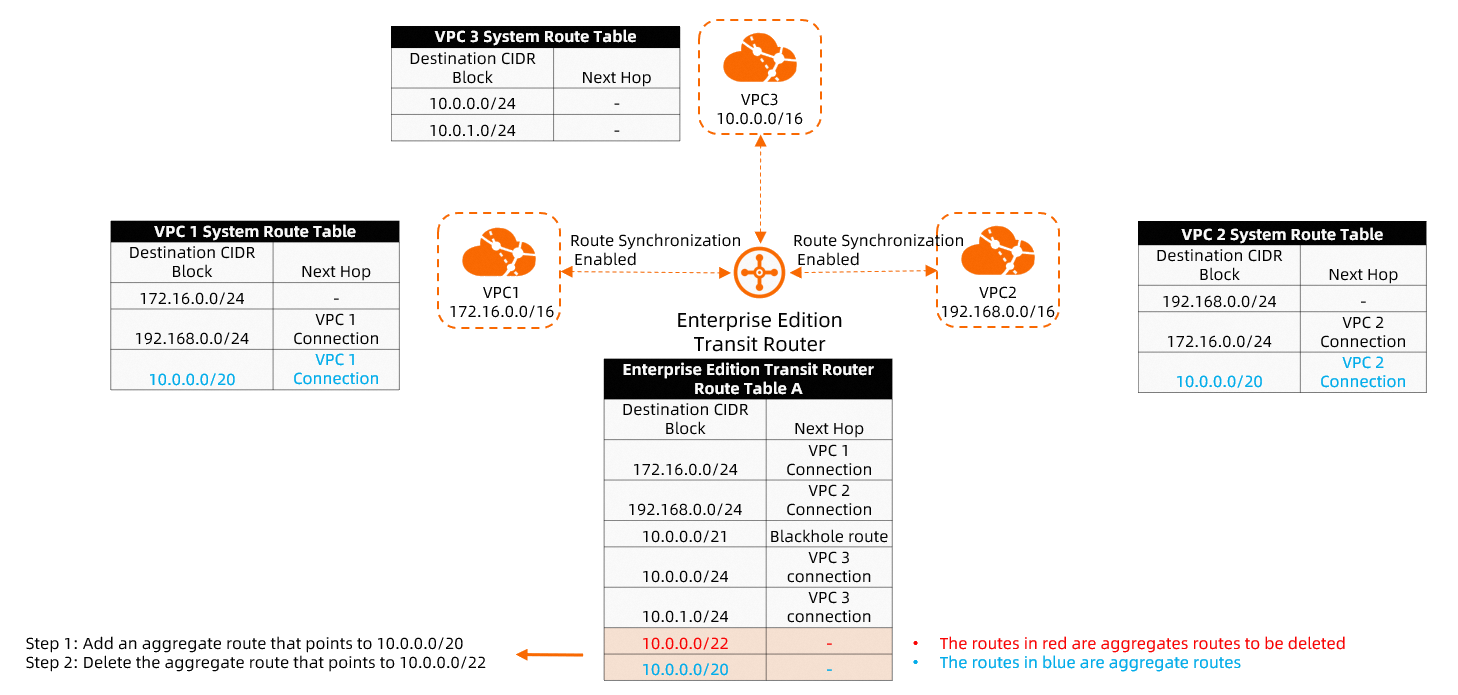
To increase the destination CIDR block from 10.0.0.0/22 to 10.0.0.0/20: create a new aggregate route 10.0.0.0/20, then delete the existing 10.0.0.0/22 aggregate route.
Before | After | |
Routes in VPC1 and VPC2 route tables | 10.0.0.0/22, 10.0.0.0/21 | 10.0.0.0/20 only |
Reason | — | 10.0.0.0/21 falls within 10.0.0.0/20 and is withdrawn |
Decrease the destination CIDR block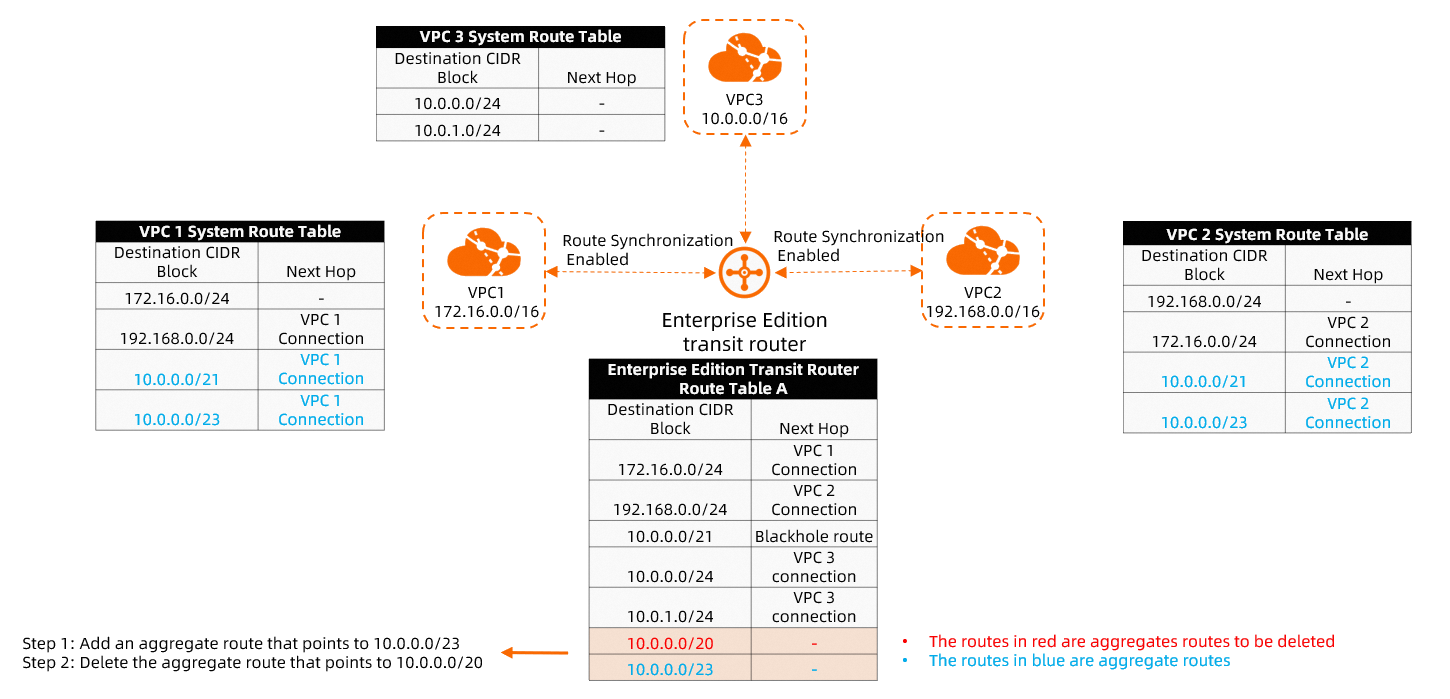
To decrease the destination CIDR block from 10.0.0.0/20 to 10.0.0.0/23: create a new aggregate route 10.0.0.0/23, then delete the existing 10.0.0.0/20 aggregate route.
Before | After | |
Routes in VPC1 and VPC2 route tables | 10.0.0.0/20 only | 10.0.0.0/21, 10.0.0.0/23 |
Reason | — | 10.0.0.0/21 falls outside 10.0.0.0/23 and is re-advertised; 10.0.0.0/20 is withdrawn |
Modify the target range
Before narrowing the target range, make sure that the instances you are removing have redundant routes to avoid service interruptions.
After adding an aggregate route, you can expand or narrow its propagation scope by adding or removing instance types from the target range. Valid values: VPC, VBR, Inter-region, VPN, ECR.
Log on to the CEN console.
On the CEN Instance page, click the ID of the CEN instance that you want to manage.
Go to the Basic Information > Transit Router tab and click the ID of the transit router that you want to manage.
Click the Route Table tab.
In the left-side section, click the ID of the route table that you want to manage.
Click the Aggregate Route tab and click Modify in the Actions column.
In the Edit Aggregation Routes dialog box, update the Target Range and click OK.
Delete an aggregate route
Before deleting an aggregate route, make sure that your network has a redundant route to prevent service interruptions.
After an aggregate route is deleted, it is automatically withdrawn from all instances. Specific routes whose destination CIDR blocks fall within the deleted aggregate route's CIDR block are then re-advertised to the instances.
Log on to the CEN console.
On the CEN Instance page, click the ID of the CEN instance that you want to manage.
Go to the Basic Information > Transit Router tab and click the ID of the transit router that you want to manage.
Click the Route Table tab.
In the left-side section, click the ID of the route table that you want to manage.
Click the Aggregate Route tab, find the route you want to delete, and click Delete in the Actions column.
Confirm the information and click OK.
API reference
CreateTransitRouteTableAggregation: creates an aggregate route.
DeleteTransitRouteTableAggregation: deletes an aggregate route.
RefreshTransitRouteTableAggregation: re-advertises an aggregate route.
DescribeTransitRouteTableAggregationDetail: queries the configuration details of an aggregate route.