You can remove imported resources from an application in Cloud Architect Design Tool (CADT). Removed resources are deleted from the architecture but are not released.
You can remove only imported resources. To release created resources, see Release application resources.
Remove specific resources
You can remove one or more imported resources from an application.
-
Log on to the Cloud Architect Design Tool (CADT) console. In the top navigation bar, choose Application > My Applications.
-
On the My Applications page, find the application that contains the resources you want to remove, and then click View Architecture.
-
In the upper-right corner, click the Edit toggle to enter edit mode.
NoteImported resources have an Import identifier, whereas created resources do not.
-
Select the nodes you want to remove, for example, an ECS and an EIP. Right-click a node and click Delete. A deletion marker appears in the lower-right corner of the node. When you hover over the node, the tooltip To be removed from architecture is displayed.
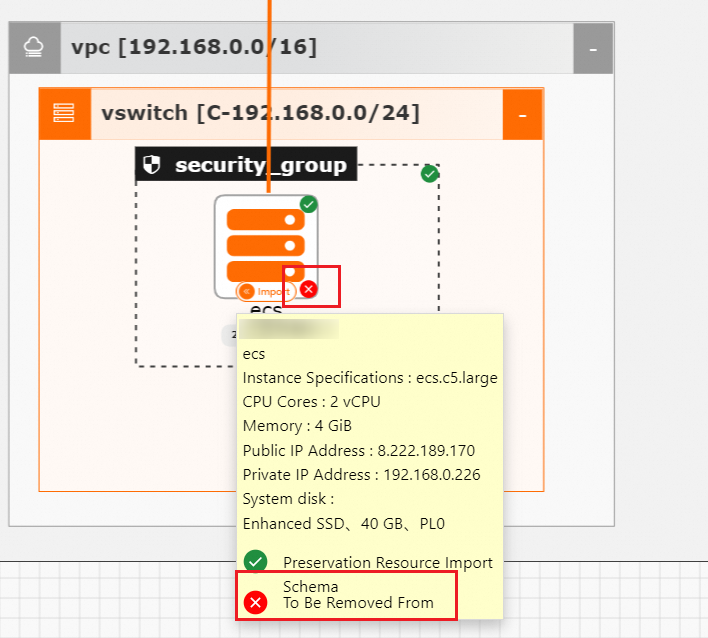
-
After marking the nodes for deletion, click Save in the upper-right corner. In the Import Resource List dialog box, verify that the status for the EIP and ECS resources is To be removed from architecture, and then click the Import button to finalize the removal.
-
After the process is complete, the corresponding nodes are removed from the architecture diagram. In the Resource Import Status dialog box, the status of the EIP and ECS resources is Removed from architecture, and the status of the remaining resources, such as the VPC, vSwitch, and security group, is running. The summary at the bottom shows Import successful.
Remove all resources
You can remove all imported resources from an application at once.
This feature applies only when all resources in the application are imported, not created.
-
Log on to the Cloud Architect Design Tool (CADT) console and go to the My Applications page.
-
On the My Applications page, find the application that contains the resources you want to remove, and then click View Architecture.
-
Turn on Edit mode.
-
At the bottom of the page, click the Resource List tab, and then click Remove All Resources. In the Remove All Resources confirmation dialog box, a message states, "This operation will remove all resources from this solution." Click OK to proceed.
ImportantIf both created and imported resources exist in the architecture but only Release All Resources is displayed in the Resource List section, clicking Release All Resources releases the created resources and removes the imported resources from the architecture.
-
Wait for the removal process to complete. Once finished, the status of all resources changes to Removed from architecture, the summary at the bottom shows Removal successful, and a confirmation message Removal successful is displayed. An Import tag then appears on all resource nodes on the canvas, such as EIP, VPC, vSwitch, security group, and ECS. This tag indicates that the resources have been removed from the application and can be imported again.