Deploy a chaincode to a channel on a Hyperledger Fabric V1.4 instance in three sequential steps: upload the chaincode package to BaaS, install it on your organization's peers, and instantiate it on the channel.
This topic applies to Fabric V1.4 instances. For Fabric V2.2 instances, see Manage chaincode (V2.2). To upgrade an existing chaincode, see Upgrade chaincodes.
Prerequisites
Before you begin, ensure that you have:
A BaaS instance running Fabric V1.4
Access to the Alibaba Cloud BaaS console
Build a chaincode package
Use the peer chaincode package command to build a chaincode package that includes all code dependencies. Download the peer binary for your platform:
| Platform | Download |
|---|---|
| Mac | hyperledger-fabric-darwin-amd64-1.4.5.tar.gz |
| Linux | hyperledger-fabric-linux-amd64-1.4.5.tar.gz |
For more details, see peer chaincode commands in the Hyperledger Fabric documentation.
Package a Go chaincode
Go chaincodes require all dependencies in a vendor directory. Use govendor to manage them.
Set -p to the main package's path relative to $GOPATH/src. Do not use the ./xxx format. Omit -l for Go. Do not use the -i or -S flags.
Install govendor.
go get -u -v github.com/kardianos/govendorIn your chaincode project directory, initialize the vendor directory.
govendor initCopy dependencies from
$GOPATHinto the vendor directory.govendor add +externalBuild the chaincode package.
peer chaincode package <output-file>.out \
  -n <chaincode-name> \
  -p <relative-path-from-GOPATH-src> \
  -c '{"Args":["init","<arg1>","<value1>","<arg2>","<value2>"]}' \
  -v <version>
Example: Package a chaincode named
myccat version1.0from theexample02directory:peer chaincode package ccpack.out \ -n mycc \ -p github.com/hyperledger/fabric/examples/chaincode/go/example02/cmd \ -c '{"Args":["init","a","100","b","200"]}' \ -v 1.0
Omit -c if the chaincode initialization does not require input arguments.Package a Node.js chaincode
Set -p to the root directory of the chaincode project (the directory containing package.json). Use -l node. Do not use the ./xxx format. Do not use the -i or -S flags.
peer chaincode package <output-file>.out \
  -n <chaincode-name> \
  -p <path-to-project-root> \
  -l node \
  -v <version>
Omit -c if the chaincode initialization does not require input arguments.Package a Java chaincode
Set -p to the root directory of the chaincode project. Use -l java. Do not use the ./xxx format. Do not use the -i or -S flags.
peer chaincode package <output-file>.out \
  -n <chaincode-name> \
  -p <path-to-project-root> \
  -l java \
  -v <version>
Omit -c if the chaincode initialization does not require input arguments.For more information on developing Fabric chaincodes, see Chaincode for Developers.
Step 1: Upload the chaincode
Upload the locally packaged chaincode to BaaS. This registers the chaincode with the specified channel and sets its endorsement policy.
About endorsement policies
An endorsement policy controls which organizations must sign a transaction before it is committed to the ledger. Org1MSP and Org2MSP refer to the Membership Service Provider (MSP) IDs of the organizations in your channel.
| Pattern | Meaning |
|---|---|
OR ('Org1MSP.peer','Org2MSP.peer') | Endorsement from either organization is sufficient |
AND ('Org1MSP.peer','Org2MSP.peer') | Endorsement from both organizations is required |
Steps
Log in to the Alibaba Cloud BaaS console.
On the Overview page, under My Organizations, click the name of the target organization.
Click the Chaincodes tab.
Click Upload Chaincode.
In the dialog box, upload the chaincode package you built locally.
Select the channel to deploy the chaincode to. For a new deployment, make sure no chaincode with the same name already exists in that channel.
Enter the endorsement policy.
Click OK.
Result: The chaincode appears in the list on the Chaincodes tab. The Chaincode column shows the name and the Version column shows the version, both as specified when you built the package.
Step 2: Install the chaincode
Installing the chaincode deploys it to the peers in your organization.
Multi-organization requirement: If your endorsement policy requires multiple organizations to endorse transactions, you must install the chaincode on each of those organizations before proceeding to instantiation. Repeat this step for each required organization.
Prerequisite: Complete Step 1 (upload the chaincode).
Log in to the Alibaba Cloud BaaS console.
On the Overview page, under My Organizations, click the name of the target organization.
Click the Chaincodes tab.
Locate the chaincode, then click Install in the Actions column.
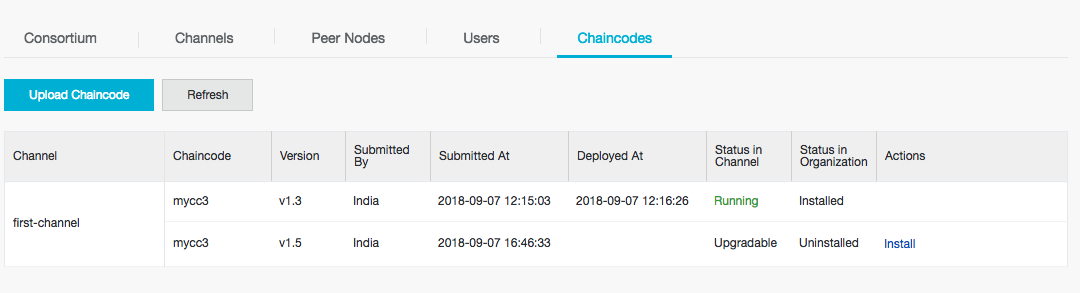
Result: The Status in Organization changes from Uninstalled to Installed, and the Actions column updates from Install to Instantiate.
Step 3: Instantiate the chaincode
Instantiating the chaincode starts it on the channel and makes it available for transactions. This step can take from a few seconds to several minutes, depending on the complexity of the chaincode's dependencies.
Prerequisite: Complete Step 1 (upload) and Step 2 (install) for all required organizations.
Log in to the Alibaba Cloud BaaS console.
On the Overview page, under My Organizations, click the name of the target organization.
Click the Chaincodes tab.
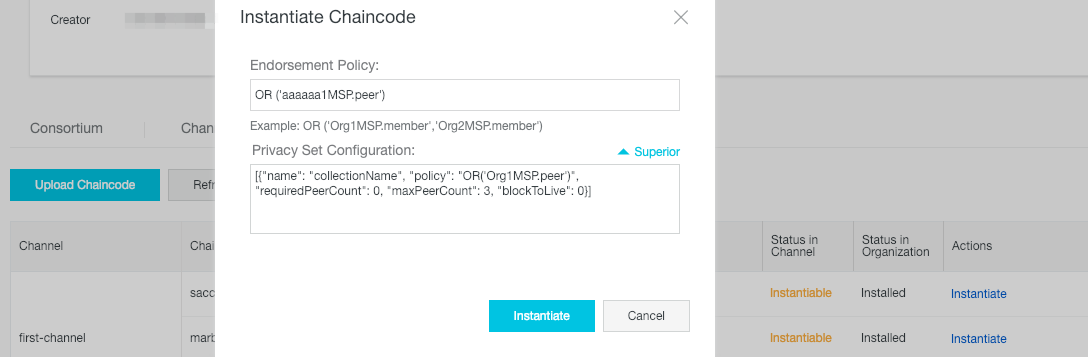
Locate the chaincode, then click Instantiate in the Actions column.
In the dialog box, the endorsement policy from Step 1 is pre-filled. Keep it or enter a new policy.
Pattern Meaning OR ('Org1MSP.member','Org2MSP.member')Endorsement from either organization is sufficient AND ('Org1MSP.member','Org2MSP.member')Endorsement from both organizations is required (Optional) To configure private data, click Superior, then enter a private data collection definition in the Privacy Set Configuration field. A private data collection limits which peers can access specific data on the ledger. Example definition:
ImportantOnce
nameandblockToLiveare set, they cannot be changed in later upgrades. For more information, see Using Private Data in Fabric.[ { "name": "collectionName", "policy": "OR('Org1MSP.peer')", "memberOnlyRead": false, "requiredPeerCount": 0, "maxPeerCount": 3, "blockToLive": 0 } ]In this example, only peers in
Org1can access data in thecollectionNamecollection.Click Instantiate.
Result: The Status in Channel changes from Instantiable to Running, and the Actions column is cleared. The chaincode is now active on the channel and ready to process transactions.