Chaincode is the smart contract implementation in Hyperledger Fabric. It supports popular programming languages, such as Go, Node.js, and Java, and support for more languages is in development. This topic explains how to deploy a new chaincode to a channel on Fabric v2.2 or v2.5 instances.
If you use a Fabric v1.4 instance, see Manage chaincode (v1.4).
Deploying a new chaincode involves three steps:
Package the chaincode — build and package chaincode in your local development environment
Upload and install the chaincode — upload the package to the BaaS console, then install it in your organization
Submit the chaincode definition — configure and commit the chaincode to a channel, with approval from other organizations
To upgrade an existing chaincode, see Upgrade chaincode.
How chaincode as a service works
For chaincode instances deployed after September 29, 2022, chaincode as a service is enabled by default.
Previously, chaincode containers were built and run using Docker, with a one-to-one relationship between each chaincode instance and a peer instance. As deployments scaled, the growing number of containers increased both operational complexity and resource costs.
With chaincode as a service, containers are built and run using Kubernetes (K8s). One chaincode package starts one container per organization, and all peer nodes in the organization share that container by accessing the same chaincode service. This brings three improvements:
Elastic resource management — all peer nodes in an organization share one chaincode container. To scale your chaincode, submit a ticket to contact support.
High availability — native K8s provides service reliability and scaling capabilities.
Enhanced stability — after a chaincode is built, peer nodes can reuse it on restart without rebuilding the image, reducing jitter.
Package the chaincode
Develop, test, and package your chaincode in a local Hyperledger Fabric development environment before uploading it to BaaS.
For an introduction to chaincode development, see Introduction to smart contracts.
Download the peer binary
Download the peer binary for your operating system:
Package by language
Use the peer lifecycle chaincode package command to package your chaincode. For full command reference, see peer lifecycle chaincode.
Do not use relative path formats such as./xxxfor the-pparameter in any language.
Go
Go chaincode requires all dependencies in a vendor directory. Use either govendor or go mod:
Option 1: govendor
Install govendor.
go get -u -v github.com/kardianos/govendorGo to the chaincode project directory and initialize the vendor directory.
govendor initMove dependencies from GOPATH to the vendor directory.
govendor add +external
Option 2: go mod
Initialize the module.
go mod initPackage dependencies into the vendor directory.
go mod vendor
After preparing dependencies, package the chaincode. The -p parameter must point to the relative path of the chaincode main package under $GOPATH/src. You can omit the -l option for Go.
peer lifecycle chaincode package \
  -p github.com/hyperledger/fabric-samples/chaincode/sacc \
  --label sacc_1_0 \
  -l Golang \
  sacc.tar.gz
This example packages the chaincode from $GOPATH/src/github.com/hyperledger/fabric-samples/chaincode/sacc into sacc.tar.gz with the label sacc_1_0.
Java
Before packaging Java chaincode, complete the following configuration:
Configure `pom.xml`: in the
<build>tag, add<finalName>chaincode</finalName>. This ensures the JAR file is namedchaincode.jar.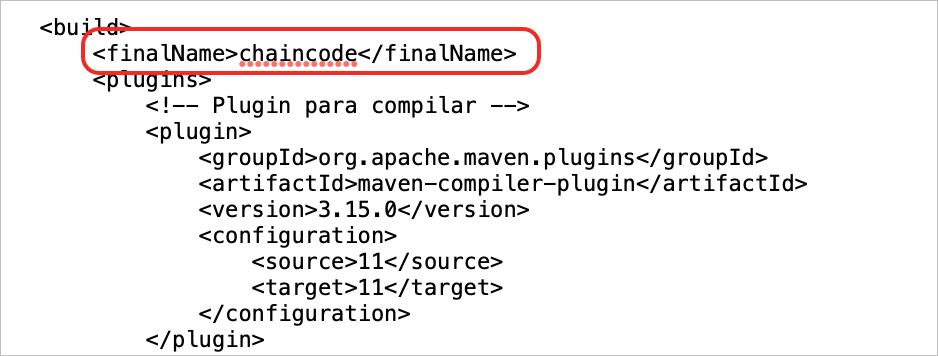
Verify the directory structure: your chaincode project should match the following layout.
/Users/***/work/JavaChainCodeDemo
├── core.yaml        # Fabric configuration file (optional)
├── pom.xml          # Maven configuration file (required)
└── src
    └── src
        ├── main
        │   ├── java      # Java source code directory
        │   └── resources # Resource file directory
        └── test          # Test code directory
Package the chaincode. The
-pparameter must point to the Java project directory. Use-l java.peer lifecycle chaincode package \ -p /Users/***/work/JavaChainCodeDemo \ --label JavaChainCodeDemo_javacc1_v1_0_0 \ -l java \ JavaChainCodeDemo_javacc1_v1.0.0.tar.gzThis example packages the chaincode from
/Users/***/work/JavaChainCodeDemointoJavaChainCodeDemo_javacc1_v1.0.0.tar.gzwith the labelJavaChainCodeDemo_javacc1_v1_0_0.
Node.js
The -p parameter must point to the root directory of the Node.js project that contains the package.json file. Use -l node.
Upload the chaincode
Log on to the Alibaba Cloud BaaS console.
On the Overview page, in the My Organizations section, find the target organization and click its name.
Click the Chaincode Package Management tab.
Click Upload Chaincode.
In the dialog box, upload the chaincode package from your local environment and click OK.
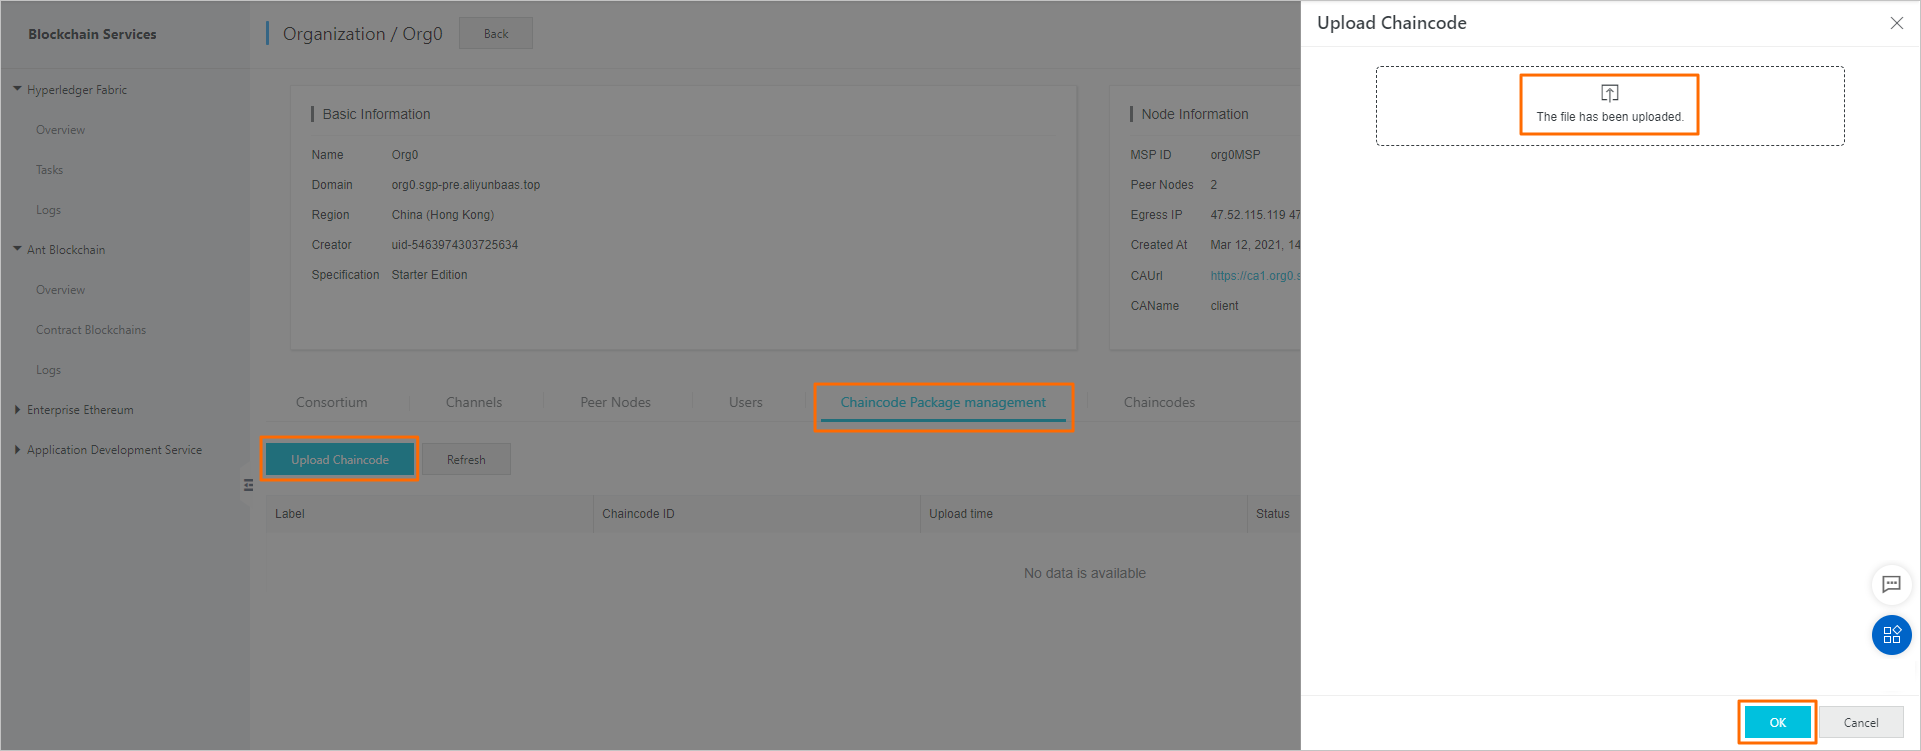
After the upload completes, the chaincode appears in the list. The Label column shows the name you specified with --label when packaging.
Install the chaincode
Prerequisites
Before you begin, ensure that you have:
Uploaded the chaincode package to the BaaS console
Steps
Log on to the Alibaba Cloud BaaS console.
On the Overview page, in the My Organizations section, find the target organization and click its name.
Click the Chaincode Package Management tab.
Find the chaincode and click Install in the Operation column. During installation, the chaincode is precompiled to check for issues in the package. This takes from a few seconds to several minutes depending on the complexity of the dependencies.

Confirm the installation is complete: the Status column changes from Not Installed to Installed, and the Operation column changes from Install to Submit Definition.
Submit the chaincode definition
Prerequisites
Before you begin, ensure that you have:
Uploaded and installed the chaincode
Steps
Log on to the Alibaba Cloud BaaS console.
On the Overview page, in the My Organizations section, find the target organization and click its name.
Click the Chaincode Package Management tab.
Find the chaincode and click Submit Definition in the Actions column.
In the dialog box, fill in the parameters. Endorsement policy examples The
*in*.peeris the organization's MSP ID. Private data collection configuration exampleImportantAfter
nameandblockToLiveare set, these values cannot be modified during an upgrade. For more information, see Using Private Data in Fabric.Parameter Description Name The system pre-fills the chaincode name from the package label. Keep it or change it to a new name. A name that has already been submitted cannot be reused. Version A version number for this chaincode definition. Deployment Channel The channel where the chaincode will be deployed. After deployment, all organizations in the channel can see the chaincode. To create a channel first, see Create a channel. Requires initialization Yes: your chaincode implements Initand requires a special initialization transaction via the software development kit (SDK) before it can be invoked. No: your chaincode does not useInit.Endorsement Policy The policy that determines which organizations must endorse transactions. See examples below. Advanced Click Advanced to enter a private data collection configuration in JSON format. Skip this if your chaincode does not use private data. Policy Behavior OR ('org0MSP.peer','org1MSP.peer')An endorsement from either organization is sufficient. AND ('org0MSP.peer','org1MSP.peer')Endorsements from both organizations are required. OutOf (a,'org0MSP.member','org1MSP.member','org2MSP.member')If a is 1, an endorsement from any one of the three organizations is sufficient. If a is 2, endorsements from at least two organizations are required. If a equals the number of organizations, the condition is equivalent to AND. [{ "name": "collectionName", "policy": "OR('org0MSP.peer')", "memberOnlyRead": false, "requiredPeerCount": 0, "maxPeerCount": 3, "blockToLive": 0 }]This creates a private data namespace called
collectionName, accessible only to nodes inOrg0.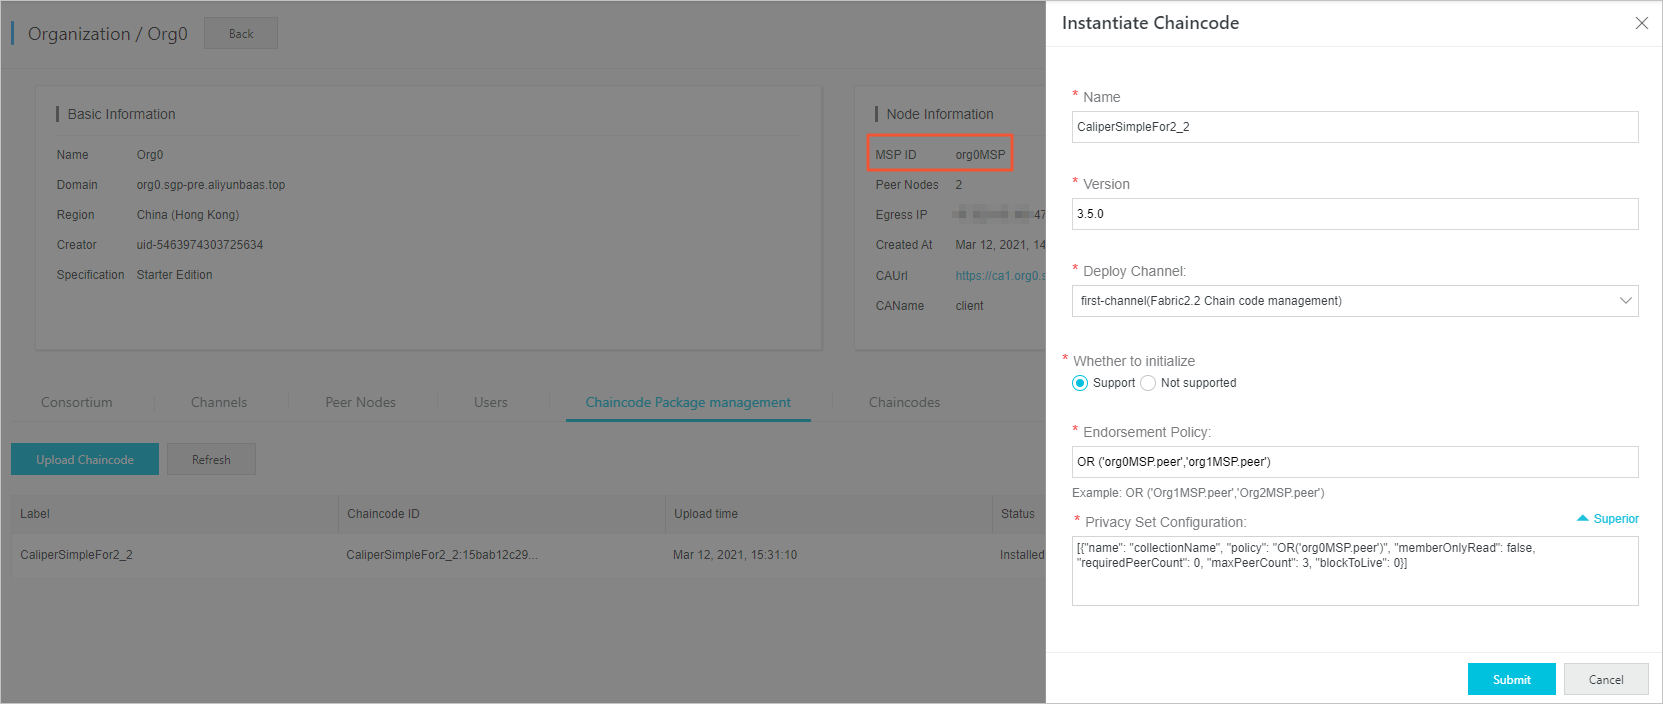
Click Submit.
Complete multi-organization consensus
After submitting, the Chaincode tab shows Channel Status: Pending Consensus and Organization Status: Processed for your organization. Click Approval Details in the Operation column to review the chaincode configuration.

Other organizations in the channel must also approve the definition before deployment completes. By default, more than 50% of organizations in the channel must approve.
For each organization that needs to approve:
Log on to the Alibaba Cloud BaaS console.
On the Overview page, in the My Organizations section, find the target organization and click its name.
Click the Chaincode tab and click Process in the Operation column.
On the Chaincode Processing page, review the submitted chaincode definition and click Submit to confirm.
Once more than 50% of organizations complete confirmation, the chaincode is deployed. The Channel Status changes from Pending Consensus to Running, and Upgrade and Show Log are added to the Operation column.

Troubleshooting
Chaincode definition stuck in Pending Consensus
Other organizations have not yet approved the definition. Contact administrators of the other organizations and ask them to log on to the BaaS console, navigate to the Chaincode tab, and click Process to approve. Deployment requires more than 50% of channel organizations to approve.
Multiple consensus entries appear on the Chaincode tab
An organization submitted a conflicting chaincode definition. If a submitted definition does not meet the requirements of other organizations, those organizations can decline to process it. They can upload their own chaincode package, install it, and submit a new chaincode definition. If the new definition parameters differ from the original, multiple consensus entries appear on the Chaincode tab.
What's next
Create a user and access the blockchain network using an SDK.