Auto Scaling provides the (ALB) QPS per Backend Server system metric as a trigger condition for event-triggered tasks of the system monitoring type. This enables automatic scaling of ECS instances and elastic container instances. This topic describes how to use the (ALB) QPS per Backend Server system metric to enable automatic scaling of elastic container instances.
Concepts
Application Load Balancer (ALB) is an Alibaba Cloud service that runs at the application layer and supports various protocols, such as HTTP, HTTPS, and Quick UDP Internet Connections (QUIC). ALB provides high elasticity and can process a large amount of network traffic at the application layer. For more information, see What is ALB?
Query per second (QPS) measures the number of HTTP or HTTPS queries or requests that can be processed by ALB per second. This metric is specific to Layer-7 listeners. (ALB) QPS per Backend Server is a metric that is used to evaluate the service performance of a server. The value of this metric is calculated by using the following formula: QPS per backend server = Total number of client requests that are received by ALB per second/Total number of ECS instances or elastic container instances of ALB backend server groups.
Scenarios
If you use ALB instances to receive client requests (or QPS) in a centralized manner, the client requests are forwarded to the backend servers for processing. The backend servers can be ECS instances or elastic container instances. When the number of client requests surges, your business system must scale out backend servers in an agile manner to keep your business running smoothly and stably.
In this case, you can create event-triggered tasks that use the (ALB) QPS per Backend Server metric as the alert trigger condition to enable automatic scaling of backend servers. This solution improves the high availability of your business application. This solution provides the following benefits:
When the value of the (ALB) QPS per Backend Server metric is greater than the specified threshold, Auto Scaling triggers a scale-out event to increase the number of backend servers and reduce the workloads on each backend server. This improves your system response time and stability.
When the value of the (ALB) QPS per Backend Server metric is less than the specified threshold, Auto Scaling triggers a scale-in event to decrease the number of backend servers and improve cost efficiency.
Prerequisites
If you use a Resource Access Management (RAM) user, the permissions to view and manage ALB resources are granted to the RAM user. For more information, see Grant permissions to a RAM user.
At least one virtual private cloud (VPC) and one vSwitch are created. For more information, see Create a VPC with an IPv4 CIDR block.
Step 1: Configure an ALB instance
Create an ALB instance.
For more information, see Create and manage an ALB instance.
The following table describes the parameters that are required to create an ALB instance.
Parameter
Description
Example
Instance Name
Enter a name for the ALB instance.
alb-qps-instance
VPC
Select a VPC for the ALB instance.
vpc-test****-001
Zone
Select zones and vSwitches for the ALB instance.
NoteALB supports cross-zone deployment. If two or more zones are available in the specified region, select at least two zones to ensure high availability.
Zones: Hangzhou Zone G and Hangzhou Zone H.
vSwitches: vsw-test003 and vsw-test002.
Create a server group for the ALB instance.
For more information, see Create and manage server groups.
The following table describes the parameters that are required to create a server group.
Parameter
Description
Example
Server Group Type
Specify the type of the server group that you want to create. The value Server specifies that the server group contains elastic container instances.
Server
Server Group Name
Enter a name for the server group.
alb-qps-servergroup
VPC
Select a VPC from the VPC drop-down list. You can add only servers that reside in the VPC to the server group.
ImportantIn this step, select the VPC that is specified in Step 1.
vpc-test****-001
Configure a listener for the ALB instance.
In the left-side navigation pane, choose .
On the Instances page, find the ALB instance whose name is lb-qps-instance and click Create Listener in the Actions column.
In the Configure Listener step of the Configure Server Load Balancer wizard, set the Listener Port parameter to 80, retain the default settings of other parameters, and then click Next.
NoteYou can specify another port number for the Listener Port parameter based on your business requirements. In this example, port number 80 is used.
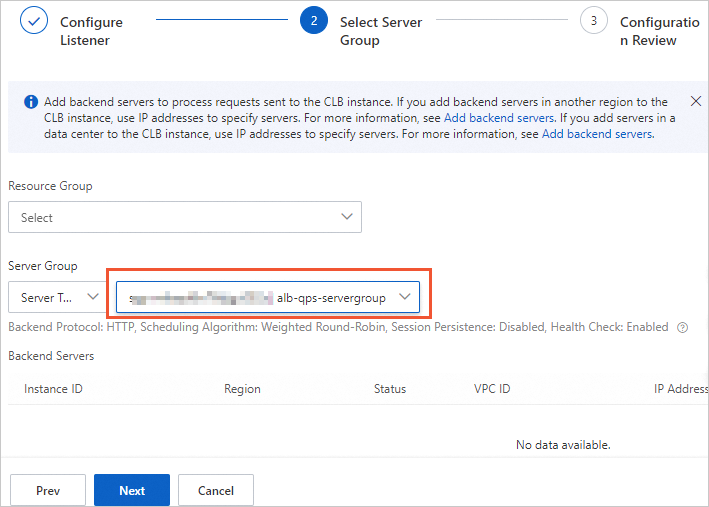
In the Select Server Group step of the Configure Server Load Balancer wizard, select Server Type below the Server Group field, select the server group whose name is alb-qps-servergroup that was created in Step 2, and then click Next.

In the Configuration Review step of the Configure Server Load Balancer wizard, confirm the parameter settings and click Submit. In the message that appears, click OK.
After you complete the configurations, click the Instance Details tab to obtain the elastic IP addresses (EIPs) of the ALB instance.

Step 2: Create a scaling group for the ALB server group
The steps to create a scaling group of the ECS type are different from the steps to create a scaling group of the Elastic Container Instance type. The parameters that are displayed when you create a scaling group shall prevail. In this step, a scaling group of the Elastic Container Instance type is created.
Create a scaling group.
For more information, see Create scaling groups. The following table describes the parameters that are required to create a scaling group. You can configure the parameters that are not described in the following table based on your business requirements.
Parameter
Description
Example
Scaling Group Name
Enter a name for the scaling group.
alb-qps-scalinggroup
Type
Specify the type of instances that are managed by the scaling group to provide computing power.
ECI
Instance Configuration Source
Auto Scaling creates instances based on the value of the Instance Configuration Source parameter.
Create from Scratch
Minimum Number of Instances
If the total number of elastic container instances is less than the lower limit, Auto Scaling automatically creates elastic container instances in the scaling group until the total number of elastic container instances reaches the lower limit.
1
Maximum Number of Instances
If the total number of elastic container instances exceeds the upper limit, Auto Scaling automatically removes elastic container instances from the scaling group until the total number of elastic container instances drops below the upper limit.
5
VPC
Select the VPC in which the ALB instance resides.
vpc-test****-001
vSwitch
Select the vSwitches that are used by the ALB instance.
In this example, vsw-test003 and vsw-test002 are selected.
Associate ALB and NLB Server Groups
Select the ALB server group that is created in Step 1. Then, enter port 80.
Server group: sgp-****/alb-qps-servergroup.
Port: 80.
Create and enable a scaling configuration.
For more information, see Create a scaling configuration of the Elastic Container Instance type. The following table describes the parameters that are required to create a scaling configuration. You can configure the parameters that are not described in the following table based on your business requirements.
Parameter
Description
Example
Container Group Configurations
Select the specifications for the container group. The specifications include the number of vCPUs and memory size.
vCPU: 2 vCPUs
Memory: 4 GiB
Container Configurations
Select a container image and image tag.
Container image: registry-vpc.cn-hangzhou.aliyuncs.com/eci_open/nginx.
Image tag: latest.
Enable the scaling group.
For information about how to enable a scaling group, see Enable or disable scaling groups.
NoteIn this example, the Minimum Number of Instances parameter is set to 1. In this case, Auto Scaling automatically triggers a scale-out event to create one elastic container instance after you enable the scaling group.
Check the status of the elastic container instance and the container running on the instance and make sure that the container runs as expected.
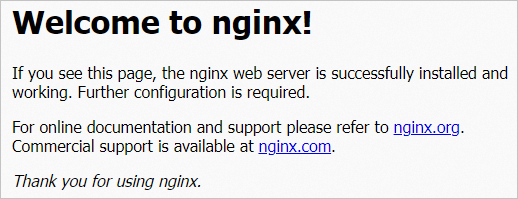
Access the EIP of the ALB instance that is created in Step 1 to check whether
nginxcan be accessed as expected.
Step 3: Create event-triggered tasks based on the (ALB) QPS per Backend Server metric
Log on to the Auto Scaling console.
Create a scaling rule.
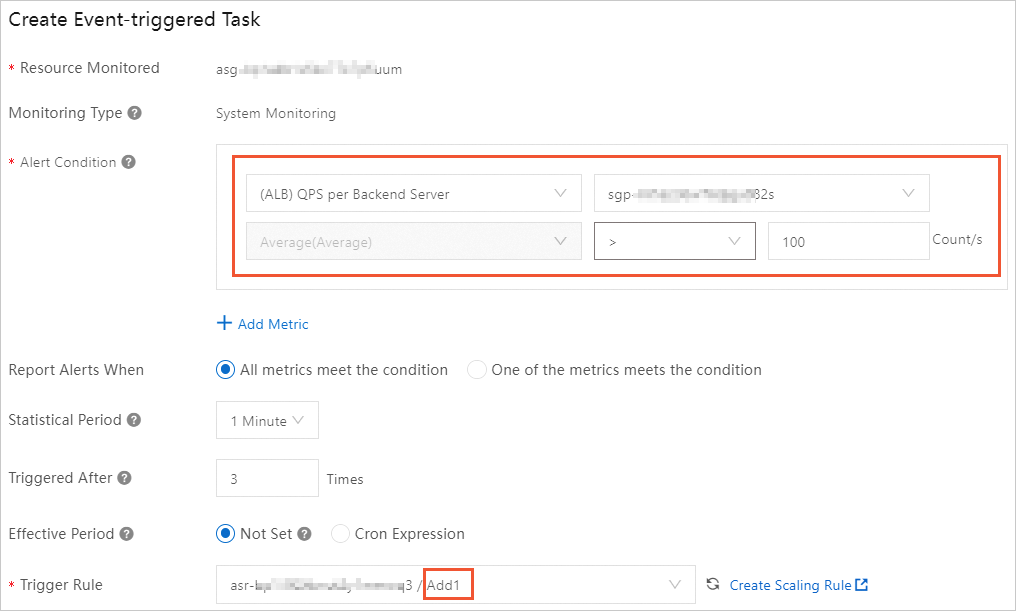
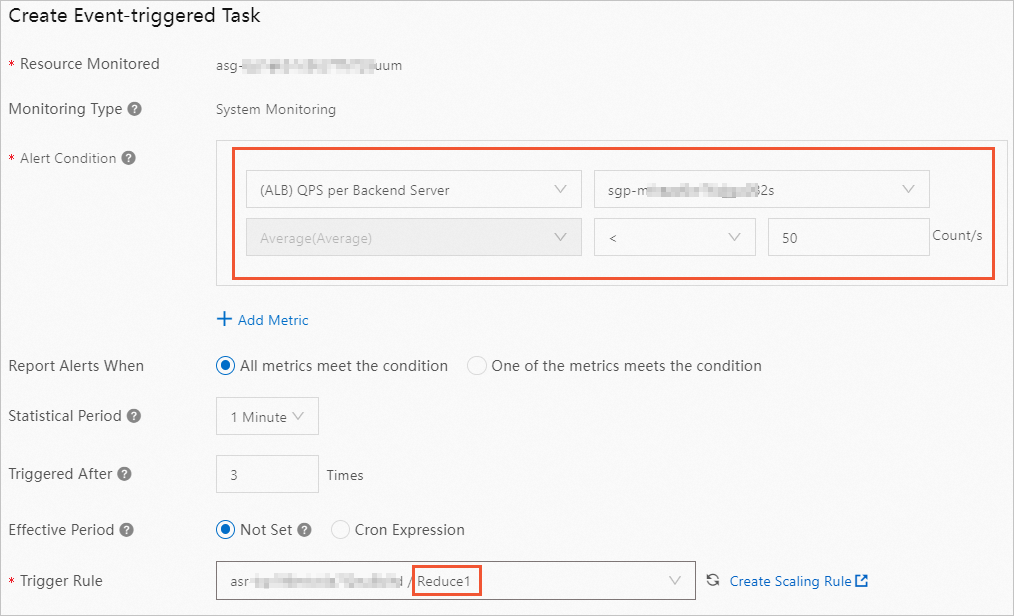
In this example, two scaling rules are created. One scale-out rule named Add1 is used to add one elastic container instance. One scale-in rule named Reduce1 is used to remove one elastic container instance from the scaling group. For more information, see Configure scaling rules.
Create event-triggered tasks.
On the Scaling Groups page, find the scaling group whose name is alb-qps-scalinggroup and click Details in the Actions column.
Choose and click Create Event-triggered Task.
In this example, two event-triggered tasks are created. One event-triggered task named Alarm1 is used to trigger Add 1. The other event-triggered task named Alarm2 is used to trigger Reduce1. For more information, see Manage event-triggered tasks.
When you create Alarm1, select the (ALB) QPS per Backend Server metric and specify the following alert trigger condition: Average(Average) >= 100 Count/s.
NoteQPS per backend server = Total QPS÷Total number of elastic container instances

When you create Alarm2, select the (ALB) QPS per Backend Server metric and specify the following alert trigger condition: Average(Average) < 50 Count/s.

Check the monitoring effect
You can use a stress testing tool, such as Apache JMeter, ApacheBench, or wrk, to perform a stress test on the EIP of the ALB instance that is created in Step 1. When you set up a stress test, you can simulate a scenario in which the QPS value reaches 500. During the test, you can observe the following trends on the Monitoring tab of the Auto Scaling console:
When the QPS value exceeds the alert threshold, the event-triggered task for scale-out events is triggered to add elastic container instances. Each time a new elastic container instance is added, the workloads on each instance are reduced, which decreases the QPS value.