Auto Scaling does not natively support NAS file system integration in scaling configurations. To automate NAS mounting when new ECS instances join a scaling group, combine a lifecycle hook with the ACS-ESS-LifeCycleAttachNASFileSystemToInstance public template in CloudOps Orchestration Service (OOS).
How it works
When a scale-out event occurs, the lifecycle hook intercepts the new ECS instance before it enters service, holding it in the Pending Add state. During this window, OOS runs the ACS-ESS-LifeCycleAttachNASFileSystemToInstance template, which mounts the NAS file system to the instance. After the mount completes, OOS signals Auto Scaling to continue, and the instance enters service.
Scale-out event → Lifecycle hook (Pending Add) → OOS template runs → NAS mounted → CompleteLifecycleAction → Instance in serviceThis approach applies to Linux ECS instances only.
Prerequisites
Before you begin, ensure that you have:
-
A scaling group in the Enabled state
-
A File Storage NAS file system with a mount target configured. The mount target must meet the following requirements:
-
Network type: matches the scaling group's network type. If the scaling group uses a virtual private cloud (VPC), the mount target must use VPC and reside in the same VPC. If the scaling group uses classic network, the mount target must also use classic network.
-
Protocol: Network File System (NFS)
-
-
A RAM role for OOS with the following settings:
-
Trusted entity: Alibaba Cloud Service
-
Trusted service: CloudOps Orchestration Service
-
This guide uses OOSServiceRole as the example RAM role name. You can use a different role.
Step 1: Grant the RAM role permissions on OOS
The ACS-ESS-LifeCycleAttachNASFileSystemToInstance template needs permissions to call ECS, Auto Scaling, and NAS APIs on your behalf. Create a custom policy and attach it to your OOS RAM role.
Create the policy
-
Log on to the RAM console.
-
In the left-side navigation pane, choose Permissions > Policies.
-
Click Create Policy.
-
On the Create Policy page, click the JSON tab and enter the following policy document:
{ "Version": "1", "Statement": [ { "Action": [ "ecs:DescribeInvocations", "ecs:RunCommand", "ecs:DescribeInvocationResults", "ecs:DescribeInstances" ], "Resource": "*", "Effect": "Allow" }, { "Action": [ "ess:CompleteLifecycleAction" ], "Resource": "*", "Effect": "Allow" } ] } -
Set Name to
ESSHookPolicyForAttachNAS, then click OK.
Attach the policy to the RAM role
-
In the left-side navigation pane, choose Identities > Roles.
-
Find
OOSServiceRoleand click Grant Permission in the Actions column. -
In the Grant Permission panel, configure the following settings and click Grant permissions:
Parameter Value Resource Scope Account Policies ESSHookPolicyForAttachNAS (custom policy)
Step 2: Create a lifecycle hook and trigger a scale-out
Create the lifecycle hook
-
Log on to the Auto Scaling console.
-
In the left-side navigation pane, click Scaling Groups.
-
In the top navigation bar, select your region.
-
Find your scaling group and click its ID or click Details in the Actions column.
-
On the details page, click the Lifecycle Hook tab, then click Create Lifecycle Hook.
-
Configure the following parameters and click OK: For Send Notification When Lifecycle Hook Takes Effect, configure the OOS template parameters:
Set Timeout Period long enough for the mount operation to complete. If the timeout expires before the operation finishes, the lifecycle hook action fails. Estimate the time needed and add a buffer.
Parameter Value Name ESSHookForAttachNAS Scaling Activity Scale-out Event Timeout Period 300 (seconds) Default Execution Policy Continue Send Notification When Lifecycle Hook Takes Effect OOS Template > Public Templates > ACS-ESS-LifeCycleAttachNASFileSystemToInstance Parameter Description Example mountTargetDomainDomain name of the NAS mount target <your-mount-target-domain>MountDirDirectory on the ECS instance where the NAS file system is mounted /mnt(default)FileSystemVersionNFS protocol version: 0for NFSv4,1for NFSv30RateControlExecution rate: Batch-based Control or Concurrency-based Control Concurrency-based Control OOSAssumeRoleThe RAM role OOS assumes to run the template OOSServiceRole
Trigger a scale-out event
Lifecycle hooks take effect only when scaling activities are triggered by executing scaling rules — not when you manually add or remove instances.
This example uses a simple scaling rule to trigger a scale-out.
-
On the scaling group details page, click the Scaling Rules and Event-triggered Tasks tab.
-
On the Scaling Rules tab, click Create Scaling Rule.
-
Configure the following settings and click OK:
Parameter Value Rule Name Add1 Rule Type Simple Scaling Rule Operation Add 1 Instances -
Find the
Add1scaling rule and click Execute in the Actions column. -
In the Execute Scaling Rule message, click OK.
Auto Scaling adds one ECS instance to the scaling group. The instance enters the Pending Add state while the ESSHookForAttachNAS lifecycle hook is active. During this window, Auto Scaling notifies OOS to run the ACS-ESS-LifeCycleAttachNASFileSystemToInstance template and mount the NAS file system.
Verify the mount
-
On the scaling group details page, click the Instances tab.
-
Find the newly created ECS instance and click its ID in the ECS Instance ID/Name column.
-
In the Basic Information section, click Connect and log on to the instance.
-
Run the following command to confirm the NAS file system is mounted:
df -h | grep aliyunIf the NAS mount path appears in the output, the file system is mounted successfully. To check the NFS protocol version, run:
nfsstat -cClient nfs v4in the output indicates NFSv4.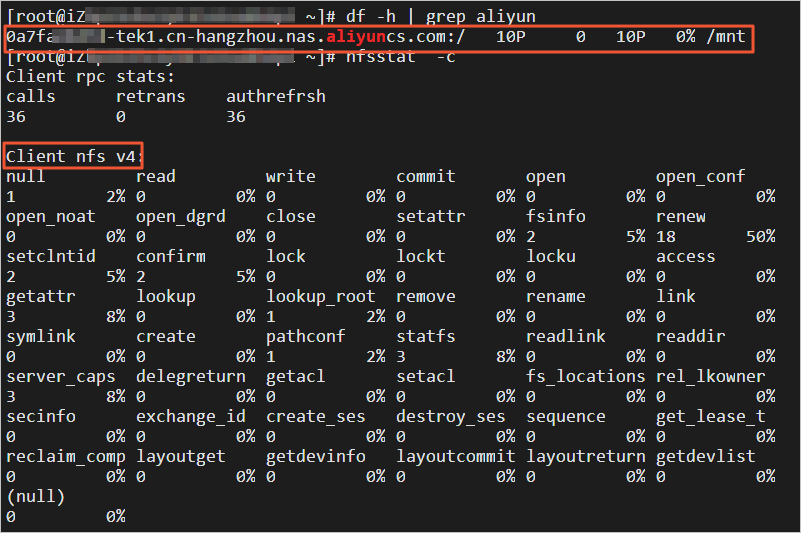
If the instance has no NAS file system attached, check the OOS execution details in Step 3.
Step 3 (optional): View the OOS execution
If mounting failed or you want to inspect what the template did, review the execution in the OOS console.
-
Log on to the OOS console.
-
In the left-side navigation pane, choose Automated Task > Task Execution Management.
-
Find the execution by time and click Details in the Actions column.
-
In the Basic Information section, check the execution ID and status. In the Execution Steps and Results section, click a task node to see the detailed output. If the execution failed, an error message is displayed on this page. For more information, see View the details of an execution.
FAQ
If an Operation and Maintenance (O&M) task fails, find the cause based on the error message in the execution result. For more information, see FAQ.
Common error messages are as follows:
Error message | Cause | Solution |
Forbidden.Unauthorized message: A required authorization for the specified action is not supplied. | Auto Scaling is not authorized to perform the specified action. | Verify that the required permissions are granted to the OOSServiceRole RAM role. |
Forbidden.RAM message: User not authorized to operate on the specified resource, or this API doesn't support RAM. | The RAM user or RAM role does not have the permissions to operate on the corresponding resource. | Verify that the OOSServiceRole RAM role has the required permissions. For example, you can grant the sample permissions for the OOS service to the RAM role. You must add operation permissions to the RAM role to ensure that the OOS service can manage the resources specified in the OOS template. |
LifecycleHookIdAndLifecycleActionToken.Invalid message: The specified lifecycleActionToken and lifecycleActionId you provided does not match any in process lifecycle action. | The ongoing lifecycle action has expired or has been aborted. | Evaluate the timeout period of the lifecycle hook to ensure that the O&M tasks defined in the OOS template can be completed within the timeout period. |
Troubleshooting
If an operations and maintenance (O&M) task fails, check the error message in the OOS execution result. For more information, see FAQ.
| Error message | Cause | Solution |
|---|---|---|
Forbidden.Unauthorized: A required authorization for the specified action is not supplied. |
The RAM role lacks the required permissions to perform the action. | Verify that OOSServiceRole has the ESSHookPolicyForAttachNAS policy attached. |
Forbidden.RAM: User not authorized to operate on the specified resource, or this API doesn't support RAM. |
The RAM role does not have permissions on the required resources. | Check the permissions attached to OOSServiceRole. The role must have permissions on ECS, Auto Scaling, and NAS resources as defined in the policy document in Step 1. |
LifecycleHookIdAndLifecycleActionToken.Invalid: The specified lifecycleActionToken and lifecycleActionId you provided does not match any in process lifecycle action. |
The lifecycle hook action already ended or was stopped before OOS completed. | Increase the Timeout Period of the lifecycle hook so that the mount operation has enough time to complete. |