If your Alibaba Cloud account has multiple cloud resources such as scaling groups, you can manage these resources by group to implement resource isolation and permission control. This topic describes how to use resource groups to manage Auto Scaling resources in a fine-grained manner.
Background information
A resource group is a group of cloud resources that are managed by purpose, permission, or ownership. You can create resource groups to manage the resources of different users and multi-level projects in a hierarchical manner within your enterprise. Each cloud resource can belong to only one resource group. The correlation among resources does not change after the resources are added to resource groups. For more information, see Resource groups.
Before you use resource groups, take note of the following items:
After you add a scaling group to a resource group, the scaling configurations, scaling rules, event-triggered tasks, and scheduled tasks of the scaling group are also added to the resource group.
The resource group to which a scaling group belongs is independent of the resource group to which an instance in the scaling group belongs.
For example, the resource group to which a scaling group belongs can be different from the resource group to which the Elastic Compute Service (ECS) instances or elastic container instances in the scaling group belong.
You can add scaling groups of different regions to the same resource group.
For example, you can add a scaling group that resides in the China (Beijing) region and a scaling group that resides in the China (Hangzhou) region to Resource Group A at the same time.
If you grant a RAM user the permissions to manage all Alibaba Cloud resources, the RAM user can access all resource groups that are created by the main account.
Scenarios
Before you use resource groups to manage scaling groups, make sure that a RAM user is created. For more information, see Create a RAM user.
You can use resource groups to manage scaling groups in the following scenarios:
Add scaling groups of different purposes to different resource groups. This allows you to manage scaling groups based on the ownership of the resource groups. For more information, see Scenario 1: Manage scaling groups by purpose.
Configure an administrator for each resource group. This allows you to manage user and resource permissions within each resource group. For more information, see Scenario 2: Manage users and permissions within a resource group.
Scenario 1: Manage scaling groups by purpose
Scenario description
For example, you have a production environment and a test environment. If you do not group the scaling groups that are created in the preceding environments, all scaling groups are displayed, regardless of the environment to which you log on. This poses high risks of misoperations on scaling groups. To prevent misoperations and simplify resource management, we recommend that you create two resource groups for the two environments. In this case, you can add the scaling groups to the resource groups by purpose. In the following sample scenario, scaling groups are added to resource groups by purpose for easy management.
For example, you have two scaling groups within your Alibaba Cloud account. Scaling Group A is used in the production environment and Scaling Group B is used in the test environment. You add Scaling Group A to the resource group that is created for the production environment, and add Scaling Group B to the resource group that is created for the test environment. The following effects are obtained:
In the resource group that is created for the test environment, you can view and operate only Scaling Group B. This prevents misoperations on Scaling Group A and compromised performance of online services that may occur if you do not group your scaling groups by purpose.
In the resource group that is created for the production environment, you can view and operate only Scaling Group A. This prevents misoperations on Scaling Group B that may occur if you do not group your scaling groups by purpose and ensures the release progress of services.
Procedure
Create two resource groups for the production and test environments.
In this example, the resource group that is created for the production environment is named
ProdResourceGroupand the resource group that is created for the test environment is namedTestResourceGroup. For more information, see Create a resource group.
After the preceding operations are complete, the resource groups enter the Creating state. Wait approximately 3 seconds and click
 . If the status of the resource groups change from Creating to Available, the resource groups are created.
 Create a scaling group for the test environment.
In this example, the scaling group is named
TestScalingGroup. To ensure that the scaling group and the ECS instances of the scaling group belong to the same resource group, perform one of the following operations based on the value of the Instance Configuration Source parameter:If you set the Instance Configuration Source parameter to Launch Templates, select
TestResourceGroupas the value of the Resource Group parameter in the Advanced Configurations (Optional) step when you create a launch template. For more information, see Create a launch template.If you set the Instance Configuration Source parameter to Select Existing Instance, select
TestResourceGroupas the value of the Resource Group parameter in the Grouping (Optional) step when you create ECS instances. For more information, see Create an instance on the Custom Launch tab.If you set the Instance Configuration Source parameter to Create from Scratch, select
TestResourceGroupas the value of the Resource Group parameter in the Advanced Settings (Optional) section when you create a scaling configuration. For more information, see Create a scaling configuration of the ECS type.
Set the Resource Group parameter of the scaling group to
TestResourceGroup. For more information, see Create scaling groups.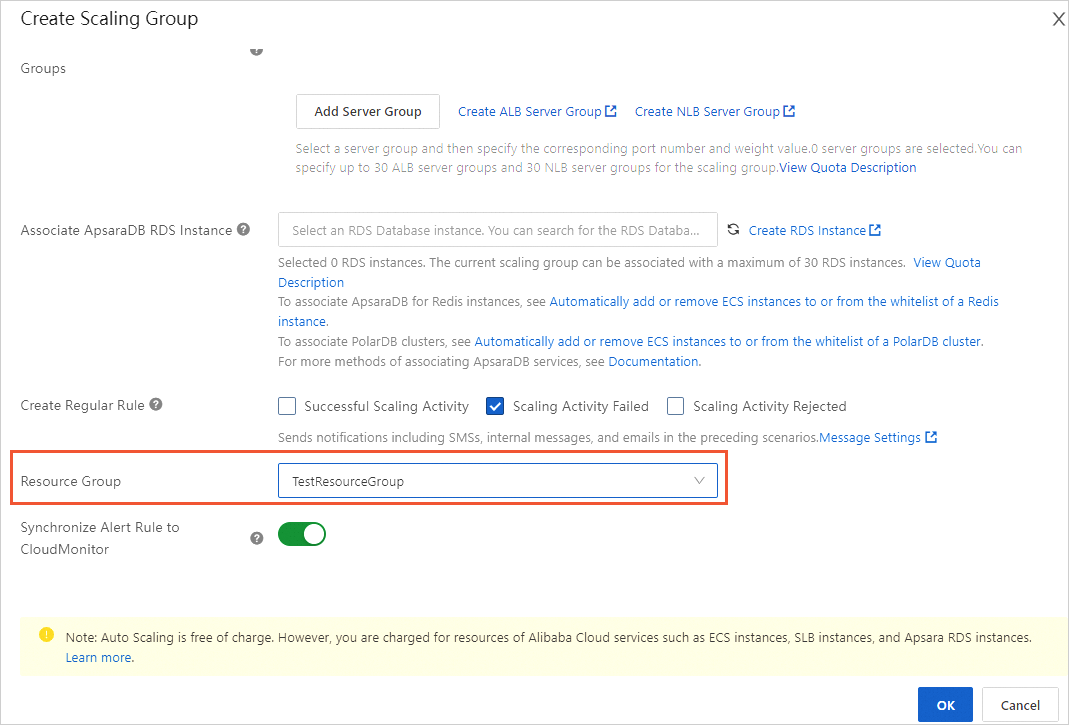
Create a scaling group for the production environment.
In this example, the scaling group is named
ProdScalingGroup. To ensure that the scaling group and the ECS instances of the scaling group belong to the same resource group, perform one of the following operations based on the value of the Instance Configuration Source parameter.If you set the Instance Configuration Source parameter to Launch Templates, select
ProdResourceGroupas the value of the Resource Group parameter in the Advanced Configurations (Optional) step when you create a launch template. For more information, see Create a launch template.If you set the Instance Configuration Source parameter to Select Existing Instance, select
ProdResourceGroupas the value of the Resource Group parameter in the Grouping (Optional) step when you create ECS instances. For more information, see Create an instance on the Custom Launch tab.If you set the Instance Configuration Source parameter to Create from Scratch, select
ProdResourceGroupas the value of the Resource Group parameter in the Advanced Settings (Optional) section when you create a scaling configuration. For more information, see Create a scaling configuration of the ECS type.
Set the Resource Group parameter of the scaling group to
ProdResourceGroup. For more information, see Create scaling groups.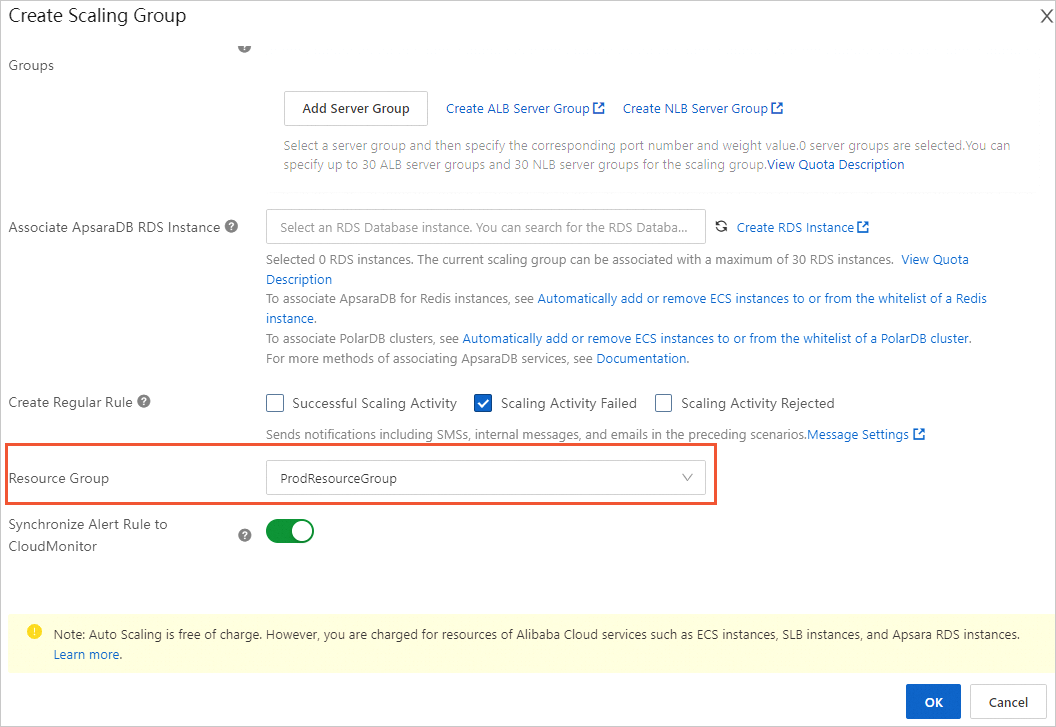
Verify the result
Log on to the Auto Scaling console.
In the upper-left corner of the top navigation bar, switch between resource groups to view the scaling group and instances in each resource group.
If you select All Resources, you can view the
TestScalingGroupandProdScalingGroupscaling groups on the Scaling Groups page. If new ECS instances are added to the scaling groups, you can view all the instances of the TestResourceGroup and ProdResourceGroup scaling groups on the Instances tab.
If you select TestResourceGroup, you can view only the TestScalingGroup scaling group on the Scaling Groups page. If new ECS instances are added to the scaling group, you can view only the instances of the TestResourceGroup scaling group on the Instances tab.

If you select ProdResourceGroup, you can view only the ProdScalingGroup scaling group on the Scaling Groups page. If new ECS instances are added to the scaling group, you can view only the instances of the ProdResourceGroup scaling group on the Instances tab.

Scenario 2: Manage users and permissions within a resource group
Scenario description
For example, your company has multiple branches that use different scaling groups of different resource groups, and each branch has its own administrator to manage resources. To ensure cross-branch administrator-based permission management within resource groups, we recommend that you assign the required permissions to each administrator. In this case, some administrators can access resources only in the production environment while other administrators can access resources only in the test environment. In the following sample scenario, resource group-based permission management is performed.
For example, your company owns an Alibaba Cloud account and your branches have independent RAM users. Branch A and Branch B are required to independently manage their scaling groups. In this case, the branches cannot operate the scaling groups of each other. The following requirements must be met:
Branch A and Branch B cannot create scaling groups for each other, or modify the scaling groups and other configurations such as scaling rules of each other.
Branch A and Branch B cannot view the scaling groups of each other.
Procedure
Create the
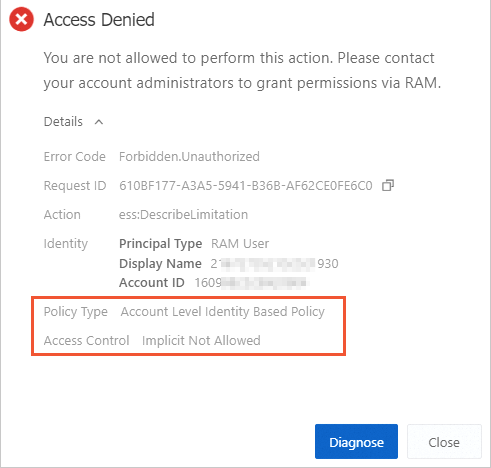
ApiWithoutResourcePolicypolicy in the RAM console.Some Auto Scaling API operations do not support resource group-based authentication. Therefore, you must create a custom policy for the API operations. For more information, see Create custom policies.
The following API operations do not support resource group-based authentication:
DescribeRegions
DescribeLimitation
DescribeNotificationTypes
ListTagKeys
ListTagValues
The following sample code provides an example on the content of the
ApiWithoutResourcePolicycustom policy:{ "Version": "1", "Statement": [ { "Action": [ "ess:DescribleRegions", "ess:DescribleLimitation", "ess:DecsribleNotificationTypes", "ess:ListTagKeys", "ess:ListTagValues" ], "Resource": "*", "Effect": "Allow" } ] }
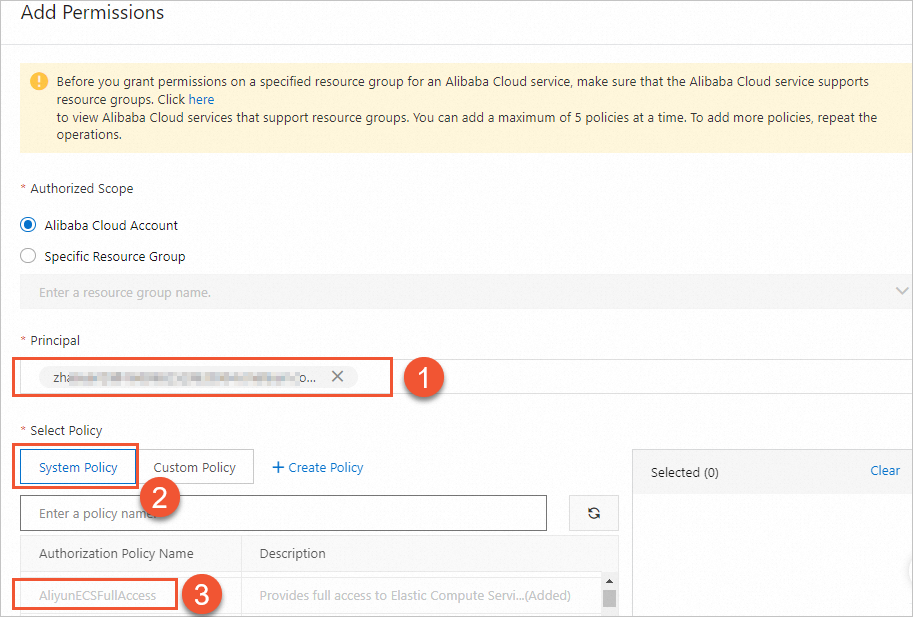
Create a RAM user for each of the administrators of Branch A and Branch B, set the Authorized Scope parameter to Alibaba Cloud Account, and then grant the required permissions to each RAM user.
In this step, the administrator of Branch A is used as an example to describe how to grant the required permissions. Set the Principal parameter to the RAM user of the administrator of Branch A. Select the
ApiWithoutResourcePolicycustom policy that is created in Step 1 and the AliyunECSFullAccess system policy. For more information, see Grant permissions to a RAM user.Grant the following custom policy to the administrator of Branch A:
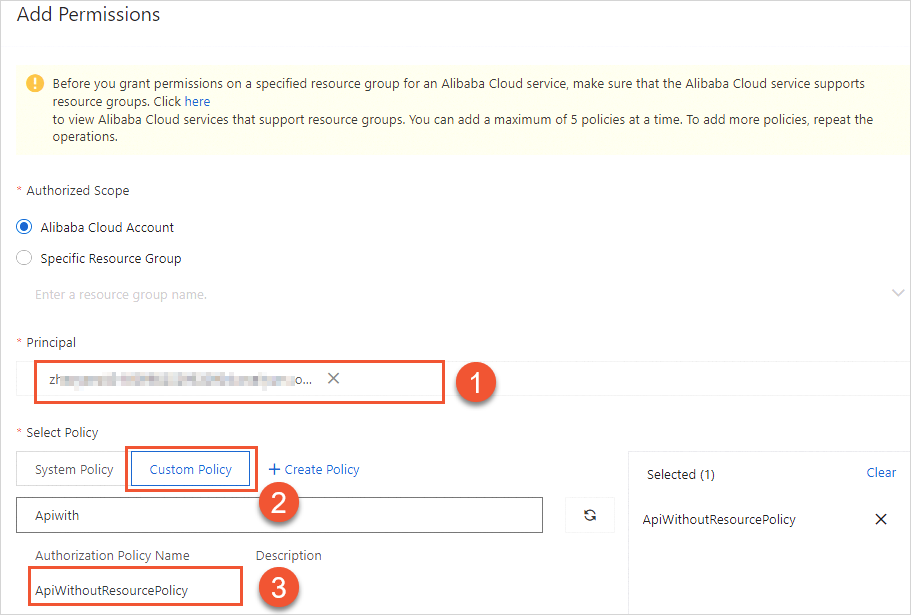
Grant the following system policy to the administrator of Branch A:
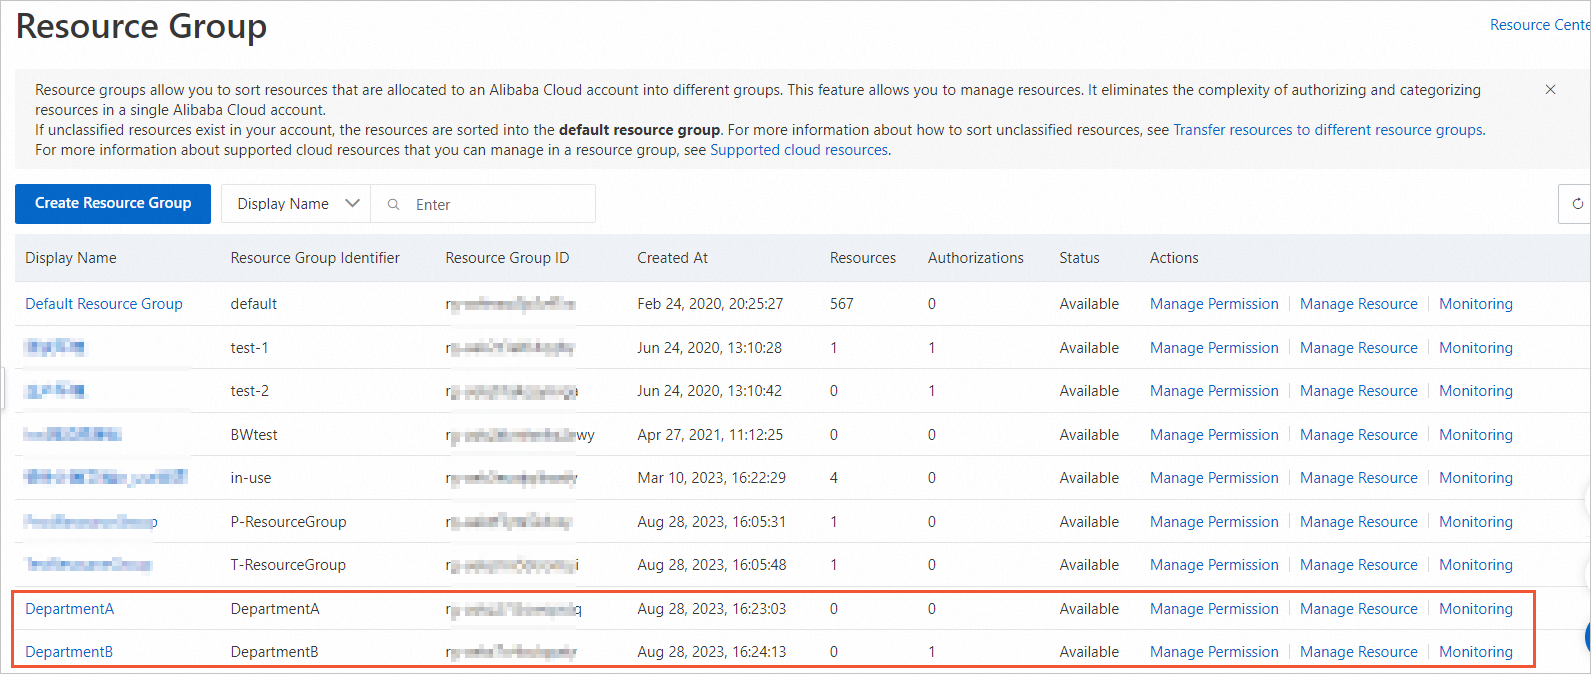
Create a resource group named Department A for Branch A and a resource group named Department B for Branch B.
For more information, see Create a resource group.
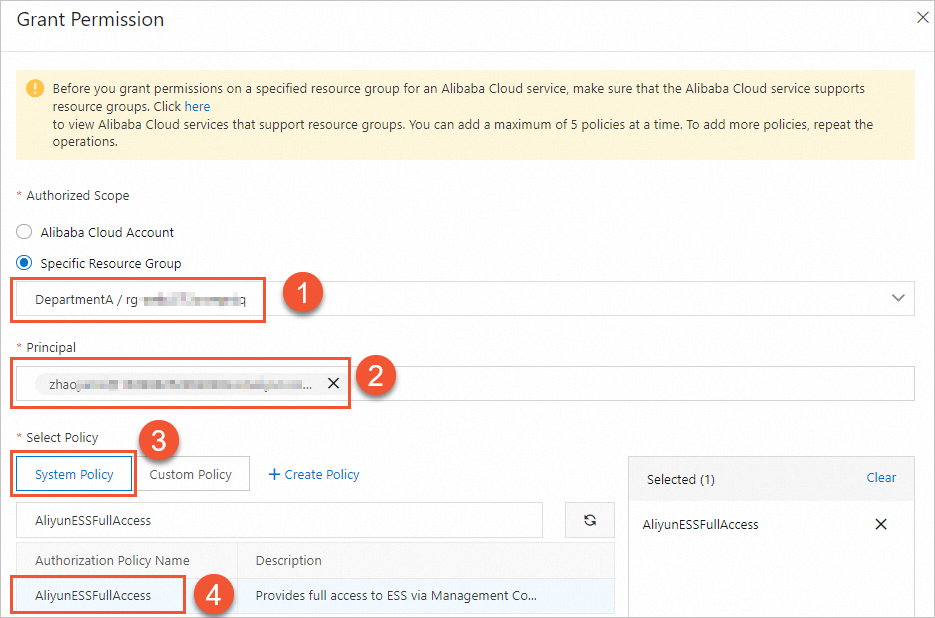
Attach the AliyunESSFullAccess policy to the administrator of Branch A. In this case, the administrator has the permissions on all resources of the Department A resource group.
For more information, see Add RAM authorization or Grant permissions to a RAM user.
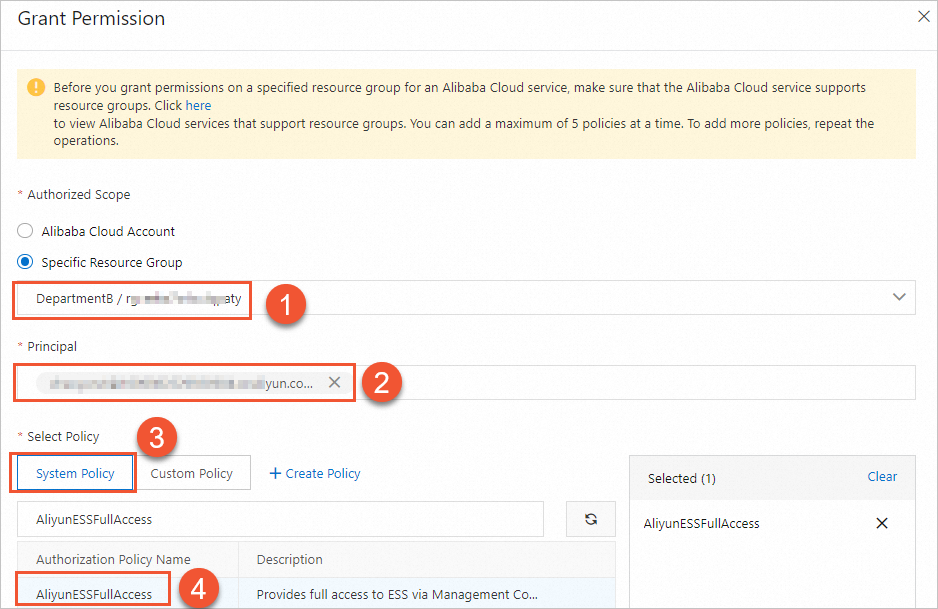
Repeat Step 4 to attach the AliyunESSFullAccess policy to the administrator of Branch B. In this case, the administrator has the permissions on all resources of the Department B resource group.
Set the Authorized Scope parameter to Specific Resource Group and select Department B. Set the Principal parameter to the RAM user of the administrator of Branch B.
Verify the result
Log on to the Auto Scaling console.
Check whether you can create scaling groups in different resource groups as the administrator of Branch A. In the top navigation bar, select a different resource group to create a scaling group.
For information about how to create a scaling group, see Create scaling groups.
If you select the Department A resource group, you can create a scaling group as the administrator of Branch A in the resource group.

If you select the Department B resource group, you cannot create a scaling group as the administrator of Branch A in the resource group.
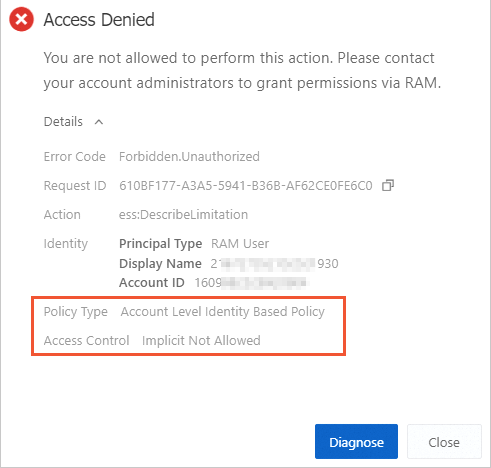
Check whether you can view scaling groups of different resource groups as the administrator of Branch A.
For information about how to view scaling groups, see View or modify scaling groups.
You can view the scaling groups of the Department A resource group.

You cannot view the scaling groups of the Department B resource group.
