When your ASM ingress gateway needs to terminate HTTPS traffic, you can use SSL certificates managed through Certificate Management Service (Original SSL Certificate). Instead of manually creating Kubernetes Secrets, deploy certificates directly from the Certificate Management Service console to your Container Service for Kubernetes (ACK) data plane cluster. The gateway then references the deployed certificate to handle TLS termination.
This topic walks through four steps: granting permissions, deploying the certificate as a Kubernetes Secret, configuring the Istio Gateway resource for TLS, and verifying HTTPS access.
Prerequisites
An SSL certificate is available in the Certificate Management Service console. You can purchase a certificate or upload an existing one.
The httpbin application is deployed in your ASM-managed cluster.
Step 1: Grant Certificate Management Service access to the ACK cluster
Certificate Management Service uses the AliyunCASDefaultRole Resource Access Management (RAM) role to access and manage ACK clusters. Grant this role the required permissions before deploying certificates.
Log on to the ACK console. In the left-side navigation pane, click Authorizations.
Click the RAM Roles tab, enter
AliyunCASDefaultRolein the search box, and then click Manage Permissions.Note: If the message AliyunCASDefaultRole Does Not Exist appears, create the RAM role for Certificate Management Service and grant permissions first.
In the Permission Management dialog box, click + Add Permissions and configure the following fields:
Field Value Cluster Select the target cluster from the drop-down list. Namespace Select istio-system.Permission Management Select Restricted User. Click Submit Authorization.
Step 2: Deploy the certificate to the ACK cluster
After deployment, Certificate Management Service creates a Kubernetes Secret of type kubernetes.io/tls in the istio-system namespace. The ingress gateway reads this Secret for TLS termination.
Note: This topic uses the domain name test.com as an example. Replace it with your actual domain.Deploy the certificate
Log on to the Certificate Management Service console.
If this is your first time using the deployment feature, follow the on-screen prompts to grant the required permissions. For details, see Grant permissions to access cloud resources.
In the left-side navigation pane, choose Certificate Management > SSL Certificate Management.
On the SSL Certificate Management page, click the tab for your certificate type, find the certificate, and then click Deploy in the Actions column.
Note: Certificates issued by a private certificate authority (CA) appear on the Manage Uploaded Certificates tab.
On the Select Resource step of the Create Task page, select the target cloud services and resources, and then click Preview and Submit.
The system automatically matches your SSL certificate with cloud service resources that already have an SSL certificate configured. Matched resources appear in the Selected Resources section. Adjust the selection as needed.

If the target resource is missing:
Check the Total Resources section. If resources are still being synchronized (grayed out), wait for the synchronization to complete.
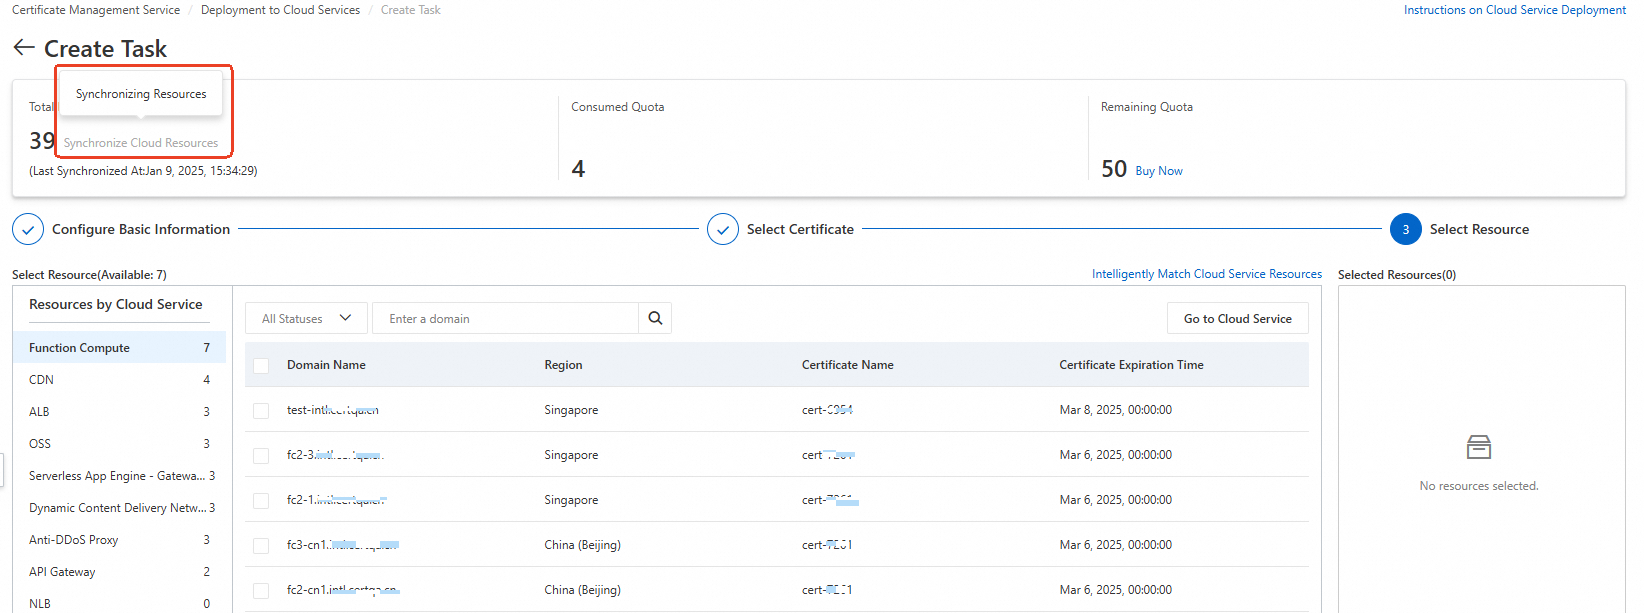
If synchronization is complete but the resource is still missing, verify that the deployment prerequisites are met.
In the Task Preview panel, confirm the certificate instance and cloud service resource information, and then click Submit.
Note: The preview shows the number of matched certificates and deployment quotas consumed. A matched certificate count of 0 means the certificate does not match the selected resource. Review your certificate selection before proceeding.
Retrieve the Secret name
After deployment, retrieve the Secret name to reference in the Gateway configuration:
kubectl -n istio-system get secret -l alibabacloud.com/ssl-certificate-identifier=${CertIdentifier of the SSL certificate}Expected output:
NAME                TYPE                DATA   AGE
cas-cert-305xxx76   kubernetes.io/tls   2      10m
Record the Secret name (for example, cas-cert-305xxx76) for the next step.
Step 3: Configure the Gateway resource for HTTPS
Update the Istio Gateway resource that was created when you deployed the httpbin application. Add an HTTPS server block that references the Secret from the previous step.
kubectl apply -f - <<EOF
apiVersion: networking.istio.io/v1beta1
kind: Gateway
metadata:
  name: httpbin
  namespace: default
spec:
  selector:
    istio: ingressgateway
  servers:
    - hosts:
        - '*'
      port:
        name: test
        number: 80
        protocol: HTTP
    - hosts:
        - 'test.com'
      port:
        name: https
        number: 443
        protocol: HTTPS
      tls:
        mode: SIMPLE
        credentialName: cas-cert-305xxx76  # Replace with your Secret name from Step 2
EOF
Key fields in the HTTPS server block:
| Field | Description |
|---|---|
hosts | The domain name that matches the SSL certificate (for example, test.com). |
port.number | HTTPS listens on port 443. |
tls.mode | SIMPLE enables one-way TLS (server authentication only). |
tls.credentialName | The Kubernetes Secret name that contains the certificate. Must match the Secret name retrieved in Step 2. |
Step 4: Verify HTTPS access
Get the ingress gateway IP address:
export GATEWAY_IP=$(kubectl get service istio-ingressgateway -n istio-system -o jsonpath='{.status.loadBalancer.ingress[0].ip}')Send a test request over HTTPS:
curl -vk --resolve test.com:443:${GATEWAY_IP} https://test.com/status/418Expected output (abbreviated):
* SSL connection using TLSv1.3 / TLS_AES_256_GCM_SHA384
* ALPN, server accepted to use h2
* Server certificate:
*  subject: CN=test.com; O=myexample organization
...
> GET /status/418 HTTP/2
> Host: test.com
...
< HTTP/2 418
< server: istio-envoy
...

    -=[ teapot ]=-

       _...._
     .'  _ _ `.
    | ."` ^ `". _,
    \_;`"---"`|//
      |       ;/
      \_     _/
        `"""`
A successful response includes both TLS handshake details (TLSv1.3, server certificate for
test.com) and an HTTP/2 418 status code from the httpbin application.