When multiple Container Service for Kubernetes (ACK) clusters span different regions or VPCs, connecting them all to a single Service Mesh (ASM) instance creates a single point of failure and increases configuration push latency. The multi-master control plane architecture solves this by pairing each cluster with its own ASM instance while sharing a root certificate across instances -- delivering independent configuration management, lower latency, and continued operation during zone or region outages.
This guide walks you through building a multi-master control plane with two ASM instances and two ACK clusters.
How it works
In a multi-master control plane architecture, each ASM instance manages the data plane components of its own Kubernetes cluster and pushes configurations to the mesh proxies within that cluster. Because all ASM instances share the same root certificate, mesh proxies across clusters establish mutual trust and communicate over mTLS -- enabling cross-cluster service discovery without a single point of failure.

Multi-master vs. single control plane
| Dimension | Single control plane | Multi-master control plane |
|---|---|---|
| Configuration push latency | Higher when clusters span regions or VPCs | Lower -- each cluster connects to a nearby ASM instance |
| Configuration isolation | All clusters share one control plane; changes affect every cluster | Each ASM instance manages its own control plane resources independently, supporting canary releases and batch upgrades |
| Fault tolerance | A zone or region outage, or network failure, can disconnect all clusters from the control plane | Mesh proxies in healthy regions or zones continue receiving configuration pushes and starting normally |
Shared root certificate
The control plane uses a root certificate to issue identity authentication certificates to mesh proxies. In a multi-master architecture, all ASM instances reuse the same root certificate so that mesh proxies connected to different instances can authenticate each other and communicate over mTLS.
Prerequisites
Before you begin, make sure that you have:
Two ACK managed clusters, named cluster-1 and cluster-2, with Use EIP to Expose API Server enabled during creation. For more information, see Create an ACK managed cluster
Step 1: Create two ASM instances that share a root certificate
Create two ASM instances -- one for each cluster -- and configure the second instance to reuse the root certificate from the first.
Create the first ASM instance (mesh-1)
Log on to the ASM console. In the left-side navigation pane, choose Service Mesh > Mesh Management.
On the Mesh Management page, click Create ASM Instance. Configure the following parameters: A VPC and a vSwitch are automatically added to the ASM instance after creation. For other configuration details, see Create an ASM instance.
Parameter Value Service mesh name mesh-1 Region The region where cluster-1 resides Istio version v1.22.6.71-g7d67a80b-aliyun or later Kubernetes Cluster cluster-1 Wait 2-3 minutes until the instance status changes to Running.
Create the second ASM instance (mesh-2) with a shared root certificate
Return to the Mesh Management page and click Create ASM Instance. Configure the following parameters: All other configuration options are the same as for mesh-1.
Parameter Value Service mesh name mesh-2 Region The region where cluster-2 resides Istio version v1.22.6.71-g7d67a80b-aliyun or later Kubernetes Cluster cluster-2 ASM Root Certificate Click Show Advanced Settings, select Reuse an Existing Root Certificate of ASM Instance, and then select mesh-1 from the drop-down list Wait 2-3 minutes until the instance status changes to Running.
Step 2: Enable cross-cluster service discovery
After Step 1, mesh-1 manages cluster-1 and mesh-2 manages cluster-2. To enable cross-cluster service discovery, add each cluster to the other mesh instance in service-discovery-only mode:
Add cluster-2 to mesh-1 (service discovery only)
Add cluster-1 to mesh-2 (service discovery only)
Add cluster-2 to mesh-1
Log on to the ASM console. In the left-side navigation pane, choose Service Mesh > Mesh Management.
On the Mesh Management page, click the name of mesh-1. In the left-side navigation pane, choose Cluster & Workload Management > Kubernetes Clusters, and then click Add.
On the Add Kubernetes Cluster page, find cluster-2 and click Add (For Service Discovery Only) in the Actions column. In the dialog box, click OK.
After you add the cluster, the instance status changes to Updating. Wait a few seconds and click the refresh icon in the upper-right corner. The status returns to Running.

Add cluster-1 to mesh-2
On the Mesh Management page, click the name of mesh-2. In the left-side navigation pane, choose Cluster & Workload Management > Kubernetes Clusters, and then click Add.
On the Add Kubernetes Cluster page, find cluster-1 and click Add (For Service Discovery Only) in the Actions column. In the dialog box, click OK.
Wait for the instance status to return to Running. The wait time depends on the number of clusters added.

When a cluster is added in service discovery mode, the ASM instance only discovers services and service endpoints in that cluster. It does not deploy any data plane components to the cluster, and changes to the ASM instance do not affect clusters added this way. For Service Discovery Only applies exclusively to multi-master control plane architectures. To fully manage a cluster with an ASM instance, add the cluster normally instead. For more information, see Add a cluster to an ASM instance.
Step 3 (optional): Configure cross-network communication
Skip this step if cluster-1 and cluster-2 share the same VPC or are already connected through Cloud Enterprise Network (CEN).
If the two ACK clusters are deployed across different VPCs or regions without a CEN connection, configure a multi-cluster network between the two ASM instances and deploy cross-cluster mesh proxies for both clusters. This allows services in different clusters to reach each other through the mesh proxies.
For details, see Use ASM cross-cluster mesh proxy to implement cross-network communication among multiple clusters.
Configure the multi-cluster network in mesh-1
On the Mesh Management page, click the name of mesh-1. In the left-side navigation pane, choose Cluster & Workload Management > Kubernetes Clusters.
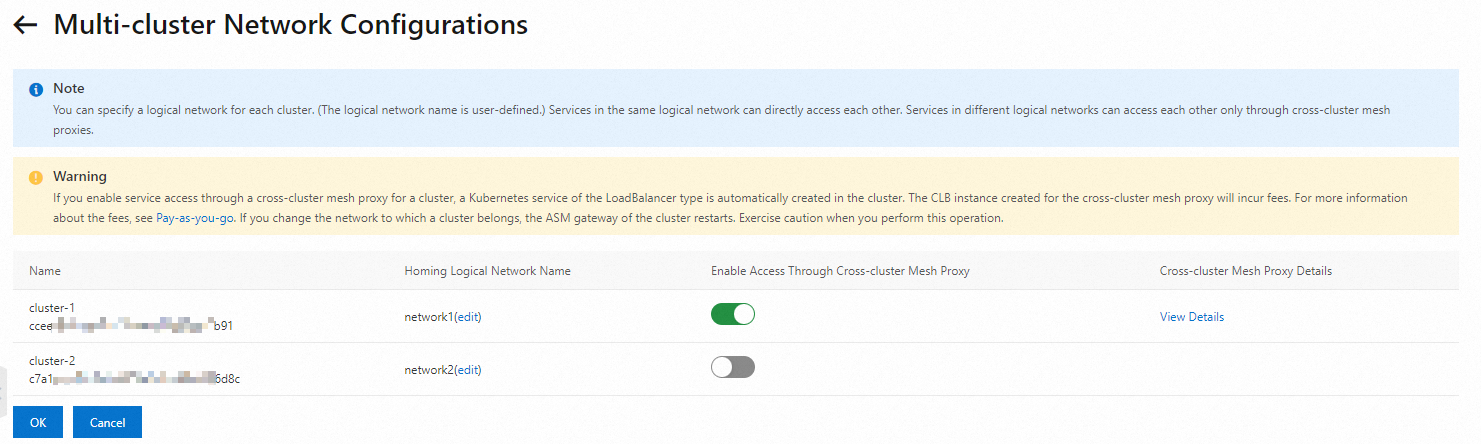
Click Multi-cluster Network Configurations and configure the following settings:
Set Homing Logical Network Name to
network1for cluster-1, and enable Enable Access Through Cross-cluster Mesh Proxy.Set Homing Logical Network Name to
network2for cluster-2.
Configure the multi-cluster network in mesh-2
On the Mesh Management page, click the name of mesh-2. In the left-side navigation pane, choose Cluster & Workload Management > Kubernetes Clusters.
Click Multi-cluster Network Configurations and configure the following settings:
Set Homing Logical Network Name to
network2for cluster-2, and enable Enable Access Through Cross-cluster Mesh Proxy.Set Homing Logical Network Name to
network1for cluster-1.

Step 4: Deploy sample applications
To verify cross-cluster communication, deploy the following sample applications:
cluster-1: a
sleepclient application andhelloworldservice V1cluster-2:
helloworldservice V2

Enable sidecar injection
Enable sidecar automatic injection for the default namespace in both mesh-1 and mesh-2. For more information, see Manage global namespaces.
Verify cross-cluster service access
Send requests from cluster-1
From cluster-1, the sleep pod sends 10 requests to the helloworld service. Run the following command by using the kubeconfig file of cluster-1:
kubectl exec -it deploy/sleep -- sh -c 'for i in $(seq 1 10); do curl helloworld:5000/hello; done;'Expected output:
Hello version: v1, instance: helloworld-v1-7b888xxxxx-xxxxx
Hello version: v1, instance: helloworld-v1-7b888xxxxx-xxxxx
Hello version: v2, instance: helloworld-v2-7b949xxxxx-xxxxx
Hello version: v2, instance: helloworld-v2-7b949xxxxx-xxxxx
Hello version: v1, instance: helloworld-v1-7b888xxxxx-xxxxx
Hello version: v2, instance: helloworld-v2-7b949xxxxx-xxxxx
Hello version: v2, instance: helloworld-v2-7b949xxxxx-xxxxx
Hello version: v2, instance: helloworld-v2-7b949xxxxx-xxxxx
Hello version: v2, instance: helloworld-v2-7b949xxxxx-xxxxx
Hello version: v1, instance: helloworld-v1-7b888xxxxx-xxxxx
Responses alternate between V1 (cluster-1) and V2 (cluster-2), confirming that cross-cluster service discovery and routing are working.
Send requests from cluster-2
Scale down the
sleepdeployment in cluster-1 to 0 replicas:kubectl scale deploy sleep --replicas=0Deploy a
sleepapplication in cluster-2 using the following YAML: For more information, see Create a stateless application by using a Deployment.apiVersion: v1 kind: ServiceAccount metadata: name: sleep --- apiVersion: v1 kind: Service metadata: name: sleep labels: app: sleep service: sleep spec: ports: - port: 80 name: http selector: app: sleep --- apiVersion: apps/v1 kind: Deployment metadata: name: sleep spec: replicas: 1 selector: matchLabels: app: sleep template: metadata: labels: app: sleep spec: terminationGracePeriodSeconds: 0 serviceAccountName: sleep containers: - name: sleep image: registry.cn-hangzhou.aliyuncs.com/acs/curl:8.1.2 command: ["/bin/sleep", "infinity"] imagePullPolicy: IfNotPresentRun the following command by using the kubeconfig file of cluster-2:
kubectl exec -it deploy/sleep -- sh -c 'for i in $(seq 1 10); do curl helloworld:5000/hello; done;'Expected output:
Hello version: v1, instance: helloworld-v1-7b888xxxxx-xxxxx
Hello version: v2, instance: helloworld-v2-7b949xxxxx-xxxxx
Hello version: v2, instance: helloworld-v2-7b949xxxxx-xxxxx
Hello version: v2, instance: helloworld-v2-7b949xxxxx-xxxxx
Hello version: v2, instance: helloworld-v2-7b949xxxxx-xxxxx
Hello version: v1, instance: helloworld-v1-7b888xxxxx-xxxxx
Hello version: v2, instance: helloworld-v2-7b949xxxxx-xxxxx
Hello version: v1, instance: helloworld-v1-7b888xxxxx-xxxxx
Hello version: v2, instance: helloworld-v2-7b949xxxxx-xxxxx
Hello version: v2, instance: helloworld-v2-7b949xxxxx-xxxxx
Responses again alternate between V1 and V2, confirming bidirectional cross-cluster access.