Knative on ASM provides the Knative Pod Autoscaler (KPA), an out-of-the-box feature that automatically scales services based on request traffic. If your service experiences performance instability or resource waste due to fluctuating traffic, use KPA to autoscale it. KPA dynamically adjusts the number of service instances by monitoring and analyzing real-time traffic data. This ensures service quality during peak times and saves resources during off-peak periods, improving system efficiency and reducing costs.
Prerequisites
You have created a Knative Service in Knative on ASM. For more information, see Deploy a serverless application by using Knative on ASM.
This topic uses the default domain name example.com for demonstration purposes. To use a custom domain name, see Use a custom domain name in Knative on ASM.
How autoscaling works
Knative Serving injects a Queue Proxy container (queue-proxy) into each pod. This container reports concurrency metrics from the application container to the autoscaler. The autoscaler then adjusts the number of pods in the Deployment based on the number of concurrent requests and the scaling algorithm, enabling autoscaling.
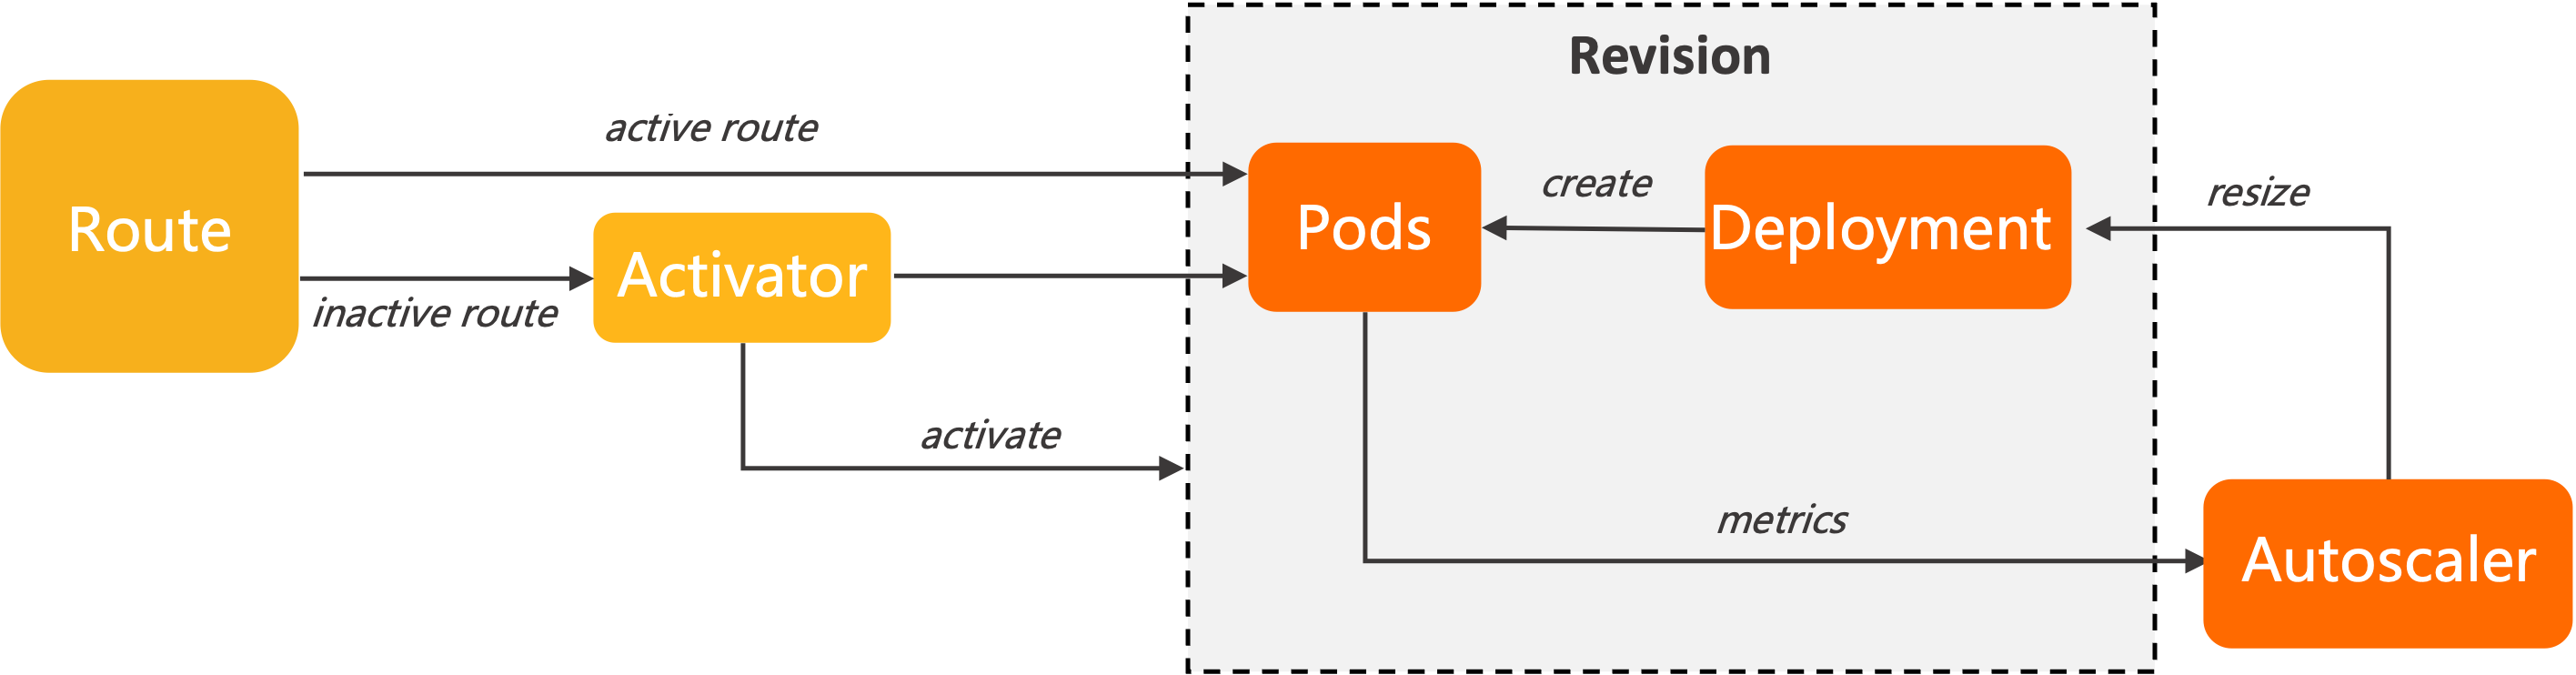
Concurrency and QPS
Concurrency is the number of simultaneous requests a pod is handling. QPS (queries per second) is the number of requests a pod processes per second, which represents its maximum throughput.
Under heavy load, a high concurrency can overload the system. This increases CPU and memory consumption, which can degrade system performance, increase response latency, and cause the QPS to drop.
Algorithm
The Knative pod autoscaler (KPA) scales pods based on the average number of concurrent requests per pod. By default, Knative uses concurrency-based autoscaling, with a target of 100 concurrent requests per pod. KPA also uses a target utilization percentage to decide when to scale.
For concurrency-based scaling, the number of pods is calculated as follows: desired pods = Total Concurrent Requests / (Target Concurrency * Target Utilization)
For example, if the target concurrency is 10 and target utilization is 0.7 (70%), an influx of 100 concurrent requests causes the autoscaler to scale to 15 pods (100 / (10 * 0.7) ≈ 15).
KPA uses two modes, Stable mode and Panic mode, to scale responsively to both gradual and sudden changes in traffic.
-
Stable mode
In Stable mode, KPA calculates the average concurrency over a 60-second stable window and adjusts the number of pods accordingly.
-
Panic mode
Panic mode activates when traffic increases suddenly. It calculates the average concurrency over a much shorter panic window, which is 6 seconds by default. The panic window is calculated as
stable window * panic-window-percentage. The default panic-window-percentage is 10% (0.1). When observed traffic exceeds a panic threshold, KPA rapidly scales up the number of pods to meet the immediate demand.
KPA determines whether to use the Stable or Panic mode calculation based on the panic threshold. The panic threshold is calculated as panic-threshold-percentage / 100. The default panic-threshold-percentage is 200, making the default panic threshold 2.
If the desired number of pods calculated in Panic mode is at least double the current number of ready pods, KPA scales based on the Panic mode calculation. Otherwise, it uses the Stable mode calculation.
KPA configuration
The global KPA configuration is defined in the config-autoscaler ConfigMap, located in the knative-serving namespace. Run the following command to view the default configuration. Key parameters are explained below.
kubectl -n knative-serving get cm config-autoscaler -o yamlExpected output (comments in the code are omitted):
apiVersion: v1
kind: ConfigMap
metadata:
  name: config-autoscaler
  namespace: knative-serving
data:
  _example:
    container-concurrency-target-default: "100"
    container-concurrency-target-percentage: "0.7"
    enable-scale-to-zero: "true"
    max-scale-up-rate: "1000"
    max-scale-down-rate: "2"
    panic-window-percentage: "10"
    panic-threshold-percentage: "200"
    scale-to-zero-grace-period: "30s"
    scale-to-zero-pod-retention-period: "0s"
    stable-window: "60s"
    target-burst-capacity: "200"
    requests-per-second-target-default: "200"
The parameters under the _example field show the default values. To change a parameter, copy it from the _example field to the data field and then modify its value.
Changes to the config-autoscaler ConfigMap apply to all Knative Services globally. To configure a specific Knative Service, use annotations. For more information, see Use case 1: Set a concurrency target for autoscaling and Use case 2: Set scale bounds for autoscaling.
Configure scale-to-zero
|
Parameter |
Description |
Example value |
|
scale-to-zero-grace-period |
The duration an inactive Revision runs before it is scaled to zero. The minimum value is 30s. |
30s |
|
stable-window |
In Stable mode, the Autoscaler operates based on the average concurrency within the stable window. Additionally, the stable window can be configured in a Revision annotation, for example, |
60s |
|
enable-scale-to-zero |
Set the field to |
true |
Configure autoscaler concurrency
|
Parameter |
Description |
Example value |
|
container-concurrency-target-default |
Defines the desired number of concurrent requests (a soft limit). This is the recommended configuration for the autoscaler in Knative. The default concurrency target in the ConfigMap is 100. Additionally, this field value can be modified with the |
100 |
|
containerConcurrency |
Limits the number of concurrent requests allowed at a given time (a hard limit) for the given Revision.
|
0 |
|
container-concurrency-target-percentage |
The concurrency percentage, also known as the concurrency factor, is used to calculate the effective concurrency target for scaling.Effective concurrency target = target (or containerConcurrency) * container-concurrency-target-percentage. For example, if |
0.7 |
Configure scale bounds
You can use minScale and maxScale to configure the minimum and maximum number of pods for your application. This helps control cold starts and computing costs.
-
If the
minScaleannotation is not set, the service can scale to zero pods. -
If the
maxScaleannotation is not set, there is no upper limit on the number of pods that can be created. -
If you set
enable-scale-to-zerotofalsein theconfig-autoscalerConfigMap, the service scales down to one pod.
You can configure minScale and maxScale in the Revision template as follows:
spec:
  template:
    metadata:
      annotations:
        autoscaling.knative.dev/minScale: "2"
        autoscaling.knative.dev/maxScale: "10"
Use case 1: Set concurrency target
This use case demonstrates how to deploy an autoscale-go application in a cluster and use KPA to autoscale it by setting a concurrency target.
For more information about how to create a Knative Service, see Deploy a serverless application by using Knative on ASM.
-
Create
autoscale-go.yamland set the concurrency target to 10, which means setting the value ofautoscaling.knative.dev/targetto10.apiVersion: serving.knative.dev/v1 kind: Service metadata: name: autoscale-go namespace: default spec: template: metadata: labels: app: autoscale-go annotations: autoscaling.knative.dev/target: "10" spec: containers: - image: registry.cn-hangzhou.aliyuncs.com/knative-sample/autoscale-go:0.1 -
Connect to your cluster with kubectl and run the following command to deploy the
autoscale-goapplication.kubectl apply -f autoscale-go.yaml -
Log on to the ASM console. In the left-side navigation pane, click the name of the target instance. Choose and obtain the IP address from the Service address section.
-
Use the Hey load testing tool to send traffic with 50 concurrent requests for 30 seconds.
For information about how to install and use the Hey tool, see the official Hey repository.
NoteReplace
xxx.xxx.xxx.xxxwith your actual access gateway address. For more information, see Obtain the access gateway address.hey -z 30s -c 50 -host "autoscale-go.default.example.com" "http://xxx.xxx.xxx.xxx?sleep=100&prime=10000&bloat=5"(base) xxx .kube % kubectl get deploy -w NAME READY UP-TO-DATE AVAILABLE AGE autoscale-go-00001-deployment 0/0 0 0 7m5s autoscale-go-00001-deployment 0/1 0 0 7m17s autoscale-go-00001-deployment 0/1 0 0 7m17s autoscale-go-00001-deployment 0/1 0 0 7m17s autoscale-go-00001-deployment 0/1 1 0 7m17s autoscale-go-00001-deployment 0/7 1 0 7m18s autoscale-go-00001-deployment 0/7 1 0 7m18s autoscale-go-00001-deployment 0/7 1 0 7m18s autoscale-go-00001-deployment 0/7 7 0 7m18s autoscale-go-00001-deployment 1/7 7 1 7m19s autoscale-go-00001-deployment 2/7 7 2 7m20s autoscale-go-00001-deployment 3/7 7 3 7m20s autoscale-go-00001-deployment 4/7 7 4 7m21s autoscale-go-00001-deployment 5/7 7 5 7m23s autoscale-go-00001-deployment 6/7 7 6 7m23s autoscale-go-00001-deployment 7/7 7 7 7m23s autoscale-go-00001-deployment 7/3 7 7 8m20s autoscale-go-00001-deployment 7/3 7 7 8m20s autoscale-go-00001-deployment 7/3 7 7 8m20s autoscale-go-00001-deployment 3/3 3 3 8m20s autoscale-go-00001-deployment 3/2 3 3 8m26s autoscale-go-00001-deployment 3/2 3 3 8m26s autoscale-go-00001-deployment 2/2 2 2 8m26s autoscale-go-00001-deployment 2/1 2 2 8m36s autoscale-go-00001-deployment 2/1 2 2 8m36s autoscale-go-00001-deployment 1/1 1 1 8m36s autoscale-go-00001-deployment 1/0 1 1 9m48s autoscale-go-00001-deployment 1/0 1 1 9m48s autoscale-go-00001-deployment 0/0 0 0 9m48sThe output shows that the service scales out to 7 pods. This is because Knative proactively creates more pods when container concurrency exceeds a certain percentage of the target (70% by default). This prevents the target from being breached if concurrency continues to increase.
Use case 2: Set scale bounds
Scale bounds define the minimum and maximum number of pods for an application. This use case demonstrates how to deploy an autoscale-go application and autoscale it by setting these bounds.
For more information about how to create a Knative Service, see Deploy a serverless application by using Knative on ASM.
-
Create a file named
autoscale-go.yaml. Set the concurrency target to 10, the minimum instances (minScale) to 1, and the maximum instances (maxScale) to 3.apiVersion: serving.knative.dev/v1 kind: Service metadata: name: autoscale-go namespace: default spec: template: metadata: labels: app: autoscale-go annotations: autoscaling.knative.dev/target: "10" autoscaling.knative.dev/minScale: "1" autoscaling.knative.dev/maxScale: "3" spec: containers: - image: registry.cn-hangzhou.aliyuncs.com/knative-sample/autoscale-go:0.1 -
Connect to your cluster with kubectl and run the following command to deploy the
autoscale-goapplication.kubectl apply -f autoscale-go.yaml -
Log on to the ASM console. In the left-side navigation pane, click the name of the target instance. Choose and obtain the IP address from the Service address section.
-
Use the Hey load testing tool to send traffic with 50 concurrent requests for 30 seconds.
For information about how to install and use the Hey tool, see the official Hey repository.
NoteReplace
xxx.xxx.xxx.xxxwith your actual access gateway address. For more information, see Obtain the access gateway address.hey -z 30s -c 50 -host "autoscale-go.default.example.com" "http://xxx.xxx.xxx.xxx?sleep=100&prime=10000&bloat=5"kubectl get deploy -w
text NAME READY UP-TO-DATE AVAILABLE AGE autoscale-go-00001-deployment 1/1 1 1 115s autoscale-go-00001-deployment 1/2 1 1 2m4s autoscale-go-00001-deployment 1/2 1 1 2m4s autoscale-go-00001-deployment 1/2 1 1 2m4s autoscale-go-00001-deployment 1/2 2 1 2m4s autoscale-go-00001-deployment 2/2 2 2 2m6s autoscale-go-00001-deployment 2/3 2 2 2m6s autoscale-go-00001-deployment 2/3 2 2 2m6s autoscale-go-00001-deployment 2/3 2 2 2m6s autoscale-go-00001-deployment 2/3 3 2 2m6s autoscale-go-00001-deployment 3/3 3 3 2m8s autoscale-go-00001-deployment 3/1 3 3 3m34s autoscale-go-00001-deployment 3/1 3 3 3m34s autoscale-go-00001-deployment 1/1 1 1 3m34sExpected output:The output shows that the service scales out to a maximum of 3 pods. When there is no request traffic, the service scales down to a minimum of 1 pod. This confirms that autoscaling is working as expected.
Related documentation
-
To securely access and manage microservices built with Knative, you can use an ASM gateway to enable HTTPS access. Encrypting traffic to service endpoints protects communication and improves the security and reliability of your architecture. For more information, see Access a Knative Service over HTTPS by using an ASM gateway.
-
When facing compatibility and stability challenges during application upgrades, you can perform a canary release for your Knative Service in Knative on ASM. For more information, see Perform a canary release for a Knative Service in Knative on ASM.
-
You can set a CPU metric threshold for a Knative Service to autoscale resources in response to sudden spikes in load. For more information, see Use HPA in Knative.