Bind a TLS certificate to a domain name on a Service Mesh (ASM) ingress gateway to enable HTTPS access to your backend services. The ingress gateway terminates TLS at the mesh edge, decrypts incoming traffic, and forwards plaintext HTTP requests to upstream services.
This topic covers two approaches:
Create and bind a new certificate -- Generate a self-signed TLS certificate with openssl and bind it to a domain.
Import and bind an existing certificate -- Use a certificate stored as a Kubernetes Secret and bind it to a domain.
How it works
The ingress gateway sits at the edge of the service mesh and handles TLS termination for inbound traffic. The flow works as follows:
External clients connect over HTTPS (port 443).
The gateway decrypts the request using the bound certificate and private key.
The gateway forwards the decrypted HTTP request to the target service inside the mesh.
This means only the ingress gateway needs the TLS certificate. Services inside the mesh communicate over plaintext HTTP through the sidecar proxy network.
Prerequisites
Before you begin, make sure that you have:
An ASM instance of Enterprise Edition or Ultimate Edition with an application deployed in the Container Service for Kubernetes (ACK) cluster added to the instance. For more information, see Deploy an application in an ASM instance
An ingress gateway. For more information, see Create an ingress gateway
Automatic sidecar proxy injection enabled for the namespace of the target service. For more information, see Enable automatic sidecar proxy injection
The IP address of the ingress gateway. For more information, see the "Step 3: Access the Bookinfo application" section of Use Istio resources to route traffic to different versions of a service
Example setup
The examples in this topic use a service named myexampleapp with the domain name aliyun.com. After you bind a certificate to aliyun.com, the ingress gateway serves HTTPS traffic for myexampleapp.
Step 1: Deploy a sample service
If you already have a service behind the ingress gateway, skip to Step 2.
Create a file named
myexample-nginx.confwith the following content. This NGINX configuration returns the messageWelcome to aliyun.com!with status code200for requests to the root path.events { } http { log_format main '$remote_addr - $remote_user [$time_local] $status ' '"$request" $body_bytes_sent "$http_referer" ' '"$http_user_agent" "$http_x_forwarded_for"'; access_log /var/log/nginx/access.log main; error_log /var/log/nginx/error.log; server { listen 80; location / { return 200 'Welcome to aliyun.com!'; add_header Content-Type text/plain; } } }Create a ConfigMap from the NGINX configuration file:
kubectl create configmap myexample-nginx-configmap --from-file=nginx.conf=./myexample-nginx.confCreate a file named
myexampleapp.yamlwith the following content:Apply the manifest to create the Service and Deployment:
kubectl apply -f myexampleapp.yaml
Step 2: Import the service to the ingress gateway
Log on to the ASM console. In the left-side navigation pane, choose Service Mesh > Mesh Management.
On the Mesh Management page, click the name of the ASM instance. In the left-side navigation pane, choose ASM Gateways > Ingress Gateway.
On the Ingress Gateway page, click the name of the ingress gateway.
In the left-side navigation pane of the gateway details page, click Upstream Service.
On the Upstream Service page, click Import service.
On the Import service page, select the namespace of the
myexampleappservice from the Namespace drop-down list. In the service selection box, select myexampleapp and click the icon to move it to the selected box. Click OK.
Step 3: Add the certificate
Choose one of the following approaches based on whether you need to create a new certificate or use an existing one.
Option A: Create and add a new certificate
Generate the certificate files
Run the following openssl commands to create a self-signed certificate for aliyun.com.
Create a root certificate and private key:
openssl req -x509 -sha256 -nodes -days 365 -newkey rsa:2048 -subj '/O=myexample Inc./CN=aliyun.com' -keyout aliyun.root.key -out aliyun.root.crtGenerate a Certificate Signing Request (CSR) and a server private key:
openssl req -out aliyun.com.csr -newkey rsa:2048 -nodes -keyout aliyun.com.key -subj "/CN=aliyun.com/O=myexample organization"Sign the CSR with the root certificate to produce the server certificate:
openssl x509 -req -days 365 -CA aliyun.root.crt -CAkey aliyun.root.key -set_serial 0 -in aliyun.com.csr -out aliyun.com.crt
Run these commands in the order shown. Step 3 requires the CSR file (aliyun.com.csr) generated in Step 2.
The following table summarizes the generated files:
| File | Description |
|---|---|
aliyun.root.key | Root CA private key |
aliyun.root.crt | Root CA certificate |
aliyun.com.key | Server private key |
aliyun.com.csr | Certificate Signing Request |
aliyun.com.crt | Server certificate (used for TLS termination) |
Upload the certificate to the ingress gateway
Log on to the ASM console. In the left-side navigation pane, choose Service Mesh > Mesh Management.
On the Mesh Management page, click the name of the ASM instance. In the left-side navigation pane, choose ASM Gateways > Ingress Gateway.
On the Ingress Gateway page, click the name of the ingress gateway.
In the left-side navigation pane of the gateway details page, click Domain/Certificate.
On the Domain/Certificate page, click the Certificate tab and then click Create.
On the New Certificate page, enter a certificate name in the Name field, paste the content of
aliyun.com.crtinto the Certificate field, paste the content ofaliyun.com.keyinto the key field, and then click Create.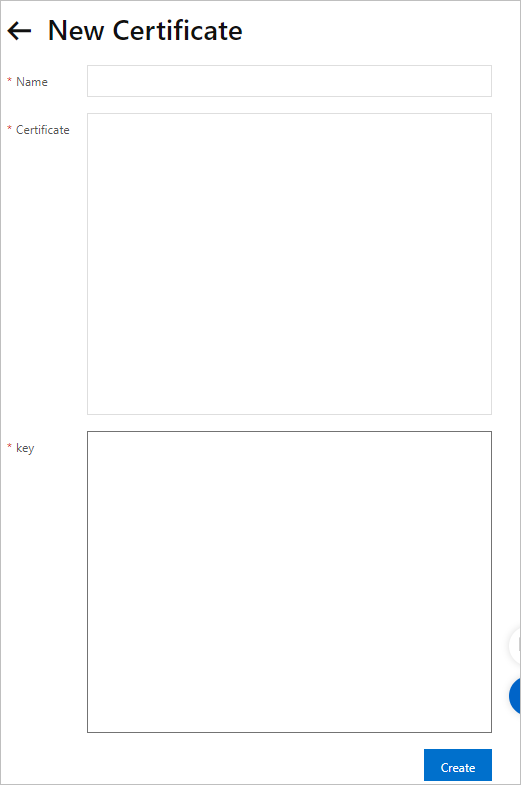
Option B: Import an existing certificate
If you already have a TLS certificate stored as a Kubernetes Secret, add the following labels to the Secret so that it appears automatically on the Certificate tab in the ASM console:
| Label | Value | Purpose |
|---|---|---|
istioGateway | Name of the ingress gateway | Associates the certificate with a specific gateway |
provider | asm | Identifies the certificate as ASM-managed |
Example: If your ingress gateway is named ingressgateway, add these labels to the Secret:
istioGateway: ingressgateway
provider: asm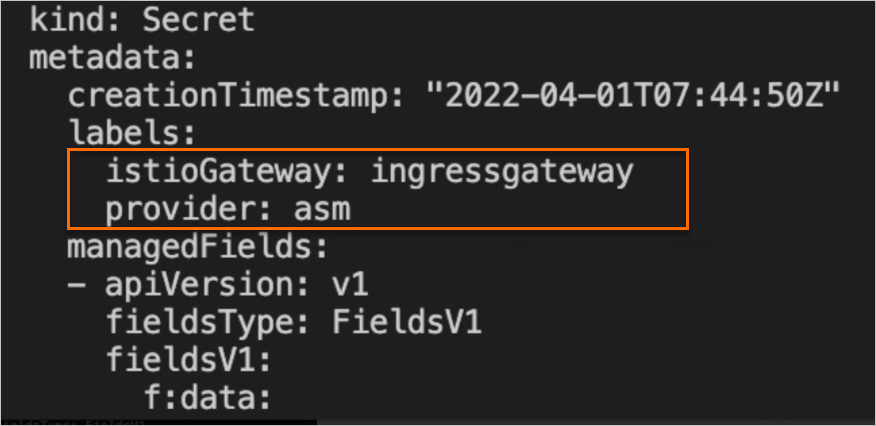
After the labels are added, the certificate is available for selection when you bind it to a domain name in the next step.
Step 4: Bind the certificate to a domain name
Log on to the ASM console. In the left-side navigation pane, choose Service Mesh > Mesh Management.
On the Mesh Management page, click the name of the ASM instance. In the left-side navigation pane, choose ASM Gateways > Ingress Gateway.
On the Ingress Gateway page, click the name of the ingress gateway.
In the left-side navigation pane of the gateway details page, click Domain/Certificate.
On the Domain/Certificate page, click the Domain tab and then click Create.
On the Add domain page, configure the following settings: Click Create.
NoteWhen Secure connections with standard TLS semantics is selected, only TLS-encrypted requests can access the domain name.
Setting Value Domain Name *.aliyun.comProtocol HTTPS Port name and port number Based on your requirements Certificate The certificate you uploaded or imported Secure connections with standard TLS semantics Selected 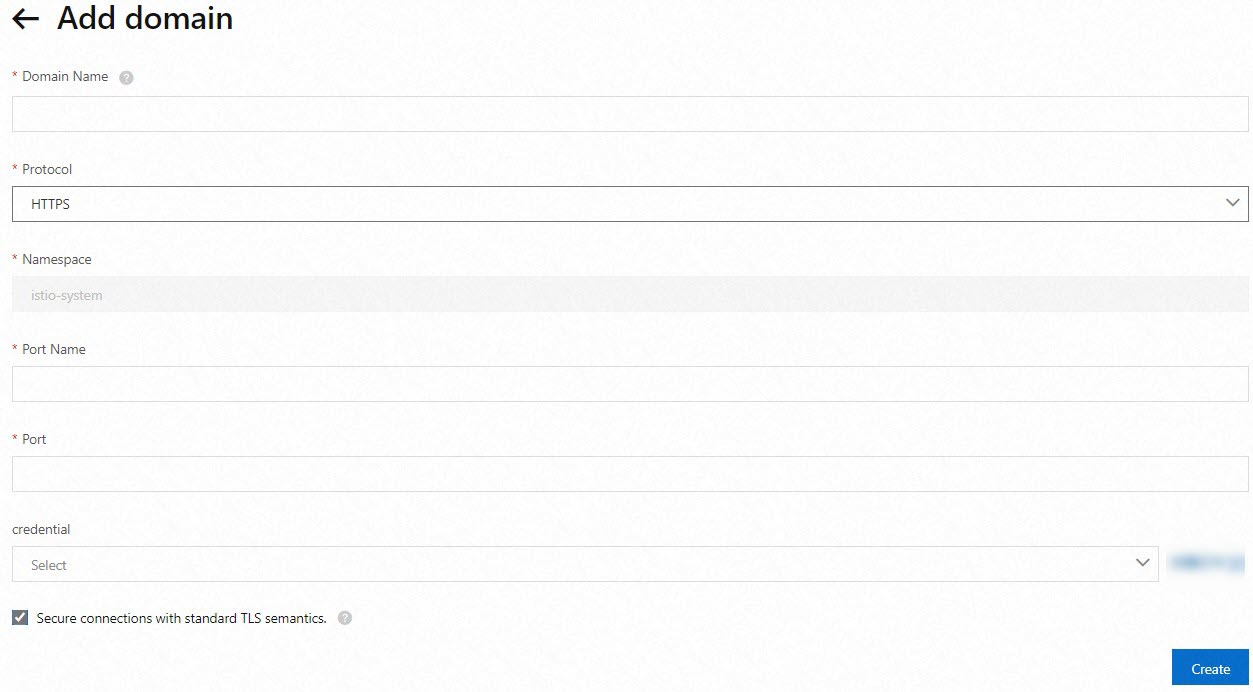
Verify the configuration
Run the following curl command to verify that the domain name is accessible over HTTPS. Replace <ingress-gateway-ip> with the actual IP address of your ingress gateway.
| Placeholder | Description | Example |
|---|---|---|
<ingress-gateway-ip> | IP address of the ingress gateway | 47.95.XX.XX |
curl -k -H Host:www.aliyun.com --resolve www.aliyun.com:443:<ingress-gateway-ip> https://www.aliyun.comExpected output:
Welcome to aliyun.com!If you see this response, the certificate is successfully bound to the domain name, and the ingress gateway is serving HTTPS traffic.
Troubleshoot common issues
If the curl command does not return the expected output, check the following:
| Issue | What to check |
|---|---|
| Connection refused | Verify that the ingress gateway is running and the IP address is correct. Run kubectl get svc -n istio-system to confirm the gateway's external IP. |
Certificate error (non -k requests) | The self-signed root CA is not trusted by your client. Use -k to skip verification, or add aliyun.root.crt to your trust store. |
| 404 or no response | Confirm that the domain binding and upstream service import are configured correctly. Check that the domain name in the binding matches the Host header in your request. |
| TLS handshake failure | Verify that the certificate content and private key match. Make sure you pasted aliyun.com.crt (not aliyun.root.crt) into the Certificate field. |
Clean up resources
To remove the resources created in this tutorial, run the following commands:
kubectl delete -f myexampleapp.yaml
kubectl delete configmap myexample-nginx-configmap
Also delete the certificate and domain binding from the ASM console if they are no longer needed:
Navigate to the ingress gateway's Domain/Certificate page.
On the Domain tab, delete the domain binding for
*.aliyun.com.On the Certificate tab, delete the certificate you created.