Microservices communicate over the network, and each service is a potential attack target. By default, Kubernetes does not encrypt or authenticate service-to-service traffic. If an attacker compromises a single service, they can move laterally across the internal network using plaintext HTTP. Alibaba Cloud Service Mesh (ASM) addresses this gap by enforcing zero trust at the infrastructure level -- mutual TLS (mTLS), authentication, and authorization happen outside your application code. Policies take effect immediately without redeploying applications.
Why microservices need zero trust
Perimeter-based security cannot prevent lateral movement within a cluster. Zero trust eliminates implicit trust by requiring:
Explicit authentication for every request, whether internal or external.
Least-privilege access so each service can reach only the resources it needs.
Encrypted transport for all service-to-service communication.
ASM implements these principles through its data plane proxies (ztunnel and waypoint in Ambient mode), removing the burden from application developers. Security teams define policies centrally, and all services in the mesh inherit these protections by default.
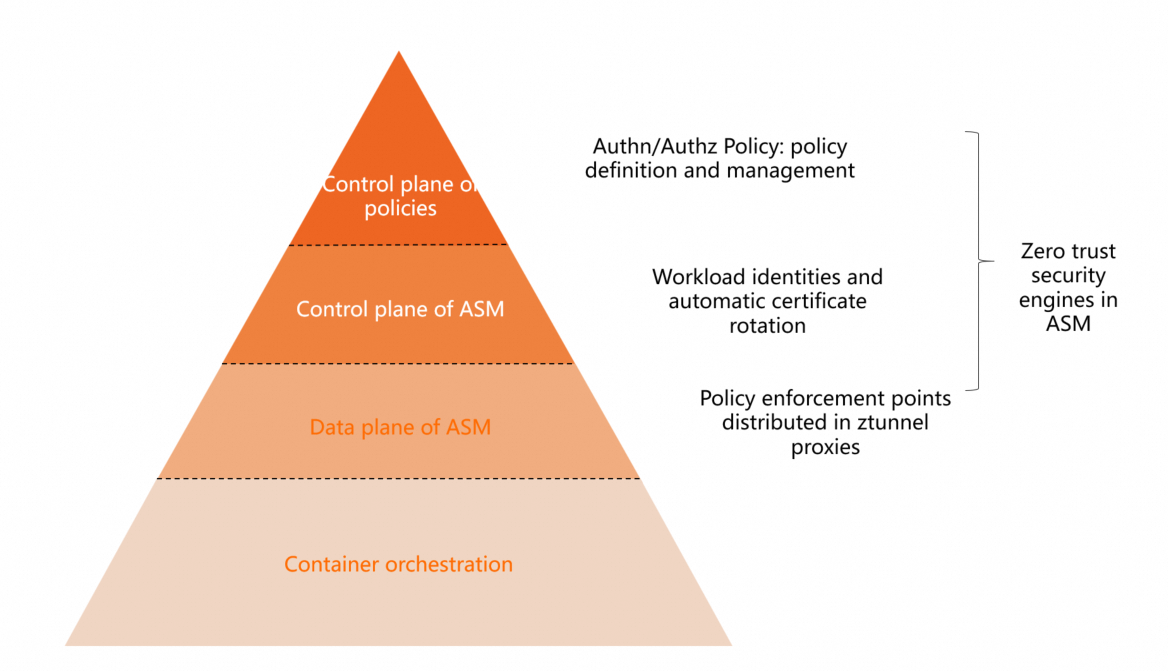
Zero trust architecture
ASM provides four pillars for zero trust:
| Pillar | Role | What ASM provides |
|---|---|---|
| Workload identity | Foundation | A unique, SPIFFE-compliant identity for every workload, derived from the Kubernetes service account token |
| Security certificates | Transport | X.509 TLS certificate issuance, lifecycle management, and automatic rotation for every proxy |
| Policy execution | Enforcement | Istio role-based access control (RBAC) authorization policies enforced by ztunnel and waypoint proxies in Ambient mode |
| Observability | Insight | Logs and metrics for every policy decision, supporting audit and anomaly detection |
Benefits over application-level security
| Benefit | Description |
|---|---|
| Independent lifecycle | Ztunnel proxy updates do not require application redeployment |
| Dynamic configuration | Policy changes propagate immediately across the mesh |
| Centralized management | Security teams define and deploy policies for the entire organization. Developers inherit protections without extra work |
| End-user credential validation | ASM validates credentials such as JSON Web Tokens (JWTs) attached to incoming requests |
| Security for security services | Identity and authorization services deployed in the mesh receive the same protections: in-transit encryption, identity verification, and policy enforcement |
With a single control plane, ASM delivers identity and access management, transparent TLS encryption, authentication, authorization, and audit logging out of the box.
Workload identity
ASM assigns a unique identity to every service in the mesh. This identity is derived from the workload's Kubernetes service account token and conforms to the SPIFFE standard:
spiffe://<trust-domain>/ns/<namespace>/sa/<service-account>The service identity serves two purposes:
Mutual verification between services during mTLS handshakes
Matching against authorization policy rules
View workload identities in the console
Log on to the ASM console. In the left-side navigation pane, choose Service Mesh > Mesh Management.
On the Mesh Management page, click the name of the target ASM instance. In the left-side navigation pane, choose Mesh Security Center > Workload Identity.
On the Workload Identity page, set Data Plane to the cluster ID and select a Namespace to view the identities of connected services.
Peer authentication (mTLS)
Peer authentication verifies both communicating services through mTLS. ASM supports the following mTLS modes:
| Mode | Behavior | Use case |
|---|---|---|
| PERMISSIVE | Accepts both plaintext and mTLS traffic | Default mode. Use during migration when some workloads lack mesh proxies |
| STRICT | Accepts only mTLS traffic | Use after all workloads are enrolled in the mesh |
The actual mTLS behavior depends on the Ambient mode enrollment of each side:
| Client | Server | mTLS behavior |
|---|---|---|
| Ambient mode enabled | Ambient mode enabled | mTLS enabled by default |
| Ambient mode enabled | No mesh proxy | Server decides whether to accept mTLS based on whether it has a mesh proxy |
| No mesh proxy | Ambient mode enabled | Default mode is PERMISSIVE (accepts both plaintext and mTLS). Setting PeerAuthentication to STRICT causes plaintext requests to fail |
In addition to Kubernetes network policies for Layer 3 network security, ASM provides policy control capabilities through peer authentication, request authentication, and authorization policies.
Request authentication (JWT validation)
Request authentication validates JWTs attached to incoming requests. The validation behavior is as follows:
| Request contains | Result |
|---|---|
| Valid JWT | Access granted (HTTP 200) |
| Invalid JWT | Access denied (HTTP 403) |
| No JWT | Access granted (HTTP 200) |
Because requests without a JWT are allowed by default, combine request authentication with an authorization policy to deny all unauthenticated requests. The following walkthrough demonstrates this combination.
Set up request authentication with JWT validation
Prerequisites
Deploy the Bookinfo sample application with Ambient mode enabled. For details, see Deploy the sample application and enable Ambient mode.
Enable a waypoint proxy for the namespace where the application resides.
Step 1: Deploy a test client
Create a
sleep.yamlfile with the following content.Deploy the sleep application:
kubectl apply -f sleep.yaml -n default
Step 2: Create a request authentication policy
Log on to the ASM console. In the left-side navigation pane, choose Service Mesh > Mesh Management.
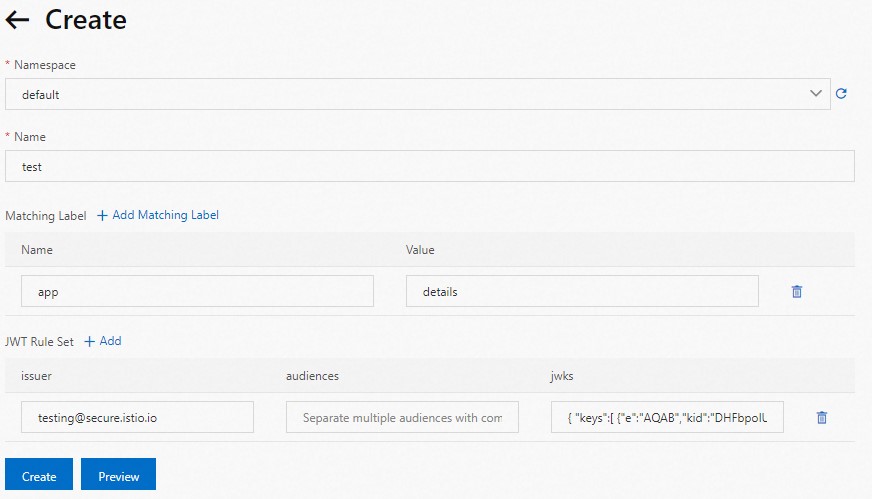
On the Mesh Management page, click the name of the target ASM instance. In the left-side navigation pane, choose Mesh Security Center > RequestAuthentication. Click Create.
Configure a JWT rule for the
detailsworkload with the following settings:issuer:
testing@secure.istio.ioaudiences: Leave blank (no restrictions on which services can use the JWT).
jwks: The JSON Web Key Set for validating JWTs. Use the following value:
{ "keys":[ {"e":"AQAB","kid":"DHFbpoIUqrY8t2zpA2qXfCmr5VO5ZEr4RzHU_-envvQ","kty":"RSA","n":"xAE7eB6qugXyCAG3yhh7pkDkT65pHymX-P7KfIupjf59vsdo91bSP9C8H07pSAGQO1MV_xFj9VswgsCg4R6otmg5PV2He95lZdHtOcU5DXIg_pbhLdKXbi66GlVeK6ABZOUW3WYtnNHD-91gVuoeJT_DwtGGcp4ignkgXfkiEm4sw-4sfb4qdt5oLbyVpmW6x9cfa7vs2WTfURiCrBoUqgBo_-4WTiULmmHSGZHOjzwa8WtrtOQGsAFjIbno85jp6MnGGGZPYZbDAa_b3y5u-YpW7ypZrvD8BgtKVjgtQgZhLAGezMt0ua3DRrWnKqTZ0BJ_EyxOGuHJrLsn00fnMQ"}]}For more information, see jwks.json.
Click Create.
Step 3: Encode and test with a JWT
Use a JWT tool to encode the JWKS into a token. The expected encoded token is:
eyJhbGciOiJSUzI1NiIsImtpZCI6IkRIRmJwb0lVcXJZOHQyenBBMnFYZkNtcjVWTzVaRXI0UnpIVV8tZW52dlEiLCJ0eXAiOiJKV1QifQ.eyJleHAiOjQ2ODU5ODk3MDAsImZvbyI6ImJhciIsImlhdCI6MTUzMjM4OTcwMCwiaXNzIjoidGVzdGluZ0BzZWN1cmUuaXN0aW8uaW8iLCJzdWIiOiJ0ZXN0aW5nQHNlY3VyZS5pc3Rpby5pbyJ9.CfNnxWP2tcnR9q0vxyxweaF3ovQYHYZl82hAUsn21bwQd9zP7c-LS9qd_vpdLG4Tn1A15NxfCjp5f7QNBUo-KC9PJqYpgGbaXhaGx7bEdFWjcwv3nZzvc7M__ZpaCERdwU7igUmJqYGBYQ51vr2njU9ZimyKkfDe3axcyiBZde7G6dabliUosJvvKOPcKIWPccCgefSj_GNfwIip3-SsFdlR7BtbVUcqR-yv-XOxJ3UcMI0tz3uMiiZcyPV7sNCU4KRnemRIMHVOfuvHsU60_GhGbiSFzgPTAa9WTltbnarTbxudb_YEOx12JiwYToeX0DCPb43W1tzIBxgm8NxUgTest all three cases:
# Set the token
export TOKEN=eyJhbGciOiJSUzI1NiIsImtpZCI6IkRIRmJwb0lVcXJZOHQyenBBMnFYZkNtcjVWTzVaRXI0UnpIVV8tZW52dlEiLCJ0eXAiOiJKV1QifQ.eyJleHAiOjQ2ODU5ODk3MDAsImZvbyI6ImJhciIsImlhdCI6MTUzMjM4OTcwMCwiaXNzIjoidGVzdGluZ0BzZWN1cmUuaXN0aW8uaW8iLCJzdWIiOiJ0ZXN0aW5nQHNlY3VyZS5pc3Rpby5pbyJ9.CfNnxWP2tcnR9q0vxyxweaF3ovQYHYZl82hAUsn21bwQd9zP7c-LS9qd_vpdLG4Tn1A15NxfCjp5f7QNBUo-KC9PJqYpgGbaXhaGx7bEdFWjcwv3nZzvc7M__ZpaCERdwU7igUmJqYGBYQ51vr2njU9ZimyKkfDe3axcyiBZde7G6dabliUosJvvKOPcKIWPccCgefSj_GNfwIip3-SsFdlR7BtbVUcqR-yv-XOxJ3UcMI0tz3uMiiZcyPV7sNCU4KRnemRIMHVOfuvHsU60_GhGbiSFzgPTAa9WTltbnarTbxudb_YEOx12JiwYToeX0DCPb43W1tzIBxgm8NxUg

# Test 1: Valid JWT -- expect HTTP 200
kubectl exec $(kubectl get pod -l app=sleep -o jsonpath={.items..metadata.name}) -c sleep \
  -- curl http://details:9080/details/1 -o /dev/null \
  --header "Authorization: Bearer $TOKEN" -s -w '%{http_code}\n'

# Test 2: Invalid JWT -- expect HTTP 403
kubectl exec $(kubectl get pod -l app=sleep -o jsonpath={.items..metadata.name}) -c sleep \
  -- curl http://details:9080/details/1 -o /dev/null \
  --header "Authorization: Bearer badtoken" -s -w '%{http_code}\n'

# Test 3: No JWT -- expect HTTP 200
kubectl exec $(kubectl get pod -l app=sleep -o jsonpath={.items..metadata.name}) -c sleep \
  -- curl http://details:9080/details/1 -o /dev/null -s -w '%{http_code}\n'
The results confirm that request authentication validates JWTs when present but does not block requests without a JWT. To enforce JWT requirements, add an authorization policy.
Authorization policies
Authorization policies restrict which requests can reach a service based on attributes such as source identity, port, IP address, or JWT claims. Each policy consists of three parts:
| Field | Purpose | Details |
|---|---|---|
selector | Targets specific workloads by label | Determines which workloads the policy applies to |
action | Specifies ALLOW or DENY | Defines whether matching requests are permitted or blocked |
rules | Defines conditions that trigger the action | Contains from (source), to (operation), and when (custom conditions) sub-fields |
Require a valid JWT for service access
The following example builds on the request authentication above by requiring a valid JWT for all requests to the details service.
Enable a waypoint proxy for the namespace where the application resides before applying this policy.
Prerequisites
Deploy the Bookinfo sample application. For details, see Deploy applications in clusters associated with ASM instances.
Deploy the sleep test client as described in the request authentication section above.
Create the authorization policy
Log on to the ASM console. In the left-side navigation pane, choose Service Mesh > Mesh Management.
On the Mesh Management page, click the name of the target ASM instance. In the left-side navigation pane, choose Mesh Security Center > AuthorizationPolicy. Click Create from YAML.
Select the default namespace and apply the following YAML:
apiVersion: security.istio.io/v1beta1
kind: AuthorizationPolicy
metadata:
  name: require-jwt
  namespace: default
spec:
  action: ALLOW
  rules:
    - from:
        - source:
            requestPrincipals:
              - testing@secure.istio.io/testing@secure.istio.io
  selector:
    matchLabels:
      app: details
This policy allows requests to the
detailsservice only when the request principal matchestesting@secure.istio.io/testing@secure.istio.io. All other requests are denied.For field reference, see Authorization Policy.
Click Create.
Verify the policy
Send a request without a JWT:
kubectl exec $(kubectl get pod -l app=sleep -o jsonpath={.items..metadata.name}) -c sleep \
  -- curl http://details:9080/details/1 -o /dev/null -s -w '%{http_code}\n'
Expected output: 403. The authorization policy blocks requests that lack a valid JWT issued by testing@secure.istio.io.
Security capabilities summary
ASM delivers the following security capabilities for zero trust:
| Capability | Description |
|---|---|
| Managed certificate infrastructure | Full lifecycle management, including certificate issuance and CA rotation. If a private key is compromised, ASM quickly replaces it with a new certificate, reducing the attack surface |
| Managed control plane APIs | Distributes authentication policies, authorization policies, and secure naming information to Envoy proxies |
| Ztunnel and waypoint enforcement | Applies security policies in Ambient mode to protect applications by default |
| Observability | Ztunnel and waypoint proxies generate data to detect unauthorized access |
Each workload establishes its identity through an X.509 TLS certificate. ASM issues these certificates and periodically rotates both certificates and private keys.
Reference use cases
Use authorization policies on the ingress gateway to implement IP-based access control or access control based on custom external authorization.
A fintech customer uses ASM authorization policies to isolate external-facing zones from application zones, controlling access for cross-cluster, multi-language applications. They also use the egress gateway to audit outbound mesh traffic and combine it with authorization policies to govern access to third-party services.