When you run Go microservices on Kubernetes, validating a new version across an entire call chain before full rollout reduces production risk. By combining Application Real-Time Monitoring Service (ARMS) with Service Mesh (ASM) traffic lanes, you can route canary traffic end-to-end through a Go service chain and monitor both baseline and canary versions in real time.
How it works
The sample architecture consists of four Go services deployed in the go-gray namespace:
requestsender (entry) > go-demo-a > go-demo-b > go-demo-c
Each service (A, B, C) runs two versions:
v1 (baseline): The stable production version.
v2 (canary): The version under validation.
In this setup, only go-demo-a and go-demo-c have canary versions. go-demo-b uses the baseline version in both lanes -- a common pattern where not every service in the call chain needs a canary release.
ASM traffic lanes route requests based on the x-asm-prefer-tag header:
x-asm-prefer-tag: v1-- all requests flow through baseline versions (A:base > B:base > C:base).x-asm-prefer-tag: v2-- requests route to canary versions where available (A:gray > B:base > C:gray).
The ARMS Go agent provides application-level observability across both lanes, including topology maps, API call analysis, and database monitoring.

Prerequisites
Before you begin, make sure that you have:
A Kubernetes cluster (ACK or self-managed) with
kubectlaccessFamiliarity with Kubernetes Deployments, Services, and Istio concepts
Sample applications
All sample applications are deployed in the go-gray namespace.
Key labels
Each pod carries labels that enable ARMS monitoring and ASM traffic routing:
| Label | Purpose | Values |
|---|---|---|
ASM_TRAFFIC_TAG | Identifies the traffic lane for ASM routing | v1 (baseline), v2 (canary) |
version | Version identifier used by Istio routing | v1, v2 |
armsPilotCreateAppName | Registers the application name in ARMS | Application name (e.g., go-demo-a) |
armsPilotAutoEnable | Enables automatic ARMS agent injection | on |
aliyun.com/app-language | Specifies the application language for agent selection | golang |
Application manifests
The Kubernetes labels on each pod serve two purposes: ARMS agent injection (armsPilotAutoEnable, armsPilotCreateAppName, aliyun.com/app-language) and ASM traffic routing (ASM_TRAFFIC_TAG, version).
Step 1: Install the ARMS Go agent
Install the ARMS agent to integrate the sample applications into ARMS Application Monitoring. After installation, application topology, API calls, and database analysis become available in the ARMS console.
Choose the installation method based on your cluster type:
| Cluster type | Installation guide |
|---|---|
| Container Service for Kubernetes (ACK) | Install an ARMS agent for a Go application deployed in ACK |
| Self-managed Kubernetes | Automatically install an ARMS agent for Go in a Kubernetes cluster |
Step 2: Set up ASM for end-to-end canary release
2.1 Create an ASM instance and add a cluster
Create an ASM instance and add your Kubernetes cluster to it.
2.2 Create an ingress gateway
Create an ingress gateway for the ASM instance.
2.3 Create an Istio gateway
Create an Istio gateway named ingressgateway in the istio-system namespace. For detailed instructions, see Manage Istio gateways.
Use the following YAML:
apiVersion: networking.istio.io/v1beta1
kind: Gateway
metadata:
  name: ingressgateway
  namespace: istio-system
spec:
  selector:
    istio: ingressgateway
  servers:
    - port:
        number: 80
        name: http
        protocol: HTTP
      hosts:
        - '*'
2.4 Inject sidecar proxies
Inject sidecar proxies into the sample applications and restart them. For instructions, see Install a sidecar proxy.
2.5 Enable distributed tracing
Distributed tracing propagates trace context across services, enabling end-to-end observability for canary routing.
Create a namespace for the OpenTelemetry collector:
kubectl create namespace opentelemetry-operator-systemDeploy the tracing collector service:
   apiVersion: v1
   kind: Service
   metadata:
     name: default-collector
     namespace: opentelemetry-operator-system
   spec:
     ports:
       - port: 4317
         protocol: TCP
         targetPort: 4317
     selector:
       app: default-collector
     sessionAffinity: None
     type: ClusterIP
In the ASM console, enable tracing with the following settings:
Parameter Value OpenTelemetry FQDN default-collector.opentelemetry-operator-system.svc.cluster.localOpenTelemetry port 4317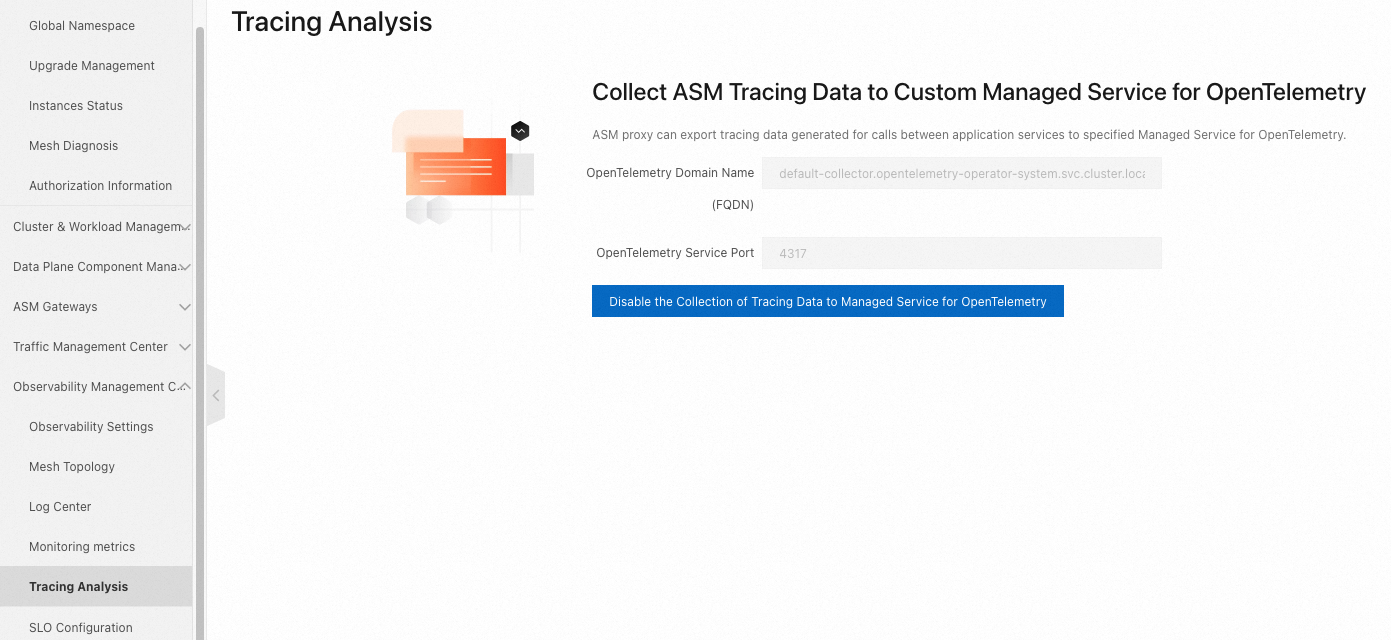
On the Observability Settings page, go to the Tracing Analysis Settings section. Enable tracing and configure the sample rate.

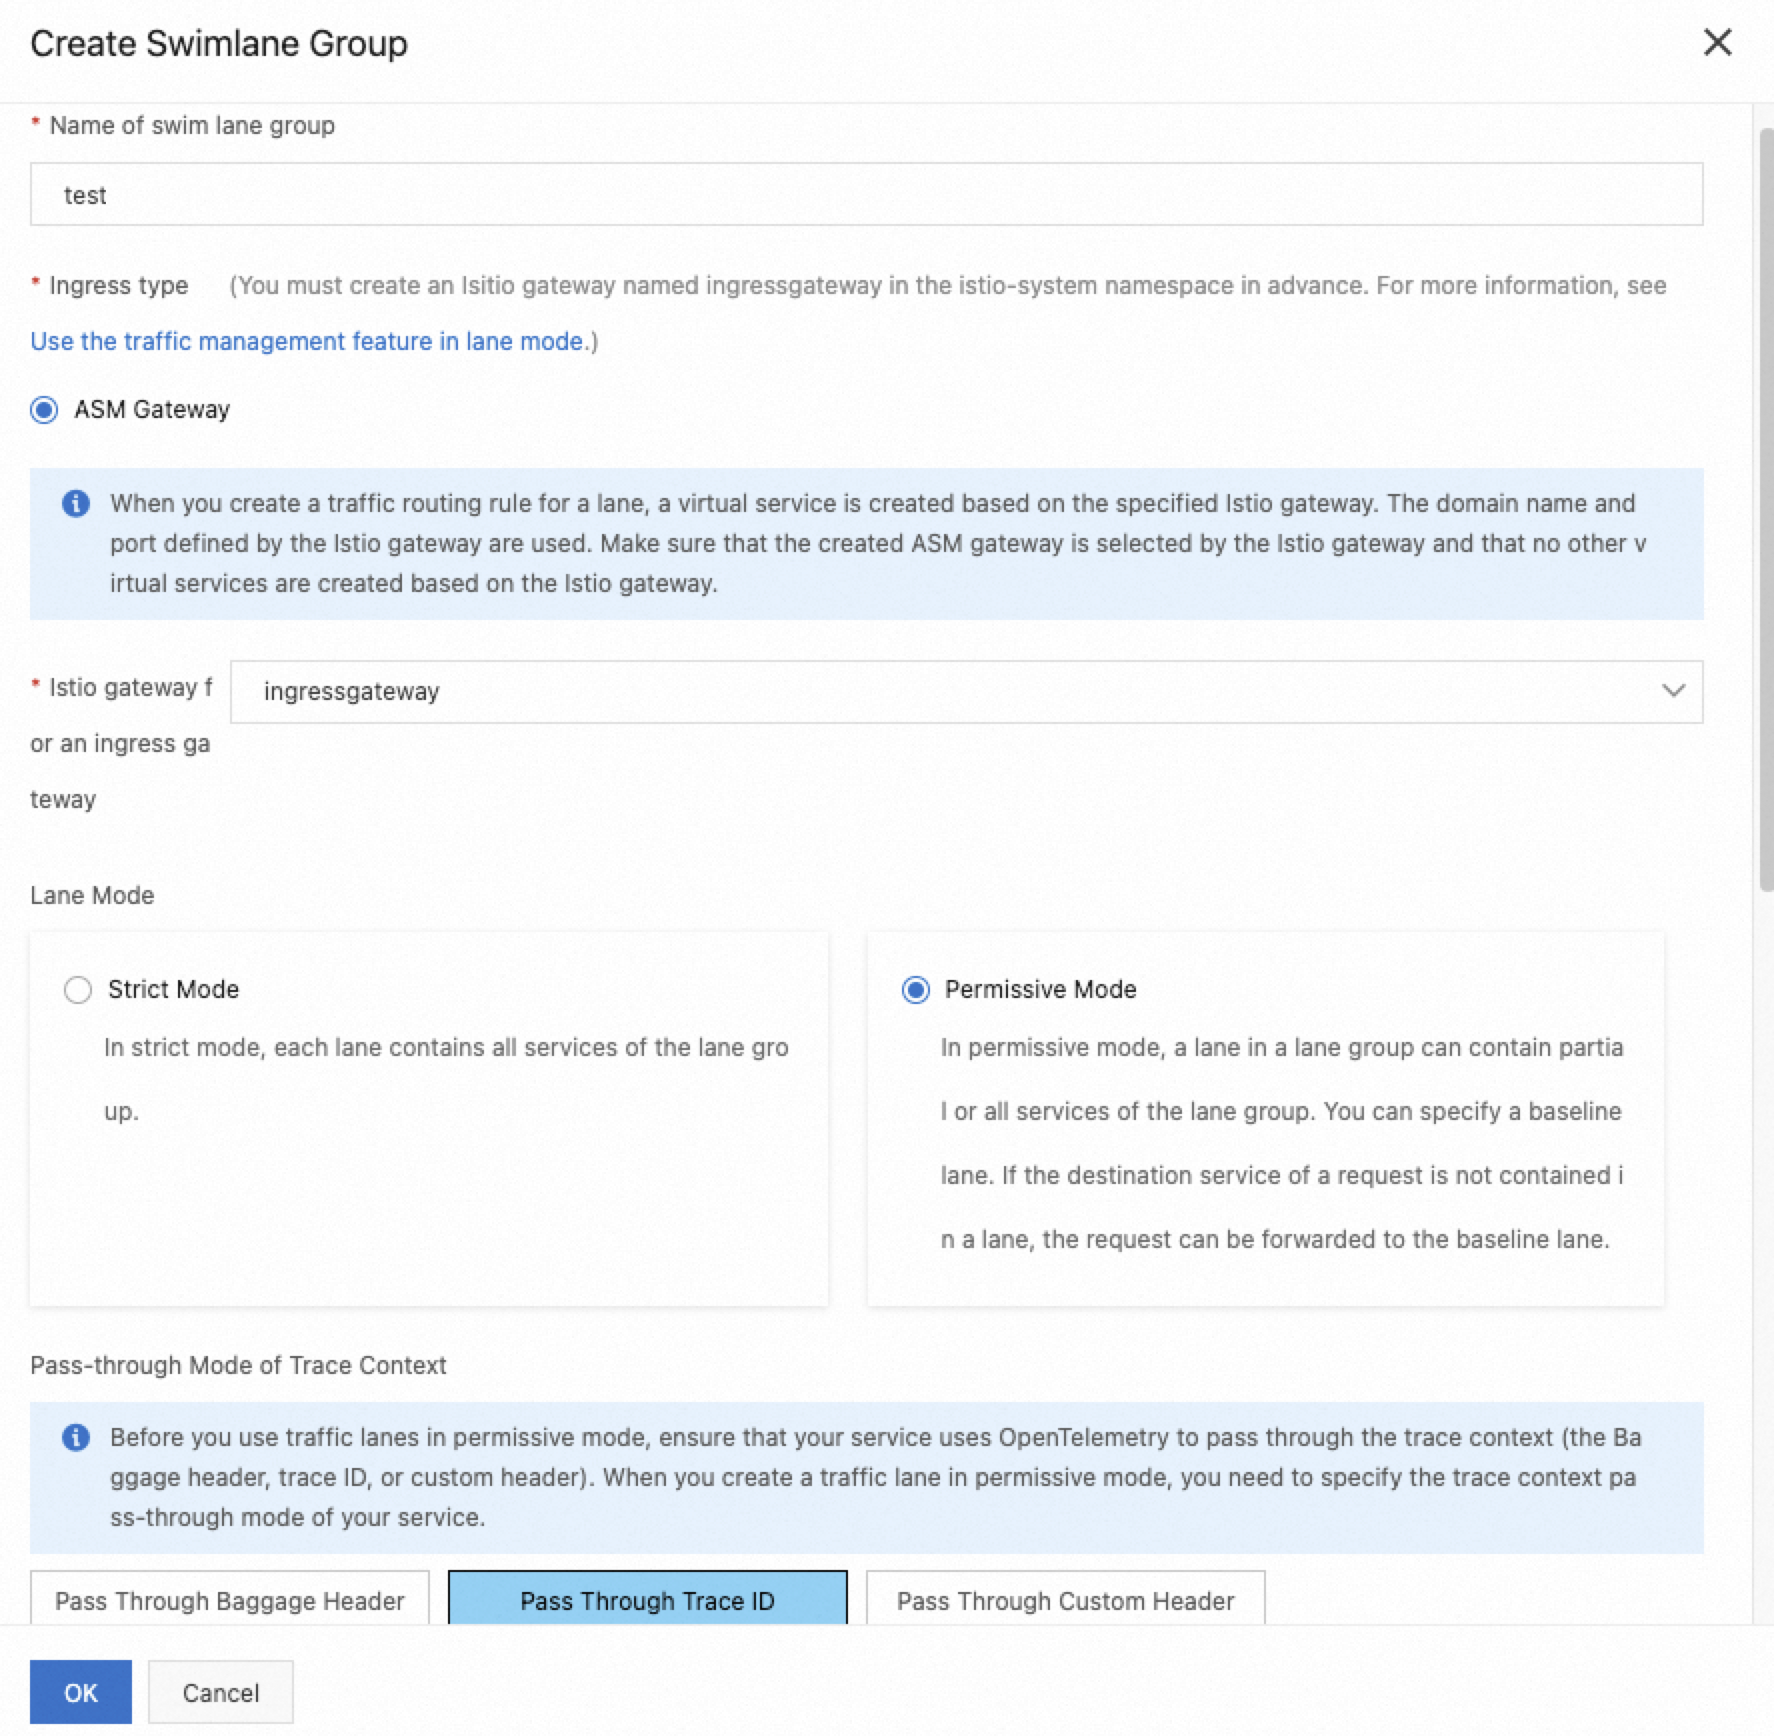
2.6 Configure traffic lanes
Traffic lanes define how requests route to different service versions. For background information, see Create lanes.
Create a lane group
Create a lane group named test with the following settings:
| Parameter | Value |
|---|---|
| Trace ID Request Header | traceparent |
| Routing Request Header | x-asm-prefer-tag |
| Swimlane Services | requestsender, go-demo-a, go-demo-b, go-demo-c |
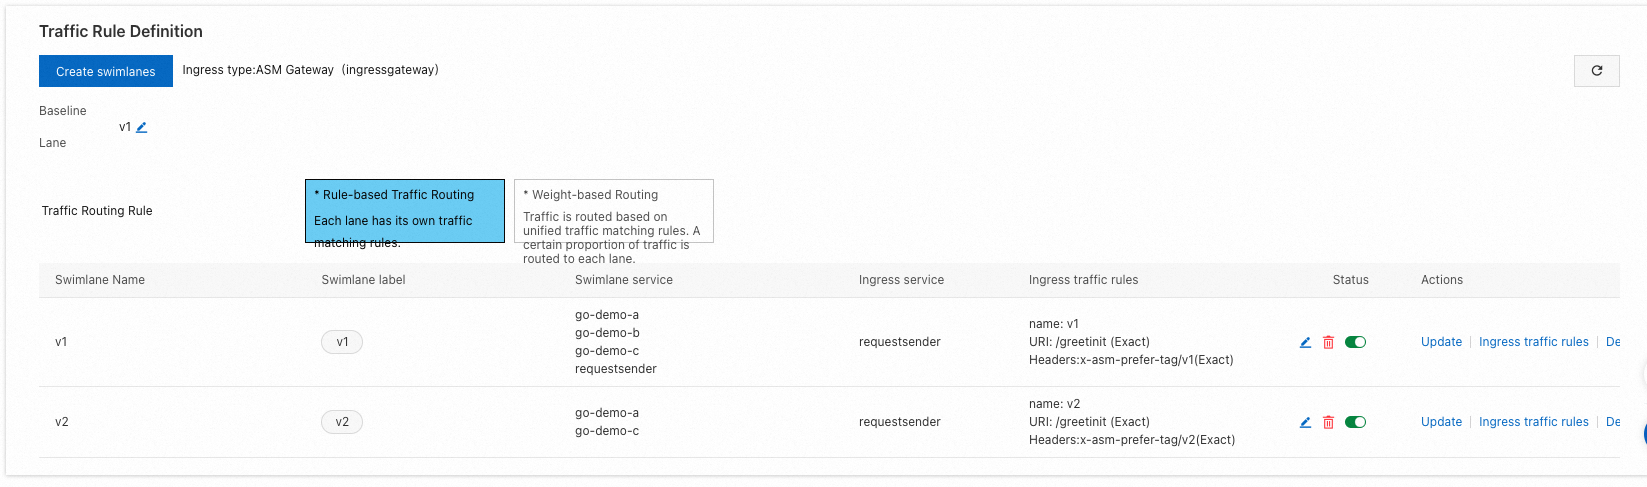
Create lanes
Create two lanes, v1 (baseline) and v2 (canary). Under Configure Service Tag, set the label key and value for each lane:
| Parameter | v1 (baseline) | v2 (canary) |
|---|---|---|
| Swimlane Name | v1 | v2 |
| Label Key | ASM_TRAFFIC_TAG | ASM_TRAFFIC_TAG |
| Label Value | v1 | v2 |
| Add Service | requestsender, go-demo-a, go-demo-b, go-demo-c | go-demo-a, go-demo-c |
The v2 lane only includes go-demo-a and go-demo-c. Requests to go-demo-b fall back to the baseline version automatically.
Configure routing rules
Set up Ingress traffic rules for the v1 and v2 lanes:
| Parameter | Value |
|---|---|
| Ingress service | requestsender.go-gray.svc.cluster.local |
| Name | v1 and v2 |
| Domain Name | * |
| Matching Method | Exact |
| Content | /greetinit |
Step 3: Verify the canary release
Get the ingress gateway IP
In the ARMS console, go to .
Copy the public IP address of the ingress gateway.
Set an environment variable: Replace
<ingress-gateway-ip>with the IP address from the previous step.export ASM_GATEWAY_IP=<ingress-gateway-ip>
Test baseline routing (v1)
Send requests with the x-asm-prefer-tag: v1 header. All services in the call chain return their baseline versions:
for i in {1..100}; do curl -H 'x-asm-prefer-tag: v1' http://${ASM_GATEWAY_IP}/greetinit; echo ''; sleep 1; done;Expected output:
{"code":0,"data":{"greeting":"Hello ","callChain":"Init:base:172.30.208.29 - A:base:172.30.208.114 - B:base:172.30.208.116 - C:base:172.30.208.120"},"message":"success"}Every hop in the callChain field shows base, confirming that all traffic stays in the baseline lane.
Test canary routing (v2)
Send requests with the x-asm-prefer-tag: v2 header. Services with canary versions (A and C) return their canary versions, while B returns the baseline:
for i in {1..100}; do curl -H 'x-asm-prefer-tag: v2' http://${ASM_GATEWAY_IP}/greetinit; echo ''; sleep 1; done;Expected output:
{"code":0,"data":{"greeting":"Hello ","callChain":"Init:base:172.30.208.29 - A:gray:172.30.208.115 - B:base:172.30.208.116 - C:gray:172.30.208.122"},"message":"success"}The callChain field shows A:gray and C:gray, while B:base confirms that go-demo-b falls back to the baseline lane as expected.
Monitor baseline and canary versions in ARMS
After you send traffic to both lanes, use ARMS to compare the performance of baseline and canary versions:
Log on to the ARMS console.
In the left-side navigation pane, choose .
On the Applications page, locate the deployed services. Each service registered through the
armsPilotCreateAppNamelabel appears as a separate application entry.

Use the application topology and API call analysis to compare error rates, latency, and throughput between the baseline and canary versions.