If system policies do not meet your requirements, you can create custom policies. Custom policies provide fine-grained access control and enhance the security of your resource access. This topic describes how to use custom policies for ARMS.
What is a custom policy?
Resource Access Management (RAM) policies are classified into system policies and custom policies. You can manage custom policies based on your business requirements.
After you create a custom policy, you must attach the policy to a RAM user, RAM user group, or RAM role. This way, the permissions that are specified in the policy can be granted to the principal.
You can delete a RAM policy that is not attached to a principal. If the RAM policy is attached to a principal, before you can delete the RAM policy you must detach the RAM policy from the principal.
Custom policies support version control. You can manage custom policy versions based on the version management mechanism provided by RAM.
References
Prerequisites
This feature is enabled by default for Alibaba Cloud accounts that activated ARMS after 00:00 on April 1, 2022. If you activated ARMS before this date, you must submit a ticket to enable the feature.
Before you create a custom policy, understand the basic structure and syntax of permission policies. For more information, see Basic elements of a permission policy.
The RAM user must have the
ReadOnlyAccessorAliyunARMSReadOnlyAccesssystem policy attached to log on to the ARMS console.ImportantTo grant the read-only permissions on all ARMS features to a specific resource group, you must attach the AliyunARMSReadOnlyAccess policy to and grant the ReadTraceApp permission to the resource group. Otherwise, ARMS cannot display the application list that belongs to the authenticated resource group.
Make sure that the AliyunARMSFullAccess system policy is not attached to the RAM user.
Background information
ARMS provides system policies that grant coarse-grained permissions. If these policies do not meet your requirements, you can create custom policies. For example, to control a RAM user's permissions on a specific application, you must use a custom policy.
Step 1: Create a custom policy
Sign in to the RAM console as a RAM administrator.
In the left-side navigation pane, choose .
On the Policies page, click Create Policy.
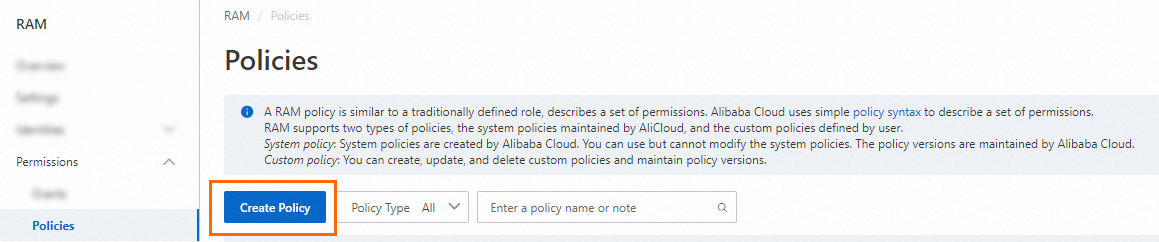
On the Create Policy page, click the JSON tab. Write your policy content in the policy editor.
For more information about the elements in a permission policy, see Policy elements.
Example: This policy grants read-only permissions on applications in the China (Hangzhou) region that have the tag
key0: value01orkey0: value02.{ "Version": "1", "Statement": [ { "Action": [ "arms:ReadTraceApp" ], "Resource": "acs:arms:cn-hangzhou:*:armsapp/*", "Effect": "Allow", "Condition": { "StringEquals": { "arms:tag/key0":[ "value01", "value02" ] } } } ] }At the top of the page, click Optimize, and then click Perform to perform advanced optimization on the policy.
This feature performs the following tasks:
Splits resources or conditions for incompatible actions.
Reduces the resource scope for greater precision.
Removes duplicate statements or merges statements.
On the Create Policy page, click OK.
In the Create Policy dialog box, enter a policy name and Description, then click OK.
Step 2: Attach a permission policy
Attach permission policy to a RAM user
Console
The RAM console provides two methods to grant permissions to a RAM user. You can use either method to grant permissions to a single user or to multiple users at once. Choose the method that best suits your workflow:
From the Users page: After you select a target user in the user list, the authorization panel automatically selects the principal. This method is ideal for a user-centric approach.
From the Authorization page: You must manually select a principal, but you can see an overview of all authorization records in your account. This approach is ideal for a permission-centric view.
Recommendation for large-scale management: To grant the same permissions to multiple RAM users with similar responsibilities, add these users to a user group and then attach the policy to the user group (console path: Identity Management > User Groups). This approach is easier to maintain than granting permissions to each user individually.
From the Users page
Log on to the .
In the navigation pane on the left, choose .
On the Users page, find the RAM user and click Actions in the Attach Policy column.
You can also select multiple RAM users and click Attach Policy below the user list to grant permissions to multiple RAM users.
In the Add Permissions panel, grant permissions to the RAM user.
Select a Resource Scope:
Entire Account: The permissions apply to all resources within the current Alibaba Cloud account. This is suitable for general scenarios that do not require isolation by resource group.
Specific Resource Group: The permissions apply only to the resources within the specified resource group. This is suitable for scenarios where multiple teams share an account and require permission isolation. When a RAM user is granted permissions on a specific resource group, they must select that group from the top navigation bar in the console to access its resources.
NoteThe system automatically flags high-risk system policies, such as AdministratorAccess and AliyunRAMFullAccess. These policies typically grant full control over all cloud resources or full management access to RAM. Grant these policies with caution.
For an example of resource group authorization, see Use a resource group to control a RAM user's access to specific ECS instances.
Select Principals:
The principals are the RAM users to whom you want to grant permissions. If you started from the Users page, the system automatically selects the RAM user you are editing. If you initiated the process from the Grants page, you must manually select one or more RAM users.
Select Policies:
System Policies: You can search for and select system policies. Search tip: Use the search box to quickly find a policy. You can perform a fuzzy search by product name (for example,
ECSorOSS), permission level (for example,ReadOnlyorFullAccess), or the full policy name.Custom Policies: You must first create a custom policy before you can attach it.
(Optional) Enter a Description: We recommend providing a reason for the authorization to aid future auditing and traceability, such as "Authorization for OSS upload tasks".
Submit the authorization: Click OK.
Review the result of the operation and click Close.
From the Grants page
Log on to the .
In the navigation pane on the left, choose .
On the Grants page, click Add Grant.
In the Add Grant panel, grant permissions to the RAM user. The configuration is the same as described in the previous section.
Review the result of the operation and click Close.
API
Grant a custom policy
Call the CreatePolicy operation to create a custom policy. You can refer to Basic elements of a permission policy and Overview of permission policy examples.
Call the AttachPolicyToUser operation to grant permissions at the account-level to a RAM user. Set the
PolicyTypeparameter toCustom.Alternatively, call the AttachPolicy operation to grant permissions at the resource group-level to a RAM user.
Grant a system policy
Call the AttachPolicyToUser operation to attach a policy to a RAM user. Set the
PolicyTypeparameter toSystem. For more information about thePolicyNameparameter, see System policy reference.Alternatively, call the AttachPolicy operation to grant permissions at the resource group-level to a RAM user.
Attach a permission policy to a RAM role
After you attach a permission policy to a RAM role, you can use the RAM role to log on to the ARMS console. For more information, see Assume a RAM role.
Permission policy elements
Effect
The authorization effect can be Allow or Deny.
Action
Action | Permission description |
arms:ReadTraceApp | Read-only permission for Application Real-Time Monitoring Service (ARMS). This permission lets you view information such as application overviews, API calls, and application diagnostics. |
arms:EditTraceApp | Edit permission for ARMS. This permission lets you customize application configurations and set custom parameters. |
arms:DeleteTraceApp | Delete permission for ARMS. This permission lets you delete applications. |
Resource
Specifies the object that the authorization applies to.
The format is as follows:
"Resource": [
     "acs:arms:<regionid>:*:armsapp/<appname>"
 ]
Replace
<regionid>with the ID of a specific region. To grant permissions on resources in all regions, use an asterisk (*).Replace
<appname>with the name of a specific application. To grant permissions on all applications, use an asterisk (*). If the authorization applies to applications that share a name prefix, useprefix*, such ask8s*.
Condition
A condition block consists of one or more condition clauses. A condition clause consists of a condition operator, a condition key, and a condition value. 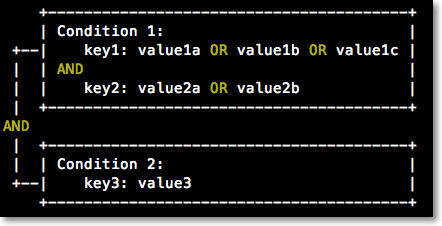
Evaluation logic:
Condition match: A condition key can have one or more values. The condition is met if the key's value in the request matches any of the values specified in the policy (logical OR).
Condition clause match: A condition clause is met only if all its condition keys are met (logical AND).
Condition block match: A condition block is met only if all of its condition clauses are met (logical AND).
ARMS lets you use tag key-value pairs to specify the objects for authorization. For more information about how to set application tags, see Tag management.
The following condition operators are supported for tag key-value pairs:
StringEquals
StringNotEquals
StringEqualsIgnoreCase
StringNotEqualsIgnoreCase
StringLike
StringNotLike
Condition key:
arms:tag.Condition value: The tag key-value pair.
Example: Grant permissions to applications where the tag key-value pair is key0: value01 or key0: value02.
"Condition": {
  "StringEquals": {       // Condition operator.
    "arms:tag/key0":[      // Condition key
      "value01",        // Condition value
      "value02"
    ]
  }
}
Authorization reference
To use custom policies, understand your service's permission requirements and the authorization information for Application Real-Time Monitoring Service (ARMS). For more information, see Authorization information.