Compared to open-source Apache RocketMQ, Alibaba Cloud ApsaraMQ for RocketMQ provides higher stability, security, and a more comprehensive operations and maintenance system. You can migrate your open-source RocketMQ cluster to ApsaraMQ for RocketMQ for a better business experience. This topic describes how to use the migration tool of ApsaraMQ for RocketMQ to migrate a self-managed Apache RocketMQ cluster to ApsaraMQ for RocketMQ.
Prerequisites
Role name: AliyunServiceRoleForRMQMigration
Policy: AliyunServiceRolePolicyForRMQMigration
Description: Allows ApsaraMQ for RocketMQ to access VPCs.
Usage notes
During the message migration phase, before switching from the Write in Destination Cluster and Read and Write in Source and Destination Clusters stage to the Read and Write in Destination Cluster stage, ensure all messages in the source cluster have been consumed and that no scheduled messages are pending. Only then can you switch to the Read and Write in Destination Cluster stage.
Do not decommission the self-managed open-source Apache RocketMQ cluster before the migration task is complete.
Migration process
The following figure shows the process of migrating an open-source RocketMQ cluster to ApsaraMQ for RocketMQ.
Evaluate migration risks and compatibility based on the version and feature usage of your self-managed open-source RocketMQ cluster. Confirm the goals and scope of the migration task.
Step 2: Configure network information
Enter the network and node information of your self-managed cluster. ApsaraMQ for RocketMQ establishes network connectivity with the minimum required permissions to support traffic switching operations and verification checks.
ApsaraMQ for RocketMQ reads the topic and group metadata from your self-managed cluster and replicates it to the destination ApsaraMQ for RocketMQ instance.
Identify all producers and consumers within the migration scope. Change the endpoint in your producer and consumer code from the source cluster to the destination ApsaraMQ for RocketMQ instance.
Step 5: Migrate messaging traffic
Perform traffic switching operations in phases at the topic level.
Step 6: Complete the migration task
Complete the migration task and decommission the self-managed open-source RocketMQ cluster.
Step 1: Migration assessment
Before migrating, perform a technical assessment and define the migration scope based on your business requirements. This helps you complete the cloud migration in batches.
Technical assessment: Helps you determine whether the client and environment of your self-managed RocketMQ cluster meet the migration requirements and clarifies feature support before and after migration.
Confirm migration scope: We recommend migrating in batches based on business priority and application coupling. After a batch is stable, you can expand the migration scope and gradually complete the entire migration task.
Technical assessment
Ensure your source self-managed RocketMQ cluster meets the following requirements. If any requirement is not met, submit a ticket for a solution.
Requirement
Description
Deployment version
Apache RocketMQ 5.x and 4.x server versions are supported.
Network requirements
The source cluster must be deployed in an Alibaba Cloud VPC environment. If deployed in an on-premises data center, it must be accessible from a VPC private address.
Supported regions
The Migration to Cloud feature is available only in the following regions: China (Hangzhou), China (Shanghai), China (Beijing), China (Shenzhen), China (Zhangjiakou), China (Hong Kong), US (Silicon Valley), Singapore, and Japan (Tokyo).
Parameter constraints
Message size:
Maximum: 4 MB.
Message retention period:
Minimum: 24 hours.
Maximum: 720 hours.
Maximum delay for scheduled messages:
Non-Serverless series (subscription and pay-as-you-go):
Standard Edition: 7 days.
Professional Edition and Platinum Edition: 40 days.
Serverless series:
Existing Standard Edition and Professional Edition instances: 7 days.
Dedicated: 7 days. You can submit a ticket to request a change. After the limit is changed, the instance cannot be downgraded to a shared instance.
For more parameter constraints, see quotas and limits.
SDK version requirements: The migration solution is designed to minimize changes. In most cases, you can directly upgrade the client SDK version. Because a major version change typically includes new features and stability optimizations, we recommend upgrading the SDK version during migration.
SDK
Language
Version
Upgrade needed?
Apache RocketMQ Remoting SDK
The following code provides an example of the Java SDK Maven dependency:
<dependency>
    <groupId>org.apache.rocketmq</groupId>
    <artifactId>rocketmq-client</artifactId>
    <version>{version}</version>
</dependency>
The endpoint is configured in the following format:
producer.setNamesrvAddr("xxx:9876");

consumer.setNamesrvAddr("xxx:9876");
Java
5.x SDK
Compatible by default. No upgrade is needed.
Java, C++
4.x SDK
If your source cluster uses the
PullConsumer,DefaultLitePullConsumer, orDefaultPullConsumerinterface, you must upgrade to a 5.x series SDK. For more information, see SDK reference overview.NoteIf you use the Flink connector for RocketMQ to send and receive messages, we recommend compiling and using the latest SDK version for the migration. For more information, see rocketmq-flink.
Migration scope
ApsaraMQ for RocketMQ supports topic-level migration, which allows for phased and canary releases with rollback capabilities. This approach effectively reduces the risk of large-scale changes.
Before you perform the migration, you must confirm the business scope of the topics and plan the migration batches.
Select topics: Select topics at the self-managed cluster level and plan migration batches based on business priority. We recommend starting with topics from non-critical services.
Coordinate with upstream and downstream services: After you select topics, you must notify all upstream and downstream applications (producers and consumers) that use these topics to switch their endpoints.
ImportantYou must notify all upstream and downstream applications affected by the topic migration. Failing to switch an application's endpoint can cause issues such as message consumption delays.
Step 2: Configure network information
Create a migration task and configure the network information of the source self-managed cluster. The ApsaraMQ for RocketMQ migration tool uses this information to read metadata from the source cluster and manage subsequent migration tasks.
Usage notes
With least privilege, the ApsaraMQ for RocketMQ migration tool accesses only the following information from the source self-managed cluster:
Topic metadata configurations
Group metadata configurations
Topic dynamic route registration information
Consumer connection information and message accumulation status
The migration tool does not access any other information from the source cluster, nor does it perform any write operations on its configurations. This ensures that the migration tool does not affect your source self-managed cluster's operation.
After you configure the network information, carefully review and confirm its accuracy before you proceed. After you proceed, you cannot modify the network settings. To make changes, you must create a new task.
Procedure
Log on to the ApsaraMQ for RocketMQ console.
In the top navigation bar, select the region where the source cluster and destination ApsaraMQ for RocketMQ instance are located. In the left-side navigation pane, choose .
On the Migration to Cloud page, click Create Task.
In the Create Migration Task panel, configure the parameters and click OK.
For more information about the parameters, see Source cluster network parameters.
On the Network Settings page of the Migration to Cloud wizard, enter the network information of the source self-managed RocketMQ cluster and click Configure Network.
For more information about the parameters, see Source cluster network parameters.
Wait for the configuration to complete. After the page shows that the configuration is complete, click Next.
Parameters
Table 1. Source cluster network parameters
Parameter | Description | Example |
Network Type | The network environment where the self-managed open-source cluster is deployed.
| VPC-connected Cluster |
Cluster Name | A custom identifier for the self-managed open-source cluster, used to distinguish tasks. It does not affect service links. | first |
VPC | The ID of the VPC where the self-managed open-source cluster is deployed. This parameter is required only when Network Type is set to VPC-connected Cluster. | vpc-bp1mhd******24chrxn |
vSwitch | The vSwitch information is used only by the ApsaraMQ for RocketMQ migration tool to establish a network channel to access the self-managed open-source cluster. It does not specify the vSwitch where the cluster is deployed. Follow these rules:
This parameter is required only when Network Type is set to VPC-connected Cluster. | vsw-bp1hejs******0los38rn |
Security Group | We recommend that you select the security group to which the ECS instance of the self-managed cluster belongs. If you select a different one, ensure the selected security group's rules allow access to the destination ApsaraMQ for RocketMQ instance nodes. This parameter is required only when Network Type is set to VPC-connected Cluster. | sg-bp160q******vtcxvwl |
Name Server Address | The name server address of the self-managed open-source cluster. Separate multiple addresses with commas (,) or semicolons (;). Important You must configure the name server information for all self-managed clusters to be migrated. If any information is missing, you cannot select the required topics for migration in subsequent steps. | 192.168.XX.XX:9876 |
Access Credential |
| ACL |
Username | The Admin account of the self-managed open-source cluster. This parameter is required only if ACL is enabled for the self-managed open-source cluster. | admin |
Password | The password for the Admin account of the self-managed open-source cluster. This parameter is required only if ACL is enabled for the self-managed open-source cluster. | ****** |
Step 3: Migrate metadata
After the network connection is established, select the specified topics and groups based on the migration scope to complete the metadata migration.
Usage notes
When migrating metadata, the ApsaraMQ for RocketMQ migration tool dynamically reads and displays all topics and groups from the source self-managed cluster. Select only the topics and groups relevant to the current migration task.
This step cannot be undone. Make sure you migrate all topics and groups within the current migration scope before proceeding to the next step. Otherwise, you will need to manually add any missing topics later.
Procedure
On the Metadata Migration page of the migration wizard, click the Topic Metadata tab.
In the topic list, select the topics that you want to migrate, choose the corresponding topic type from the Message Type drop-down list, and then click Confirm and Import in the Actions column.
You can also select multiple topics and click Batch Import.
ImportantOpen-source Apache RocketMQ 4.x does not have the concept of message types. ApsaraMQ for RocketMQ validates the consistency between the message type of a topic and the actual message type. Therefore, during metadata migration, you must manually enter the message type of the topic based on your business scenario.
If you select an incorrect message type, message production and consumption will fail after migration. If you are unsure about the topic's message type or if a topic is used for mixed message types, submit a ticket for assistance.
Click the Group Metadata tab. In the group list, select the groups that you want to migrate, choose the delivery order for message consumption from the Consumption Order drop-down list, and then click Confirm and Import in the Actions column.
You can also select multiple groups and click Batch Import.
ImportantIn open-source Apache RocketMQ 4.x series SDKs, the message consumption order is configured on the client side. In ApsaraMQ for RocketMQ 5.x instances, the consumption order of a group is controlled on the server side. Therefore, during metadata migration, you must manually enter the consumption order type of the group based on your business scenario.
If you select an incorrect consumption order type, the message consumption order may be incorrect after migration. If you are unsure about the group's consumption order, submit a ticket for assistance.
After you confirm that all topics and groups for this migration task have been imported, click Next.
Step 4: Change the endpoint
In this phase, you prepare to migrate the production service. Change the endpoint in all relevant producer and consumer applications to that of the destination ApsaraMQ for RocketMQ 5.x instance.
Usage notes
After you change the endpoint, restart the producer and consumer applications. Although this step connects the messaging applications to the destination ApsaraMQ for RocketMQ instance, the migration tool's backend still routes the topic's traffic to the source self-managed cluster. Therefore, the messaging links remain unaffected at this stage. You can switch the messaging applications in any order.
Make sure all producer and consumer applications involved in this migration have changed their endpoints before you proceed to the next step.
Example endpoint changes
For the Apache RocketMQ Remoting protocol SDK, perform the following configurations based on the SDK version:
Before change:
producer.setNamesrvAddr("192.168.XX.XX:9876");

consumer.setNamesrvAddr("192.168.XX.XX:9876");
After change:
SDK version >= 4.5.1
producer.setNamesrvAddr("rmq-cn-pe334******-vpc.cn-hangzhou.rmq.aliyuncs.com:8080");
// The default value of vipChannelEnabled is false. If you have set it to true, you must remove this configuration.
// producer.setVipChannelEnabled(false);

consumer.setNamesrvAddr("rmq-cn-pe334******-vpc.cn-hangzhou.rmq.aliyuncs.com:8080");
// The default value of vipChannelEnabled is false. If you have set it to true, you must remove this configuration.
// consumer.setVipChannelEnabled(false);
SDK version < 4.5.1
producer.setNamesrvAddr("rmq-cn-pe334******-vpc.cn-hangzhou.rmq.aliyuncs.com:8080");
// The default value of vipChannelEnabled is true. You must set it to false.
producer.setVipChannelEnabled(false);

consumer.setNamesrvAddr("rmq-cn-pe334******-vpc.cn-hangzhou.rmq.aliyuncs.com:8080");
// The default value of vipChannelEnabled is true. You must set it to false.
consumer.setVipChannelEnabled(false);
Procedure
After you modify the endpoint configurations in your messaging applications and restart the applications, click Next on the Change Endpoint page of the migration wizard.
Step 5: Migrate messaging traffic
To migrate messaging traffic, you must switch traffic for each topic individually to gradually shift read and write traffic to the destination instance.
Usage notes
When you perform a traffic switching operation, monitor message production and consumption to ensure they meet expectations after each topic state change. If no exceptions occur, proceed with the next switching operation. If an exception occurs, you can immediately roll back the operation. After you identify and resolve the cause of the exception, you can resume the traffic switching operation.
Make sure that traffic switching is completed for all topics within the scope of the migration task and that message sending and receiving are stable without any exceptions before you complete the migration task. A migration task cannot be modified after it is completed.
Traffic switching stages
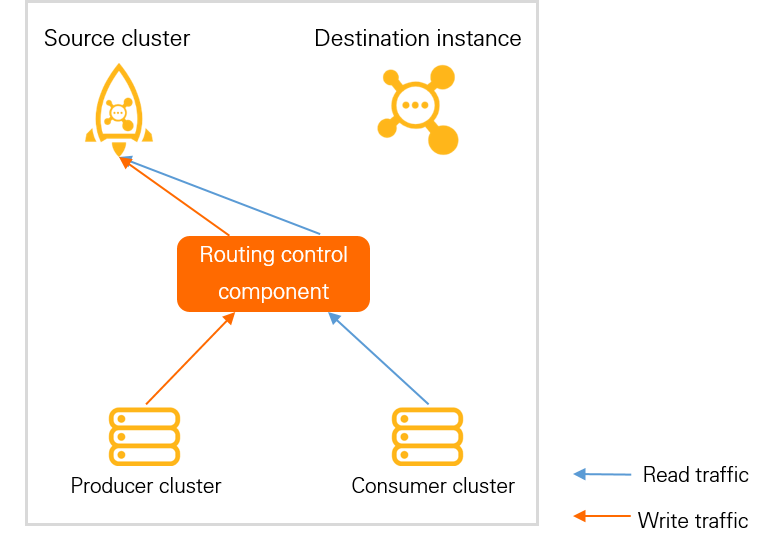
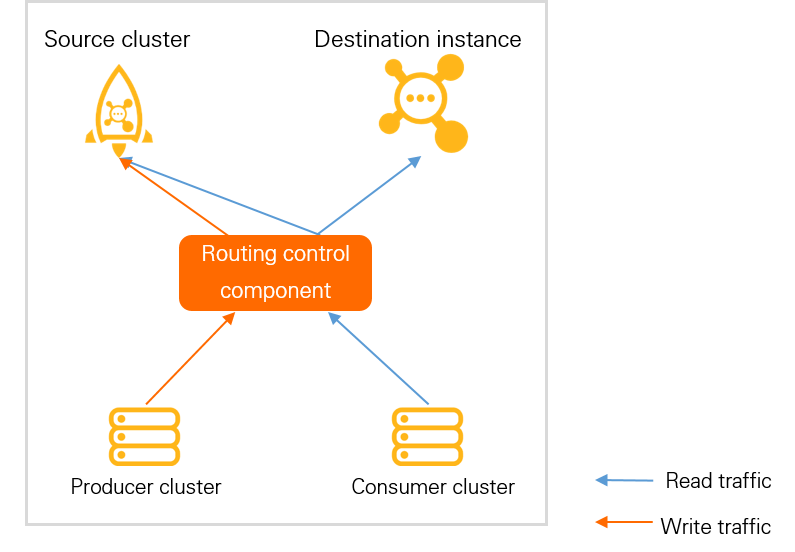
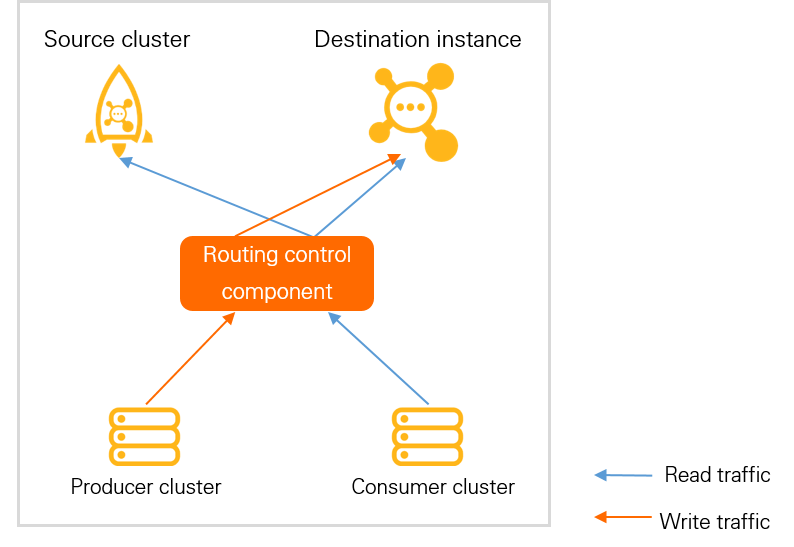
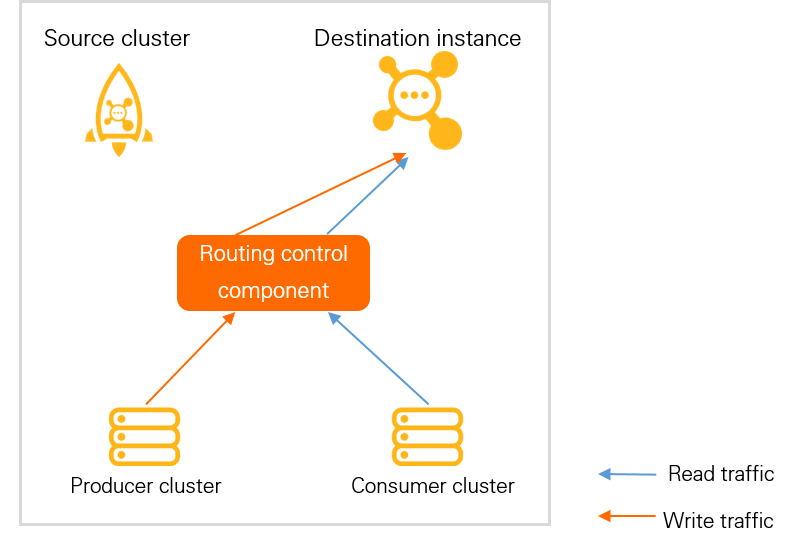
Table 2. Traffic switching stages
Stage | Description | Traffic topology |
Read and Write in Source Cluster | The initial stage of message migration.
|
|
Write in Source Cluster and Read in Source and Destination Clusters |
|
|
Write in Destination Cluster and Read and Write in Source and Destination Clusters |
At this stage, the destination instance handles both message production and consumption traffic. Verify that the new messaging flow is normal and wait for the messages in the source cluster to be fully consumed. Important At this stage, ensure all messages in the source cluster have been consumed and no scheduled messages are pending before you switch to the Read and Write in Destination Cluster stage. |
|
Read and Write in Destination Cluster | After you confirm that the new messaging flow meets expectations and that all accumulated messages in the source cluster have been consumed, you can switch the topic to this state. At this point, both read and write traffic are directed only to the destination instance, and the migration is complete.
|
|
Traffic switching
On the Message Migration page of the migration wizard, select the topic that you want to migrate and check its verification status.
If the status is Check Passed, proceed to the next step.
If the status is not Check Passed, troubleshoot the issue. Click Re-verify in the Actions column until the check passes, and then proceed to the next step.
For the checks performed at each traffic switching stage, see Verification checks.
If the status is not Check Passed but you confirm that the check result is not blocking, click Ignore Check in the Actions column for the specified topic and then proceed to the next step.
In the Actions column of the topic to be switched, click Switch Traffic.
In the dialog box that appears, carefully read the prompt and click OK.
The traffic switching process has four stages. You must perform the switching operation for each stage until the Traffic Switching Stage of the topic becomes Read and Write in Destination Cluster.
For information about the topic's read and write traffic status at each switching stage, see Traffic switching stages.
After you confirm that traffic switching is complete for all topics in this migration task, click Migrated at the bottom of the page.
Related operations
The following are other operations available on the message migration page during traffic switching:
Roll Back
Roll back to the previous stage: If an unexpected result occurs during migration, you can roll back the traffic switching stage of the specified topic to the last normally running stage. After you troubleshoot the cause of the exception, you can decide on the subsequent operations.
Roll back to the initial stage: This method directly forces the traffic switching stage to revert to the initial state, which is the routing state before traffic switching began. This method is typically used for emergency mitigation.
NoteThis method involves a significant state change. Unconsumed messages generated during the migration process may be delayed or remain unprocessed.
Create Topic
If you missed a topic during metadata migration, you can add it during the traffic switching task. This involves manually creating a topic in the ApsaraMQ for RocketMQ 5.x instance with the same name as the source cluster's topic.
Batch Traffic Switching/Batch Rollback
Perform traffic switching or rollback operations in batches.
NoteBatch switching and batch rollback apply only to topics that are in the same Traffic Switching Stage.
Switching stage verification
Table 3. Verification checks
Traffic switching stage | Verification check |
Switch to the Write in Source Cluster and Read in Source and Destination Clusters stage |
|
Switch to the Write in Destination Cluster and Read and Write in Source and Destination Clusters stage |
|
Switch to the Read and Write in Destination Cluster stage |
|
Step 6: Complete the migration task
Usage notes
Before you complete the migration task, ensure that all scheduled messages in the self-managed open-source RocketMQ cluster have been consumed.
You can decommission the self-managed open-source RocketMQ cluster only after the migration task is complete.
Procedure
On the Migration to Cloud page, select the target task and click Details in the Actions column.
On the migration task Details page, click Migrated.
Related documents
For information about the differences between open-source Apache RocketMQ and ApsaraMQ for RocketMQ, and the principles and advantages of the migration solution, see Migration to Cloud overview.
After the migration task is complete, you can use the metrics on the ApsaraMQ for RocketMQ dashboard to check that the instance is running as expected and that business data is normal. If exceptions occur, you can perform a rollback at any time.