ApsaraMQ for MQTT clients use server certificates to authenticate ApsaraMQ for MQTT brokers. You must purchase or issue server certificates and host the certificates in Alibaba Cloud Certificate Management Service. This topic describes how to generate and use a server certificate.
Process for using a server certificate

Limits
You can manage server certificates only on ApsaraMQ for MQTT Enterprise Platinum Edition instances.
Prerequisites
A certificate authority (CA) certificate is obtained.
OpenSSL v1.1.1i or later is installed.
Step 1: Use a CA certificate to issue a server certificate
You can purchase a server certificate from a CA or use a CA certificate to issue a server certificate. For information about how to obtain a CA certificate, see Self-signed certificates.
Rivest-Shamir-Adleman (RSA) CA certificates
In the path of the installed OpenSSL library, create the configuration files.
Create a file named server.csr.cfg. The following sample code provides an example of the file content:
NoteYou must configure the parameters in the
[dn]section based on your business scenario.[req] default_bits = 2048 prompt = no default_md = sha256 distinguished_name = dn [dn] C=CN ST=ZJ L=HZ O=ALI OU=MQTT emailAddress=xxx@xxx CN=mqtt-test.xxx.aliyuncs.comCreate a file named server.crt.cfg. The following sample code provides an example of the file content:
NoteYou can specify custom domain names in the
[alt_names]section. If you use custom domain names, you must create CNAME records to map the custom domain names to the domain names provided by ApsaraMQ for MQTT.If you do not want to use custom domain names, specify the domain names provided by ApsaraMQ for MQTT in the
[alt_names]section. Example:DNS.2=mqtt-test.cn-qingdao.aliyuncs.com.If you want to use the same server certificate for ApsaraMQ for MQTT instances deployed in multiple regions, use the asterisk (*) wildcard character to specify the domain name. Example: DNS.1=*.mqtt.aliyuncs.com.
authorityKeyIdentifier=keyid,issuer
basicConstraints=CA:FALSE
keyUsage = digitalSignature, nonRepudiation, keyEncipherment, dataEncipherment, keyCertSign
extendedKeyUsage = serverAuth, clientAuth
subjectAltName = @alt_names

[alt_names]
DNS.1=*.mqtt.aliyuncs.com
DNS.2=mqtt-test.cn-qingdao.aliyuncs.com
Run the following command to generate the private key and certificate signing request (CSR) file of the server certificate:
Mac:
openssl req -new -sha256 -nodes -out server.csr -newkey rsa:2048 -keyout server.key -config <(cat server.csr.cfg)Windows:
openssl req -new -sha256 -nodes -out server.csr -newkey rsa:2048 -keyout server.key -config server.csr.cfg
Run the following command to convert the private key of the server certificate into the PKCS#8 format:
openssl pkcs8 -topk8 -nocrypt -in server.key -out server_pkcs8.keyAfter conversion, the private key file of the server certificate is
server_pkcs8.key. You can run thecat server_pkcs8.keycommand to view the private key. Sample private key:ImportantWhen you host the server certificate in Certificate Management Service, you must upload the generated private key of the server certificate. For more information, see Step 2: Host the server certificate.
-----BEGIN PRIVATE KEY-----
MIICdQIBADANBgkqhkiG9w0BAQEFAASCAl8wggJbAgEAAoGBALaDOET1McZD0hV/
ma1YlSZjim00rVwrdXefqOHXWEqm8/HxZ3iWmKN/jGWW1aAoYFRAg0CNar1eDap4
*****
*****
*****
PLX2WlXAXggKZvpozkig/J6klAN8pVvwM4BPgJDLk+hllM8MowOxlNjoHsI34lAQ
g17SUS1ERIK+
-----END PRIVATE KEY-----
Run the following command to generate a server certificate:
openssl x509 -req -in server.csr -CA CA.crt -CAkey CA.key -CAcreateserial -out server.crt -days 500 -sha256 -extfile server.crt.cfgThe generated server certificate is
server.crt.Generate a server certificate chain.
Run the following command to create an empty certificate chain file named
server_chain.crt:touch server_chain.crtRun the following command to copy the content of the server certificate to the certificate chain file:
cat server.crt >> server_chain.crtRun the following command to copy the content of the CA certificate to the certificate chain file and append the copied content to the content of the server certificate:
cat CA.crt >> server_chain.crt
You can run the
cat server_chain.crtcommand to view the content of the server certificate chain that is displayed in the following format:ImportantWhen you host the server certificate in Certificate Management Service, you must upload the generated server certificate chain. For more information, see Step 2: Host the server certificate.
-----BEGIN CERTIFICATE-----
xxx
The content of the server certificate.
xxx
-----END CERTIFICATE-----
-----BEGIN CERTIFICATE-----
xxx
The content of the CA certificate.
xxx
-----END CERTIFICATE-----
Elliptic Curve Cryptography (ECC) CA certificates
In the path of the installed OpenSSL library, create the configuration files.
Create a file named server.csr.cfg. The following sample code provides an example of the file content:
NoteYou must configure the parameters in the
[dn]section based on your business scenario.[req] default_bits = 2048 prompt = no default_md = sha256 distinguished_name = dn [dn] C=CN ST=ZJ L=HZ O=ALI OU=MQTT emailAddress=xxx@xxx CN=mqtt-test.xxx.aliyuncs.comCreate a file named server.crt.cfg. The following sample code provides an example of the file content:
NoteYou can specify custom domain names in the
[alt_names]section. If you use custom domain names, you must create CNAME records to map the custom domain names to the domain names provided by ApsaraMQ for MQTT.If you do not want to use custom domain names, specify the domain names provided by ApsaraMQ for MQTT in the
[alt_names]section. Example:DNS.2=mqtt-test.cn-qingdao.aliyuncs.com.If you want to use the same server certificate for ApsaraMQ for MQTT instances deployed in multiple regions, use the asterisk (*) wildcard character to specify the domain name. Example: DNS.1=*.mqtt.aliyuncs.com.
authorityKeyIdentifier=keyid,issuer
basicConstraints=CA:FALSE
keyUsage = digitalSignature, nonRepudiation, keyEncipherment, dataEncipherment, keyCertSign
extendedKeyUsage = serverAuth, clientAuth
subjectAltName = @alt_names

[alt_names]
DNS.1=*.mqtt.aliyuncs.com
DNS.2=mqtt-test.cn-qingdao.aliyuncs.com
Generate a file named server.key to store the private key of the server certificate.
openssl ecparam -out server.key -name prime256v1 -genkeyGenerate a file named server.csr to send requests to issue the server certificate.
Mac:
openssl req -new -sha256 -nodes -out server.csr -key server.key -config <(cat server.csr.cfg)Windows:
openssl req -new -sha256 -nodes -out server.csr -key server.key -config server.csr.cfg
Use the CA certificate to issue a server certificate.
openssl x509 -req -in server.csr -CA CA.crt -CAkey CA.key -CAcreateserial -out server.crt -days 500 -sha256 -extfile server.crt.cfgRun the following command to convert the private key of the server certificate into the PKCS#8 format. After conversion, the private key file of the server certificate is
server_pkcs8.key.openssl pkcs8 -topk8 -nocrypt -in server.key -out server_pkcs8.keyImportantWhen you host the server certificate in Certificate Management Service, you must upload the generated private key of the server certificate. For more information, see Step 2: Host the server certificate.
Generate a server certificate chain.
Run the following command to create an empty certificate chain file named
server_chain.crt:touch server_chain.crtRun the following command to copy the content of the server certificate to the certificate chain file:
cat server.crt >> server_chain.crtRun the following command to copy the content of the CA certificate to the certificate chain file and append the copied content to the content of the server certificate:
cat CA.crt >> server_chain.crt
ImportantWhen you host the server certificate in Certificate Management Service, you must upload the generated server certificate chain. For more information, see Step 2: Host the server certificate.
Step 2: Host the server certificate
Before you can view and enable the server certificate in the ApsaraMQ for MQTT console, you must host the issued server certificate in the Certificate Management Service console.
Server certificates support the RSA and ECC algorithms.
If you want to use custom domain names, specify the domain names in the certificate and create CNAME records to resolve the domain names to the endpoint of the ApsaraMQ for MQTT instance.
Log on to the ApsaraMQ for MQTT console. In the left-side navigation pane, click Instances.
In the top navigation bar, select the region where the instance that you want to manage resides. On the Instances page, click the instance name to go to the Instance Details page.
In the left-side navigation pane, choose . In the upper-left corner of the Server Certificate page, click Create Certificate.
The system redirects you to the SSL Certificate Management page in the Certificate Management Service console.
On the SSL Certificate Management page, click Upload Certificate. In the Upload Certificate panel, configure the parameters and click OK.
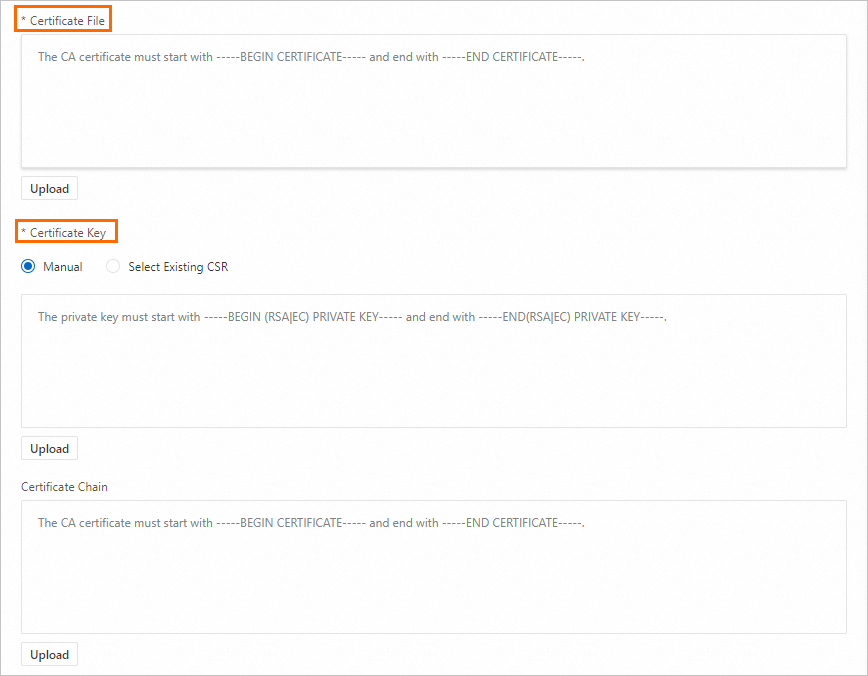
Certificate Algorithm: Select Internationally Accepted Algorithm.
Certificate File: Upload the
server_chain.crtserver certificate chain file that is generated in Step 1: Use a CA certificate to issue a server certificate or copy the content of the server certificate chain to the field.Certificate Key: Upload the
server_pkcs8.keyprivate key file that is generated in Step 1: Use a CA certificate to issue a server certificate or copy the content of the private key to the field.Certificate Chain: We recommend that you do not upload a certificate chain file or specify the content of a certificate chain file in this field. Otherwise, the certificate authentication fails.
Step 3: Use the server certificate to enable ApsaraMQ for MQTT
When you use a server certificate to enable ApsaraMQ for MQTT, clients are disconnected. Exercise caution when you perform this operation.
If the certificate is invalid, ApsaraMQ for MQTT becomes temporarily unavailable.
Log on to the ApsaraMQ for MQTT console. In the left-side navigation pane, click Instances.
In the top navigation bar, select the region where the instance that you want to manage resides. On the Instances page, click the instance name to go to the Instance Details page.
In the left-side navigation pane, choose .
Click the Mutual Authentication tab. In the dialog box that appears, select a server certificate and click Enable Service in the Actions column.
After you click Enable Service, the ApsaraMQ for MQTT instance is restarted. The restart requires approximately 5 to 10 minutes to complete. After the instance is restarted, clients can use the server certificate to authenticate the broker.
After you enable ApsaraMQ for MQTT, mutual authentication is enabled and one-way authentication is disabled on port 8883.
In the message that appears, read the notes and click OK.
If you want to roll back to one-way authentication, click the One-way Authentication tab. In the message that appears, click OK. Then, wait until the broker is restarted.