When multiple custom domain names are CNAME-mapped to a single ApsaraMQ for MQTT instance, each domain requires its own server certificate for TLS connections. Server Name Indication (SNI) enables this by letting the client specify the target hostname during the TLS handshake so the broker can select the matching certificate.
How SNI-based certificate selection works
A client initiates a TLS connection and includes the target hostname in the SNI extension of the ClientHello message.
The ApsaraMQ for MQTT broker matches the hostname against the configured SNI mappings.
If a match is found, the broker presents the corresponding server certificate.
If no match is found, the broker returns the default certificate.
This mechanism allows a single instance to serve multiple domains, each with its own certificate, on the same port.
Prerequisites
Before you begin, make sure that you have:
An ApsaraMQ for MQTT Enterprise Platinum Edition instance. Only this edition supports multi-domain certificates.
Multiple domain names mapped to the ApsaraMQ for MQTT instance endpoint through CNAME records. See CNAME record.
Mutual authentication enabled on the instance, with multiple server certificates uploaded. See Manage server certificates.
Step 1: Enable the service with a server certificate
Log on to the ApsaraMQ for MQTT console. In the left-side navigation pane, click Instances.
In the top navigation bar, select the region of your instance. On the Instances page, click the instance name to open the Instance Details page.
In the left-side navigation pane, choose Certificates > Server Certificate.
Click the Mutual Authentication tab. In the dialog box that appears, select a server certificate, then click Enable Service in the Actions column.
ImportantEnabling the service restarts the instance. The restart takes approximately 5 to 10 minutes. After the restart, clients can use the server certificate to authenticate the broker.
After mutual authentication is enabled, one-way authentication is disabled on port 8883.
Read the confirmation message and click OK.
Step 2: Configure the SNI mapping
Call the SetSniConfig API operation to map each domain name to its server certificate. OpenAPI Explorer calculates the signature automatically and generates SDK sample code.
Request parameters
| Parameter | Type | Required | Description | Example |
|---|---|---|---|---|
| MqttInstanceId | string | Yes | The ID of the ApsaraMQ for MQTT instance. | mqtt-cn-xxxxxx |
| DefaultCertificate | string | Yes | The ID of the fallback certificate. The broker returns this certificate when the client's requested hostname does not match any SNI mapping. | 15xxxxxx-cn-hangzhou |
| SniConfig | string | Yes | A delimited string that maps each domain name to a certificate. During the TLS handshake, the broker uses this mapping to select the certificate that matches the client's SNI hostname. Format: <domain>#<certificate-ID>#<password (optional)>. Separate multiple entries with semicolons (;). | mqtt-test001.aliyuncs.com#15xxxxx-cn-hangzhou;mqtt-test002.aliyuncs.com#16xxxxx-cn-hangzhou |
SniConfig format:
<domain-A>#<cert-ID-A>#<cert-password-A>;<domain-B>#<cert-ID-B>#<cert-password-B>| Delimiter | Purpose |
|---|---|
# | Separates the domain name, certificate ID, and certificate password within a single entry. The password field is optional -- omit it if the certificate has no password. |
; | Separates multiple domain-certificate entries. |
Find the certificate IDs and domain names in the ApsaraMQ for MQTT console:

Response
A successful call returns "Success": "true". A failed call returns "Success": "false".
{
  "RequestId": "9B5505EB-D2F3-5258-886D-**********",
  "Success": "true"
}
Step 3: Verify the configuration
Edit the hosts file
Point the test domain names to the ApsaraMQ for MQTT instance by editing your local hosts file. Replace <instance-ip> with the IP address of the instance endpoint.
<instance-ip> mqtt-test001.aliyuncs.com
<instance-ip> mqtt-test002.aliyuncs.com
Verify with openssl
Run the following command to confirm that the broker returns the correct certificate for a given domain. Replace <domain> with one of the configured domain names.
openssl s_client -connect <domain>:8883 -showcerts -servername <domain>In the output, check that the subject and issuer fields in the returned certificate match the certificate you configured for that domain in the SNI mapping.
Run the sample code
Download the mqtt-demo sample project.
Before running the code:
Set the MQTT_AK_ENV and MQTT_SK_ENV environment variables. See Configure an access credential.
Create the topics and groups used in the code in advance.
In the
MQ4IoTBiSSLProducerDemo.javaclass, replace theendPointparameter with one of the test domain names configured in thehostsfile, such asmqtt-test001.aliyuncs.comormqtt-test002.aliyuncs.com.Run the code. If the following output appears, the multi-domain certificate configuration is working:
   connect success
   send msg succeed topic is : topic/testMq4Iot
   send msg succeed topic is : topic/p2p/xxx
Repeat the test with the other domain name to confirm that each domain returns the correct certificate.
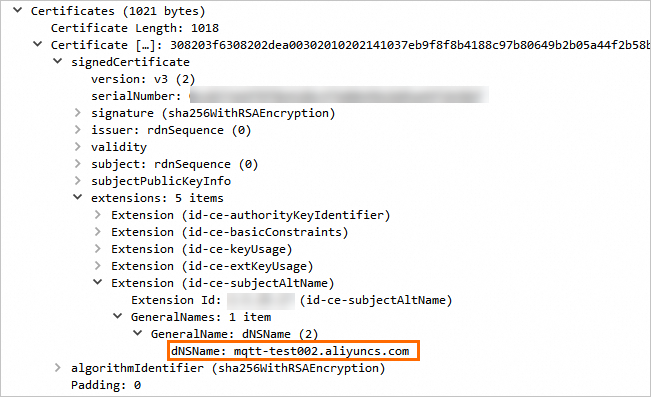
Verify with a packet capture tool
Use a packet capture tool to inspect the TLS handshake and confirm that the returned certificate matches the SNI configuration. The following example shows the certificate returned when accessing mqtt-test002.aliyuncs.com: