This topic describes how to create the JDBC connector to synchronize data between ApsaraDB RDS for MySQL and ApsaraMQ for Kafka.
Prerequisites
EventBridge is activated and the required permissions are granted to a Resource Access Management (RAM) user. For more information, see Activate EventBridge and grant permissions to a RAM user.
Object Storage Service (OSS) is activated and a bucket is created. For more information, see Get started by using the OSS console.
Serverless App Engine (SAE) is activated. For more information, see Preparations.
A virtual private cloud (VPC) and a vSwitch are created. For more information, see Resource Orchestration Service (ROS) console.
An ApsaraMQ for Kafka instance is purchased and deployed. For more information, see Step 2: Purchase and deploy an instance.
Step 1: Create a table
Log on to the ApsaraDB RDS console to create an ApsaraDB RDS for MySQL instance. For more information, see Create an ApsaraDB RDS for MySQL instance.
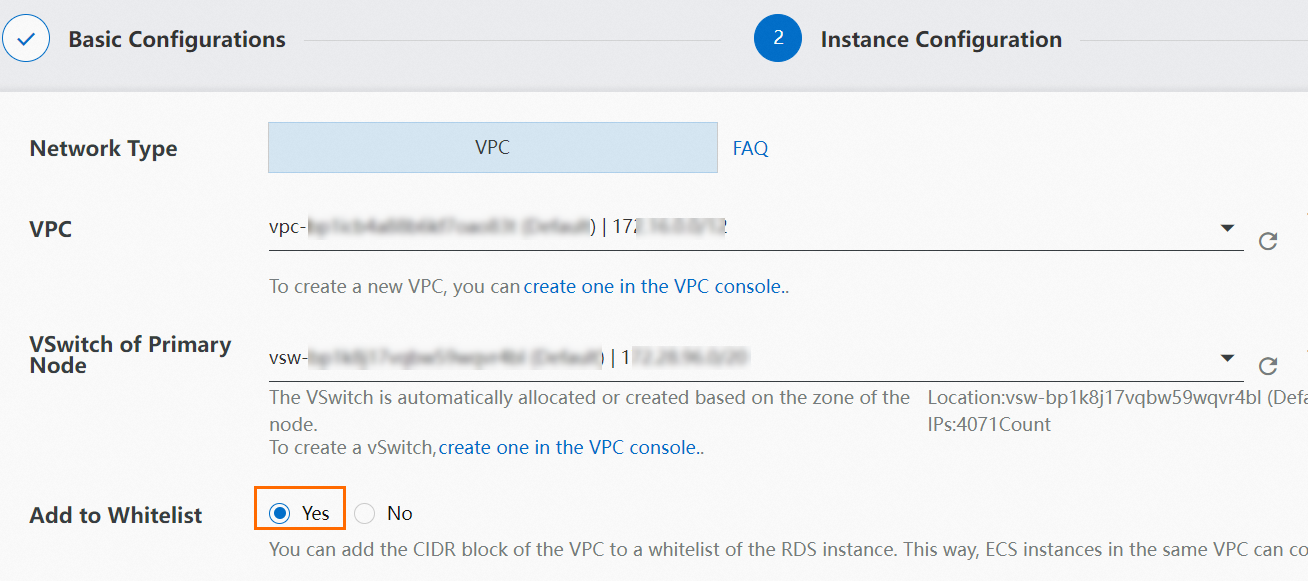
When you create the ApsaraDB RDS for MySQL instance, select the VPC in which the ApsaraMQ for Kafka instance that you created in the "Prerequisites" section of this topic is deployed and add the CIDR block of the VPC to the whitelist.
On the Instances page, click the ApsaraDB RDS for MySQL instance that you created. Then, in the left-side navigation pane of the instance details page, perform the following operations:
Click Accounts. On the page that appears, click Create Account to create an account. For more information, see Create a database and an account. You can also use an existing account.
Click Databases. On the page that appears, click Create Database to create a database. For more information, see Create a database and an account. You can also use an existing database.
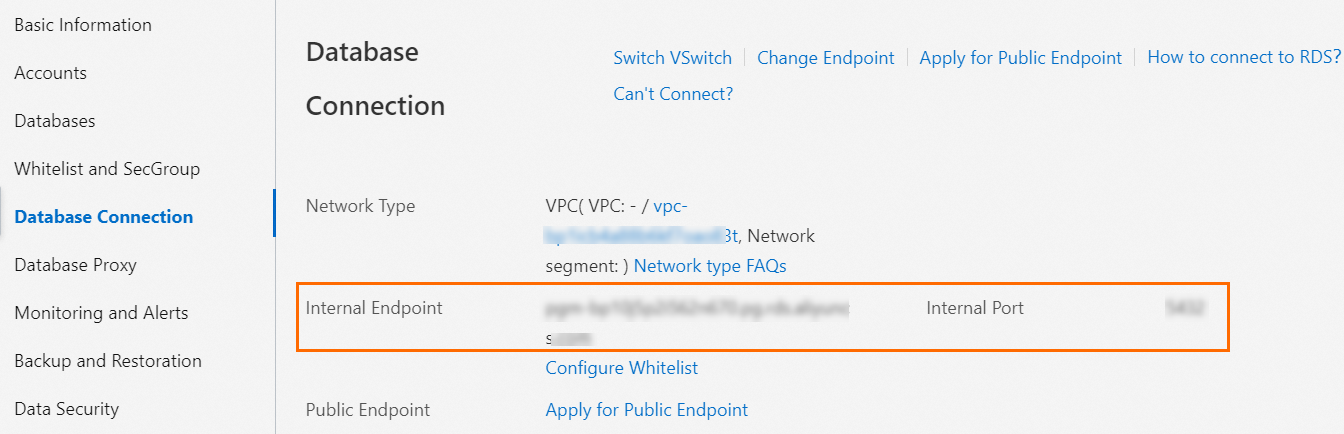
Click Database Connection to view and record the internal endpoint and port number.
On the instance details page, click Log On to Database to go to the Data Management (DMS) console. Then, click the database that you want to manage and create a table by using SQL statements. The following sample command provides an example on how to create a table whose column names are id and number. For more information, see SQL Commands.
CREATE TABLE sql_table(id INT ,number INT);ImportantWhen you create a table, specify one of the columns as the primary key and specify the column as incremental. For more information, see Query and change a schema.
Step 2: Create the connector
Source connector
Download the JDBC Connector file and upload the file to the OSS bucket that you created. For more information, see Get started by using the OSS console.
ImportantWhen you download the JDBC Connector file, select a version that is compatible with Java 8.
Log on to the ApsaraMQ for Kafka console. In the Resource Distribution section of the Overview page, select the region where the ApsaraMQ for Kafka instance that you want to manage resides.
In the left-side navigation pane, choose .
On the Tasks page, click Create Task.
On the Create Task page, configure the Task Name parameter and follow the on-screen instructions to configure other parameters. The following section describes the parameters:
Task Creation
In the Source step, set the Data Provider parameter to Apache Kafka Connect and click Next Step.
In the Connector step, configure the parameters and click Next Step. The following table describes the parameters.
Subsection
Parameter
Description
Kafka Connect Plug-in
Bucket
Select the OSS bucket to which the JDBC Connector file was uploaded.
File
Select the JDBC Connector file that you uploaded to the OSS bucket.
Message Queue for Apache Kafka Resources
Message Queue for Apache Kafka Parameters
Select Source Connect.
Message Queue for Apache Kafka Instance
Select the ApsaraMQ for Kafka instance that you created in the "Prerequisites" section of this topic.
VPC
Select the VPC that you created.
vSwitch
Select the vSwitch that you created.
Security Group
Select a security group.
Kafka Connect
Parse .properties File in ZIP Package
Select Create .properties File. Then, select the .properties file that contains the configurations of the source connector from the ZIP package. The path of the .properties file is /etc/source-xxx.properties.
For information about all parameters that are used to create the JDBC source connector, see JDBC Source Connector Configuration Properties.
In the Instance step, configure the parameters and click Next Step. The following table describes the parameters.
Subsection
Parameter
Description
Worker Type
Worker Type
Select a worker type.
Min. Number of Workers
Set this parameter to 1.
Max. Number of Workers
Set this parameter to 1.
Worker Configurations
Automatically Create Dependencies for Apache Kafka Connector Worker
We recommend that you select this option. After you select the option, the system creates internal topics and consumer groups that are required to run Kafka Connect in the selected ApsaraMQ for Kafka instance and then synchronizes the information to the corresponding parameters in the code editor. The following section describes the configuration items.
Offset Topic: the topic that is used to store offset data. The name of the topic is in the
connect-eb-offset-<Task name>format.Config Topic: the topic that is used to store the configuration data of connectors and tasks. The name of the topic is in the
connect-eb-config-<Task name>format.Status Topic: the topic that is used to store status data of connectors and tasks. The name of the topic is in the
connect-eb-status-<Task name>format.Kafka Connect Consumer Group: the consumer group that the Kafka Connect workers use to consume messages in internal topics. The name of the consumer group is in the
connect-eb-cluster-<Task name>format.Kafka Source Connector Consumer Group: the consumer group that is used to consume data in the source topic. This consumer group takes effect only for sink connectors. The name of the consumer group is in the
connector-eb-cluster-<task name>-<connector name>format.
In the Running Configurations section, set the Log Delivery parameter to Deliver Data to Log Service or Deliver Data to ApsaraMQ for Kafka, select a role on which Kafka Connect depends from the Role drop-down list in the Role Authorization subsection, and then click Save.
ImportantWe recommend that you select a role to which the AliyunSAEFullAccess permission policy is attached. Otherwise, the task may fail to run.
Task Property
Configure the retry policy and dead-letter queue for the task. For more information, see Retry policies and dead-letter queues.
If the status of the task becomes Running, the connector starts to work as expected.
Sink connector
Download the JDBC Connector file and upload the file to the OSS bucket that you created. For more information, see Get started by using the OSS console.
ImportantWhen you download the JDBC Connector file, select a version that is compatible with Java 8.
Log on to the ApsaraMQ for Kafka console. In the Resource Distribution section of the Overview page, select the region where the ApsaraMQ for Kafka instance that you want to manage resides.
In the left-side navigation pane, choose .
On the Tasks page, click Create Task.
On the Create Task page, configure the Task Name parameter and follow the on-screen instructions to configure other parameters. The following section describes the parameters:
Task Creation
In the Source step, set the Data Provider parameter to Apache Kafka Connect and click Next Step.
In the Connector step, configure the parameters and click Next Step. The following table describes the parameters.
Subsection
Parameter
Description
Kafka Connect Plug-in
Bucket
Select the OSS bucket to which the JDBC Connector file was uploaded.
File
Select the JDBC Connector file that you uploaded to the OSS bucket.
Message Queue for Apache Kafka Resources
Message Queue for Apache Kafka Parameters
Select Sink Connect.
Message Queue for Apache Kafka Instance
Select the ApsaraMQ for Kafka instance that you created in the "Prerequisites" section of this topic.
VPC
Select the VPC that you created.
vSwitch
Select the vSwitch that you created.
Security Group
Select a security group.
Kafka Connect
Parse .properties File in ZIP Package
Select Create .properties File. Then, select the .properties file that contains the configurations of the sink connector from the ZIP package. The path of the .properties file is /etc/sink-xxx.properties.
For information about all parameters that are used to create the JDBC sink connector, see JDBC Sink Connector Configuration Properties.
In the Instance step, configure the parameters and click Next Step. The following table describes the parameters.
Subsection
Parameter
Description
Worker Type
Worker Type
Select a worker type.
Min. Number of Workers
Set this parameter to 1.
Max. Number of Workers
Set this parameter to 1. The value of this field cannot be greater than the value of the tasks.max field.
Worker Configurations
Automatically Create Dependencies for Apache Kafka Connector Worker
We recommend that you select this option. After you select this option, the system creates internal topics and consumer groups that are required to run Kafka Connect in the selected ApsaraMQ for Kafka instance and then synchronizes the information to the corresponding parameters in the code editor. The following section describes the configuration items.
Offset Topic: the topic that is used to store offset data. The name of the topic is in the
connect-eb-offset-<Task name>format.Config Topic: the topic that is used to store the configuration data of connectors and tasks. The name of the topic is in the
connect-eb-config-<Task name>format.Status Topic: the topic that is used to store status data of connectors and tasks. The name of the topic is in the
connect-eb-status-<Task name>format.Kafka Connect Consumer Group: the consumer group that the Kafka Connect workers use to consume messages in internal topics. The name of the consumer group is in the
connect-eb-cluster-<Task name>format.Kafka Source Connector Consumer Group: the consumer group that is used to consume data in the source topic. This consumer group takes effect only for sink connectors. The name of the consumer group is in the
connector-eb-cluster-<task name>-<connector name>format.
In the Running Configurations section, set the Log Delivery parameter to Deliver Data to Log Service or Deliver Data to ApsaraMQ for Kafka, select a role on which Kafka Connect depends from the Role drop-down list in the Role Authorization subsection, and then click Save.
ImportantWe recommend that you select a role to which the AliyunSAEFullAccess permission policy is attached. Otherwise, the task may fail to run.
Task Property
Configure the retry policy and dead-letter queue for the task. For more information, see Retry policies and dead-letter queues.
If the status of the task becomes Running, the connector starts to work as expected.
Step 3: Test the connector
Source connector
In the DMS console, insert a data record into the data table that you created in Step 1: Create a table. The following sample command provides an example on how to insert a data record whose id is 12 and number is 20:
INSERT INTO sql_table(id, number) VALUES(12,20);Log on to the ApsaraMQ for Kafka console. On the Instances page, click the instance that you want to manage.
In the left-side navigation pane of the Instance Details page, click Topics. On the page that appears, click the topic that you want to manage. Then, click the Message Query tab to view the inserted message data. The following sample code provides an example of a message value:
{"schema":{"type":"struct","fields":[{"type":"int32","optional":false,"field":"id"},{"type":"int32","optional":true,"field":"number"}],"optional":false,"name":"sql_table"},"payload":{"id":12,"number":20}}
Sink connector
Log on to the ApsaraMQ for Kafka console. On the Instances page, click the instance that you want to manage.
In the left-side navigation pane of the Instance Details page, click Topics. On the page that appears, click the name of the topic that you want to manage.
In the upper-right corner of the Topic Details page, click Send Message.
In the Start to Send and Consume Message panel, specify the message content. For example, if you want to add a data record whose id is 13 and number is 14, enter the following message content:
{"schema":{"type":"struct","fields":[{"type":"int32","optional":false,"field":"id"},{"type":"int32","optional":true,"field":"number"}],"optional":false,"name":"sql_table"},"payload":{"id":13,"number":14}}In the DMS console, check whether data is written to the destination table.

Common errors and troubleshooting
Error 1: All tasks fail to run
Error message:
All tasks under connector mongo-source failed, please check the error trace of the task.Solution: On the Message Inflow Task Details page, click Diagnostics in the Basic Information section to go to the Connector Monitoring page. On the Connector Monitoring page, you can view the details of the task failure.
Error 2: Kafka Connect unexpectedly exits
Error message:
Kafka connect exited! Please check the error log /opt/kafka/logs/connect.log on sae application to find out the reason why kafka connect exited and update the event streaming with valid arguments to solve it.Solution: The status update of Kafka Connect may be delayed. We recommend that you refresh the page. If Kafka Connect still fails, you can perform the following operations to troubleshoot the issue:
In the Worker Information section of the Message Inflow Task Details page, click the instance name to the right of SAE Application to go to the Application Details page.
On the Basic Information page, click the Instance Deployment Information tab.
Click Webshell in the Actions column to log on to the running environment of Kafka Connect.

Run the
vi /home/admin/connector-bootstrap.logcommand to view the startup logs of the connector and check whether an error message exists in the logs.Run the
vi /opt/kafka/logs/connect.logcommand to view the running logs of the connector and check whether an error message exists in the ERROR or WARN field.
After you troubleshoot the issue based on the error message, you can restart the corresponding task.
Error 3: The verification of connector parameters fails
Error message:
Start or update connector xxx failed. Error code=400. Error message=Connector configuration is invalid and contains the following 1 error(s):
Value must be one of never, initial_only, when_needed, initial, schema_only, schema_only_recovery
You can also find the above list of errors at the endpoint `/connector-plugins/{connectorType}/config/validate`
Solution: Find the parameter whose value is invalid based on the error message and update the parameter. If you cannot find the parameter based on the error message, you can log on to the running environment of Kafka Connect and run the following command. For information about how to log on to the running environment of Kafka Connect, see Error 2 in this topic.
curl -i -X PUT -H "Accept:application/json" -H "Content-Type:application/json" -d @$CONNECTOR_PROPERTIES_MAPPING http://localhost:8083/connector-plugins/io.confluent.connect.jdbc.JdbcSinkConnector/config/validateThe verification result of each connector parameter is returned in the response. If the value of a parameter is invalid, the errors field of the parameter is not empty.
"value":{
    "name":"snapshot.mode",
    "value":null,
    "recommended_values":[
        "never",
        "initial_only",
        "when_needed",
        "initial",
        "schema_only",
        "schema_only_recovery"
    ],
    "errors":[
        "Value must be one of never, initial_only, when_needed, initial, schema_only, schema_only_recovery"
    ],
    "visible":true
}