When blackhole filtering is triggered on an Elastic Compute Service (ECS) instance, Alibaba Cloud discards all inbound packets destined for the instance's public IP address, making it unreachable over the Internet. This topic explains how to estimate how long the blackhole filter will remain active and how to quickly restore your workloads using one of four solutions.
After you change the public IP address or migrate workloads to a new ECS instance, attackers can still discover the new IP address by pinging your domain name and re-launch attacks. To prevent this, purchase an Anti-DDoS Origin or Anti-DDoS Proxy instance.
Estimate how long blackhole filtering lasts
If you do not have an Anti-DDoS Origin or Anti-DDoS Proxy instance, wait for blackhole filtering to be automatically deactivated. If you do have one, you can manually deactivate it after adding your workloads for protection. For more information, see Deactivate blackhole filtering (Anti-DDoS Origin) and Deactivate blackhole filtering (Anti-DDoS Proxy).
To estimate when blackhole filtering will be automatically deactivated:
Find the most recent attack time. Log on to the Traffic Security console. On the Event Center page, locate the public IP address of the ECS instance and click View Details.
NoteIf the instance received multiple DDoS attacks, the blackhole filtering duration is calculated from when the last attack stopped.
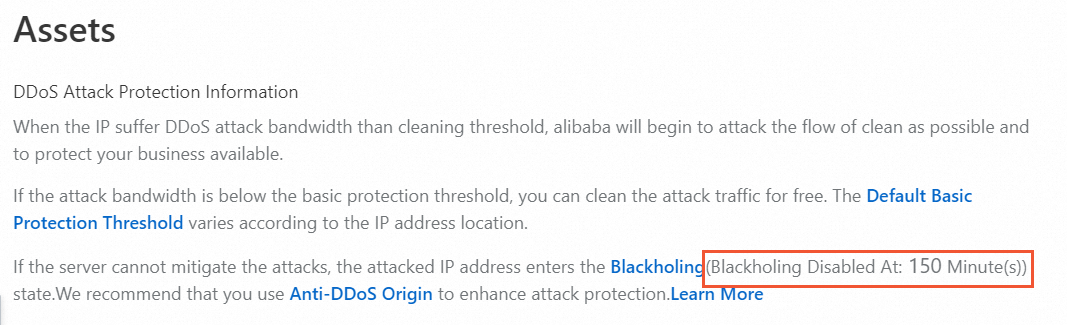
Check the blackhole filtering duration. On the Assets page, view the duration of blackhole filtering. The default duration is 2.5 hours (150 minutes). The actual duration ranges from 30 minutes to 24 hours depending on attack frequency. In rare cases, the duration may be longer.
Estimate the deactivation time. Add the blackhole filtering duration to the last attack time. For example, if the instance was attacked at 12:30 and the duration is 150 minutes, blackhole filtering is expected to be deactivated at 15:00.
NoteThis estimate is for reference only. Continuous DDoS attacks extend the blackhole filtering duration.
If you cannot wait, use one of the following solutions to restore your workloads immediately.
After changing the IP address or migrating workloads, update your DNS records and database connection strings.
Choose a recovery solution
Select a solution based on your current environment:
| Solution | When to use | Time to recover |
|---|---|---|
| Solution 1a: Change the EIP | The instance uses an elastic IP address (EIP) | Fast |
| Solution 1b: Change the system-assigned public IP address | The instance uses a system-assigned public IP and no EIP is attached | Fast |
| Solution 2: Create a new instance from a custom image | A snapshot or custom image of the instance already exists | Fast if image exists |
| Solution 3: Use SMC to migrate the instance | No existing snapshot or image; full workload migration needed | Moderate |
| Solution 4: Connect via the internal network and migrate data | Only the business data needs to be moved to another instance | Moderate |
Frequently changing the public IP address of an affected ECS instance may cause continuous attack traffic to impact the cloud platform. If this occurs, your Alibaba Cloud account may be restricted and you will not be able to purchase new instances.
Solution 1a: Change the elastic IP address
(Optional) Apply for a new EIP. For more information, see Apply for an EIP.
Disassociate the current EIP from the ECS instance. For more information, see Disassociate an EIP from a cloud resource.
Important- After you disassociate a pay-as-you-go EIP from a resource, EIP configuration fees continue to accrue. To avoid unnecessary charges, release the EIP. For billing details, see Pay-as-you-go. To release the EIP, see Release a pay-as-you-go EIP. - If you no longer need the EIP, unsubscribe from it. For more information, see Rules for unsubscribing from resources.
Associate the new EIP with the ECS instance. For more information, see Associate an EIP with an ECS instance.
Solution 1b: Change the system-assigned public IP address
The steps differ depending on when the ECS instance was created.
Within 6 hours of instance creation
Log on to the ECS console. In the left-side navigation pane, click Instances.
In the Actions column for the instance, choose
 > Network and Security Group > Change Public IP Address.
More than 6 hours after instance creation
(Optional) If the instance is a pay-as-you-go instance using the pay-by-bandwidth metering method, change it to pay-by-traffic first. For more information, see the Change from pay-by-bandwidth to pay-by-traffic section of the "Change the billing method for network usage of an ECS instance that uses an auto-assigned IP address" topic.
Convert the system-assigned public IP address to an EIP. For more information, see Convert the public IP address of an ECS instance in a VPC to an EIP.
Disassociate the EIP from the ECS instance. For more information, see Disassociate an EIP from a cloud resource.
Important- After you disassociate a pay-as-you-go EIP from a resource, EIP configuration fees continue to accrue. To avoid unnecessary charges, release the EIP. For billing details, see Pay-as-you-go. To release the EIP, see Release a pay-as-you-go EIP. - If you no longer need the EIP, unsubscribe from it. For more information, see Rules for unsubscribing from resources.
Set the public bandwidth to greater than 1 Mbit/s so the system assigns a new public IP address to the instance. For more information, see Modify the bandwidth configurations of subscription instances or Modify the bandwidth configurations of pay-as-you-go instances.
Solution 2: Create a new ECS instance from a custom image
Create a custom image from the affected ECS instance. For more information, see Create a custom image.
NoteIf you regularly create snapshots during operations and maintenance (O&M), you can create a custom image directly from a snapshot. For details, see Create an automatic snapshot policy and Create a custom image from a snapshot.
Use the custom image to create a new ECS instance with the same configurations. For more information, see Create an ECS instance by using a custom image.
Solution 3: Use SMC to migrate the instance
Server Migration Center (SMC) is a migration platform that creates a custom image from your ECS instance, which you can then use to launch a new instance with a clean public IP address.
Import the affected ECS instance into SMC as a migration source. For more information, see Step 1: Import the information about a migration source.
Create a migration task to copy the system configuration and business data into a custom image. For more information, see Step 2: Create and start a migration task.
Use the custom image to create a new ECS instance. For more information, see Create an ECS instance by using a custom image.
Solution 4: Connect via the internal network and migrate data
Because blackhole filtering blocks all inbound Internet traffic, you cannot connect to the affected ECS instance over the Internet. You can still connect to it through Workbench, Session Manager, Virtual Network Computing (VNC), or another ECS instance in the same virtual private cloud (VPC).
This section describes how to use a second ECS instance in the same VPC to access the affected instance and migrate business data.
Requirements: Both ECS instances must be in the same region, the same VPC, and the same security group. For more information about security groups, see Overview.
Log on to the unaffected ECS instance using its private IP address or public IP address.
From that instance, connect to the affected ECS instance using its private IP address or public IP address. The following table lists the connection methods by operating system:
Affected instance OS Connecting instance OS Method Reference Windows Windows Microsoft Terminal Services Client (MSTSC) Connect to a Windows instance by using a username and password Windows Linux rdesktop Connect to a Windows instance by using a username and password Linux Windows PuTTY Connect to a Linux instance by using an SSH key pair or Connect to a Linux instance by using a username and password Linux Linux SSH command Run ssh root@<System-assigned public IP address or EIP of the instance>Migrate business data to the unaffected ECS instance.
Reduce recovery time in future incidents
Set up the following before an attack occurs to minimize downtime:
Create automatic snapshots: Configure an automatic snapshot policy so you always have a recent image to restore from. See Create an automatic snapshot policy.
Enable proactive DDoS protection: An Anti-DDoS Origin or Anti-DDoS Proxy instance lets you manually deactivate blackhole filtering immediately, without waiting for automatic expiration.
Update DNS and connections after IP changes: Whenever you change a public IP address, update your DNS records and any application configuration that references the old IP address (such as database connection strings).