The MySQL Event Scheduler works for simple, single-database tasks but lacks observability, cross-database support, and failure recovery. Data Management (DMS) task orchestration runs outside the database kernel, giving you a visual drag-and-drop editor, multi-engine support, scheduled execution, and built-in notifications and O&M controls.
This topic walks through a complete scheduling scenario: filter completed orders above $10,000 from the orders table and write results to a separate table on a daily schedule.
Why use DMS instead of MySQL Event Scheduler
| Limitation | MySQL Event Scheduler | DMS task orchestration |
|---|---|---|
| Configuration | Requires CREATE EVENT and ALTER EVENT syntax; no UI | Visual drag-and-drop editor |
| Scope | Single database only | Multiple engines (MySQL, Oracle, PostgreSQL, SQL Server) and cross-database workflows |
| Observability | No execution history, run duration, or status | Full run history and status in the O&M console |
| Failure handling | Cannot pause, rerun, or recover failed events | Supports pausing, stopping, and rerunning tasks |
| Notifications | None | DingTalk, text message, and email |
| Kernel dependency | Scheduler must be enabled at the kernel level | Independent of database kernel |
Prerequisites
Before you begin, ensure that you have:
An AnalyticDB for MySQL cluster (Enterprise Edition, Basic Edition, Data Lakehouse Edition, or Data Warehouse Edition)
Access to the AnalyticDB for MySQL console
The
adb_testdatabase and sample tables created (see Sample data)
The end-to-end data management feature is not supported for AnalyticDB for MySQL clusters in the Indonesia (Jakarta) region.
Sample data
The examples use a database named adb_test with three tables: orders, finish_orders, and large_finish_orders.
CREATE DATABASE adb_test;

CREATE TABLE orders (
  order_id     BIGINT        NOT NULL COMMENT 'Order ID',
  order_status VARCHAR(10)   NOT NULL COMMENT 'Order status',
  total_price  DECIMAL(15,2) NOT NULL COMMENT 'Total price',
  order_date   DATE          NOT NULL COMMENT 'Order date',
  PRIMARY KEY (order_id)
);

CREATE TABLE finish_orders (
  order_id    BIGINT        NOT NULL COMMENT 'Order ID',
  total_price DECIMAL(15,2) NOT NULL COMMENT 'Total price',
  order_date  DATE          NOT NULL COMMENT 'Order date',
  PRIMARY KEY (order_id)
);

CREATE TABLE large_finish_orders (
  order_id    BIGINT        NOT NULL COMMENT 'Order ID',
  total_price DECIMAL(15,2) NOT NULL COMMENT 'Total price',
  order_date  DATE          NOT NULL COMMENT 'Order date',
  PRIMARY KEY (order_id)
);
Schedule a task flow
The workflow has three steps:
Create a task flow — set up the container for your tasks
Add task nodes — configure two SQL tasks with a dependency between them
Schedule and publish — enable periodic scheduling and release the task flow
Step 1: Create a task flow
Log on to the AnalyticDB for MySQL console. In the upper-left corner, select a region. In the left-side navigation pane, click Clusters, then click the target cluster ID.
In the left-side navigation pane, click Job Scheduling.
If this is your first time accessing an AnalyticDB for MySQL database through the DMS console, you must enter your database logon credentials. For details, see Log on to a database. If you previously logged on to an AnalyticDB for MySQL cluster in Flexible Management or Stable Change mode without selecting Remember Password, a password prompt appears when you open the DMS console. For details about control modes, see Control modes.
Hover over
 > All Features.
Choose Data+AI > Data Development > Task Orchestration.
On the Task orchestration page, click Create Task Flow.
In the New Task Flow dialog box, enter a Task Flow Name (for example,
Order Filtering) and an optional Description, then click OK.
Step 2: Add task nodes
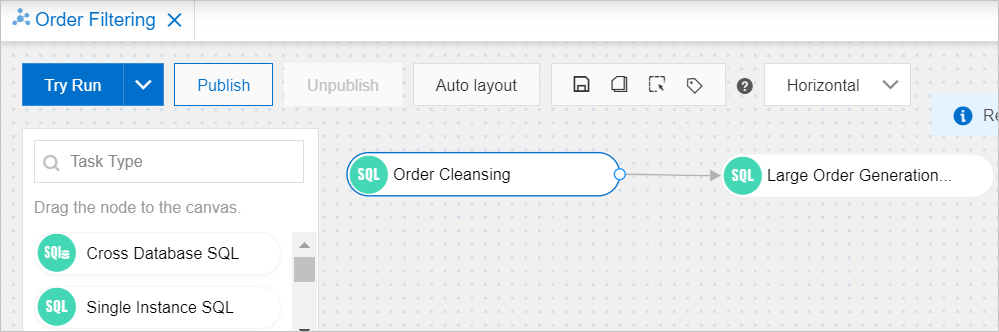
On the Order Filtering task orchestration page, add two Single Instance SQL nodes and connect them.
Add the Order Cleansing node
This node filters completed orders from orders and inserts them into finish_orders.
In the left-side pane, drag Single Instance SQL onto the canvas.
Select the node and click the
 icon to rename it to
 Order Cleansing.Double-click the node (or click the
 icon) to open the editor.
From the database drop-down list, select
adb_test.Enter the following SQL statement and click Save:
If Automatic Save is enabled, the SQL statement is saved automatically.
INSERT INTO finish_orders
SELECT order_id, total_price, order_date
FROM orders
WHERE order_status = 'F';
Add the Large Order Generation node
This node filters high-value orders from finish_orders and inserts them into large_finish_orders.
Drag another Single Instance SQL node onto the canvas.
Rename it to
Large Order Generation.Open the editor and select
adb_testfrom the database drop-down list.Enter the following SQL statement and click Save:
If Automatic Save is enabled, the SQL statement is saved automatically.
INSERT INTO large_finish_orders
SELECT order_id, total_price, order_date
FROM finish_orders
WHERE total_price > 10000;
Connect the two nodes
Hover over the Order Cleansing node. Click the circle on the right edge and drag a line to the Large Order Generation node. This creates a dependency: Large Order Generation runs only after Order Cleansing completes.
Step 3: Schedule and publish
In the Task Flow Information section below the canvas, turn on the Enable Scheduling switch and configure the scheduling parameters.
This example schedules the task to run daily at 01:00 from February 1, 2023 to February 28, 2023. Adjust the schedule to match your requirements. For all available scheduling parameters, see Configure scheduling.
In the upper-left corner of the canvas, click Publish.
In the Publish dialog box, enter any Remarks and click Publish.
Verify the task flow is published: click Go to O&M in the upper-right corner and check the Released parameter.
Value Meaning Published The task flow is active and will run on schedule Not published The task flow was not successfully published
Monitor and manage task flows
After publishing, use the DMS O&M console to monitor and manage your task flows.
View run history and status
In the O&M console, you can view the execution history of each task flow. Use this to identify runs that failed or took longer than expected.
Handle task failures
If a task fails, the DMS O&M console provides O&M operations such as pausing, stopping, and rerunning tasks. To rerun or retry a task flow, go to the O&M console, locate the failed run, and select the appropriate action.
Configure notifications
To receive alerts when a task succeeds or fails, configure notifications in the task flow settings. DMS supports the following notification methods:
DingTalk
Text message
Email