This guide demonstrates how to build an efficient data processing pipeline for a Vision-Language Model (VLM). You will use a DMS Notebook and PySpark to process and combine image and text data stored in Object Storage Service (OSS) and store it in the high-performance Lance format.
Background information
Building multimodal capabilities and applying multimodal training data are critical technical directions. In multimodal scenarios, mixed storage of images and text is a common storage method, typically executed through distributed computing frameworks (such as Spark). Through appropriate and efficient training data solutions, you can ensure that models learn effectively from diverse multimodal data, thereby enhancing the model's generalization ability and performance.
Solution advantages
Based on the rich ecosystem libraries of DMS Notebook+ADB Spark, you can quickly develop and debug tasks.
Multimodal data is uniformly stored in Lance format and managed in a data lake (including lifecycle, permissions, and other aspects).
Lance format provides high-performance point query capabilities, making model training and data preprocessing scenarios more efficient. In the demonstration scenario, the performance of Lance format improves by approximately 3~4 times compared to Parquet format.
Lance format offers the following advantages for mixed storage of images and data:
Data integrity and consistency: Images and their associated data (such as metadata, annotations, etc.) are stored in the same file, avoiding loss or matching errors caused by scattered files, facilitating overall management and migration.
Improved reading efficiency: No need to read multiple files simultaneously, reducing the time required for IO operations and path lookups. Suitable for scenarios that process large amounts of images and data in batches, such as machine learning datasets.
Simplified data management: A single file can cover all relevant information, eliminating the need to maintain complex file indexes or directory structures, thereby reducing management costs and suitable for collaborative scenarios.
Compatibility and portability: Using a single file format helps with transmission between different systems or platforms, avoiding compatibility issues caused by dependencies on external paths.
Security and access control: The entire file can be encrypted or permission settings can be applied uniformly to prevent splitting and tampering of images and data, thereby enhancing data security.
Solution process

Before you begin
Deploy resources
An AnalyticDB for MySQL Enterprise Edition, Basic Edition, or Data Lakehouse Edition cluster is created.
Create a database account.
If you access through an Alibaba Cloud account, you only need to create a privileged account.
If you access through a RAM user, you need to create a privileged account and a standard account, grant appropriate database and table permissions to the standard account, and attach the RAM user to the standard account.
Configure the log storage address for Spark applications.
Log on to the AnalyticDB for MySQL console, on the page, click Log Settings, and select the default path or customize a storage path. When customizing the storage path, you cannot save logs in the root directory of OSS. Make sure that the path contains at least one folder.
To use a RAM user to log on to the console for Spark job development, you need to complete authorization for the RAM user.
Prepare sample data and JAR packages
Randomly select three images, name them
image1.jpg,image2.jpg, andimage3.jpg, and upload them to OSS.Prepare the
testdata.jsonfile and upload it to OSS.[ { "docid": "doc_001", "text": "This is a prompt for image processing.", "image_id1": "image1", "image_id2": "image2" }, { "docid": "doc_002", "text": "Another prompt with image references.", "image_id1": "image3", "image_id2": "image1" }, { "docid": "doc_003", "text": "Interesting dialogue about images.", "image_id1": "image2", "image_id2": "image1", "image_id3": "image3" } ]Download the lance-spark-bundle-3.5_2.12-0.0.1.jar package and upload it to OSS.
Procedure
Step 1: Set up the Notebook environment
Log on to the AnalyticDB for MySQL console, select the region where your cluster is located in the upper-left corner. In the navigation pane on the left, click Clusters, and then click the target cluster ID.
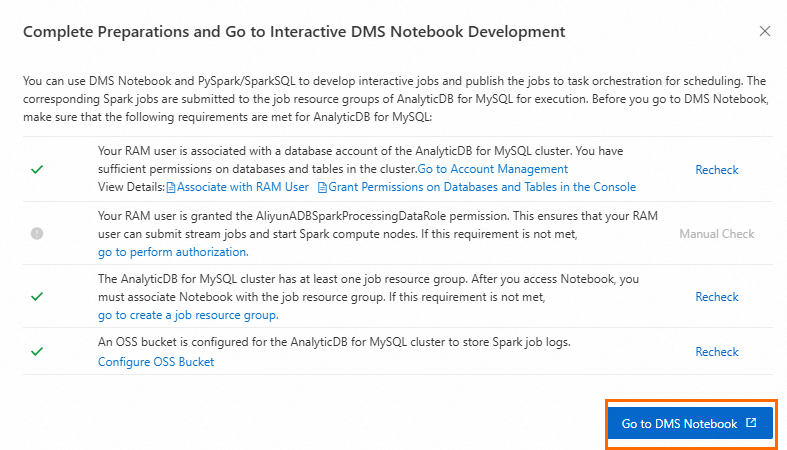
Click . Make sure you have completed the following preparations, and then click Enter DMS Notebook.
Step 2: Create a Notebook file
Prepare resources for Notebook.
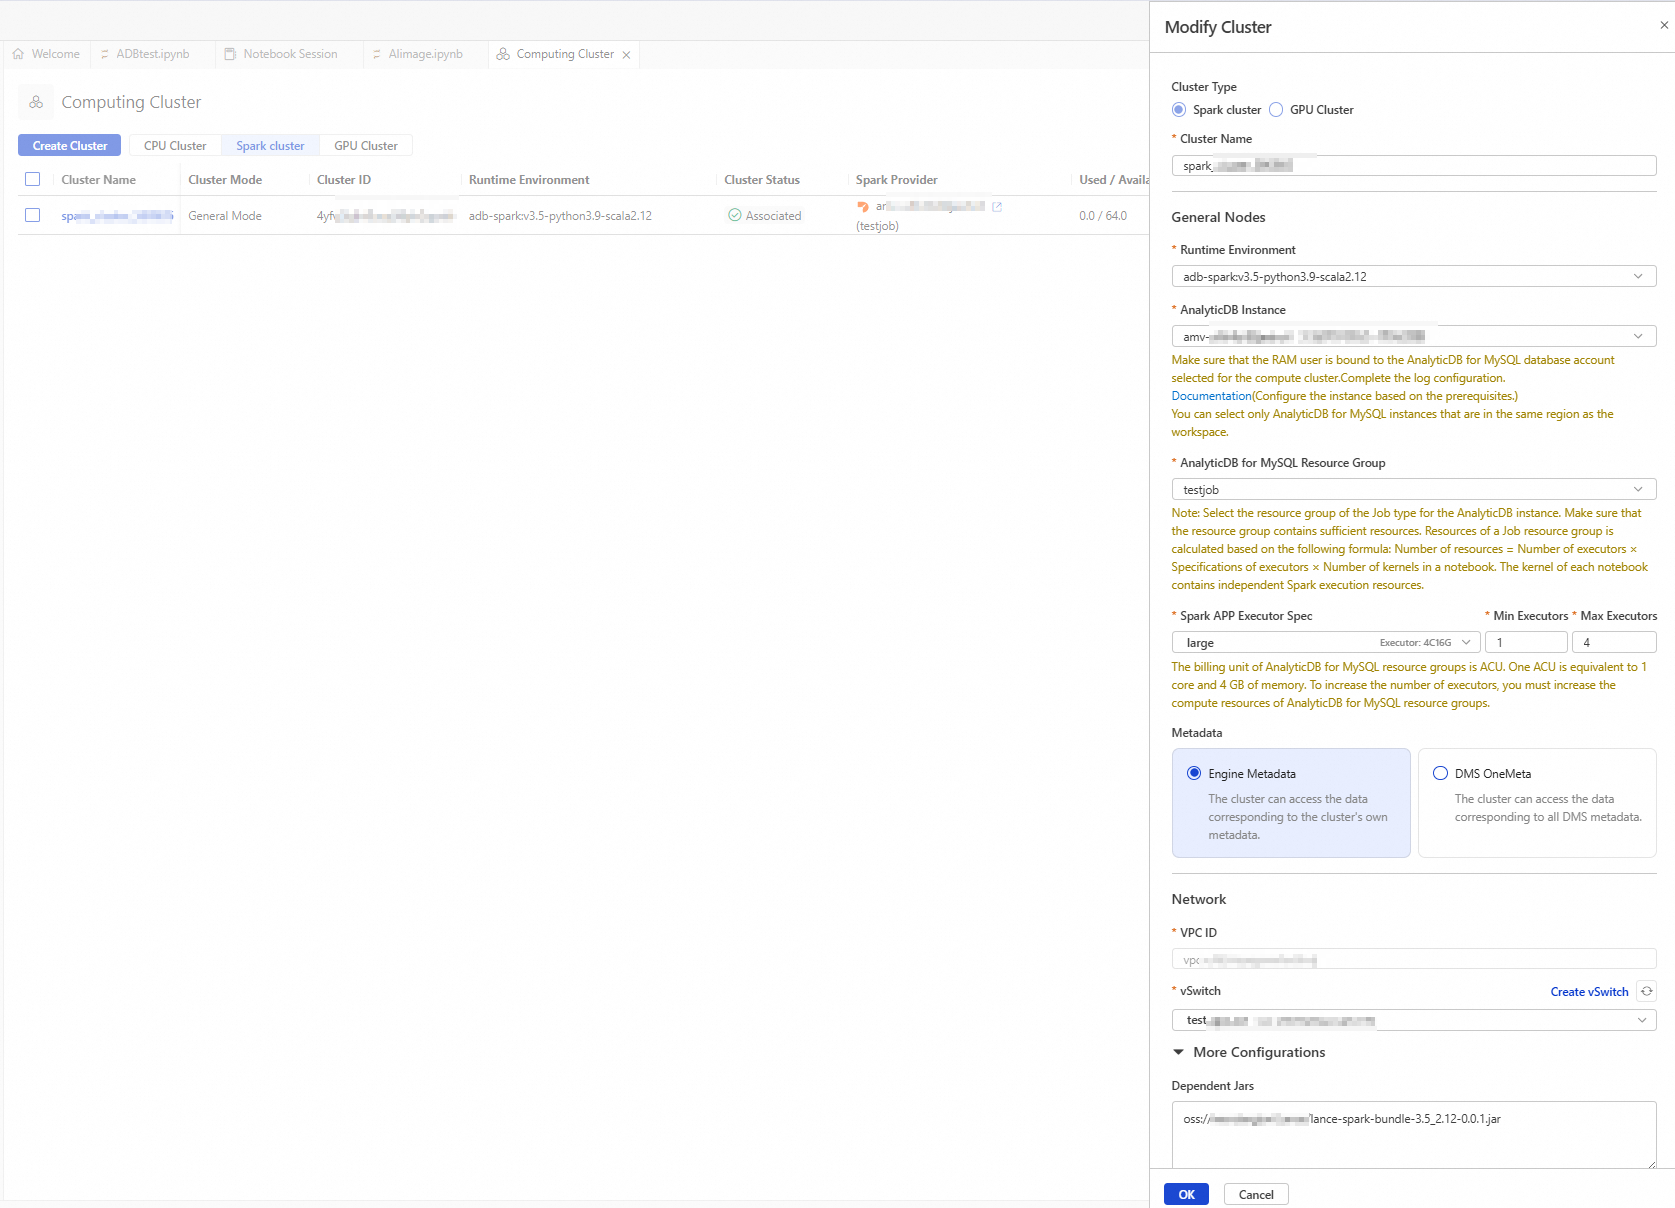
Create a Spark cluster.
Click the
 button to access the resource management page, and click Compute Cluster.
Select the Spark Cluster tab, click Create Cluster, and configure the following parameters:
Parameter
Description
Example
Cluster Name
Enter a cluster name that is easy to identify the usage scenario.
spark_test
Runtime Environment
Currently, the following images are supported:
adb-spark:v3.3-python3.9-scala2.12
adb-spark:v3.5-python3.9-scala2.12
adb-spark:v3.5-python3.9-scala2.12
AnalyticDB Instance
Select the AnalyticDB for MySQL cluster from the drop-down list.
amv-uf6i4bi88****
AnalyticDB MySQL Resource Group
Select a Job resource group from the drop-down list.
testjob
Spark APP Executor Specification
Select the resource specification for the Spark Executor.
Different models correspond to different specifications. For more information, see the Model column in Spark application configuration parameter description.
large
VSwitch
Select a vSwitch under the current VPC.
vsw-uf6n9ipl6qgo****
Dependent JARs
Specify the OSS storage path of the JAR package. Enter the OSS path of the JAR package downloaded in the preparation work.
oss://testBucketName/adb/lance-spark-bundle-3.5_2.12-0.0.1.jar
Create and start a Notebook session.
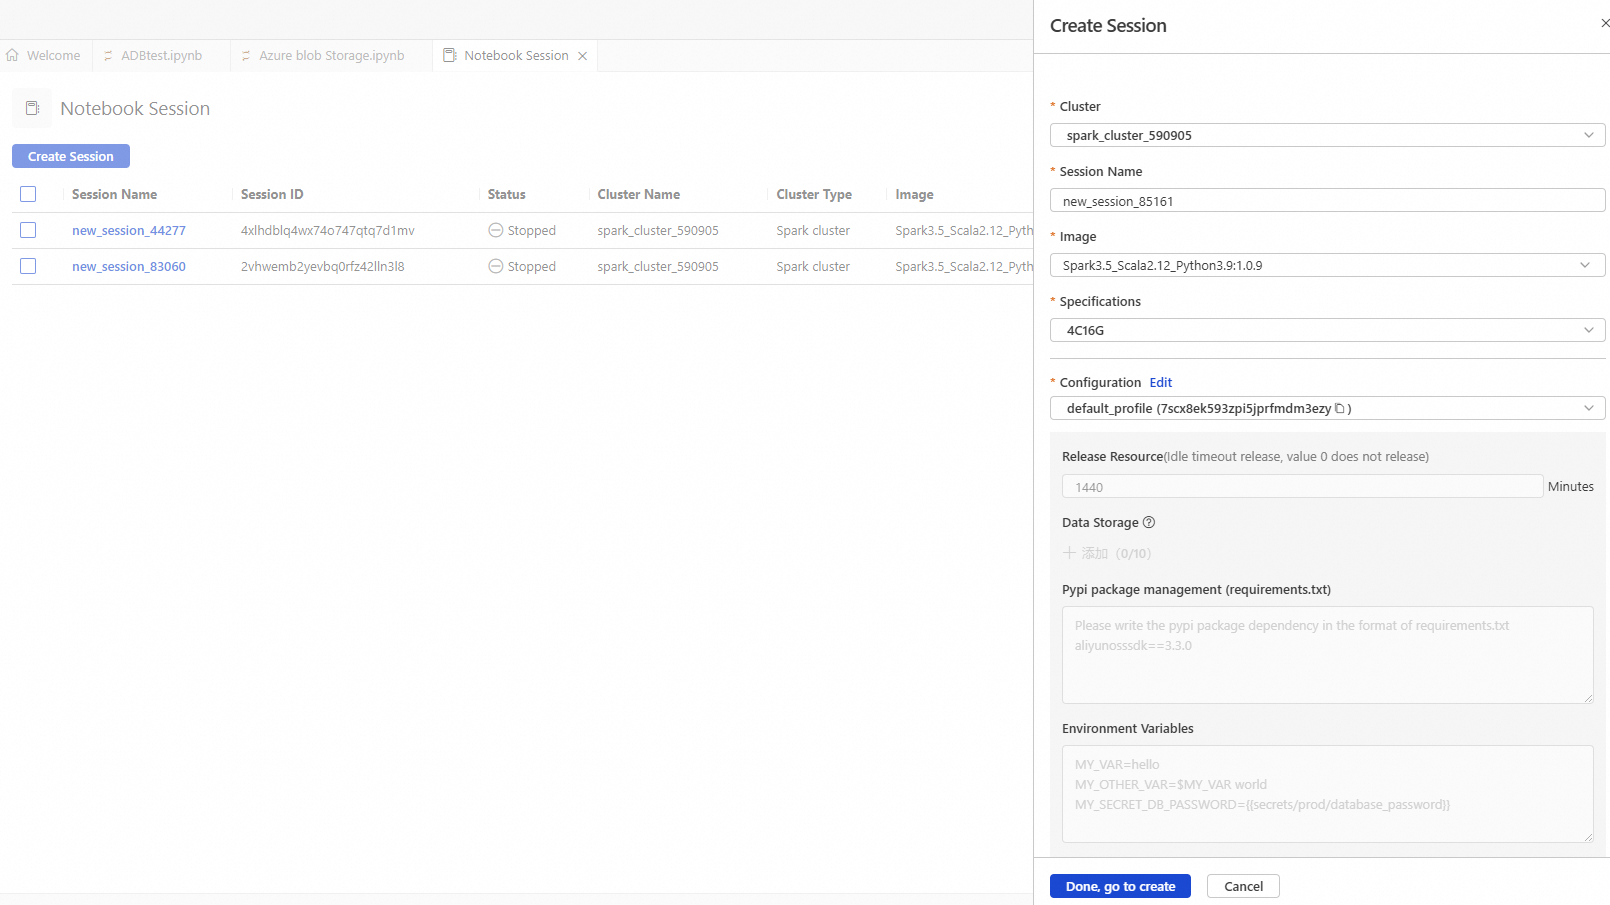
Parameter
Description
Example
Cluster
Select the Spark cluster created in step b.
spark_test
Session Name
You can customize the session name.
new_session
Image
Select the image specification.
Spark3.5_Scala2.12_Python3.9:1.0.9
Spark3.3_Scala2.12_Python3.9:1.0.9
Spark3.5_Scala2.12_Python3.9:1.0.9
Specification
Driver resource specification.
1 core 4 GB
2 cores 8 GB
4 cores 16 GB
8 cores 32 GB
16 cores 64 GB
4C16G
Configuration
Profile resource.
You can edit the profile name, resource release duration, data storage location, Pypi package management, and environment variables.
ImportantResource release duration: When the resource idle time exceeds the set duration, it will be automatically released. Setting the resource release duration to 0 means the resource will never be automatically released.
deault_profile
Click the
 button, and then click .
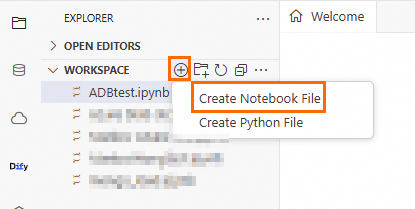
Step 3: Import image and text data into Lance
Set the Cell language type to Python and execute the following code to download Python dependencies.
!pip install pyarrow==19.0.1
!pip install pylance==0.23.2
!pip install oss2==2.19.1
!pip install pandas==2.2.3
!pip install torch==2.7.0
!pip install torchvision==0.22.0
!pip install pillow==11.2.1
Set the Cell language type to Python, replace the relevant configuration parameters in the following code, and execute it to import image data into Lance.
import os
import oss2
import pandas as pd
import pyarrow as pa
import lance

# Bucket name
bucket_name = 'testBucketName'
# Bucket Endpoint
endpoint = 'oss-cn-hangzhou-internal.aliyuncs.com'
# AccessKey ID and AccessKey Secret of an Alibaba Cloud account or a RAM user with OSS access permissions
auth = oss2.Auth('AK', 'SK')
bucket = oss2.Bucket(auth, endpoint, bucket_name)

# Directory prefix where image data is stored
prefix = 'lanceData/'

storage_options = {
    # Region where the bucket is located
    "region": "cn-hangzhou",
    # Bucket Endpoint
    "endpoint": "https://testBucketName.oss-cn-hangzhou-internal.aliyuncs.com",
    # AccessKey ID and AccessKey Secret of an Alibaba Cloud account or a RAM user with OSS access permissions
    "access_key_id": "ak",
    "secret_access_key": "sk",
    "virtual_hosted_style_request": "True"
}

data = []
for obj in oss2.ObjectIterator(bucket, prefix=prefix):
    if obj.key.endswith(('.png', '.jpg', '.jpeg')):
        image_id = os.path.splitext(os.path.basename(obj.key))[0]
        img_binary = bucket.get_object(obj.key).read()
        data.append({'image_id': image_id, 'image_data': img_binary})

df = pd.DataFrame(data)

schema = pa.schema([pa.field("image_id", pa.string()), pa.field("image_data", pa.binary())])
table = pa.Table.from_pandas(df, schema=schema)
# OSS path where image Lance data is stored, protocol must be s3
uri = "s3://testBucketName/lance_data/lance_image_dataset.lance"
lance.write_dataset(table, uri, storage_options=storage_options)

ds = lance.dataset(uri, storage_options=storage_options)
Set the Cell language type to Python, replace the relevant configuration parameters in the following code, and execute it to import text data into Lance.
import pandas as pd
import pyarrow as pa
import lance
import fsspec
import json
import oss2
import json

storage_options = {
    # Region where the bucket is located
    "region": "cn-hangzhou",
    # Bucket Endpoint
    "endpoint": "https://testBucketName.oss-cn-hangzhou-internal.aliyuncs.com",
    # AccessKey ID and AccessKey Secret of an Alibaba Cloud account or a RAM user with OSS access permissions
    "access_key_id": "AK",
    "secret_access_key": "SK",
    "virtual_hosted_style_request": "True"
}


# Initialize authentication information
auth = oss2.Auth('AK', 'SK')
bucket = oss2.Bucket(
    auth,
    'https://oss-cn-hangzhou-internal.aliyuncs.com',
    'testBucketName' # Bucket name
)

# Get file content
obj = bucket.get_object('Lance/data/testdata.json')
text_data = json.load(obj)
# 2. Construct DataFrame and subsequent data processing
schema = pa.schema([
    pa.field("docid", pa.string()),
    pa.field("text", pa.string()),
    pa.field("image_id1", pa.string()),
    pa.field("image_id2", pa.string()),
    pa.field("image_id3", pa.string())
])

df = pd.DataFrame(text_data)
table = pa.Table.from_pandas(df, schema=schema)
# OSS path where text Lance data is stored, protocol must be s3
uri = "s3://testBucketName/Lance/lance_text_dataset.lance"

lance.write_dataset(table, uri, storage_options=storage_options)

ds = lance.dataset(uri, storage_options=storage_options)
print(ds.to_table().to_pandas())
Step 4: Mix and store image and text data
Set the Cell language type to Python, replace the relevant configuration parameters in the following code, and execute it to associate and integrate image and text data, storing them as a comprehensive dataset that contains both images and text.
from pyspark.sql.dataframe import DataFrame

from pyspark.sql import SparkSession, DataFrame
from pyspark.sql import functions as F
from pyspark.sql.types import StringType
import lance
import json

storage_options = {
    # Region where the bucket is located
    "region": "cn-hangzhou",
    # Bucket Endpoint
    "endpoint": "https://testBucketName.oss-cn-hangzhou-internal.aliyuncs.com",
    # AccessKey ID and AccessKey Secret of an Alibaba Cloud account or a RAM user with OSS access permissions
    "access_key_id": "ak",
    "secret_access_key": "sk",
    "virtual_hosted_style_request": "True"
}
class VisionDataProcessor:
    def __init__(self, app_name="Lance Vision Data Join and Format Example"):
        self.spark = SparkSession.builder.config("spark.driver.memory", "32g") \
        .config("spark.sql.catalog.lance","com.lancedb.lance.spark.LanceCatalog") \
        .config("spark.sql.catalog.lance.aws_region","cn-hangzhou") \
         # Bucket Endpoint
        .config("spark.sql.catalog.lance.aws_endpoint","https://testBucketName.oss-cn-hangzhou-internal.aliyuncs.com") \
        # AccessKey ID and AccessKey Secret of an Alibaba Cloud account or a RAM user with OSS access permissions
        .config("spark.sql.catalog.lance.access_key_id","ak") \
        .config("spark.sql.catalog.lance.secret_access_key","sk") \
        .config("spark.sql.catalog.lance.virtual_hosted_style_request","True") \
        .config("spark.driver.cores", "8").config("spark.rpc.message.maxSize","1024").appName(app_name).getOrCreate()

    def get_lance_dataset(self, uri) -> DataFrame:
        # Read Lance dataset
        data = spark.read \
            .format("lance") \
            .load(uri)
        return data

    def join_vision_data(self) -> DataFrame:
        # OSS paths where image Lance data and text Lance data are stored, protocol must be s3
        df_text = self.get_lance_dataset(uri='s3://testBucketName/lance_data/lance_text_dataset.lance')
        df_image = self.get_lance_dataset('s3://testBucketName/lance_data/lance_image_dataset.lance')

        df_text = df_text.join(
            df_image.select(F.col("image_id").alias("image_id1"), F.col("image_data")),
            on="image_id1",
            how="left"
        ).withColumnRenamed("image_data", "image1_byte")

        df_text = df_text.join(
            df_image.select(F.col("image_id").alias("image_id2"), F.col("image_data")),
            on="image_id2",
            how="left"
        ).withColumnRenamed("image_data", "image2_byte")

        df_text = df_text.join(
            df_image.select(F.col("image_id").alias("image_id3"), F.col("image_data")),
            on="image_id3",
            how="left"
        ).withColumnRenamed("image_data", "image3_byte")

        vision_df = df_text.select(
            "docid",
            "text",
            F.col("image1_byte").alias("image1"),
            F.col("image2_byte").alias("image2"),
            F.col("image3_byte").alias("image3")
        )
        return vision_df

    def format_to_training_data(self, df: DataFrame) -> DataFrame:
        def format_prompt(text, image1, image2, image3):
            images = [image.hex() for image in (image1, image2, image3) if image]
            alpaca_format = {"instruction": text, "input": images, "output": ""}
            return json.dumps(alpaca_format)

        format_prompt_udf = F.udf(format_prompt, StringType())
        result_str = df.withColumn("formatted_prompt", format_prompt_udf("text", "image1", "image2", "image3"))
        return result_str

    def process_and_save(self, json_output_path="training_data.json"):
        vision_df = self.join_vision_data()
        formatted_df = self.format_to_training_data(vision_df)

        formatted_df.show(truncate=True)

        # Save as JSON file
        formatted_prompts = [row.formatted_prompt for row in formatted_df.collect()]
        with open(json_output_path, "w") as f:
            json.dump(formatted_prompts, f, indent=2)
Set the Cell language type to Python and execute the following code to construct a training dataset.
from torch.utils.data import Dataset, DataLoader
from PIL import Image
import torch
from torchvision import transforms
import io
import json

class VLMDataset(Dataset):
    """
    Custom dataset for VLM training.
    """

    def __init__(self, df, transform=None):
        """
        Initialize the dataset.
        """
        self.rows = df.select("formatted_prompt").collect()
        self.transform = transform or transforms.Compose([
            transforms.Resize((224, 224)),
            transforms.ToTensor()
        ])

    def __len__(self):
        """
        Get the total number of samples in the dataset.
        """
        return len(self.rows)

    def __getitem__(self, idx):
        """
        Get a sample from the dataset.
        """
        row = json.loads(self.rows[idx].formatted_prompt)
        text = row["instruction"]
        images_data = row["input"]
        images = []

        for image_hex in images_data:
            img_data = bytes.fromhex(image_hex)
            try:
                image = Image.open(io.BytesIO(img_data))
                if self.transform:
                    image = self.transform(image)
                images.append(image)
            except Exception as e:
                print(f"Error processing image: {e}")
                images.append(torch.zeros(3, 224, 224))  # Placeholder for missing images

        while len(images) < 3:
            images.append(torch.zeros(3, 224, 224))

        return text, torch.stack(images)


if __name__ == "__main__":
    processor = VisionDataProcessor()
    formatted_df = processor.format_to_training_data(processor.join_vision_data())

    dataset = VLMDataset(formatted_df)
    dataloader = DataLoader(dataset, batch_size=8, shuffle=False)

    for batch in dataloader:
        texts, images = batch
        print('Texts:', texts)
        print('Images batch shape:', images.shape)

    processor.spark.stop()
The execution result is as follows:
A dataset of 3×3×3×224×224 (batch × number of images × image size [RGB, length, width]) is constructed.